Assignment Sharing
Overview
An Assignment can be shared with clients, allowing users and client users to work collaboratively in real-time throughout the hiring process. An user can define what data is shared with the client using the Assignment Sharing Settings, giving the user complete control over the visibility of the data available to client users.
Please note, Client is a premium product that must be enabled in order to share assignments with clients to view and collaborate on.
Depending on the sharing settings in place, the client user can view the following information:
- Assignment Details - Brief, Remuneration, Documents and Scoring Assessment Criteria
- Candidates - Profile, CV/Resumé, Scoring, Feedback
- Target Companies
- Placements
- Offers/Placements
- Team (contact details)
This article covers:
- Setup Sharing - enabling an Assignment for Sharing with Clients
- Sharing Settings
- Sharing Settings Templates
- Previewing an Assignment
- Sharing with Clients
- Updating Sharing Settings
- Removing Sharing Settings
Setup Sharing
Permission Required: Please note to setup sharing for an Assignment requires the "Select Sharing Template for Assignments" permission.
To share an Assignment with clients, you must select the sharing settings, which are used to control the data your client can see. The sharing settings can either be set uniquely for each assignment or you can use a pre-defined template, which can be configured in System Preferences.
To share an Assignment, select Share from the Ribbon Toolbar (top right) and click on the Clients tab.
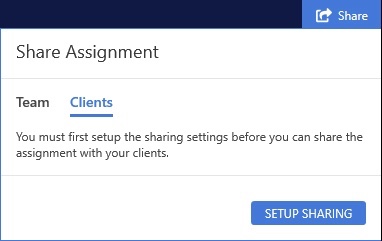
Click Setup Sharing to launch a popup window where you can select an existing template.
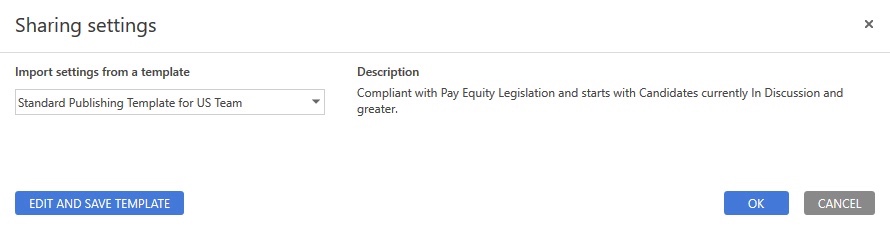
Opening the dropdown has the Create New Settings option too, allowing you to select all the sharing settings from a blank slate.
Permission Required: Please note to create and/or edit the sharing settings for a specific Assignment requires the "Edit Assignment Sharing Settings" permission.

Selecting an existing template will dismiss the popup window and a banner will be displayed in the record, indicating the Assignment is ready to be shared.

Sharing Settings
Permission Required: Please note to modify the sharing settings for a specific Assignment requires the "Edit Assignment Sharing Settings" permission.
If you want to review and/or modify the settings for this Assignment, you can open the sharing settings by clicking Share from the Ribbon Toolbar (top right), selecting the Clients tab and clicking Sharing Settings.
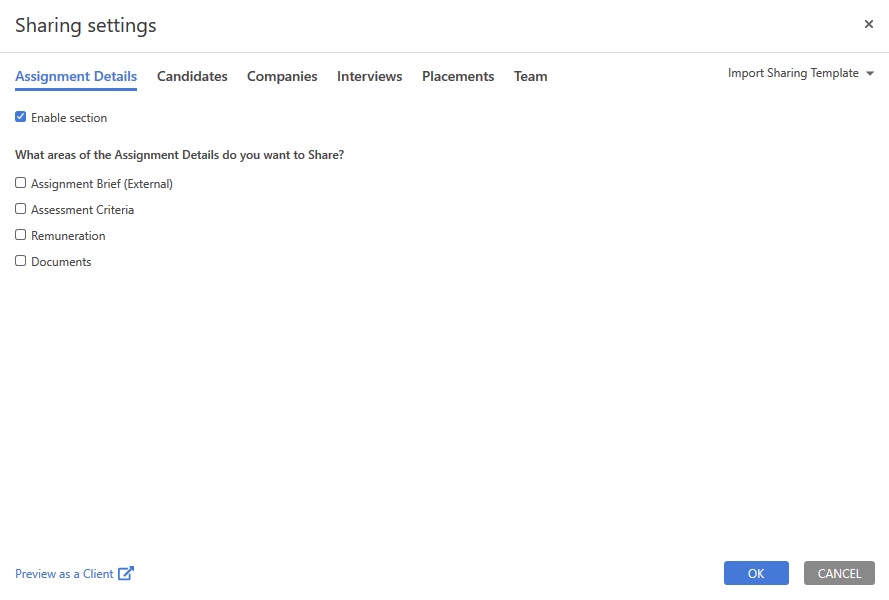
The Sharing Settings are split into several sections (Assignment Details, Candidates, Companies, Interviews, Placements, Team), to match the tabs available to the Client when they log in to work with the Assignment.
Each section has the option to enable it or not, which controls the visibility of the tab to your client(s). Where applicable, each section has additional settings, allowing you to control the visibility of data within the section.
The settings for each section are described below.
Assignment Details
- Assignment Brief (External) - Visibility of the external version of the Assignment Brief.
- Assessment Criteria - Visibility of the name, description and range of each scoring metric.
- Remuneration - Visibility of the remuneration on offer to the successful candidate.
- Documents - Visibility of the documents attached to the Assignment, however, for each individual document you wish to share, you must additionally specify whether or not it should be shared, allowing you to specify which documents are available instead of it being an all or none setting.
- To share a document, go to the Documents tab within an Assignment, select the document(s) you want to share, right click to open the context menu and select the Share Document option.

- You can use the Unshare Document option for any documents you no longer wish to share.
- To share a document, go to the Documents tab within an Assignment, select the document(s) you want to share, right click to open the context menu and select the Share Document option.
Candidates
- Automated Rules - This defines which candidates should be visible based on their progress status and/or group. This means whenever a candidate reaches the desired progress status and/or group, they will automatically become visible to the client, so you don't have to manually change their visibility.
- Presentation Style - There are two options when sharing your list of candidates to your client(s). You can either select Profile View, which displays a list of Candidates down the side of the page and a Profile to the right of the list for the currently selected Candidate. Alternatively you can select Custom List View (Grid), which displays a grid of results, where you can define the columns that should be available.
- Profile View - Selecting "Profile View" presents you with the following additional options:
- Profile Template - This is the Profile Template to use for all visible candidates. The Profile Templates are created and customised independently.
- Profile Picture - This specifies whether or not the Profile Picture should be displayed within the Profile for each Candidate.
- CV/Resumé - This specifies whether or not the CV/Resumé tab should be displayed within the Profile for each Candidate.
- Feedback - This specifies whether or not the Feedback tab should be displayed within the Profile for each Candidate.
- Show feedback from all users - If selected, every client on the Assignment will see the feedback left by all users, however, if this has not been selected, each client will only see their own feedback.
- Scoring - This specifies whether or not the Scoring tab should be displayed within the Profile for each Candidate.
- Show scoring from all users - If selected, every client on the Assignment will see the scores left by all users, however, if this has not been selected, each client will only see their own scores.
- Profile View - Selecting "Profile View" presents you with the following additional options:
- Custom List View (Grid) - Selecting "Custom List View (Grid)" presents you with the following additional options:
- Display View - A Display View that can be customised as per all other display views throughout the product, allowing you to specify the columns you want to share with the client.
- Include Profile - This option allows you to additionally share profiles for every candidate in addition to the grid of data. If selected, whenever a client clicks a row in the grid of candidates, the selected candidate's profile will be displayed as an overlay on top of the grid.
- Profile Template - If you have selected the option above, this is the Profile Template to use for all visible candidates. The Profile Templates are created and customized independently.
Companies
- Automated Rules - This defines which target companies should be visible based on their progress status. This means whenever a target company reaches the desired progress status, they will automatically become visible to the client, so you don't have to manually change their visibility.
- Display View - A Display View that can be customised as per all other display views throughout the product, allowing you to specify the columns you want to share with the client.
Interviews
- Include consultant interviews - This defines whether the consultant interviews you've held/scheduled should be displayed in addition to the client interviews.
Placements
- Display View - A Display View that can be customised as per all other display views throughout the product, allowing you to specify the columns you want to share with the client for all Offers and Placements.
Team
The team section has no additional settings in addition to the enabling of the section. Enabling this section shows a list of all contacts on the Assignment, including all Users and Client Users.
Sharing Settings Templates
Permission Required: Please note to create and/or modify these templates requires the "Access System Preferences" permission as the templates are only accessible from System Preferences.
The settings available in the sharing templates are the same as described in the section above. Below describes how to modify an existing template or create a new template either from scratch or by duplicating an existing template to use an existing template as a starting point.
Modify an existing Template
- Open System Preferences
- Select Assignments from the menu
- Select Client Sharing from the submenu
- Double click on the Sharing Template you wish to modify
- Change the settings as required, then click Save.
Create a new Template
- Open System Preferences
- Select Assignments from the menu
- Select Client Sharing from the submenu
- Click the Add a new Assignment Sharing Template link beneath the list of existing templates
- This will create a new Template in the list
- To rename the Template, click into the Template Name column for the selected template
- Double click on the new template in the list to open its settings
- Change the settings as required, then click Save.
Duplicate an existing Template
- Open System Preferences
- Select Assignments from the menu
- Select Client Sharing from the submenu
- Click the Duplicate Selected Template link beneath the list of existing templates
- This will create a new Template in the list
- To rename the Template, click into the Template Name column for the selected template
- Double click on the new template in the list to open its settings
- Change the settings as required, then click Save.
Previewing an Assignment
After Sharing Settings have been applied to an Assignment, you can preview the Assignment to see how it will be displayed to a client. To do this, click the Preview as a Client link located in the sharing banner, displayed below the Ribbon Toolbar.
Sharing with Clients
Permission Required: Please note controlling which clients can access the Assignment requires the "Select Sharing Template for Assignments" permission.
Before you can share the Assignment with clients, you need to have added them to your Assignment. Navigate to the Clients tab to add them.
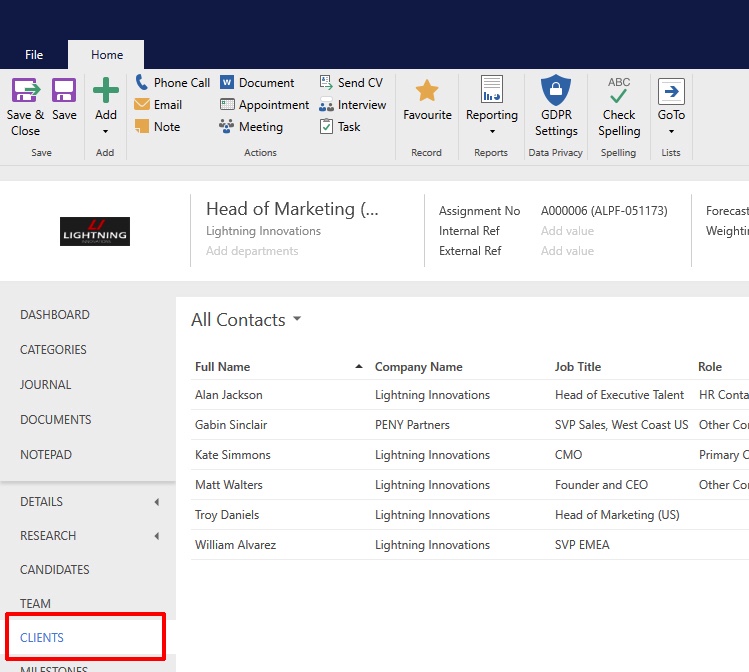
You can share the Assignment after adding clients to the Assignment and setting up the sharing settings. To share the Assignment, select Share from the Ribbon Toolbar (top right) and click on the Clients tab.
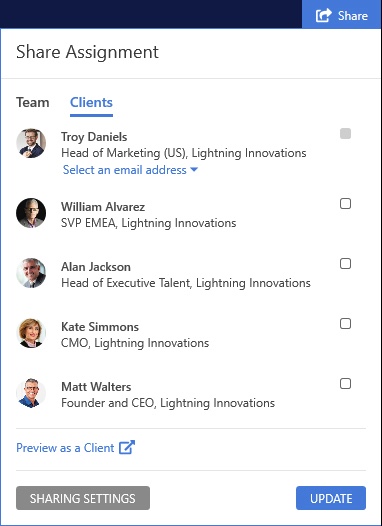
If a client has previously had an Assignment shared with them, you can share this Assignment with them by checking the tickbox in the list and clicking the Update button. This will send an email to the client informing them of the Assignment.

If the client you wish to share the Assignment with has not previously been invited to collaborate on any Assignment, their tickbox will be grayed out until you select the email address they should use to login.

Clicking on Select an email address will open a dropdown listing all their email addresses. After selecting an email address, the tickbox will become active so you can check it. After checking the tickbox for all the clients you want to share the Assignment with, you must finally click the Update button to notify them.
Updating Sharing Settings
Permission Required: Please note to create and/or edit the sharing settings for a specific Assignment requires the "Edit Assignment Sharing Settings" permission.
If you want to review and/or modify the settings for this Assignment, you can open the sharing settings by clicking Share from the Ribbon Toolbar (top right), selecting the Clients tab and clicking Sharing Settings.
Removing Sharing Settings
If you decide you either don't want to share the Assignment or you want to stop sharing an Assignment, there is a Remove Sharing Settings option available in the sharing banner, displayed below the Ribbon Toolbar. This will remove all sharing settings from the Assignment.