Amplify Enrich From Notes
Amplify Enrich from Notes is an AI-powered feature designed to streamline recruiter workflows. After a call or meeting, you can quickly update candidate, contacts or job records using the text of your notes without the need for manual data entry.
This feature saves time by reducing manual updates and helps maintain data integrity by ensuring fields stay current whenever new information is added through a note. It’s especially useful for intake notes or call summaries where you record details such as desired salary, employment type, or start date.
To use this feature, paste your note into a text area, the AI reads the content and suggests values for relevant record fields. You can then review, edit, and save these suggestions.
The AI only suggests values for fields explicitly mentioned in the note; it does not infer or guess information. If a field isn't shown, it means the AI didn't find a relevant value for it — this is by design. You can always update that field directly on the record.
Because of the flexibility of this functionality, the configuration of this component and text area varies depending on your admin's settings. Contact your admin to confirm where it has been enabled in your Salesforce org.
The LWC component is fully translatable. The Generate Suggestions, Accept All, and Reject All buttons, as well as the confidence badge, are custom labels and can be translated into different languages. The labels of the suggested fields are the Salesforce field labels, which can also be translated.
How to Enrich Records from Notes
-
Open a candidate, contact, or job record.
-
Click Enrich From Notes. The Enrich From Notes pop-up opens.
-
Type or copy and paste a note in the text area.
-
This can be anything: a call transcript, a summary of a conversation, an email snippet, or a few rough lines you jotted down. There's no required format.
-
You can also edit an existing note to check for updates to relevant fields.
-
-
When you're done, click Generate Suggestions.
-
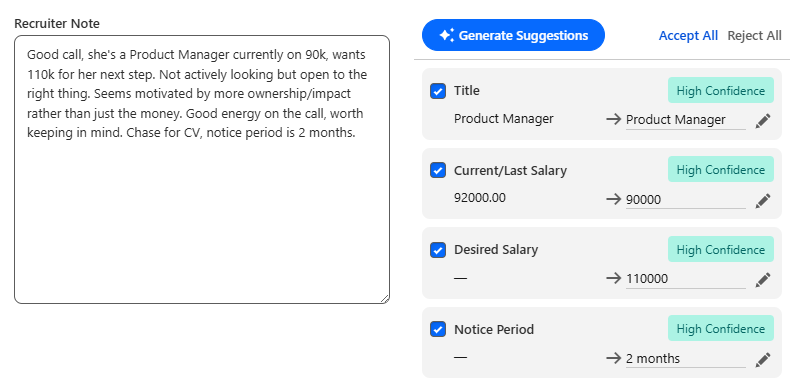
Amplify analyzes your note and returns a list of suggested field updates. Each suggestion is shown as a card containing:
- Field name: the record field being suggested
-
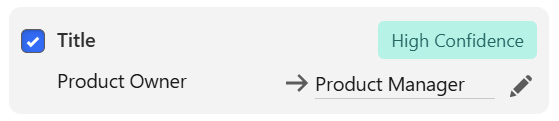
Current value: what's on the record right now (may be blank)
-
Suggested value: what Amplify extracted from your note
-
Confidence level: how certain Amplify is about the extraction
-
Review the list.
-
Check or uncheck updates as needed, and click the pencil icon (
 ) to edit any value before applying it.
By default, all fields are marked and selected as to be updated.
-
There are also Accept All and Reject All controls for handling all suggestions at once.
-
-
Click Save and Finish to add your note and apply the selected field updates to the record.
Supported Fields
This is the list of the out-of-the-box supported fields. More fields might have been configured by your admin.
Currency symbols are automatically stripped from salary fields. The AI converts shorthand values (e.g. "80k" → 80000). Date fields are resolved against today's date for relative expressions like "in two months."
|
Field Name |
What Amplify Looks For |
|---|---|
| Title | The candidate's current or most recent job title |
| The candidate's email address | |
| Mobile Phone | Mobile or cell phone number |
|
Current / Last Salary |
Annual salary in local currency (numeric value extracted) |
|
Desired Salary |
Annual salary the candidate is seeking |
|
Current / Last Hourly Rate |
Hourly pay rate (only if explicitly described as hourly) |
|
Desired Hourly Rate |
Desired hourly pay rate |
|
Notice Period |
Time before the candidate can start a new role (e.g., 2 weeks, 1 month, 30 days) |
Job
|
Field Name |
What Amplify Looks For |
|---|---|
| Job Title | The external-facing title for the position |
| Salary Low | Minimum salary budgeted for the role (numeric value extracted) |
| Salary High | Maximum salary budgeted for the role (numeric value extracted) |
| Estimated Start Date | Expected start date for the successful candidate |
Configuration
This section covers everything a Salesforce admin needs to do before recruiters can use Amplify Enrich from Notes. Admin users can configure which fields Amplify should enrich from notes (both standard and custom Salesforce fields), as well which users should have access to the functionality.
Assign the Permission Set
Every user who will use the feature must be assigned the AFA_Agentforce_Actions permission set.
To assign the permission set:
-
Go to and open the user's record.
-
Scroll to Permission Set Assignments and click Edit Assignments.
-
Add AFA_Agentforce_Actions and save.
Users without this permission set will see a feature-disabled state in the UI and an Access Denied screen when opening the flow.
Activate the Feature
The feature has an org-level on/off switch. It must be active for any user to access the feature, regardless of their permission set.
To activate the feature:
-
Go to .
-
Find TR1 Named Setting and click Manage Records.
-
Open the record named AFA_Enrich_Configuration.
-
Ensure Active (TR1__Active__c) is checked.
-
Save.
Setting this to inactive disables the feature for the entire org instantly.
Configure the Suggested Fields
Out of the box, Amplify Enrich from Notes ships with field configurations for two objects:
-
Contact: Eight fields - Title, Email, Mobile Phone, Current/Last Salary, Desired Salary, Current/Last Hourly Rate, Desired Hourly Rate, and Notice Period.
-
Job: Four fields - Job Title, Salary Low, Salary High, and Estimated Start Date.
These are controlled by the Custom Metadata Record Named Setting records:
- AFA_Enrich_Object_Contact
- AFA_Enrich_Object_Job
Editing the Suggested Fields
Changes to the suggested fields are made through configuration records only, with no code changes required. You can add, change or remove the suggested fields by editing the Custom Metadata Record Named Setting record related to the object.
For each suggested field, the JSON configuration contains an entry in the following format:
{
"fieldAPIName": "the Salesforce field name",
"context": "Optional one or two sentences that help the AI to understand the context of the field"
}
{
"fieldAPIName": "Title",
"context": "The candidate's current or most recent job title, not the role they are applying for."
}
The context attribute is optional. If it’s not specified, the AI will try to use the inline help text of the Salesforce field.
Adding Configuration for a New Object
If you need to add support for a new object, you can do so by creating a new Custom Metadata Record that follows the same schema of AFA_Enrich_Object_Contact. Make sure to specify the correct Salesforce object API name in the configuration field objectAPIName.
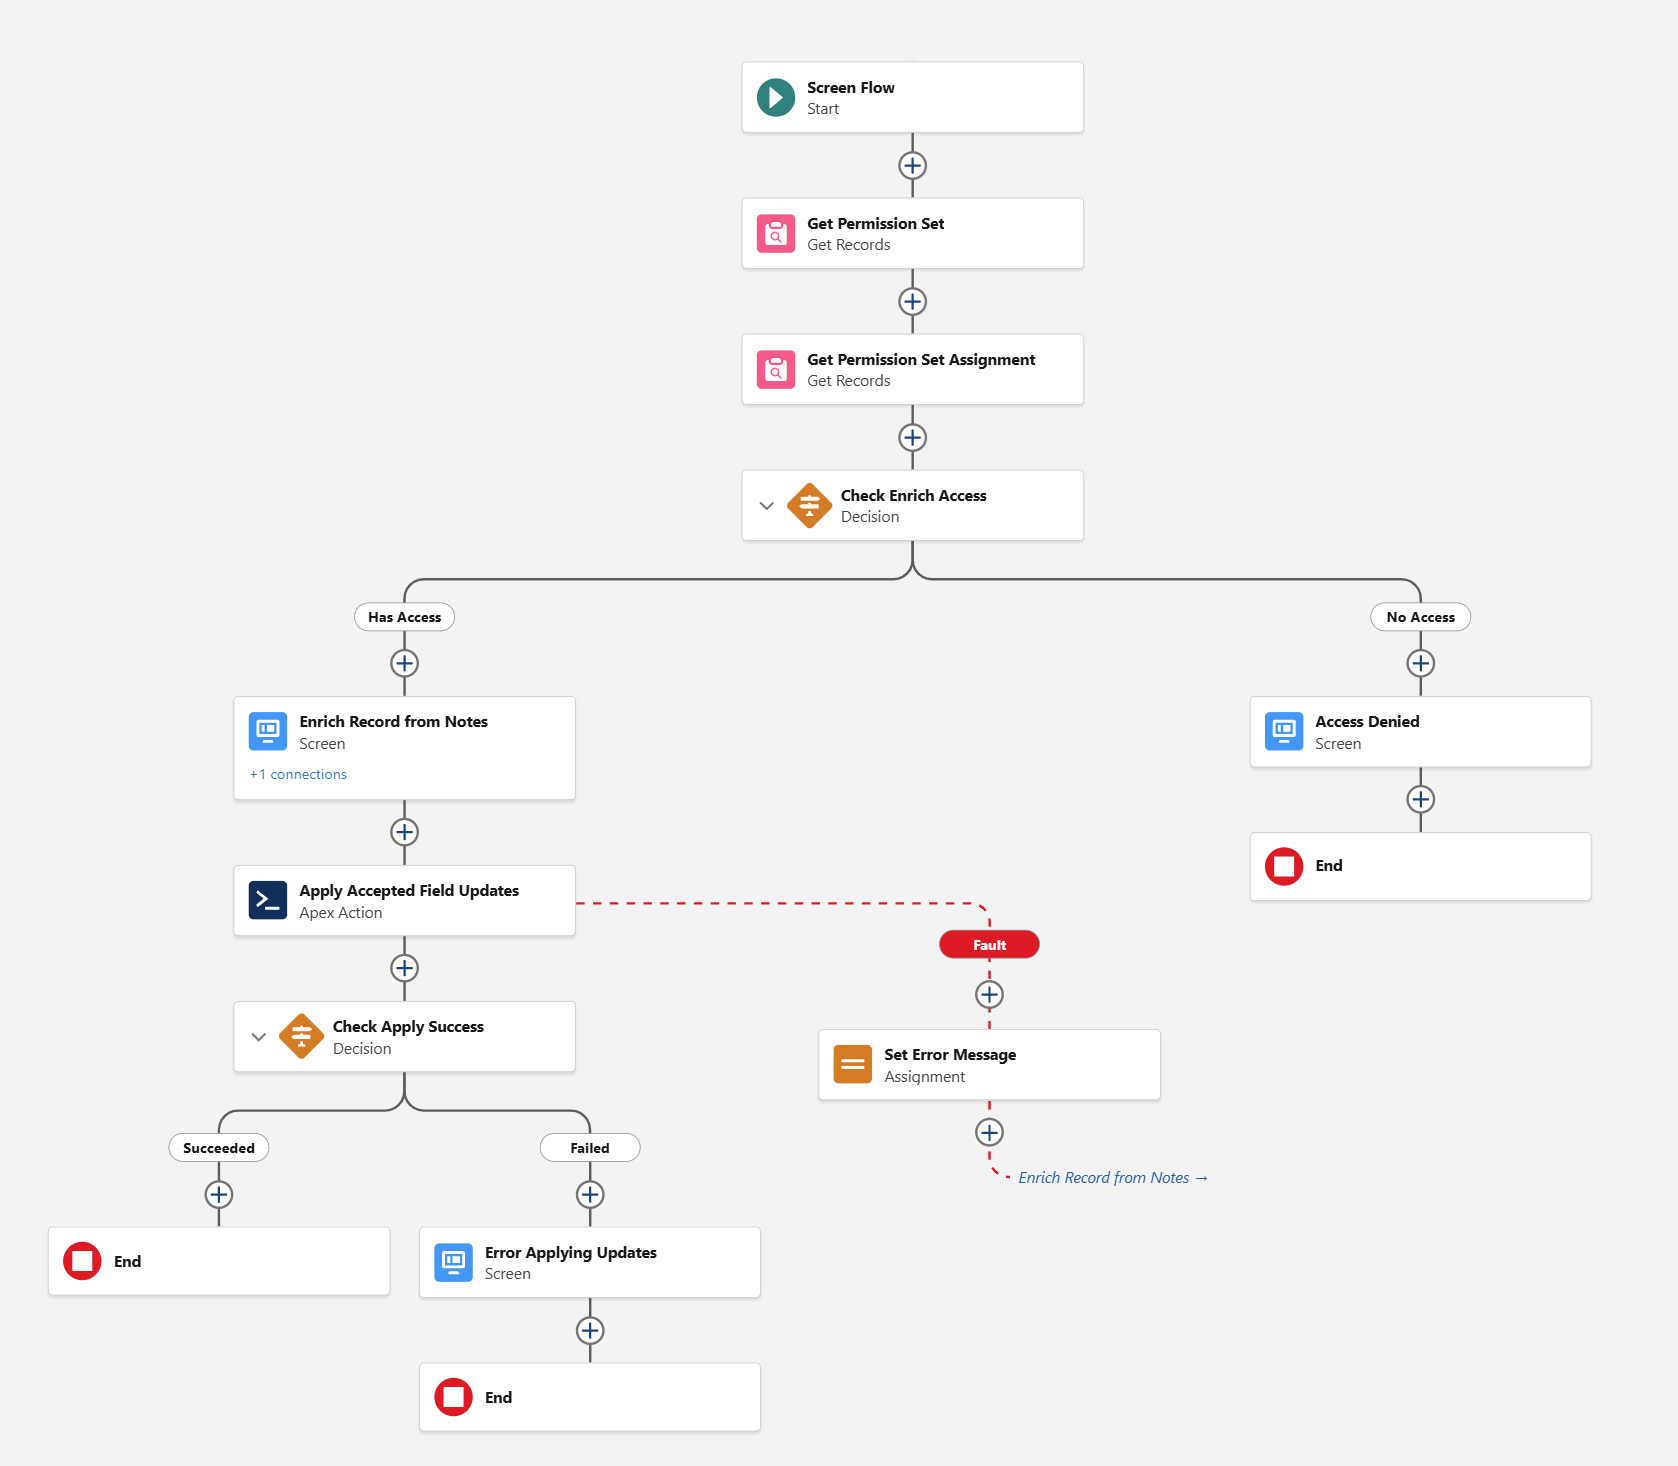
Create a Screen Flow That Uses the Component
The LWC component must be embedded in a Screen Flow. The screenshot below shows an example Screen Flow that implements permission check, shows a text area component and the Amplify Enrich from Notes, applies the changes to the record upon confirmation and displays relevant error messages.
Create a Minimum Screen Flow
Here are the steps to create a minimum screen flow (no permission checks) and add it to the Contact record as a Quick Action button:
-
Create a Screen Flow in Setup > Flows.
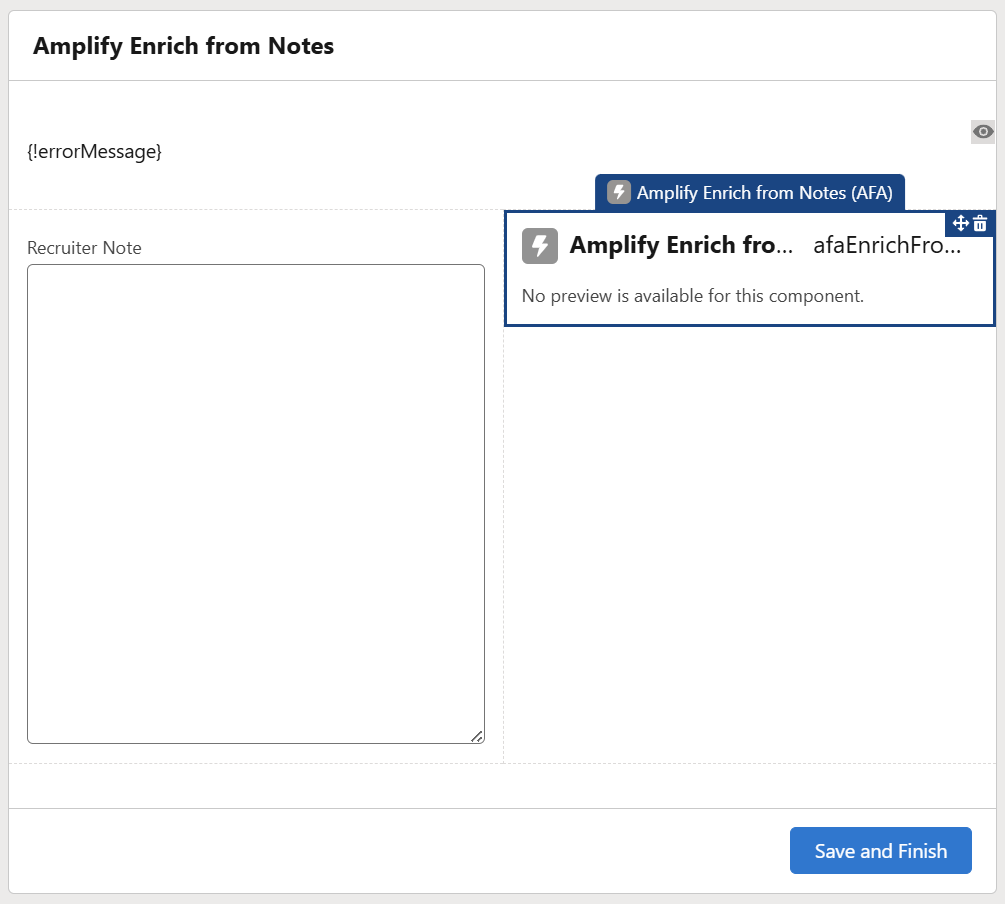
-
Add a Screen element with the component bullhorn:afaEnrichFromNotes.
-
Wire up the input and output parameters:
Flow Parameter
Direction
Maps To
recordId Input {!recordId} (flow input variable) noteText Input A LargeTextArea field on the same screen, or a flow variable fieldUpdatesJson Output A Text flow variable (e.g., {!fieldUpdatesJson})
-
After the screen, add an Apex Action element to consume the output from the component that includes the suggested value. You can build your own logic to consume the JSON, but we include an out-of-the-box Apex action that can be used to update the record:
-
Action: AFA_EnrichApplyInvocable
-
Inputs:
-
recordId → {!recordId}
-
fieldUpdatesJson → {!fieldUpdatesJson}
-
-
-
Confirm the flow is saved and deployed.
That's the minimum flow to use the component and update the record. The LWC component handles the Generate button, suggestion cards, accept/reject/inline-edit, and keeps fieldUpdatesJson up to date. The invocable applies whatever was accepted when the flow advances.
The reference flow in the screenshot above includes a built-in access check: users without the required permission set are shown an Access Denied screen before they can enter a note and use the component. You can replicate this check by querying PermissionSet and PermissionSetAssignment at the start of the flow.
Create the Quick Action
-
Go to select the object.
-
Click Buttons, Links, and Actions > New Action.
-
Set the following:
-
Action Type: Flow
-
Flow: the name of the flow you saved in the previous step
-
Label: Enrich from Notes (or your preferred label)
-
-
Save.
Add to Page Layouts
-
Go to the object's Lightning Record Page via App Builder, or edit the Page Layout.
-
Add the Enrich from Notes quick action to the page.
-
Save and activate.
After completing these steps, the Enrich from Notes button will appear in the action bar of the configured record pages.
Frequently Asked Questions
Can I use Enrich from Notes on objects other than Contact and Job?
Yes, adding support for a new object is a configuration change that doesn't require code changes. You can add it by creating a new Custom Metadata Record with the configuration for the new object and specify the list of fields the AI should suggest.
Will accepting suggestions overwrite data I've already entered?
Yes, for accepted fields the new value replaces whatever is currently on the record. You can see the current value on each suggestion card before accepting.
Does the feature respect field-level security?
Yes. Fields the running user cannot read or edit are silently excluded from suggestions before the AI even analyses them. You'll only ever see suggestions for fields you have permission to update.
Can the feature be disabled for specific users?
Yes. Removing the AFA_Agentforce_Actions permission set from a user prevents them from accessing the feature. The org-level Named Setting switch disables it for everyone at once.