Executive Search Configuration Guide
Overview
This article provides configuration steps required for the Executive Search within .
Executive Search allows for faster Candidate searching. These configurations determine what data is accessible, where it is displayed, and which options are available.
Configurations include:
- Executive Search Functions
- Permission Sets
Job Roles
Job Roles are assigned to Client Contacts that have a specific role or responsibility in the creation and filling of jobs.
You have the option to automatically create related Job Roles records when Contacts and Hiring Manager details are added to a Job.
Users will be able to see the list of Contacts and their Job Roles on Job records. We also give the option of showing the Job Role name in the recipients field when emails are sent out from .
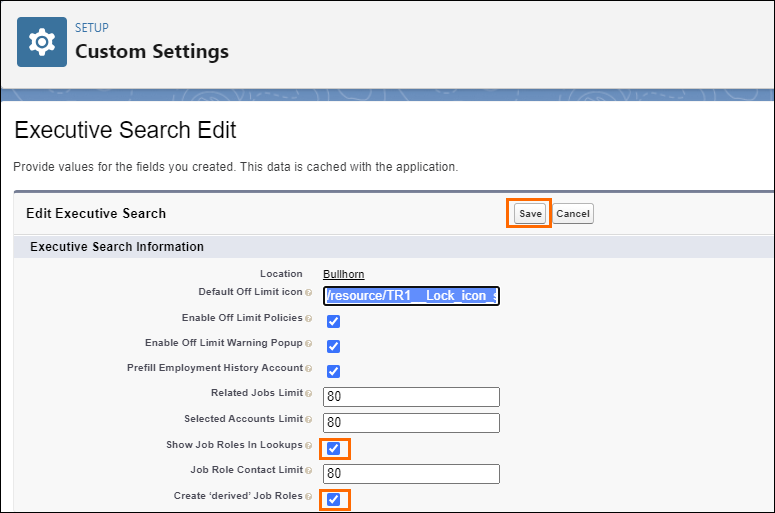
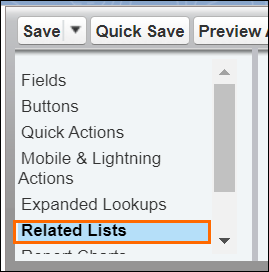
- Navigate to Setup > Custom Code > Custom Settings > Manage next to Executive Search.
- Click Edit.
- Select the checkbox for Show Job Roles in Lookups. Click Save.
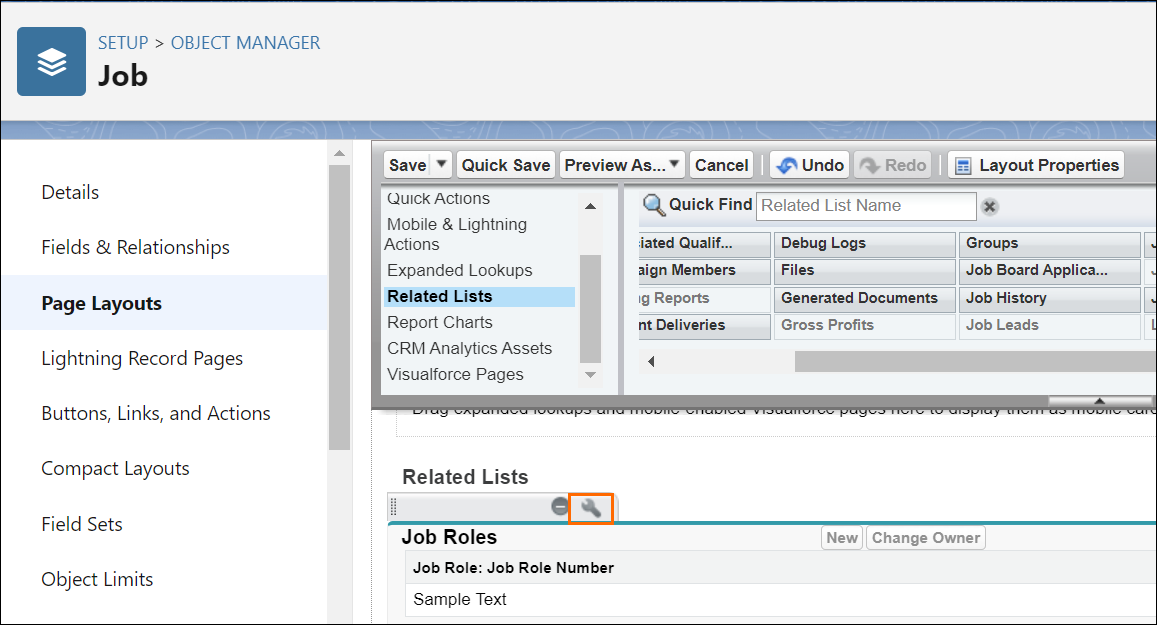
- Navigate to Setup > Manager > Job > Page Layouts.
- Select the desired page layout accessed by your users.
- Click s.
- Click and drag Job Roles to the s section.
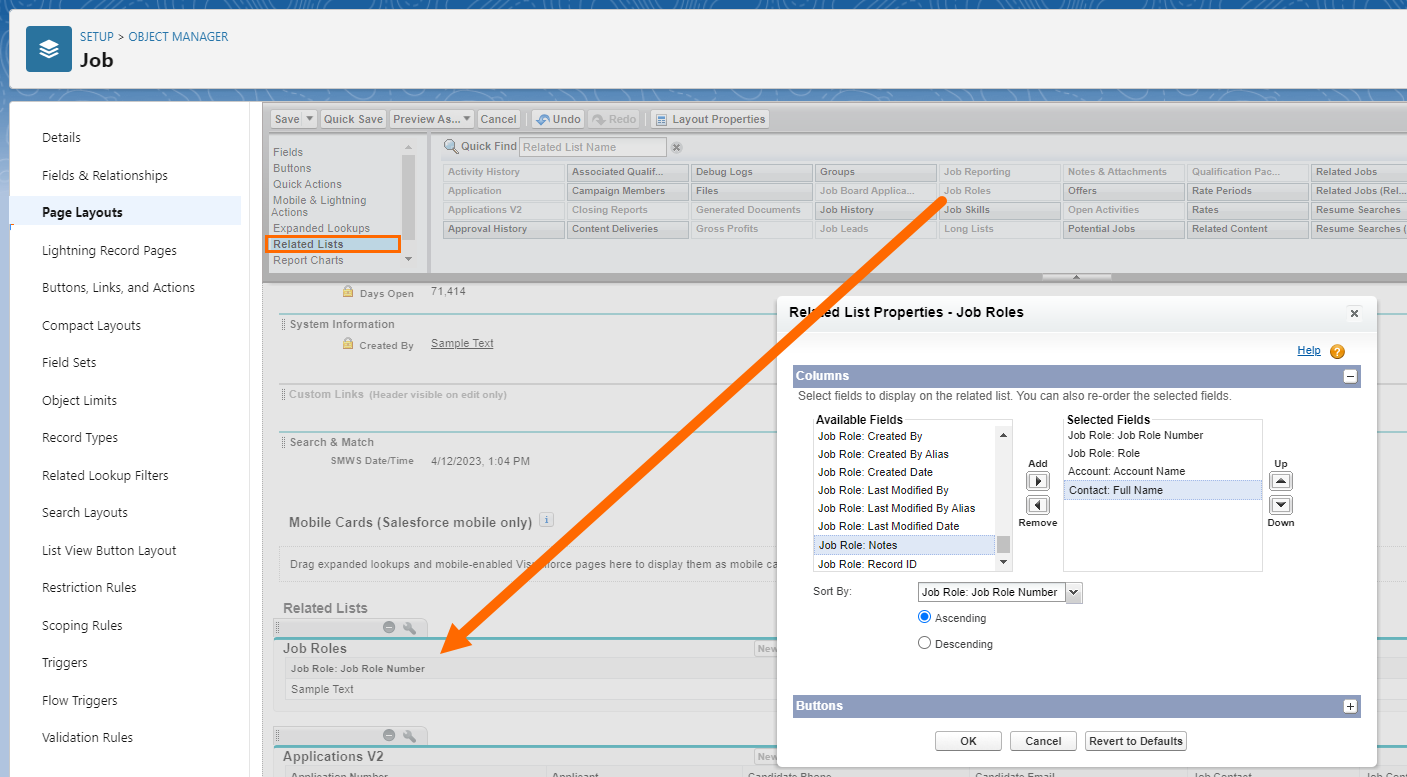
- Under s click the Properties icon.
- In the Related List Properties - Job Roles pop-up, under Columns > Available Fields, select the fields you want, including Job Role: Job Role Number.
- After you've chosen the fields you'd like click the Add button to move the fields to the Selected Fields section.
- The order of these fields can be configured with the Up and Down arrows.
- Click OK and click Save.
Ensure Job Roles are added to every page layout accessed by your users.
Derived Job Roles
You can Job Roles to be created automatically against Job records.
This configuration does not apply to historical data, but just to Job records created after the installation of package version 2023.05.
- In the same Custom Settings screen as above, select the checkbox for Create 'derived' Job Roles. Click Save.
-
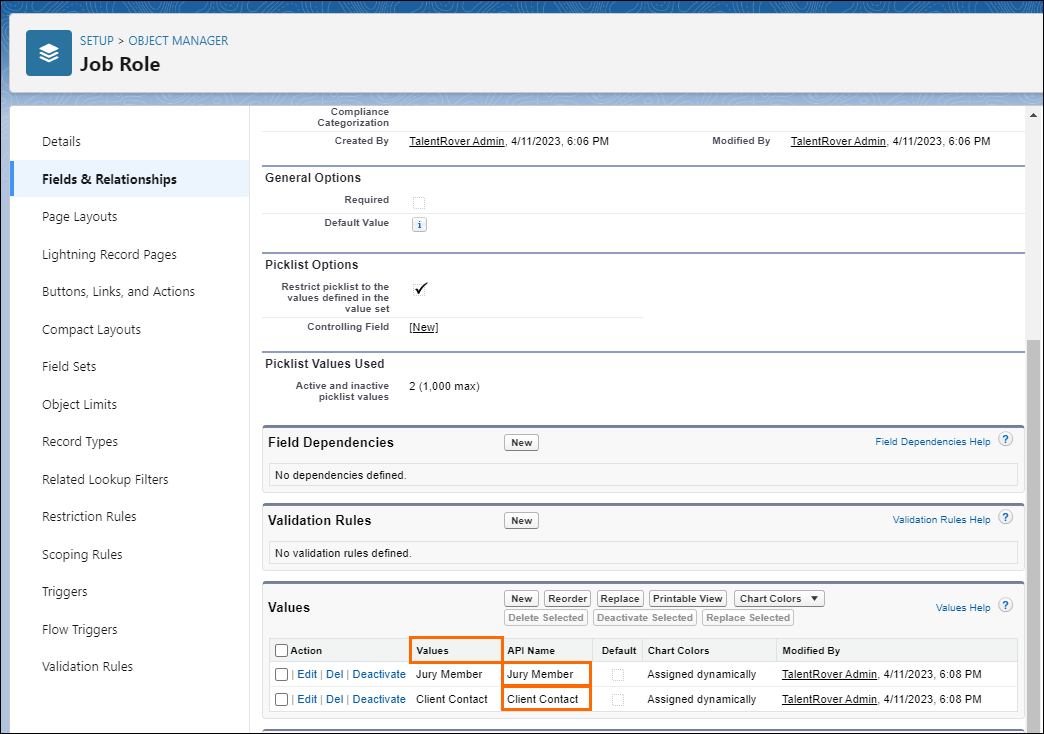
Navigate to Setup > Manager > Job Role > Fields & Relationships > Role > in the Values section.
- This screen label can be edited to match your business terms.

API names should not be changed.
- This screen label can be edited to match your business terms.
- Navigate to Setup > Manager > Job Role > Fields & Relationships > Role > in the Values section.
- This screen label can be edited to match your business terms.
- This screen label can be edited to match your business terms.
- Click New.
- In the Role screen, enter into the empty box the picklist values "Contact" and "Hiring Manager". Click Save.
- Make sure both values are on their own separate lines.
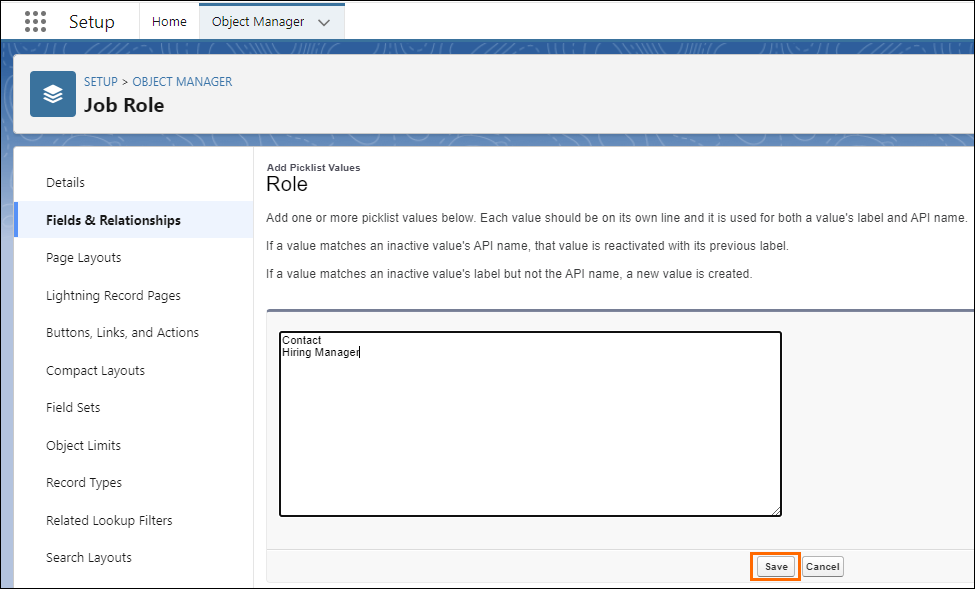
- Make sure both values are on their own separate lines.
- Still in Job Role, navigate to Page Layouts.
- Select the desired page layout accessed by your users.
- In the Job Role Detail section, ensure the Derived checkbox is selected.
- Hover over Derived, click the wrench that appears.
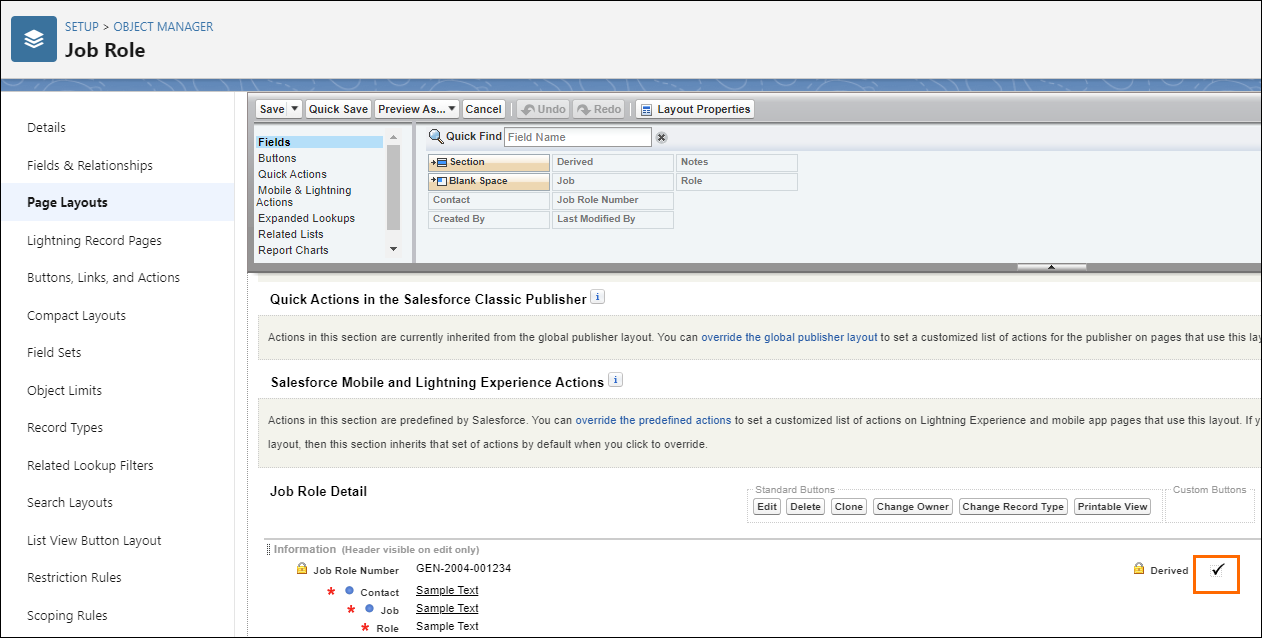
- In the Field Properties pop-up, click the checkbox for Read-Only. Click OK.
- Under s click the Properties icon.
- After you've chosen the fields you'd like click the Add button to move the fields to the Selected Fields section.
- The order of these fields can be configured with the Up and Down arrows.
- The order of these fields can be configured with the Up and Down arrows.
- Click OK and click Save.
Ensure Job Role Detail is added to every page layout accessed by your users.
Aliases
An Account Alias is a different name that is used to refer to an existing Account. For example, this can be used when a company changes names.
- Navigate to Setup > Manager > > Page Layouts.
- Select the desired page layout accessed by your users.
- Click s.
- Click and drag Aliases to the s section.
- Under s, click the Properties icon.
- In the Related List Properties - Aliases pop-up, under Columns > Available Fields, select the fields you want, including Alias Name.
- After you've chosen the fields you'd like click the Add button to move the fields to the Selected Fields section. Click OK.
- The order of these fields can be configured with the Up and Down arrows.
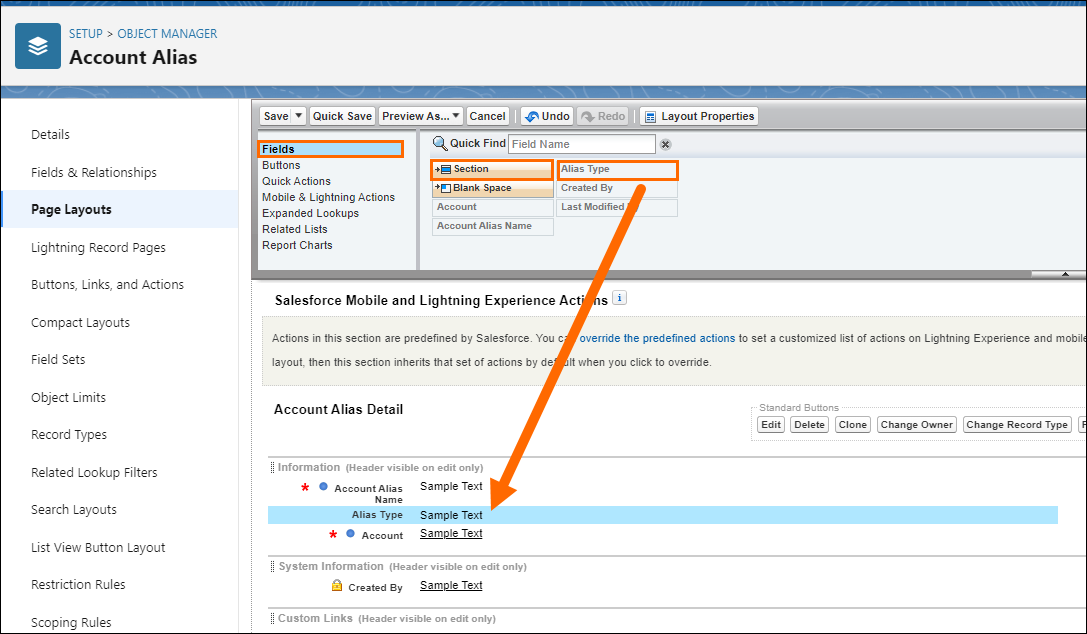
- Still in Manager, navigate to Alias > Page Layouts.
- Click the desired Page Layout accessed by your users.
- Click Fields.
- Click and drag Alias Type to the Alias Details section. Click Save.
Ensure Alias Type is added to every page layout accessed by your users.
Target s
Target s are s that can be grouped together by similar characteristics. For example, you can group together s that operate in similar the areas.
- Navigate to Setup > Manager > > Button Layout.
- Select the drop-down and click Edit.
- In the s screen under Custom Buttons select Add Target .
- Click the Add button to move the fields to the Selected Fields section. Click Save.
- The order of these fields can be configured with the Up and Down arrows.
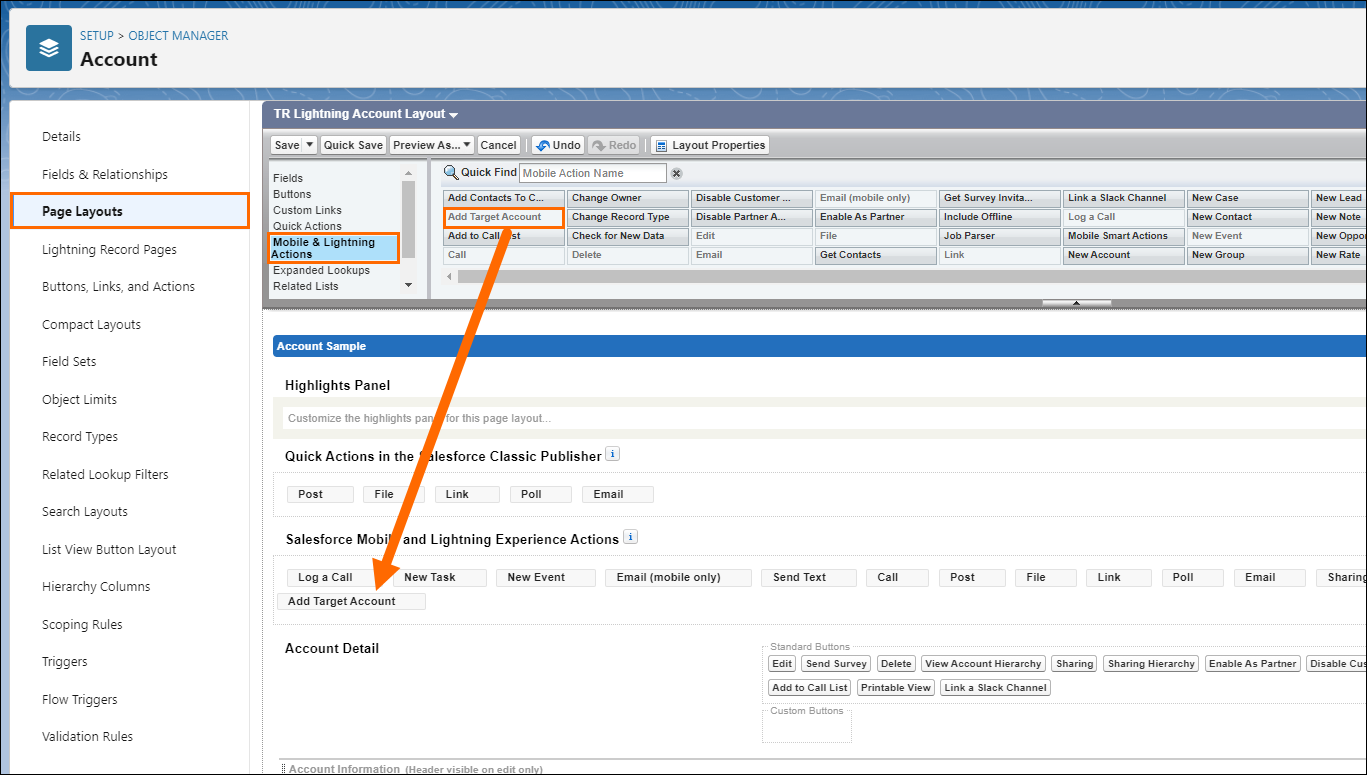
- Still in , click Page Layouts.
- Select the desired page layout accessed by your users.
- Click Mobile & Lightning Actions.
- Click and drag Add Target to the Mobile and Lightning Experience Actions section.
- Change your selection from Mobile & Lighting Actions to s.
- Click and drag Target s to the s section.
- Under s click the Properties icon.
- In the Related List Properties - Target s pop-up, under Columns > Available Fields, select the fields you want, including Target Number.
- After you've chosen the fields you'd like click the Add button to move the fields to the Selected Fields section.
- The order of these fields can be configured with the Up and Down arrows.
- Under the Buttons section, uncheck the New box. Click OK then click Save.
- Still in Manager, navigate to Job > Page Layouts.
- Select the desired page layout accessed by your users.
- Click Mobile & Lightning Actions.
- Click and drag Add Target to the Mobile and Lightning Experience Actions section.
- Change your selection from Mobile & Lighting Actions to s.
- Click and drag Target s to the s section.
- Under s click the Properties icon.
- In the Related List Properties - Target s pop-up, under Columns > Available Fields, select the fields you want.
- After you've chosen the fields you'd like click the Add button to move the fields to the Selected Fields section.
- The order of these fields can be configured with the Up and Down arrows.
- Under the Buttons section, uncheck the New box. Click OK and click Save.
Custom Settings
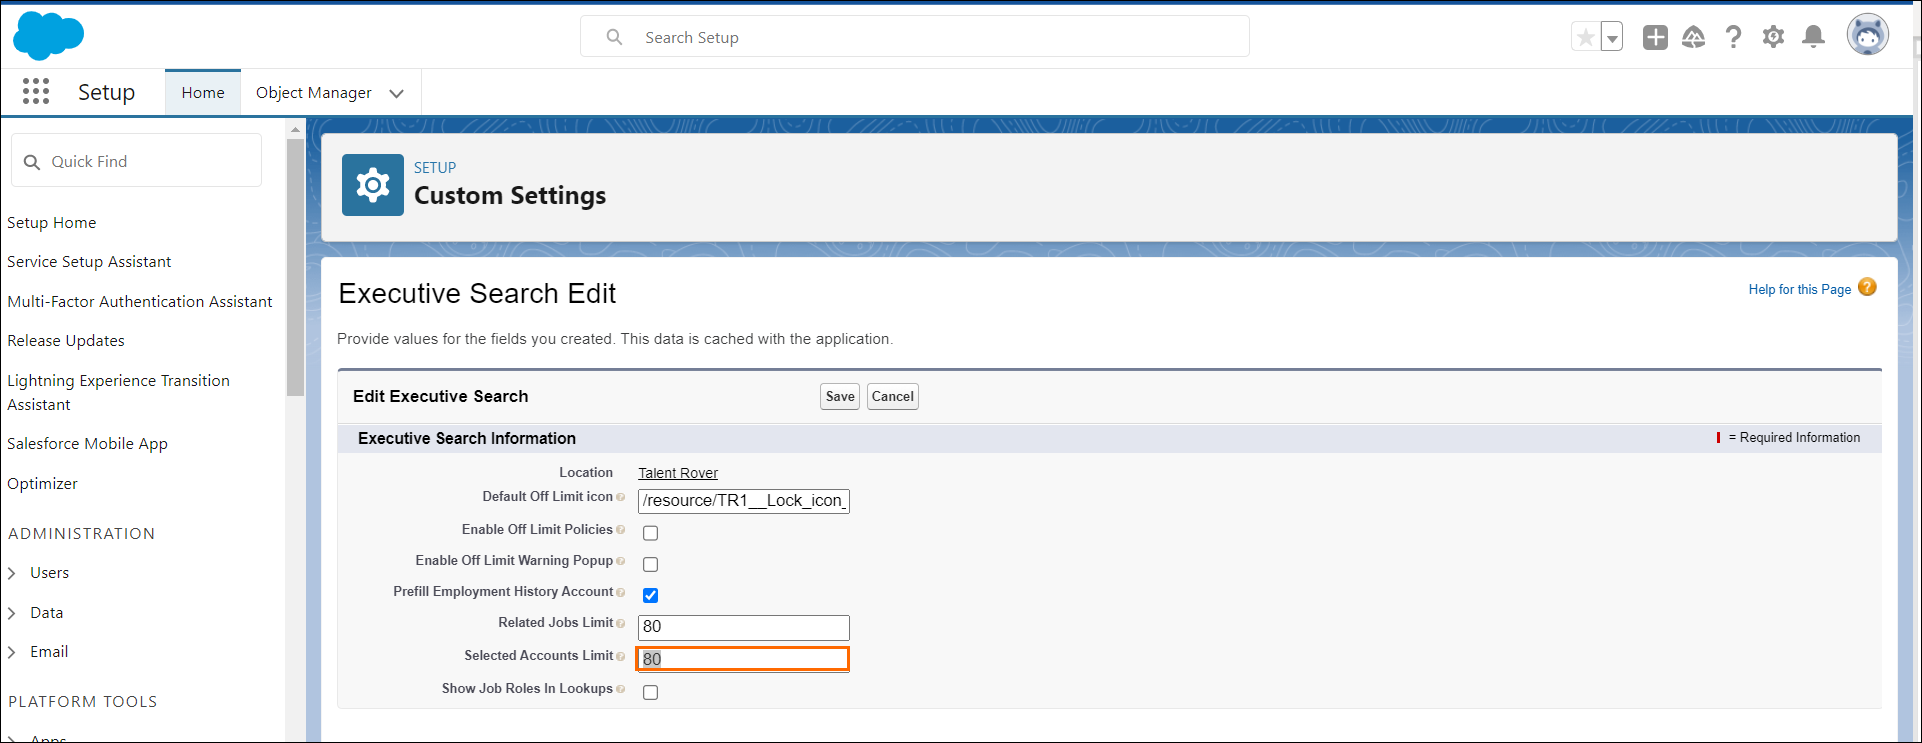
- Still in Setup, navigate to Custom Code > Custom Settings > Manage next to the Executive Search field.
- Click Edit.
- Set the Selected s Limit to "80".
- Still under Setup, navigate to Manager > Target Account > Page Layouts.
- Select the desired page layout accessed by your users.
- Click Fields.
- Click and drag all appropriate fields to the Target Detail section. Click Save.
Ensure Add Target and Target Detail are added to every page layout accessed by your users.
Employment History
Allows greater functionality when searching employment history. Features include:
- Parsing: Parsing of the name from a CV into the Employment History record.
- Account Aliases: Ability to identify the alternative names for companies when s names are searched.
- Current: The Employment History record will be marked as Current for the position a Candidate currently is filling.
- Verified: Ability to manually mark an Employment History record as Verified.
- For example, when there is no record in the system and it needs to be made clear that the data entered on the record is accurate.
Lightning Component
- Navigate to Setup > Manager > Employment History > Buttons, Links, and Actions.
- For the Edit field, select the drop-down and click Edit.
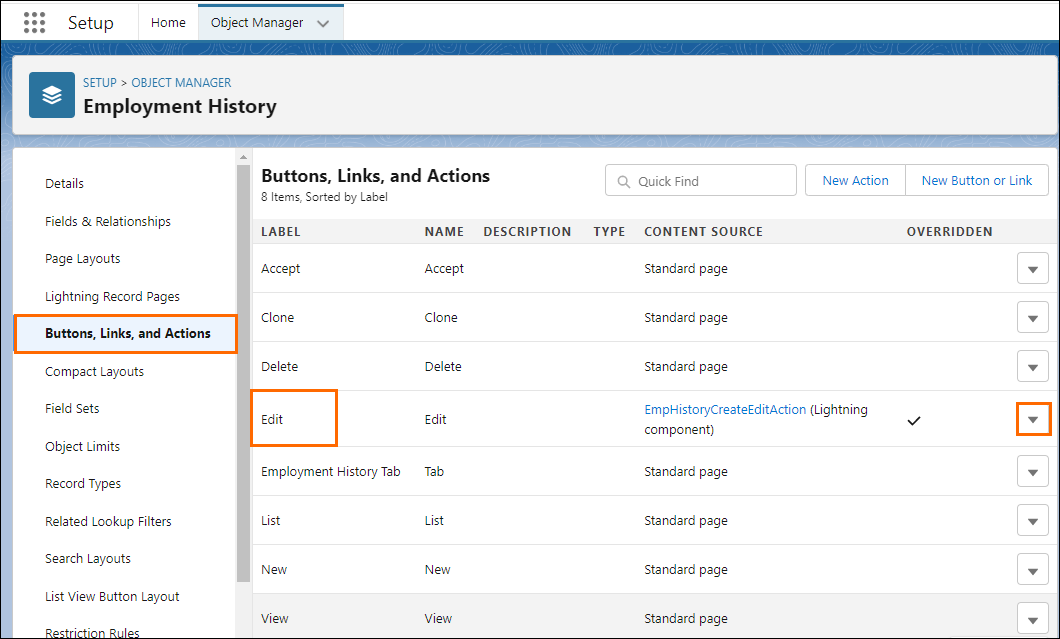
- In the Override Properties pop-up, under Lightning Experience Override, click Lightning Component.
- Select from the drop-down TR1:EmpHistoryCreateEditAction. Click Save.

- For the New field, select the drop-down and click Edit.
- In the Override Properties pop-up, under Lightning Experience Override, click Lightning Component.
- Select from the drop-down TR1:EmpHistoryCreateEditAction. Click Save.
Field Sets
- Still in Employment History, navigate to Field Sets.
- Find your desired Field Label, select the drop-down for that line, and click Edit.
- Click Employment History.
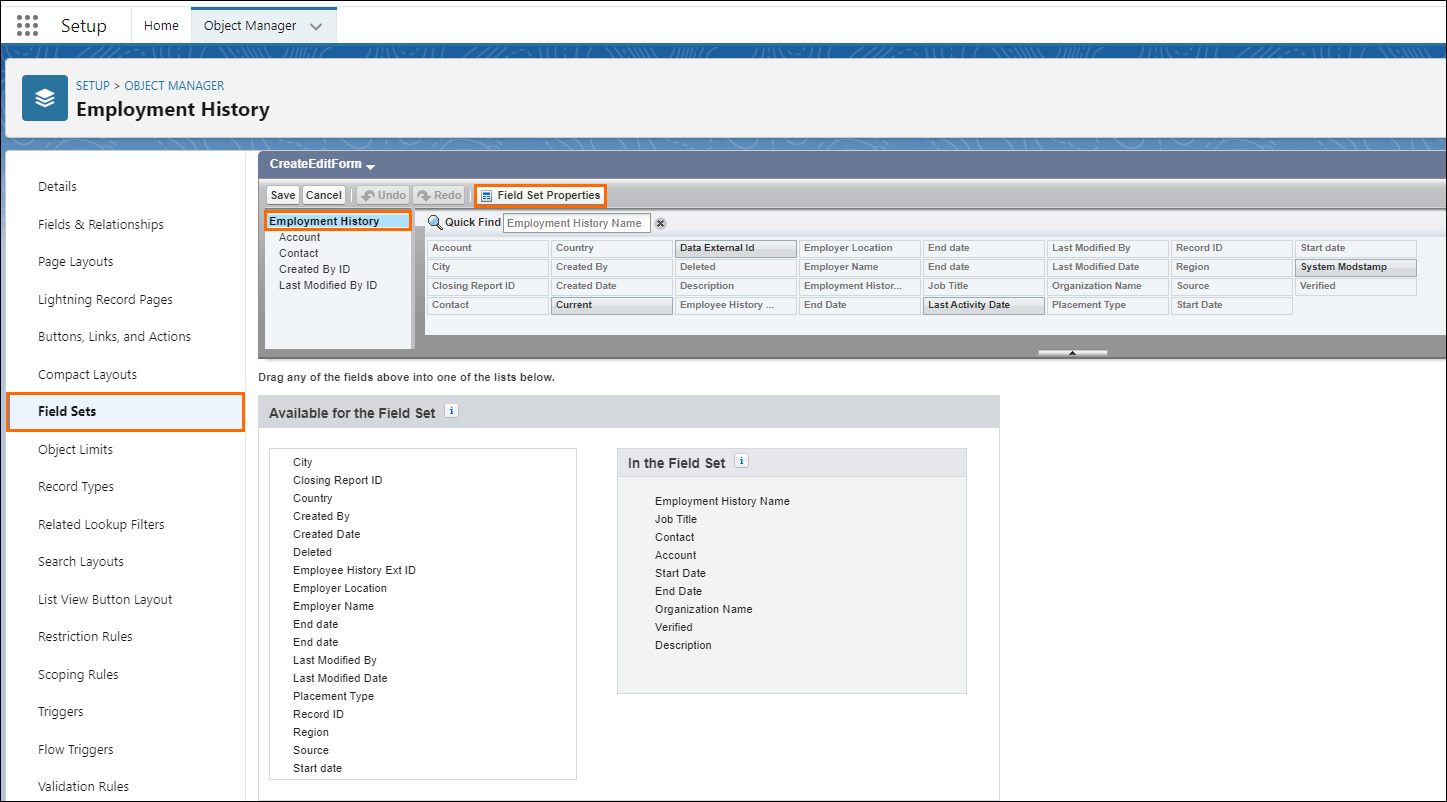
- Click the drop-down to edit TR1_CreateEditForm.
- Ensure all relevant fields are included for display. Click Save.
- If you need to add additional fields, click them from above and drag them the In the Field Set section.
Fields
- Still in Employment History, navigate to Page Layout.
- Select the desired page layout accessed by your users.
- Click Fields.
- Click and drag the following fields into the Employment History Detail section:
- Current
- Verified
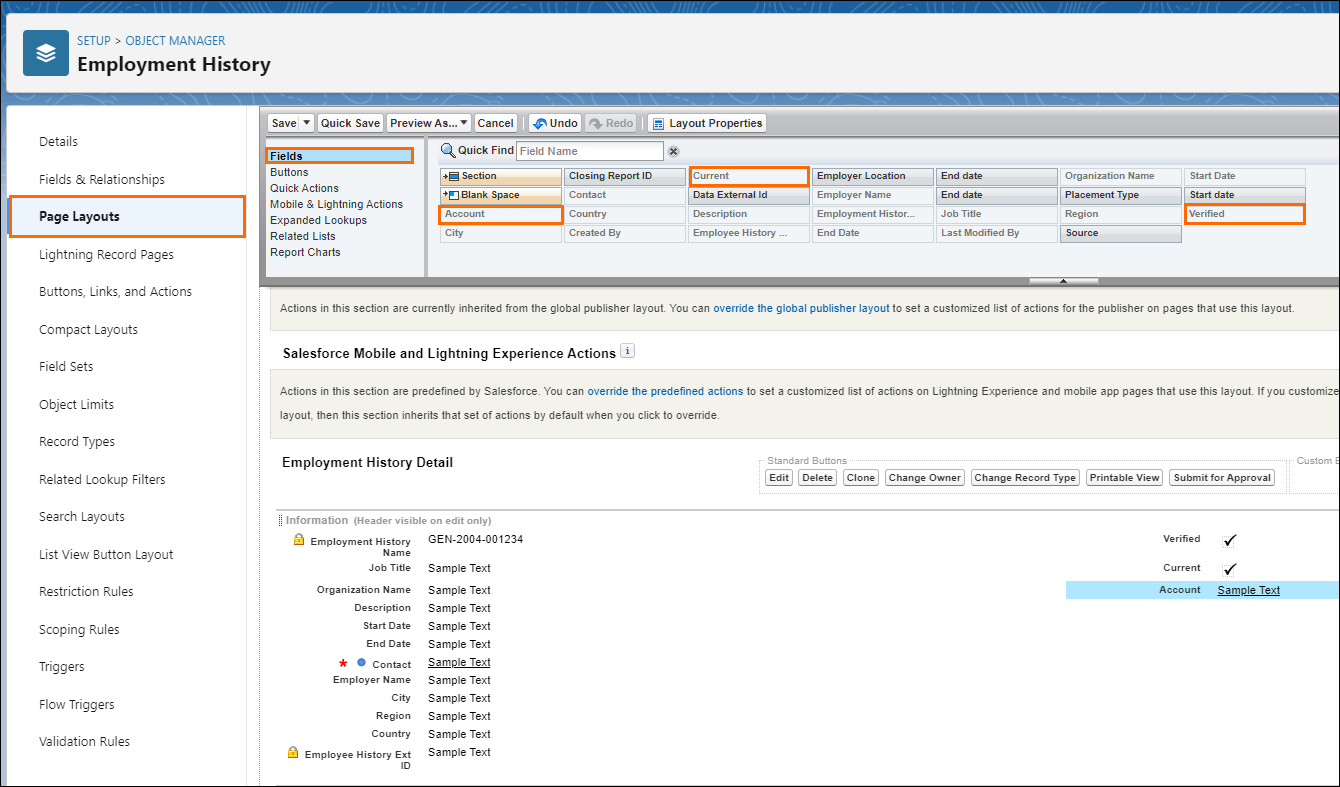
- Click Save.
Ensure , Current, and Verified are added to every page layout accessed by your users.
Resume Parser
If using the Resume Parser, follow these steps:
- Navigate to Setup > Custom Code > Custom Settings > Executive Search > Manage next to the Executive Search field.
- Click New.
- In the Executive Search Edit pop-up, enable the Prefill Employment History setting. Click Save.
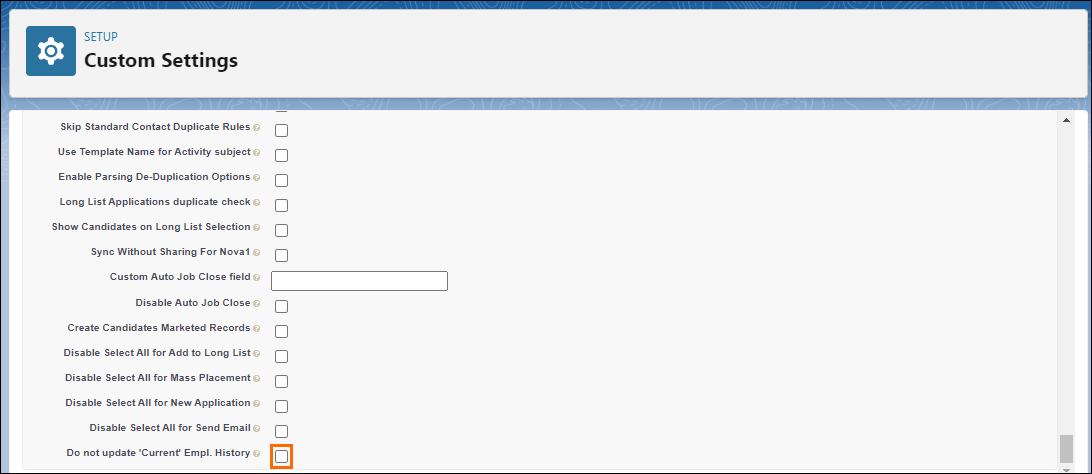
- Still under Custom Settings, click Manage next to Properties.
- Click Edit.
- In the Custom Settings pop-up uncheck the Do not update 'Current' Empl. History. Click Save.
- Still under Setup, navigate to Custom Code > Apex Classes > Schedule Apex.
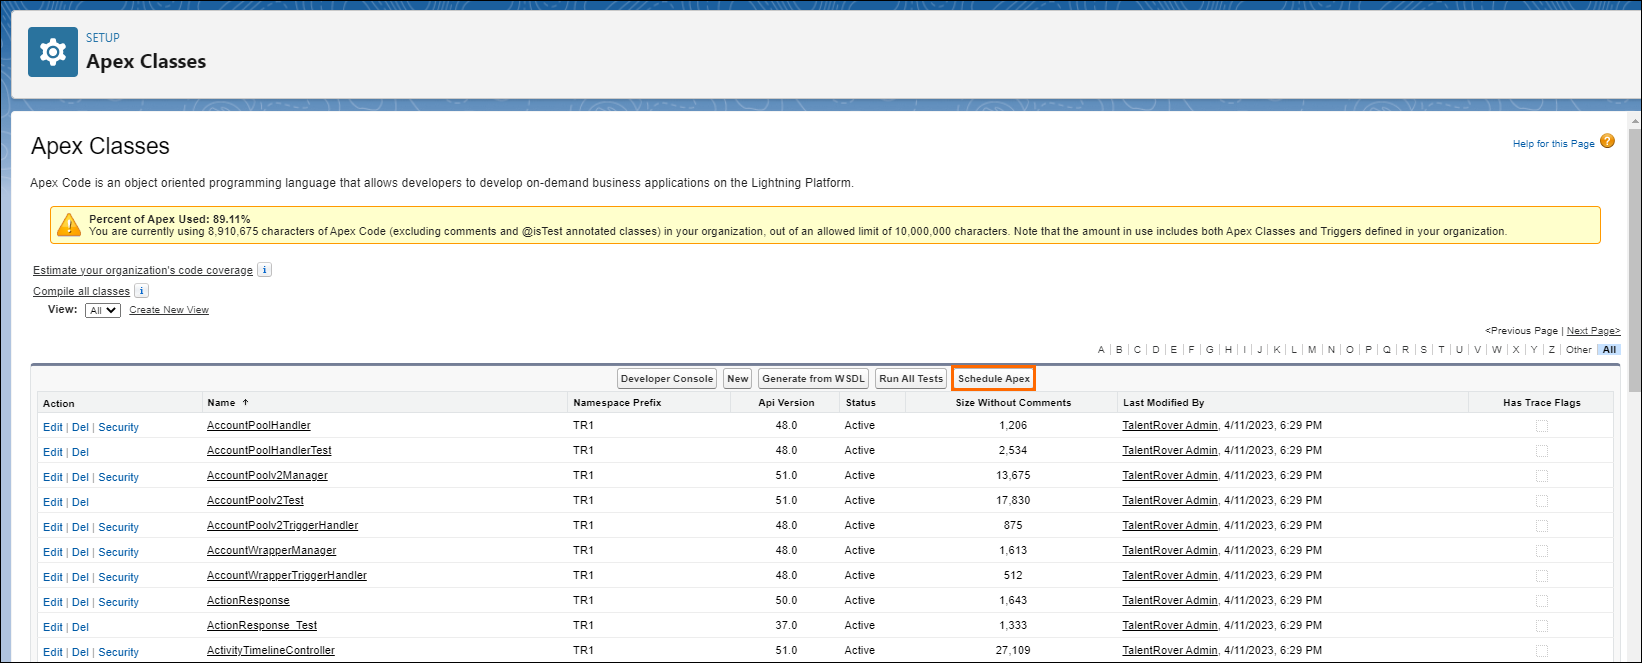
- Schedule a new Apex Class to run daily with the following information:
- Job Name: Enter "EmploymentHistoryUpdateCurrentBatch".
- Apex Class Name: Enter "EmploymentHistoryUpdateCurrentBatch".
- Schedule Apex Execution Frequency: Click Weekly then select the checkboxes next to every day of the week.
- Start: Defaults to current date.
- End: Select an end date. This will need to be updated before the date expires.
- Preferred Start Time: Select a start time. For example, 6:00 AM.
- Click Save.
Related Jobs
Related Jobs are Jobs that are similar to a previous Job a Candidate has held. This greatly reduces the amount of time spent filling a position because the candidates have already been vetted.
- Navigate to Setup > Manager Job > Button Layout.
- Select the drop-down and click Edit.
- In the Custom Button section under Available Buttons, select Add Related Jobs and click the Add button to move this option to the Selected Buttons section. Click Save.
- Still in Job, navigate to Page Layouts.
- Select the desired page layout accessed by your users.
- Click Mobile & Lightning Actions.
- Click and drag Add Related Jobs to the Mobile and Lightning Experience Actions section. Click Save.
- Still in Setup, navigate to Job > Page Layouts.
- Select the desired page layout accessed by your users.
- Click Mobile & Lightning Actions.
- Click and drag Related Jobs to the s section.
- Under s click the Properties icon.
- In the Related List Properties - Related Jobs pop-up, under Columns > Available Fields, select the fields you want, including Related Job Number.
- After you've chosen the fields you'd like click the Add button to move the fields to the Selected Fields section.
- The order of these fields can be configured with the Up and Down arrows.
- Under the Buttons section, uncheck the New box. Click OK and click Save.
- Still in Setup, navigate to Custom Code > Custom Settings > Manage next to the Executive Search field.
- Click Edit.
- Set the Selected s Limit to "80". Click Save.
Ensure Add Related Jobs and are added to every page layout accessed by your users.
Search Capability
If you activate the search capability of the Account Look-up field, Executive Search gains the ability to retrieve Account and Account Alias names, as needed.
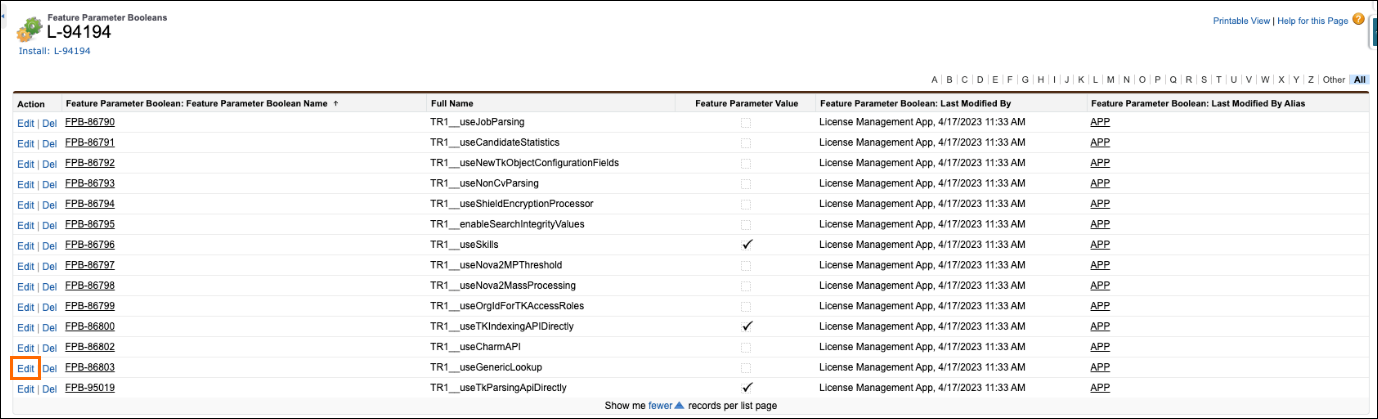
- Log in to access FMA.
- Navigate to the Connection Record for your customer and select the appropriate license.
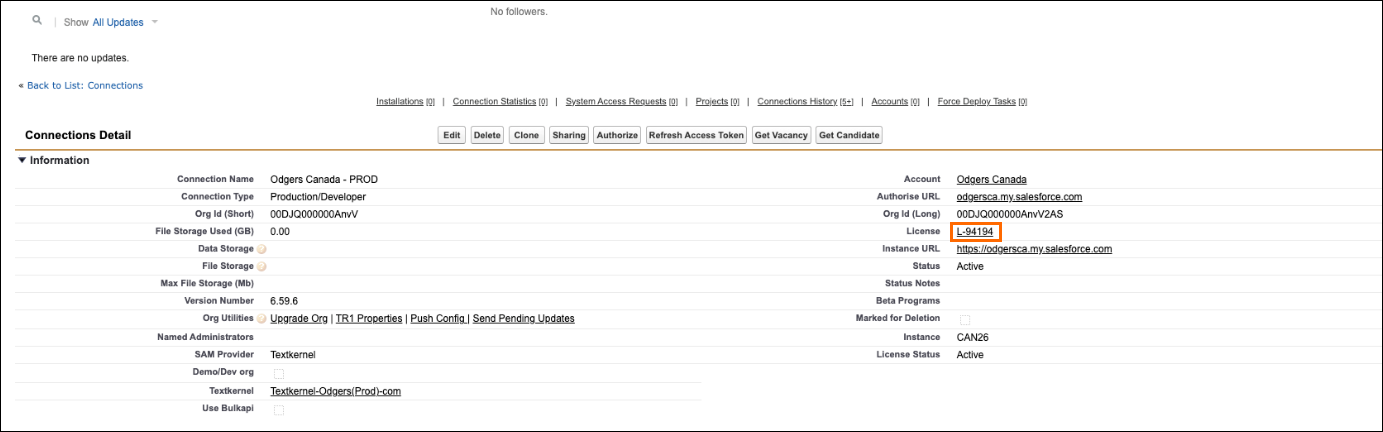
- Click Edit for TR1_useGenericLookup.
Team Member Credit
Team Member Credit is a tool for recording how different users contributed to the fulfillment of a Job.
- Navigate to Setup > Manager > Job > Page Layouts.
- Select the desired page layout accessed by your users.
- Click s.
- Click and drag Team Member Credit Number to the s section.
- Under s click the Properties icon.
- In the Related List Properties - Team Member Credits pop-up, under Columns > Available Fields, select the fields you want, including Team Member Credit Number.
- After you've chosen the fields you'd like click the Add button to move the fields to the Selected Fields section. Click OK and click Save.
- The order of these fields can be configured with the Up and Down arrows.
Ensure Team Member Credit Number is added to every page layout accessed by your users.
Job Billing
Job Billing allows for the ability to track the completion of key billing events in a Job, for example Placement Started. This eliminates the need for third-party management system.
- Navigate to Setup > Manager > Task > Page Layouts.
- Select the desired page layout accessed by your users.
- Click Fields.
- Drag and drop Billing Event into the Task section. Click Save.
- Still in Setup, navigate to Job > Page Layouts.
- Select the desired page layout accessed by your users.
- Click Fields.
- Click then drag and drop the following fields to the Job Compensation area of the page:
- Projected Fee
- Projected Base Package
- Projected Bonus
- Sum Projected Base and Bonus
- Actual Base Salary
- Actual Bonus
- Actual Total
- Click Save.
Ensure the following fields are added to every page layout accessed by your users:
- Billing Event
- Projected Fee
- Projected Base Package
- Projected Bonus
- Sum Projected Base and Bonus
- Actual Base Salary
- Actual Bonus
- Actual Total
Permission Sets
- Navigate to Setup > Users > Permission Set Groups.
- To create a group, mark the checkboxes next to the following fields:
- Generic Lookup User
- Job Roles User
- Target Account User
- Related Job User
- Team Member Credit
- Job Billing User
- Click Add.
- Create additional Permission Set Groups for users who do not require full read and/or write access to all of the functionality. For example, users who are not required to see Job Billing information.
- To add users to a Permission Set Group, click on the group > Manage Assignments >Add Assignment.
It is recommended that you provide users with the lowest Permission Set Group or Permission Set that they require to perform their role.