October 2026 Release: Omnitable New Features & Enhancements
October 2026 (2026.10 GA Release - Package Version 9.91)
Edit Fields Inline in Omnitable
-
Feature: Omnitable Inline Editing
-
Level of Configuration: Low
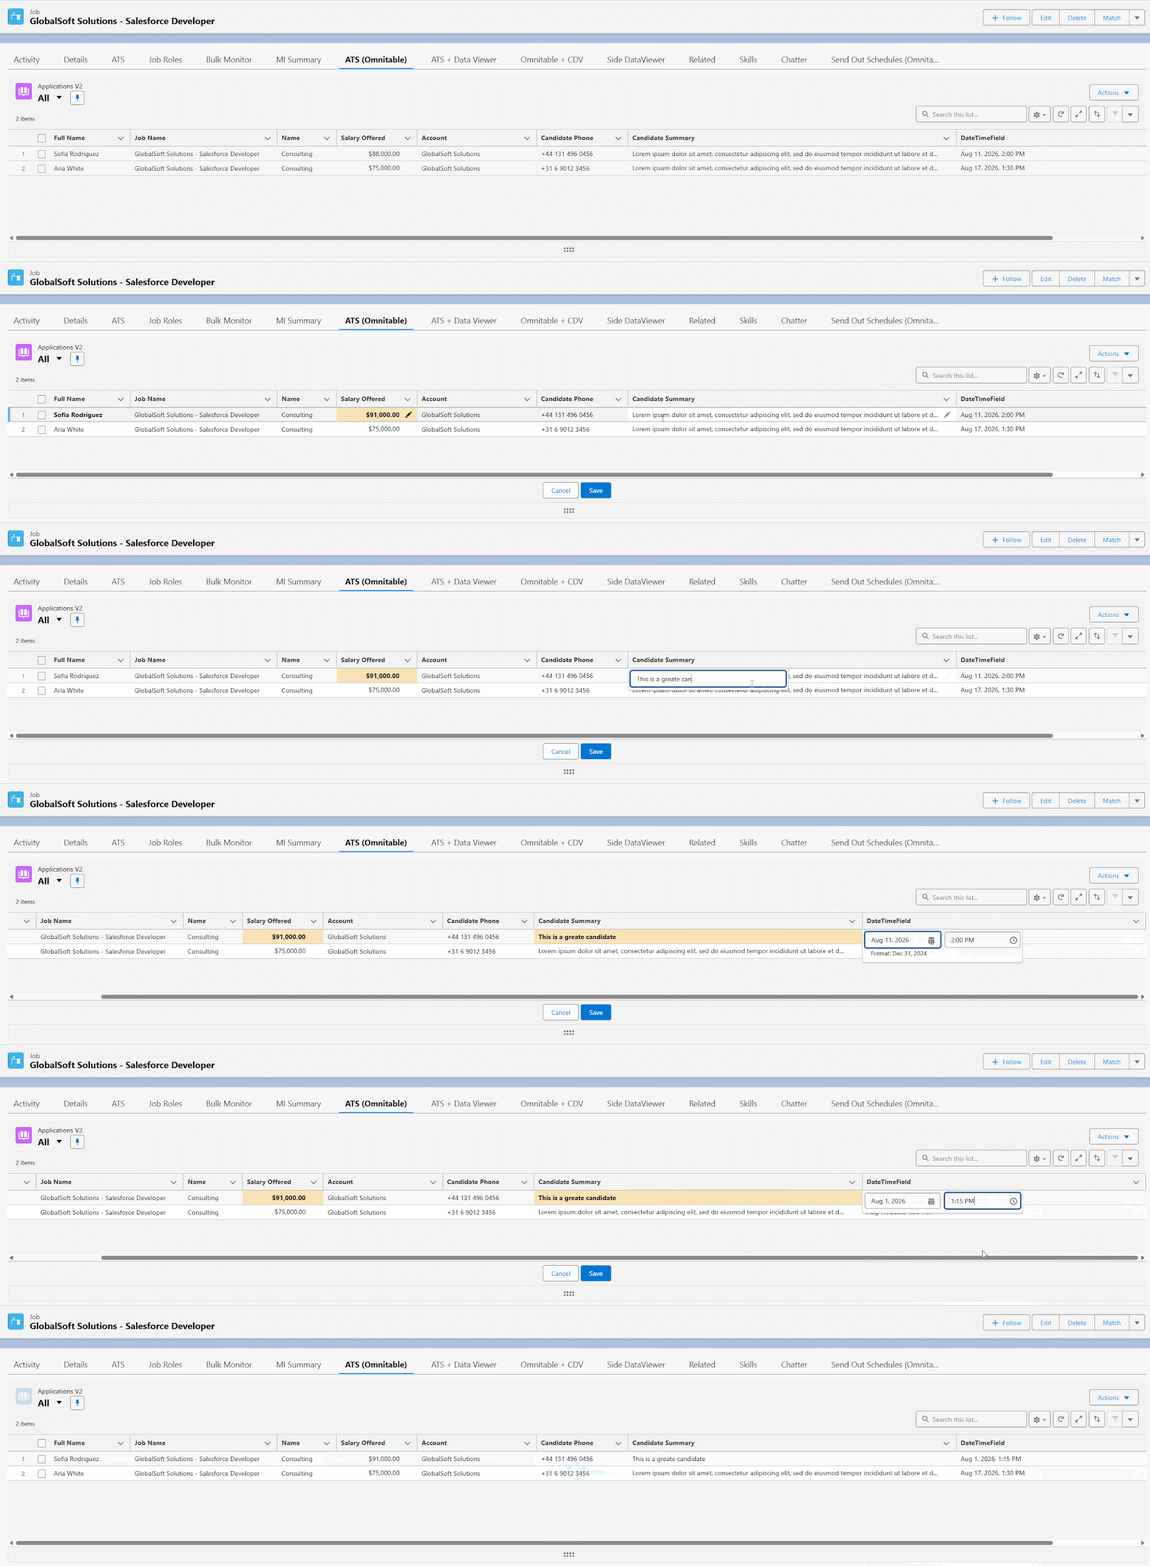
You can now edit field values directly in an Omnitable row, without opening the record detail page. Inline editing supports these Salesforce field types on the same object as the Omnitable:
-
Checkbox
-
Currency
-
Date
-
Date-Time
-
Email
-
Number
-
Percent
-
Phone
-
Picklist (single-select)
-
Text
-
Text Area (255) (displays on a single line)
-
Time
-
URL
Admins choose which fields are editable by referencing a Salesforce Field Set for each Omnitable instance. Only fields in that Field Set can be edited. Omnitable also enforces Salesforce field permissions, so you cannot edit fields your permissions do not allow.
After you save, Omnitable refreshes only the rows you changed, in place, instead of reloading the whole table. To change several rows at once, select them and click Update N Selected.
-
Inline editing is not yet supported for Omnitables that use the Contextual Data Viewer.
-
You can edit multiple rows at the same time, up to a maximum of 200 rows. You might notice slower performance before you reach that limit.
Configuration
-
Create a Salesforce Field Set on the Omnitable’s object that contains the fields users can edit.
-
Add the following to the Omnitable configuration. See example below:
"editableFields": "omnitable_InLine_Edit",
{
"objectName": "TR1__Application_V2__c",
"defaultFields": "TR1__ATSv2_Default_Candidate_FieldSet",
"editableFields": "omnitable_InLine_Edit",
"contextFilterFieldName": "TR1__Job__c",
"infiniteScrollInitialChunkSize": 50,
"infiniteScrollChunkSize": 20,
"actions": [
{
"category": "TR1__Move_To_Stage",
"actionName": "Move To Application",
"actionLabel": "TR1__Action_Move_To_Application",
"flowName": "TR1__ATS_Action_Launcher",
"modalSize": "none",
"icon": "utility:description",
"variablesMapping": {
"actionName": "actionName",
"selectedIds": "applicationIds",
"contextualRecordId": "jobId"
}
Call List Members Omnitable: Option to Add Contextual Data Viewer for Client Call List Members List
-
Feature: Omnitable
-
Level of Configuration: Low
Recruiters working in Call List Member Omnitables can now open a Contextual Data Viewer (CDV) directly within the table. The CDV lets you review key client information without leaving the Omnitable.
By default, the CDV displays these tabs:
-
Contact Details
-
Jobs: Jobs (including Job Roles) that the selected Call List Member manages hiring for.
-
Activity Timeline: Shows Combined Activity, which includes Power Notes.
Configuration
This CDV instance is part of the Managed Package and is not added to the page layout by default. Administrators must manually configure it for an existing Call List Members Omnitable. The component works independently of any specific Omnitable instance, so verify that the CDV configuration fits the composition of your Call List Members list.
Add the flow to the Call List Lightning Record Page
-
Navigate to a Call List record in your org.
-
Click the to open the Lightning App Builder.
-
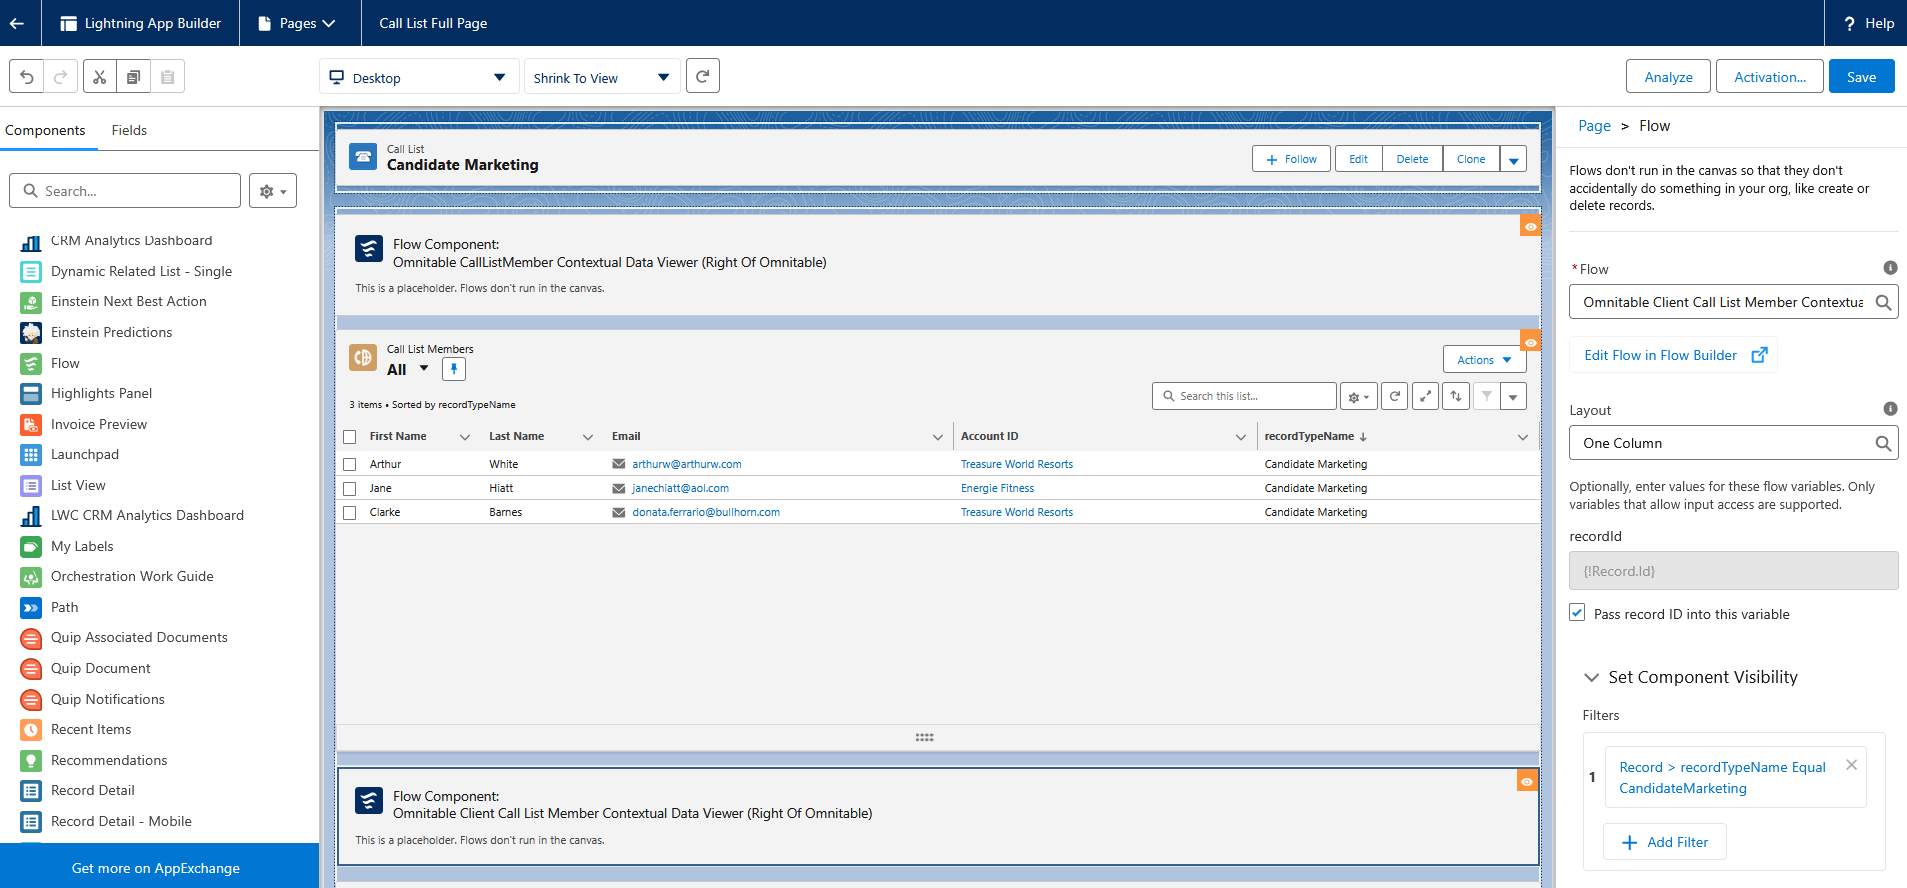
In the component palette on the left, search for "Flow" and drag a Flow component onto the page in your desired region.
-
In the component properties panel on the right, configure the following:
-
Flow: Enter one of these API Flow names: TR1__Omnitable_ClientCallListMember_Contextual_Data_Viewer_Right_Of_Omnitable or TR1__Omnitable_ClientCallListMember_Contextual_Data_Viewer_Below_Omnitable.
-
Select the Pass record ID into this variable checkbox.
-
(Optional) Use the Set Component Visibility filter to set where this Flow is displayed, for example "recordTypeName=CandidateMarketing".
-
-
Click Save.
Configure Combined Activity Timeline
If Combined Activity Timeline is not already configured for your Org, you must configure it to see data on the Activity tab. Be sure to check out Combined Activity Timeline for more on this topic.
Enter Multiple Comma-Separated Values in Omnitable Filter Conditions
-
Feature: Omnitable
-
Level of Configuration: None
You can now enter several comma-separated values in a single filter condition. For example, enter “Bullhorn, ACME, Production” to show records that match any of the values (OR match).
Wrap a value in double quotes to include a comma; for example, “ACME, Production” is one value. Omnitable removes spaces before and after commas outside quotes and ignores a trailing comma.
Each value counts as its own condition toward the 10-condition limit per view. If a view would exceed the limit, Save is disabled, and a message asks you to reduce the number of conditions.