Google Analytics Enablement Guide
As of July 1, 2023, Google’s Universal Analytics (UA) will no longer be available and will be replaced by Google Analytics 4 (GA4). has updated its support within the product to include GA4.
Overview
For clients looking to understand how users interact with the different Bullhorn features, measure adoption, and help drive the right behaviors to maximize ROI, provides integration for Google Analytics. The following information will guide clients already using Google Analytics with through the upgrade process, as well as provide complete setup instructions for new clients. The pre-requisites for this are:
- You must be on Novo.
- You must have an account with Google Analytics.
Before You Begin
Beginning in March 2023, for clients with an existing UA account, Google will automatically create a new GA4 property. You can opt out of having the new property automatically created if you choose, and manually create the property yourself.
- You will see slight changes to the interface after the switch to GA4, but the overall impact will be minimal.
- You will be required to provide your new GA4 property to Support to update the Corp Setting so that your data can be sent to your new account.
Historical data from the UA property will not be migrated to GA4. There is also no way to migrate the data manually. Google is encouraging users to export any data from UA. Google has provided instructions on how to do this in this article. You will have at least six months from July 1, 2023, to export your data. Google has not communicated an exact date at this time.
Setup
If you did not opt out of the automatic property creation by Google you will not need to complete the steps under the Google Analytics 4 Key section, however, you will still need to complete the Custom Dimension set up in order to track the data from Bullhorn and provide the new property to Support.
To locate the new GA4 property:
- Select Data Streams and locate the Measurement ID (G-xxx code).
- The code must begin with G to work.

- The code must begin with G to work.
If you did opt out of the automatic property creation by Google and users who are new to using the Google Analytics integration will need to complete all steps outlined in the next section below.
Client Configuration Steps in Google Analytics
Google Analytics 4 Key
- Sign in or set up a Google Analytics account.
- Go to Google Marketing Platform Analytics and choose Sign in to Analytics or choose Start for Free to create an account.
- To create a Google Analytics 4 Key (Google Analytics 4 API Key), open Admin tools from the gear icon in the left side bar.
- From the Admin tab, choose Create Property from the second column.
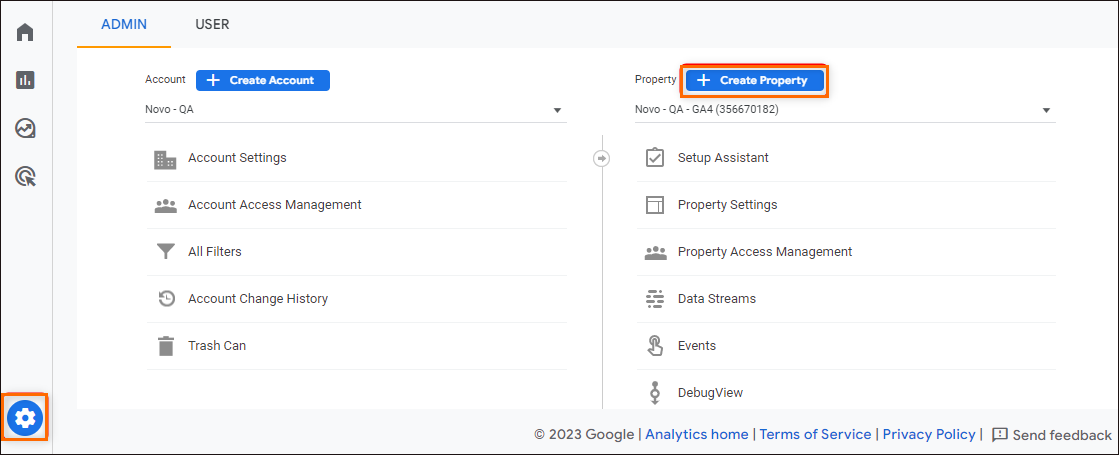
- Populate the Property Details section and then click Next.
- Locate the Measurement ID (G-xxx code), under Data Streams, and provide the code to Support.
- The code must begin with G to work.
- The code must begin with G to work.
Custom Dimensions
A dimension is a descriptive attribute or characteristic of an object with different values. For example, a geographic location’s dimensions are Latitude, Longitude, or City Name. Values for the City Name dimension are San Francisco, Berlin, or Singapore. For Bullhorn the location’s dimension is Department and the values are the user’s primary department.
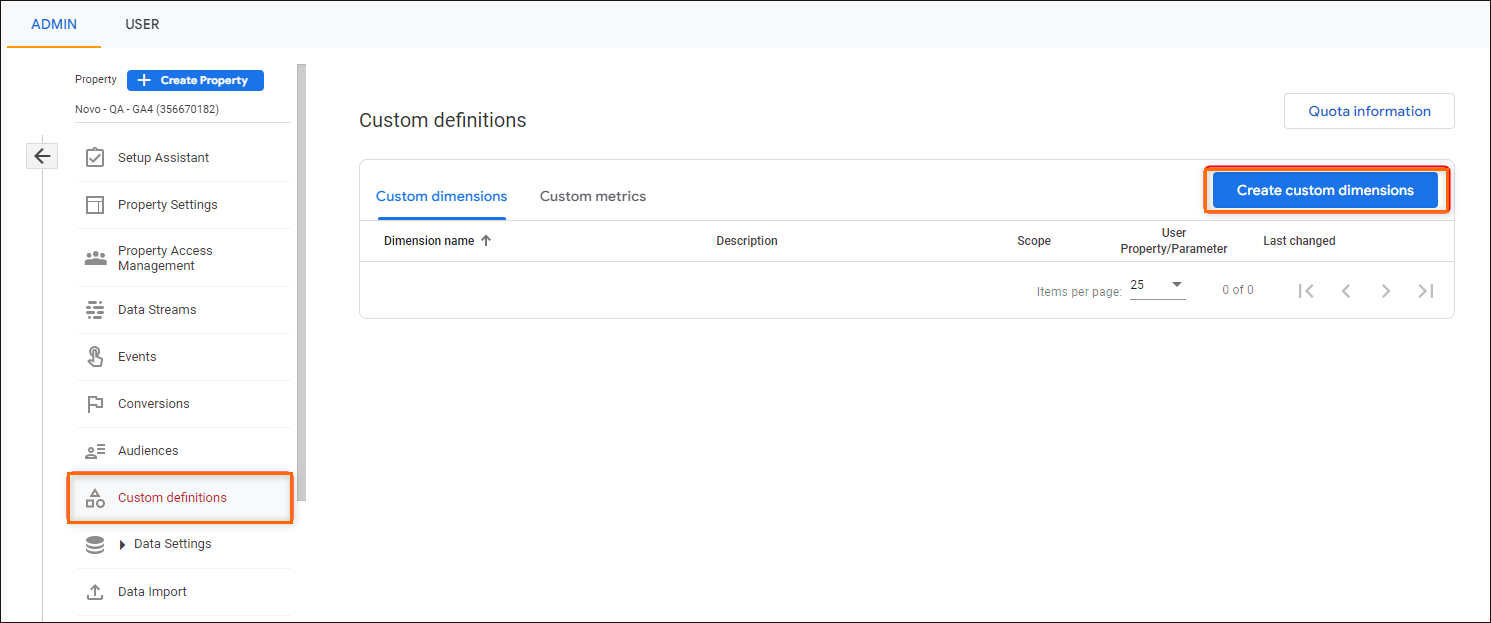
- Locate the Custom Dimensions screen by opening Admin tools, from the gear icon in the left side bar.
- From the Admin tab, locate the G-xxx Property from the second column.
- Select Custom Definitions, then click New Custom Dimension to open the Add Custom Dimension form.
- Use the table to create these nine dimensions:
Custom Dimension Name Scope Description Event Parameter Corporation ID Event Corp ID corporationId Private Label ID Event PL ID privateLabelId Master User ID Event Master User ID masterUserId Corporation Name Event Corporation Name corporationName Name Event First Name, Last Name name userId Event Local User ID userId Application Event Novo or S Release application User Primary Department Event User Primary Department userPrimaryDepartment Usertype Event Usertype userType - Copy the Custom Dimension from the table.
- Set Scope to Event and Event Parameter to the corresponding selection listed in the table.
- Click Save.