Daily Roll Call Setup and Report
Daily Roll Call is a tool used to track daily attendance of employees according to schedules defined in .
Daily Roll Call, or DRC, is available for a rolling period of 7 days only. The 7 day rolling period includes the current day + 6 previous days. DRC details must be manually configured in order to accurately display attendance information.
Prior to running your Daily Roll Call, you must configure some details so that employee attendance can be tracked properly.
Setting up Shifts
The first step in configuring the Daily Roll Call is defining the possible shifts that employees work. See Department Shift Setup for more information.
Setting Schedules
The second step in configuring Daily Roll Call is creating Roll Call schedules and adding employees.
You must set up Department Shifts before following the steps below to set schedules.
-
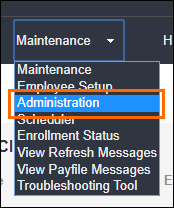
Navigate to Maintenance > Administration.
-
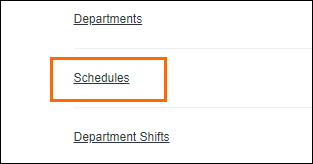
Select Schedules to open the Schedule Templates page.
-
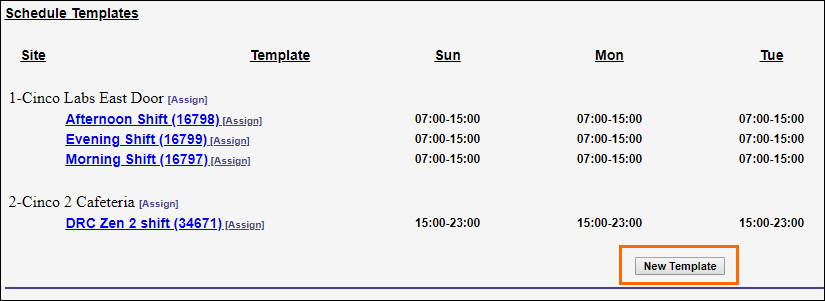
Select New Template to create a new schedule.
-
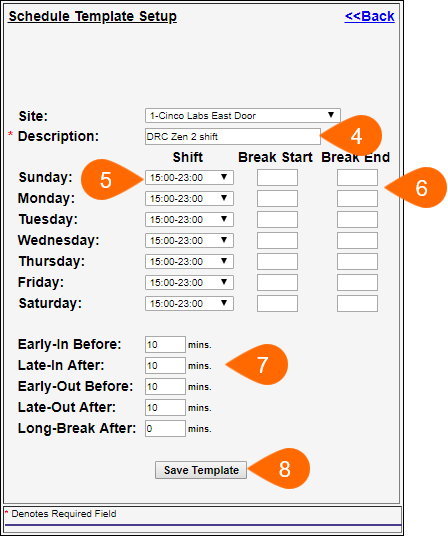
In the Description field, add a name to the schedule.
-
This should be descriptive enough to be clear as to what kind of data you're reporting on.
-
-
In the Shift column, select a shift for each day from the drop down menus.
-
These shifts will be included in the Daily Roll Call report.
-
You may only choose one shift per day in each schedule.
-
You may create separate schedules to choose additional shifts.
-
-
If needed, you may also provide Break Start and Break End times to provide additional detail in the Daily Roll Call report.
-
Towards the bottom of the options, you may indicate the details for what should be flagged as an early or late punch when running the report.
-
Enter the number of minutes for each exception type as needed.
-
-
Once you have finished entering the schedule details, select Save Template.
Assigning Talent
Next, you must assign employees to the schedule. You can assign them either by schedule or by customer.
When a talent is listed as Not Assigned from the Daily Roll Call screen or On Premise by Schedules (Roll Call) report– you will need to assign the talent to a Department/Schedule combination.
-
Navigate to Maintenance > Administration.
-
Select Schedules to open the Schedule Templates page.
-
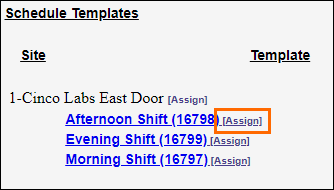
Select [Assign] next to the desired schedule to open the employee list.
-
Choose the employees to be assigned to the Department/Schedule.
-
Once assigned, select <<Back to return to the Schedule Templates screen.
-
To confirm the employ has been assigned, select [Assign] to open the employee list again. Assigned employees will appear in green toward the top of the list with a defined schedule.

The steps below will walk you through how assign talent to a Department/Shift from a single page.
-
Navigate to Maintenance > Administration.
-
Select Schedules to open the Schedule Templates page.
-
Select [Assign] next to the customer name to open the Employee Schedule Setup page.
-
Select a schedule for each employee from the drop down next to their name.
Depending on your setup or number of shifts, you may have repeat the process as needed. Next, we'll look at generating the report.
- Click the Back button in the upper left. Click this at least twice to exit the Schedules setup and also exit the Administration menu.
Generating the Report
After configuring your department shift table and the specific schedule template, you're ready to run the report and capture data.
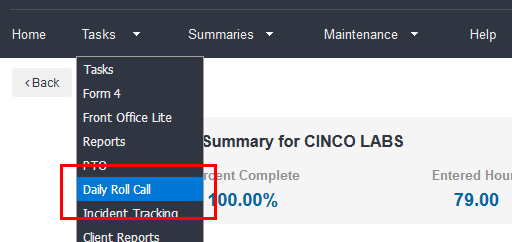
- On the Daily Roll Call menu, use the options at top to configure your report as needed. Be sure to select an appropriate Schedule option from the drop down menu.
Keep in mind that this report is available on a rolling 7 day basis. Meaning that you may report to capture data only on the current day and previous 6 days. If you need to report on data prior to that period, please run a separate report in the Time Management Console.
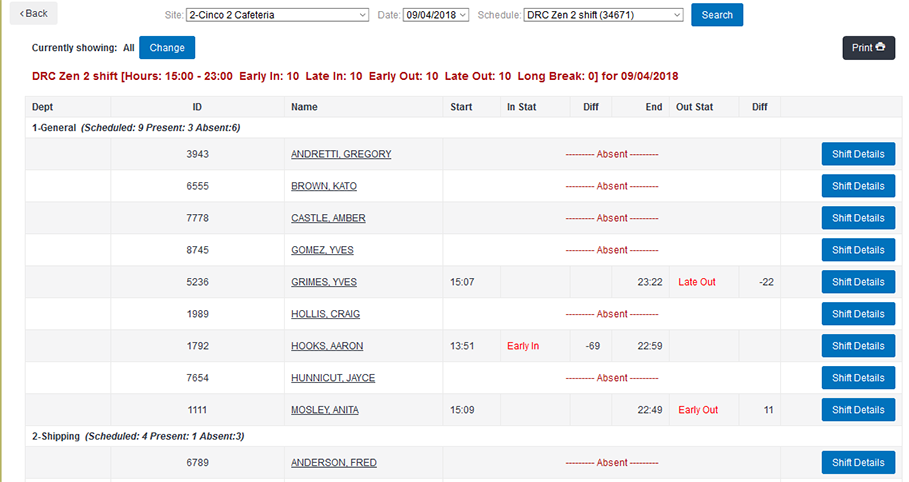
The Daily Roll Call will then display with any matching results. The table in the center displays these details:
- Dept indicates the department the employee used
- ID represents the PIN used by each employee
- Start indicates the actual IN Punch time
- In Stat shows the specific type of IN punch that was captured. Like Early In or Late In
- Diff to the right of In Stat shows the difference in minutes an employee clocked in. A negative number shows the time before the shift starts. A positive number shows the time after the shift begins.
- End shows the punch time for the OUT punch
- Diff to the right of Out Stat shows the difference in minutes an employee clocked in. A negative number shows the time after the shift ends. A positive number shows the time before a shift ends.
In addition, you may use the Change button at the upper left to set up a filter and drill into specific exceptions. You may also print the report if needed. Currently, the Daily Roll Call may not be exported. This means you cannot request these details in PDF, CSV, or flat file options like other reports.
When you run Daily Roll Call for a select schedule, you may see suggestions to add additional employees to the schedule. These suggestions are made based on the punch times for those employees.
