Candidate Lists Explained
Overview
This article explains how to use candidate lists in , including how to create and manage lists, and how to take action on candidates within a list.
What are Candidate Lists?
Candidate Lists allow you to store all desired candidates in one centralised location, and to parse results from live searches or SourceBots into shareable lists that can be distributed and reviewed at any time.
How to Add Candidates to a List
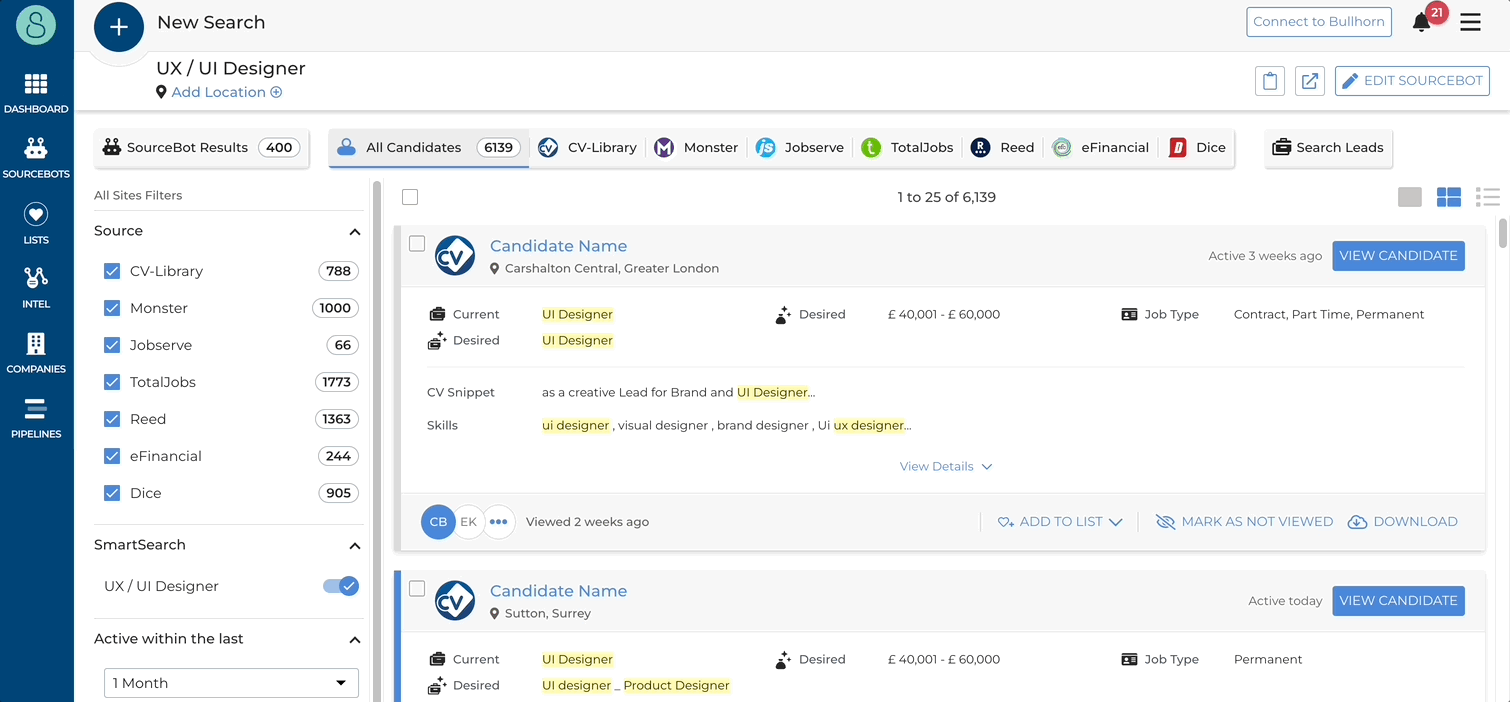
When reviewing potential candidates in your SourceBot or live search results, there are two ways you can add candidates to a list:
Adding a Single Candidate to One or More Lists
- Click the List Options button on the lower right side of a candidate to open a drop-down.
- Add the candidate to one or more existing lists.
- Select Add New List to create a new list and automatically add the selected candidate to the list
Adding Multiple Candidates to One or More Lists
- Select each candidate you would like to add to the list(s).
- Select the Add To List button on the top left of the results list to open a drop-down.
- Add all the selected candidates to one or more existing lists
- Select Add New List to create a new list and automatically add the selected candidates to the list.
Your Candidate Lists Page
You can access your Candidate Lists page by navigating to the Lists section on the left panel of the app.
When on the Candidate Lists page, you can create new lists and manage existing ones.
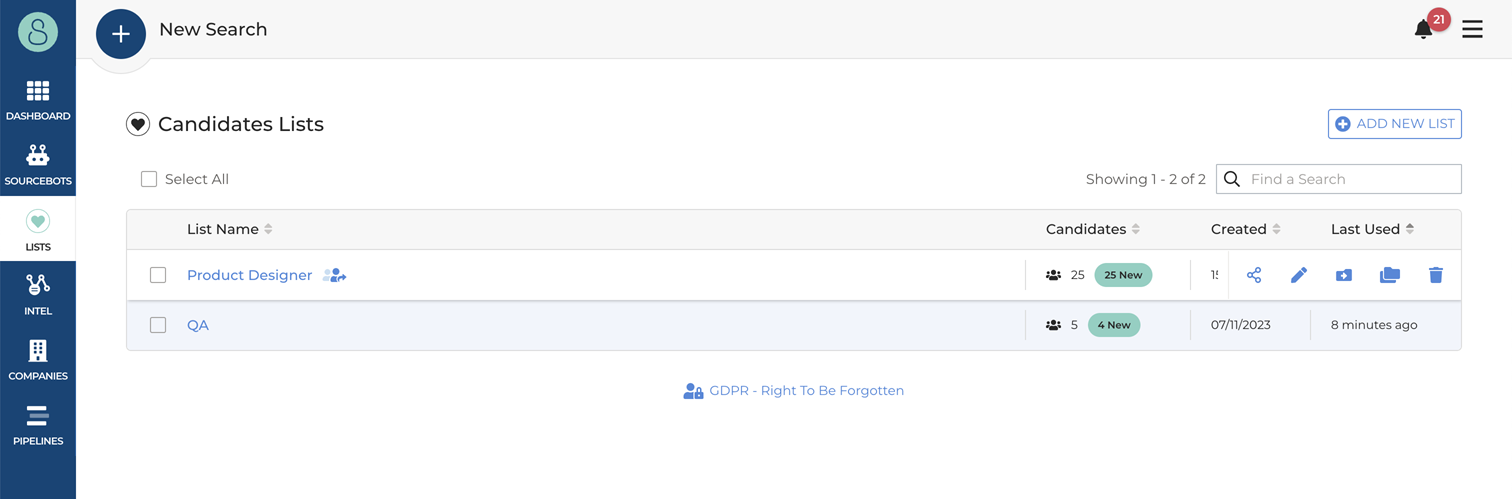
Creating a New List
Clicking on the top right Add New List button on the Candidate Lists page will open an Add New List modal to name and create your new list.
Manage your Lists
You can see all of your lists on your Candidate Lists page. By hovering over a list, you can select one of the following actions:
- Share List: Opens the Share List modal, allowing you to add, remove and edit access permissions for team members.
- Rename List: Enables you to change the list’s name.
- Move Candidates to: Moves candidates out of one list and into another. You must own or have "Can Edit" access to the lists.
- This will leave the original list empty.
- Copy Candidates to: Candidates will be copied over to a specified list, which can be a completely new one or a previously existing list. You must own the list or have "Can Edit" access.
- Candidates will remain in the original list.
- Delete: Lists that are owned only by you and not shared are permanently deleted.
Managing Candidates within a List
By clicking on candidates within a list, you can manage them individually or multiple at once.
Individual Candidate Actions
Hovering over a single candidate in your list will bring up the following action buttons to choose from:
- Mark as Viewed: A "viewed" icon will be added to the right of the candidate’s name.
- Delete Candidate: Permanently deletes the specified candidate from the list.
- Share: Uses a single credit to send the candidate profile to a select email address.
- Download: Uses a single credit to download the candidate’s CV.
- Team Activity: Opens an additional modal showing the history of team member activities pertaining to this candidate (Viewed, Added, Downloaded).
Multiple Candidate Actions
When you select multiple candidates, the following actions become available:
- Move Candidates to: Moves all selected candidates from one list to another. You must own the list or have "Can Edit" access.
- Candidates will be removed from the original list.
- Copy Candidates to: Selected candidates are copied over to a specified list. You must own or have "Can Edit" access to the list you copy to.
- Candidates will remain in the original list.
- Remove: Remove multiple candidates from an owned list.
- Share: Uses a credit to share multiple candidate profiles by email.
Candidate Traffic Light Management
Once candidates have been added to the lists, their priority can be labelled by clicking on the white circle next to the list name; allowing you to choose from one of three colours, based on the traffic light system:
- Red
- Orange
- Green
Please use this traffic light system as you best see fit.
Candidates in a CRM
If you have a CRM enabled then you'll be able to see “In [CRM]” next to the candidate name to help you distinguish between candidates already in your list and those waiting to be added.