Understanding and Creating Branches
Overview
This article contains information on how to manually create new Branches.
Steps
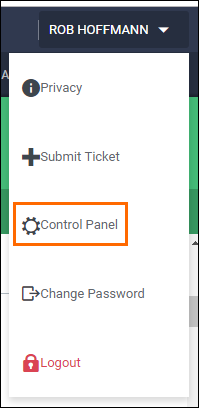
- Access the Control Panel.
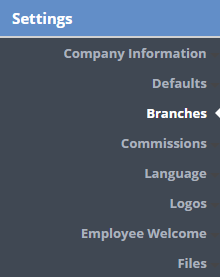
- From the menu on the left, select Settings > Branches.
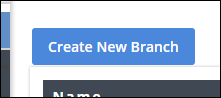
- Click Create New Branch.
- Complete the fields for the new Branch:
- Name - This is the name of the Branch you would like displayed in the system.
- Enabled - When checked the Branch is available for use in the system.
- If unchecked, the Branch is not visible in the system.
- Number - If integrating with an ATS, this will default from the ATS. This can also be used to capture a payroll Company Code per Branch.
- Company Codes are also available in the Employee Type Profiles.
- If you are using a Company Code in the Branch, contact your Bullhorn Back Office representative to enable this feature.
- Email - If you would like a different "From" email addresses for general emails generated by the system for different Branches, enter the address here.
- We strongly encourage setting up relaying for all "From" email addresses. Relaying can be tested in the Communication > Test area and can be set-up in the Communication > From SMPT area.
- Company Address - This is the address used as the "Remit To" address for invoices associated with this Branch.
- If you would like your company name, tax number, etc. to be included in the "Remit To" address, add the information here. [SAME_AS_FIRM] will pull the address as is exactly appears from Settings > Company Information.
- QuickBooks File Path - If integrated with MULTIPLE server based QuickBooks applications, entering the QB File Path here will allow the systems to connect via the WebConnector without QuickBooks being open.
- If you are only integrating with ONE QuickBooks applications, the QB File Path can be defaulted in Settings > Defaults.
- QuickBooks Tax Code True/False - If using QuickBooks and different Branches require different tax codes.
- The system-wide default settings for the QB Tax Codes are maintained by Bullhorn Back Office. Contact your Bullhorn Back Office representative if an adjustment is needed to the system-wide QB Tax Codes.
- Branch App URL - If you would like to direct users to different URLs to log into the system based on the Branches.
- This would be only be used if your Bullhorn Back Office login page is linked to your company's website and you want to provide different website addresses for users to log into the system.
- The system-wide default setting for the App URL is maintained by Bullhorn Back Office. Contact Bullhorn Back Office Support if an adjustment is needed to the system-wide App URL.
- Phone Number - If your branch has a separate phone number, enter it here.
- Date and Currency Format - If you have a branch located in a different country, you can choose the date and currency format for those branches. You can choose between US, UK, and Euro formats.
- Timesheet and Invoice Logo - You can customize the timesheets and invoices for each branch with their own logos.
- If no logos are added to the branch, the logos will be pulled from Settings > Logos.
- Select Save to confirm the changes.
Was this helpful?