Compliance Configuration Guide
Overview
This article for s contains the configuration steps for the , which can be used to manage consent for GDPR, CCPA and other regional data privacy laws.
Looking for the user guide? See Bullhorn Recruitment Cloud Consent Tool User Guide for more information.
Prerequisites
Upgrade to release 2020.01.1 (version 4.1) or higher. Contact support to request an upgrade, if needed.
Configuration Steps
Update Endpoints/Remote Site Settings
Lightning: Endpoints/Remote Site Settings
-
Go to Setup > Custom Settings > Properties > TalentRover Nova API Host and enter "https://alleo.talentrover.com/".
-
Go to Setup > Remote Site Settings > New and create a Remote Site Setting record with the following values:
-
Remote Site Name: Enter "Consent"
-
Remote Site URL: Enter "https://alleo.talentrover.com/"
Admin Note: If you are testing the in a Sandbox, enter "https://alleo-sandbox.talentrover.com/" instead.
-
Classic: Remote Site Settings
- In Classic, go to any tab then to the URL bar.
For details how to switch to Classic, see View Profile in Bullhorn Recruitment Cloud Layout and Navigation
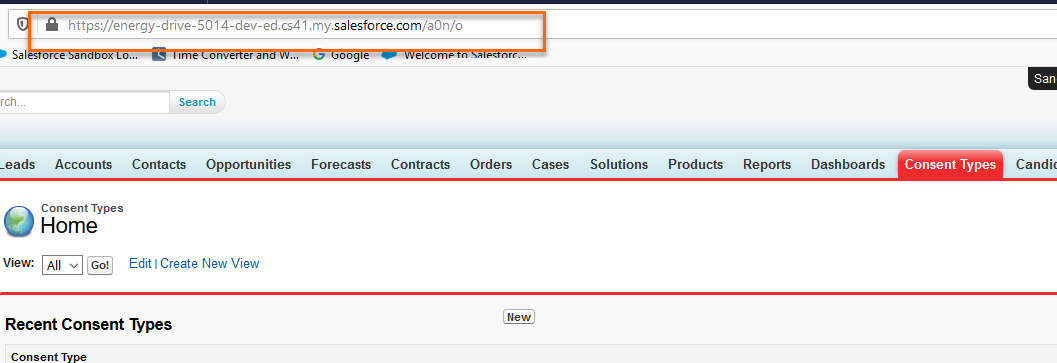
-
Add apex/apex after salesforce.com/

-
Click enter to get a new URL that contains a Visualforce reference.
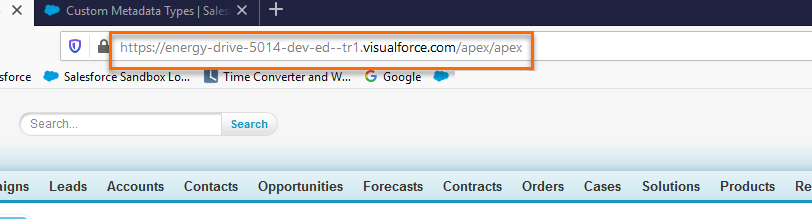
-
Copy the URL up to visualforce.com (without /apex/apex).
-
Go to Setup > Remote Site Settings > New and create a Remote Site Setting record with the following values:
- Remote Site Name: Enter "Consent"
- Remote Site URL: Paste the URL copied from above here.
Enable Consent in Custom Settings
- Navigate to Setup > Custom Settings > Properties and click Manage.
- Check Enable New Consent Model to activate this feature.
You do have the option of checking Enable Log Module if you want the system to generate Log records when errors occur. The logs will be stored in the Debug Log object, and you may need to make the Tab visible at a profile level.
Debug logs can grow, so keep an eye on them. For more details, see Logging Best Practices
Configure Global Picklists
Configure a Consent Type record to either create an association between the record and the type of law it is used for or capture the answers selected by Candidates.
- Navigate to Setup > Objects and Fields > Picklist Value Sets.
- Add/remove values from the Privacy Laws Global Picklist as required. This picklist is used on Consent Type records to create an association between the Consent Type record and the type of law it is used for ( or ).
- Add/remove values from the Privacy Law Answer Options Global Picklist as required. This picklist is used on Consent Type records to capture the answers selected by Candidates on the Public Page.
Add a Logo for the Public Page
- Switch to Classic for this step.
- For details how to switch to Classic, see View Profile in Bullhorn Recruitment Cloud Layout and Navigation
- Go to the Document tab and upload the logo that will be displayed on the public page form.
- Make sure to tick the Externally Available Image checkbox.
- Record the Record ID of this document. You will need to enter it in the Logo Document Id field when you are completing the section Configure the Consent Configuration Custom Metadata Type.
Add a FavIcon Logo for the Public Page
- Switch to Classic for this step.
- For details how to switch to Classic, see View Profile in Bullhorn Recruitment Cloud Layout and Navigation
- Go to the Document tab and upload the small logo that will be displayed on the browser tab for the public page.
- Make sure to tick the Externally Available Image checkbox.
- Record the Record ID of this document. You will need to enter it in the FavIcon Document Id field when you are completing the section Configure the Consent Configuration Custom Metadata Type.
Add the Consent Page and Request Consent Button
Lightning: Add the Consent Page
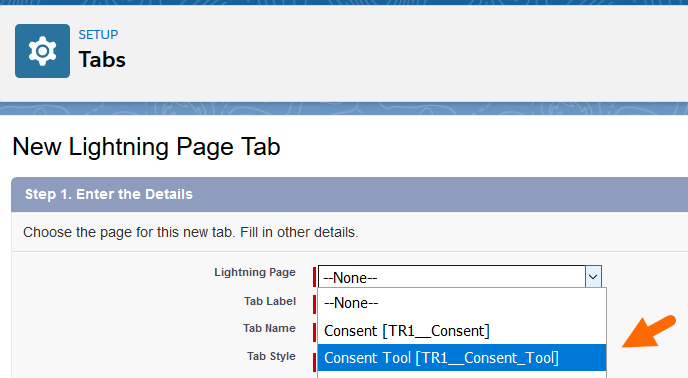
In Setup > Tabs, create a Lightning Page tab using the Consent Tool [TR__Consent_Tool] option. You might need to make it visible to user profiles as required.
Lightning: Add the Request Consent Button on Contact Records
- Go to Setup > > Object Manager > Contacts > Page Layouts.
- For your the page layout you'd like to add the Consent button to, click the dropdown and select Edit.
- Select Mobile & Lightning Actions in the top panel.
- Drag and drop the Request Consent button onto the Mobile and Lightning Experience Actions area of the page detail and Save."
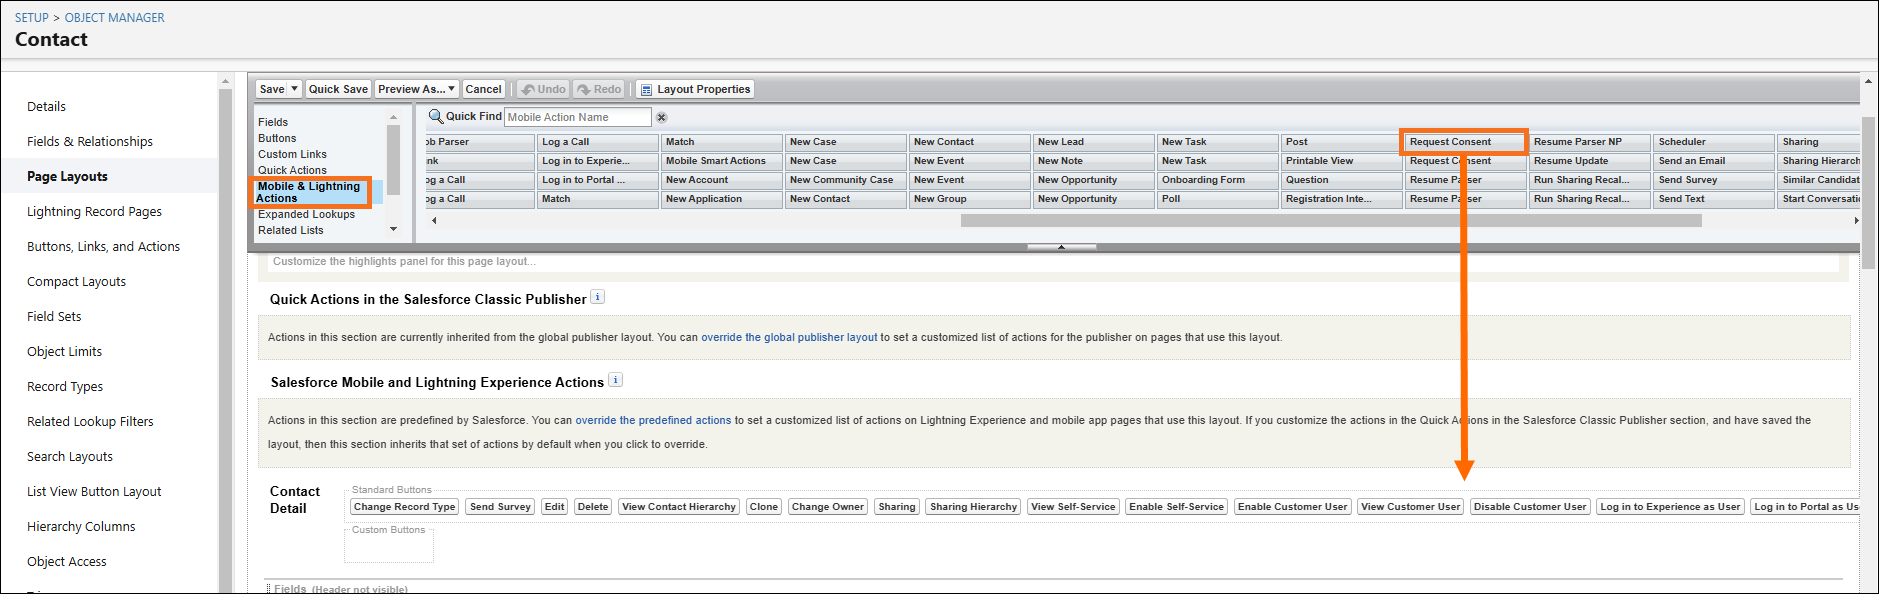
If you would like to add the Request Consent button to multiple page layouts, repeat this process for each one.
Classic: Add the Consent Page
For Classic, before you can add the Request Consent Button on Contact Records, you must first add the Consent page.
For details how to switch to Classic, see View Profile in Bullhorn Recruitment Cloud Layout and Navigation
- Go to Setup > Build > Create > Tabs > Visualforce Tabs.
- Click on New.
- In the Visualforce Page dropdown select CT_ConsentClassic.page.
- Enter Consent for the tab label and name, then select a tab style.
- Complete the steps by choosing the profile visibility and to which apps this should be added.
- Click Save.
Classic: Add the Request Consent Button on Contact Records
After you have added the Consent page, you can add the Request Consent button.
- Go to Setup > Object Manager > Contacts > Page Layouts.
- Choose the relevant Contact page layout then click Edit.
- For your the page layout you'd like to add the Consent button to, click the dropdown and select Edit.
- Select Buttons in the top panel.
- Drag and drop the Request Consent button onto the Custom Buttons area of the page detail.
- Click Save.
If you would like to add the Request Consent button to multiple page layouts, repeat this process for each one.
Configure the Consent Configuration Custom Metadata Type
- Go to Setup > Custom Metadata Types > Consent Configuration (API Name: TR1__CT_ConsentV2Configuration__mdt) and click on Manage Records.
- Click on New.
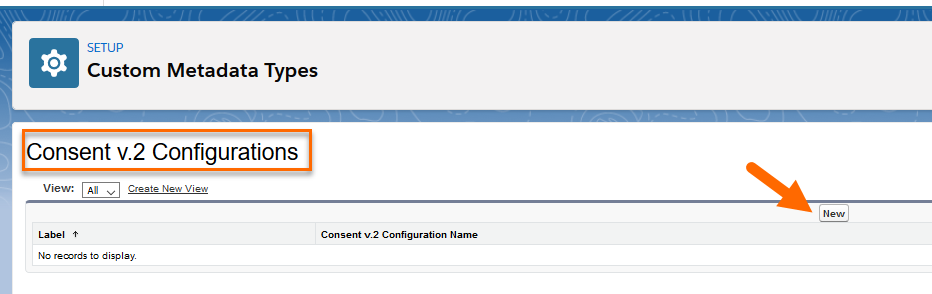
This Configuration Guide focuses on configuring this setting for the . If you are configuring for multiple laws, you will need to create a separate Custom Metadata Type record for each law (one for , one for , etc.)
This table provides the list of fields and how to configure them:
| Section | Field Name | Explanation |
|---|---|---|
| Detail |
Label |
Name of the Metadata Type record (example: Compliance) |
|
Consent Configuration Name |
API Name. IMPORTANT: The API Name must match the Law name used in the Privacy Laws Global Picklist. |
|
| General |
Law Enabled |
Switches on the Consent Module. It's referenced in various backend actions so it needs to be selected if you use Consent Tool. |
|
Default |
When this checkbox is selected, the Privacy Law configured in the Custom Metadata Type record will be the default value in the Select the Law dropdown on the Consent Page. Only one default value is supported. If you have multiple privacy law Custom Metadata Type records, even if you select this checkbox on all of them, the code will only consider the one selected first. |
|
|
Consent Email Template Name |
You can use the package email template or you can use your own template. In either scenario, the template must contain the public page link in this format: a href="NODEJSURL/v2/gdpr/consent?cId={!Contact.Id}&orgId=ORGANIZATIONID&lId=LAWID#googtrans(en|Language)" |
|
|
From Email Address |
You can specify a "From" email address here. If left blank the logged-in user’s email address will be used. |
|
|
Add BCC in Email |
Enable if you want to add a BCC in Email. |
|
|
BCC Email Address |
You can specify a BCC email address here. If left blank the logged-in user’s email address will be used. |
|
|
Contact Email Field Name |
Contact email field referenced when sending the email. |
|
|
Consent Page Language |
Not enabled. |
|
| Contact Creation Filter Criteria |
Send Consent Email on Contact Creation |
Enable if you want the email to be sent every time a new Contact is created, provided the criteria in New Contact Rule Filter is met. Dependent on Law Enabled being selected. |
|
New Contact Rule Filter |
If both Law Enabled and Send Consent Email on Contact Creation are enabled, then the criteria in this field will be checked every time a new Contact is created and the email sent if criteria are met. |
|
| Public Page |
Show Response Text |
When enabled, a free-text box is added under the main section of the public page. If the candidate enters text there it will be captured on the Candidate Consent record in the Response Text field (TR1__Response_Text__c). |
|
Success Message |
Message shown to Candidates after they submit their responses. |
|
|
Candidate Not Found Error Message |
In rare cases, such as if the Candidate record in the was deleted after the email was sent, when the Candidate tries to submit their request, the text entered in this field will be shown on the public page (example: “Sorry, we are unable to process your response”). |
|
|
Link Active Duration |
Number of days the email template link will remain active. |
|
|
Logo Document Id |
Enter the Document Record ID of the image you uploaded in the section Add a Logo to the Public Page. The logo will be shown on the public page. |
|
|
FavIcon Document Id |
Enter the Document Record ID of the image you uploaded in the section Add a Favicon Logo for the Public Page. This will be used as FavIcon on the public page. |
|
|
Consent Form Information |
The text entered here will be used as the Page Title on the public page. |
|
|
Document Public URL |
To get this URL go to the Document tab and locate the Logo Document you are using in the public page then right click on the image to copy the address. |
|
| Consent Page |
List View Prefix |
Use the same Privacy Law name as in the Privacy Laws Global Picklist as a prefix to the name. The value selected in the Select the Law picklist on the Consent page will determine which s are shown on that page. |
Create Consent Type
- Go to App Launcher > Consent Types.
- If it is the first time using this in your , you might need to create a tab and enable it for User Profiles.
- If it is the first time using this in your , you might need to create a tab and enable it for User Profiles.
- In the Consent Types tab, click on New. On the record page layout, you should see the following fields:
Consent Type
Name of the Consent Type
Consent Behavior
Explicit: A response is needed - the public page shows response options (radio buttons or checkboxes).
Implicit: No response required, only text is shown on the public page.
Default Consent Type
If you are configuring an automated action to fire the Consent Email every time certain conditions are met, the that has this checkbox ticked will be used.
Consent Email Body Request
The text that you enter here will be shown to the Candidate on the public page (for example, your Company’s Privacy Policy).
Answer Options*
This picklist value leverages the Privacy Law Answer Options global picklist. You can add/remove values from there.
Privacy Law Name*
This picklist value leverages the Privacy Laws global picklist. You can add/remove values from there.
Consent Format*
Choose Radio Buttons if the questions on the public page require one response exclusively.
Choose Checkbox if the questions on the public page can have multiple answers.
Consent Page Order*
If adding multiple consent types, the number in this field determines in which order they appear on the public page
The Consent Type fields marked with an asterisk (*) have been newly added to the package so when using them for the first time you will need to enable Field Accessibility at the profile level. They are not supported in Consent v1 Tool.
If you have been using Consent v1 and you are switching to this new version, please make sure that all of your existing records have a value selected in the Consent Format field (if Consent Behavior is explicit).
Failure to do so will result in no option at all on the Public page (even if previously present).
Configure Candidate Consent Records
- If this is your first time using Candidate Consent you may need to create a tab for this object and provide object access at profile level.
- Go to Setup > Object Manager > Candidate Consent > Fields & Relationships > Privacy Law Name and give field access at profile level
- Go to Setup > Object Manager > Candidate Consent > Fields & Relationships > Candidate Response and give field access at profile level.
- If you are planning on adding a free text field on the public page you will want to add the Response Text field to the page layout.
- For more details, refer to the Show Response Text field in the table under the section Configure the Consent Configuration Custom Metadata Type.
- Optionally you can add a Candidate Consent Related List to the Contact record.
The Candidate Response field on the Candidate Contact gets updated based on the backend depending on what response is submitted by the Candidate from the Public page.
- If Consent Behavior is set to Implicit on the Consent Type record, this field is updated to Notice Sent when the Email is sent.
- If Consent Behavior is set to Explicit on the Consent Type record, this field is set to Not Responded when the Email is first sent. This field will then get updated with the Candidate’s response when the Candidate selects any of the options on the Public page.
Add Reports to the Consent Page
- Go to Setup > Custom Metadata Type > Consent Report ( TR1__CT_ConsentV2Report__mdt). and click on New.
- You will need to create a separate record for every Report you add.

- You will need to create a separate record for every Report you add.
- Enter a Label and Consent Report Name.
- Choose the name of the related Consent Metadata Type in the Compliance Law lookup field.
- Enter the Record ID of the Report you want to display on the Consent Page.
- Select Save to confirm your changes.
Two reports are included with the package in the - Consent Reports folder on the Reports object. If you wish to use them, create two Consent Report .mdt records and fill in the required fields. These are the Report names, please make sure to clone and customize them as required:
- Candidate Responses by Privacy Law
- Candidates by Privacy Law
Optional Step: Configure Sending the Email Automatically
- Go to Setup > Custom Metadata Types > Consent Configuration and click on Manage Records.
- Go to the Custom Metadata Type record (EX: CCPA) you created for the required privacy law.
- Ensure the checkbox Law Enabled is selected.
- Check Send Consent Email on Contact Creation.
- In New Contact Rule Filter enter the criteria for the email to be fired automatically when a new Contact is created.
- Select Save.
Optional Step: Assign Users to a Permission Set
The packaged Consent Tool V2 User Permission Set assigns the permissions listed below to users.
Objects
- Candidate Consents (Read, Create, Edit, Delete)
- Consent Types (Read, Create, Edit, Delete)
Apex Class Access
- TR1.CT_ConsentCoreAsync
- TR1.CT_ConsentCoreUtil
- TR1.CT_ConsentTriggerHandler
- TR1.CT_LawChartsController
- TR1.CT_LawSelectorController
- TR1.UtilityLogger
Visualforce Page Access
- TR1.CandidateConsentRequest
- TR1.CT_ConsentClassic
To tailor the Consent Tool V2 User Permission Set to fit your organization's needs, clone the permission set and then modify it by adding or removing the desired permissions.