Admin: Power Notes Configuration
This article is intended for System Administrators. For information on how to use Power Notes see Power Notes.
Overview
Power Notes use the standard Salesforce Task object and create records with a Power Note record type as a more flexible way to log notes and memos than what is available through Salesforce Activities and Notes. Power Notes provides the ability to add notes to multiple objects using templates and includes a viewer that consolidates the notes better than the standard Salesforce Activity Timeline screen.
Power Notes tasks are visible in the Power Notes viewer rather than the Activity Timeline. Logged in users will see Power Notes they’ve created on their Tasks page. This article covers how to configure Power Notes.
Prerequisites
- The Org must use Bullhorn Recruitment Cloud release 2021.07 or newer
- Salesforce Lightning
- data model is enabled
- is enabled
Configuration Steps
Permission Sets
Assign the Power Notes Admin permission set to the users who are responsible for the Power Notes Setup and future configuration. Assign the Power Notes User and GenericLookup User permission sets to the users who will use Power Notes.
- Go to Setup > Permission Sets and choose the relevant permission set.
- Click on the Manage Assignment button.
- Select desired users and click on the Add Assignments button.
- Repeat for each necessary permission set.
Power Notes Custom Setting
Confirm the default custom setting has been created.
- Go to Setup > Custom Settings > Power Notes.
- Confirm the Default Organization Level Value is displayed.
- If it is not there, execute this script in the Developers Console: Copy
TR1.PowerNotesUtility.createOrgDefaultCustomSetting();
- If it is not there, execute this script in the Developers Console:
Power Notes Subjects
Confirm the default Power Notes Subjects are created.
- Click the Salesforce App Launcher and choose Power Notes Subjects.
- Switch to the All List View and confirm there are records present.
- If the list is empty either create the records manually or execute the following Apex Code in Developer Console to generate the standard Subjects:Copy
TR1.PowerNotesUtility.createDefaultSubjects();
- If the list is empty either create the records manually or execute the following Apex Code in Developer Console to generate the standard Subjects:
Read Only
To mark a Power Note as Read Only see Admin: Configure Read Only for Power Notes.
For details on how to add Read Only to a Power Note record, see How to Set Read Only for Power Notes Subject.
Bulk Action Definition
Confirm that the Bulk Action Definition record for Power Notes is created.
- Click the Salesforce App Launcher and choose Bulk Action Definitions.
- Confirm there is a record called Create Power Note.
- If the record does not exist, create the record manually using ATSv2_BulkCreatePowerNoteHandler as a handler or execute the following Apex Code in the Developer console:Copy
TR1.PowerNotesUtility.createBulkActionDefinitionRecord();
- If the record does not exist, create the record manually using ATSv2_BulkCreatePowerNoteHandler as a handler or execute the following Apex Code in the Developer console:
Add Create Power Note to the ATSv2 Action Menu
Enable the Create a Power Note Action for for each Job’s record type.
- Go to Setup > Custom Metadata Types > ATS Action Configuration and click on Manage Records.
- Click Edit next to the record that starts with Create Power Note + {JOB RECORD TYPE NAME}.
- Mark the Active checkbox and click Save.
- Repeat for other Job Record Types.
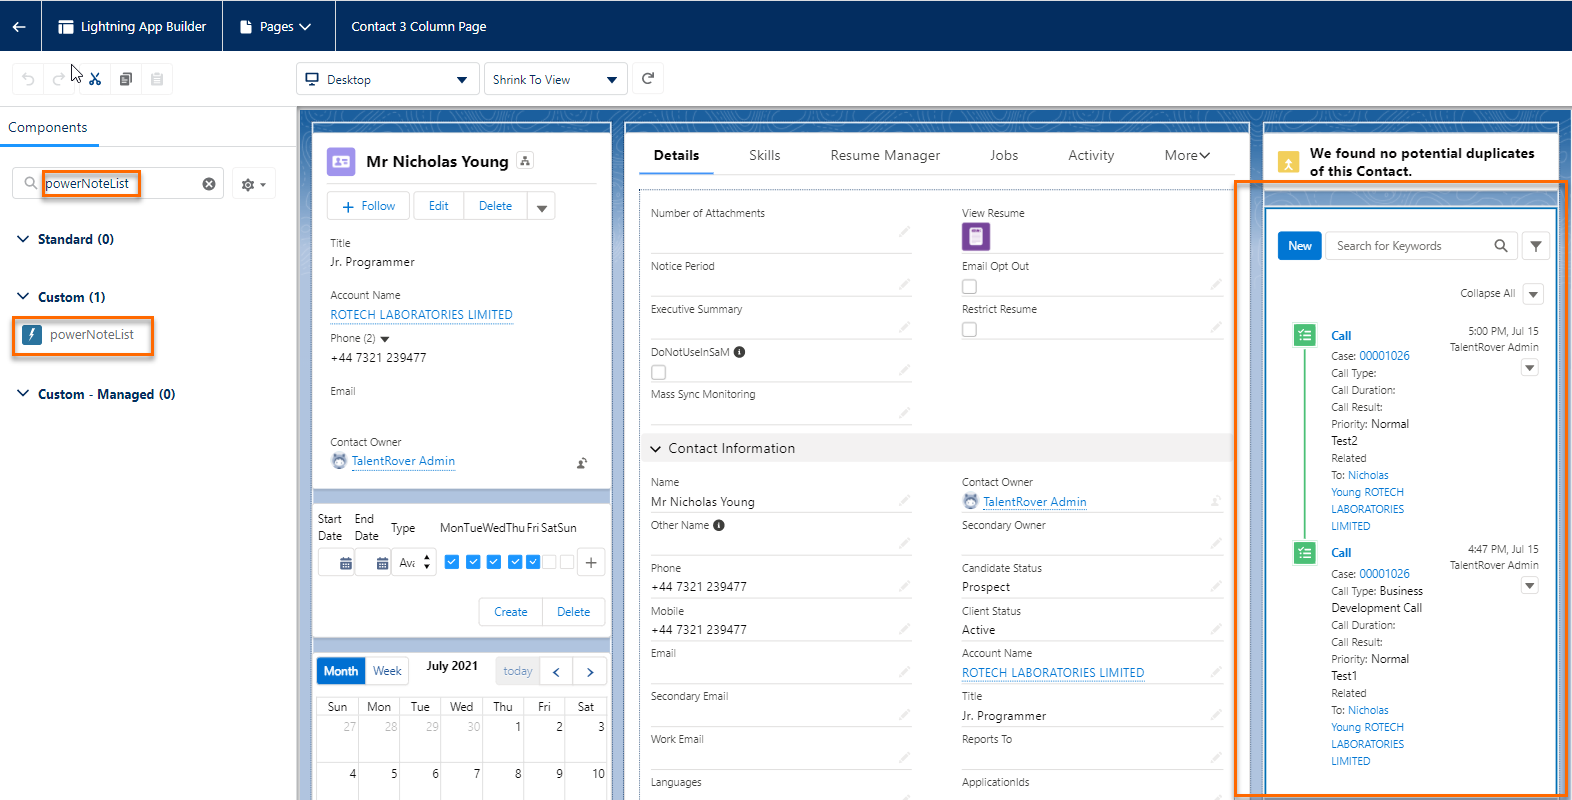
Add the Power Notes Component to Page Layouts
Drag and drop the powerNoteList component to the desired object's detail page in the Lightning App Builder and Save.
Power Notes Supported Object Custom Metadata Type
The .mdt records are configured out of the box for the five objects supported by default:
- Account
- Application
- Candidate/Client
- Job
- SendOut Schedule 2
To use Power Notes with Account, Contact, or Job records, create corresponding lookup relationships on the Salesforce Activity Object. Salesforce limits the standard Activity object to a single look-up relationship with each other Object. If there is already an existing lookup relationship you can use the existing fields.
- Go to Setup > Object Manager > Activity.
- Check if look-up relationship fields already exist for Account, Contact, or Job. If they do, use those fields, otherwise continue.
- Create a new corresponding relationship field on Account, Contact, and Job using these parameters:
- Data type = Lookup Relationship
- Related to = {parentObjectNameToUseWithPowerNotes}
- Do not mark the field as required
- Enter description/help text
- Go to Setup > Custom Metadata Types.
- Choose Power Notes Supported Object and click Manage Records. Complete the following steps for Account, Contact, and Job, if relationship fields are in use
- Mark the Active checkbox
- Populate the lookup relationship API name for each record. This can be found when viewing details for the newly created fields on the Activity Object.
- Click Save.
Power Notes Supported Object Custom Metadata Record Fields
These are the fields included on the Custom Metadata Type Power Notes Supported Object record.

Label: Label/name of metadata record
Power Notes Supported Object Name: API name of metadata record
Object name: API name of the object that the Task will be related to.
Task Field Name: API name of the field used on the Related lookup. It will determine what users see here:
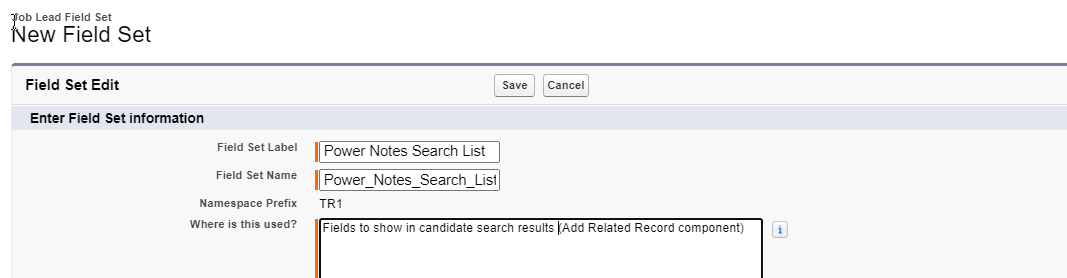
Fieldset search list: API name of the fieldset that controls which fields are shown in the lookup field drop-down.
- If this field is defined but the specified fieldset has no fields in it then the results fields will be shown using the standard Name field.
- If this field is empty then the results fields will be shown using the standard Name field.
- If this field is defined but the specified fieldset doesn't exist in the org the user will see an error message.
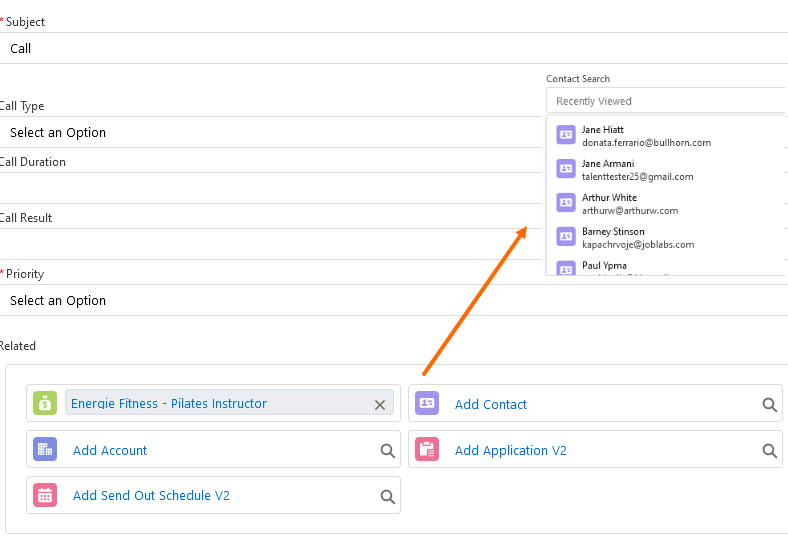
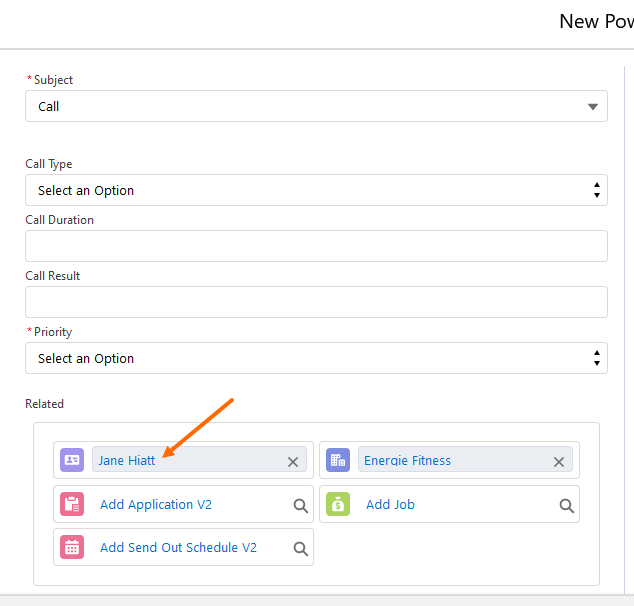
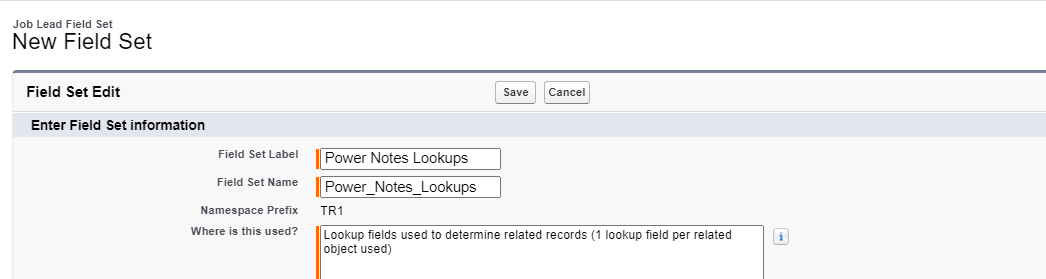
Fieldset lookups fields: API name of the fieldset that controls which lookup fields are being prepopulated in the Related section. One lookup field per related object is supported. If the fieldset contains more than one field for the same object, only the first one listed will be used. Configuration Example:
- When creating a Power Note in ATSv2, have the name of the selected Candidate display in the Contact lookup field.
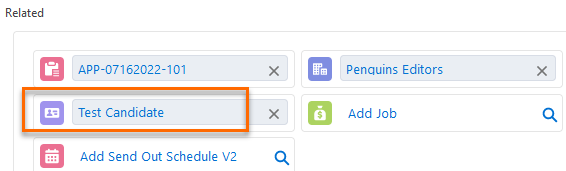
- Configure the Field Set like this:
Active: When enabled, this shows the related lookup on the New Power Note screen.
Icon Name: The name of the Icon to display with the lookup field in the Related section.
- The supported Lightning Design System names can be found on https://www.lightningdesignsystem.com/icons/. They are written in the format 'utility:down' where utility is the category, and down is the specific icon to be displayed.
SObject API Names To Display: This shows supported Objects. If it is blank (it will be for records configured out of the box) the related lookup is shown on all supported Objects.
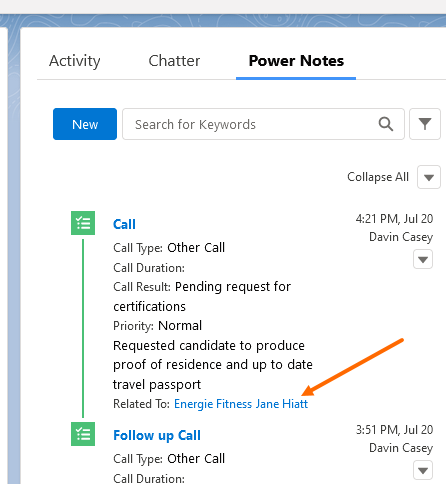
WhoId and WhatId Task Lookup Support
The Task Field Name field holds the API name for a custom lookup (TR1__Job_Lead__c) in the examples in this article. You can also use the existing standard Task fields: WhoId and WhatId.
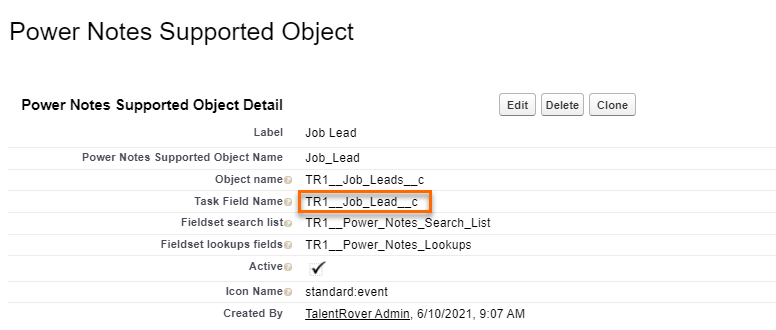
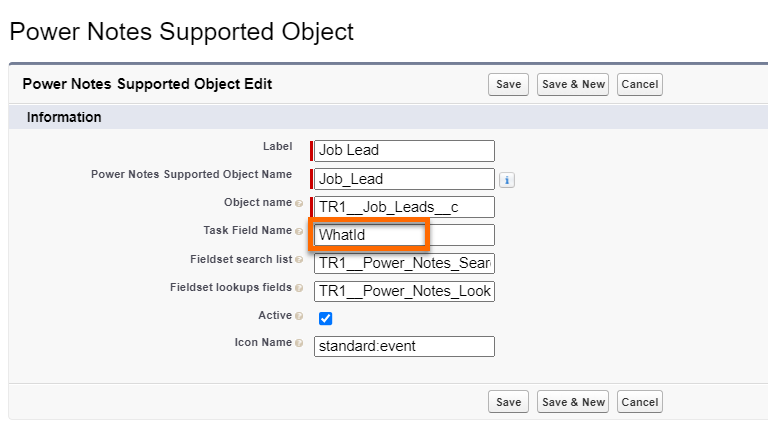
The WhoId field has a Name label and can only refer to a Lead or Contact. WhatId is labeled Related To and can refer to any custom object's records as well as supported standard objects. See Salesforce Documentation for information about limitations.
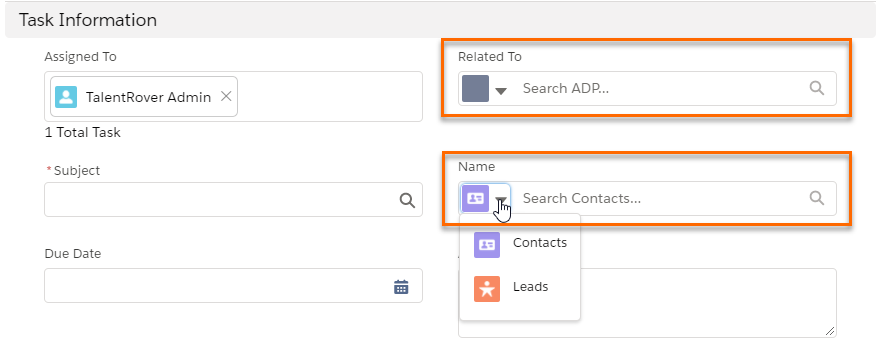
If WhoId/WhatId standard fields are used in the configuration, the task records created are shown in both Salesforce’s standard activity timeline component and under the Power Notes tab.
Enable Power Notes on Other Objects
Power Notes supports five objects by default:
- Account
- Application
- Candidate/Client
- Job
- SendOut Schedule 2
To enable Power Notes to support other objects, use the steps below
Add a New Custom Metadata Type Record.
Add a new record to the Power Notes Supported Objects Custom Metadata Type.
- Go to Setup > Custom Metadata Types and click Manage Records on the Power Notes Supported Object.
- Click New.
- Fill out these fields
- Label: Name of the Metadata Record
- Power Notes Supported Object Name: System API name of the current metadata record
- Object name: API name of the Object the Task relates to.
- Task Field Name: API name of the field to display in the Related lookup section of the New Power Note screen.
- Fieldset search list: API name of the Fieldset on the related object containing fields to show in search results. Used by the Related component on the New Power Note screen.
- Fieldset lookups fields: API name of the Fieldset on the related object containing lookup fields used to determine related records when opening the New Power Note screen. One lookup field per related object is used.
- Active: Controls if the related lookup is active and displayed on the New Power Note screen Related section.
- Icon Name: The name of the Icon to display with the lookup field in the Related section.
- The supported Lightning Design System names can be found on https://www.lightningdesignsystem.com/icons/. They are written in the format 'utility:down' where utility is the category, and down is the specific icon to be displayed.
- Click Save.
- This example shows how to enable the Job Lead object for Power Notes.
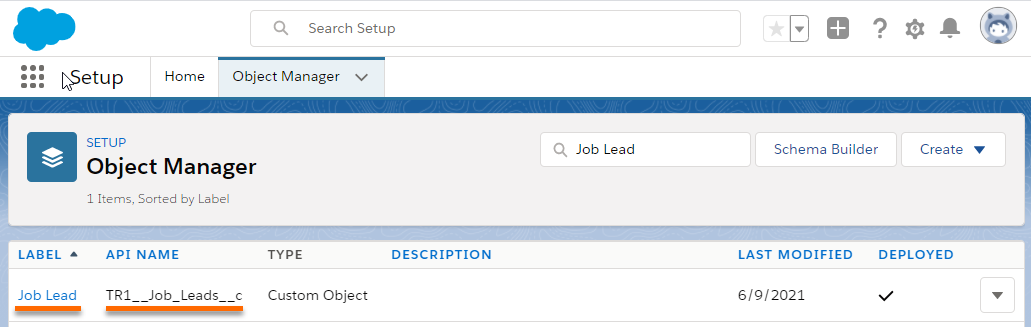
- Create a new Power Notes Supported Object custom metadata record and Save.
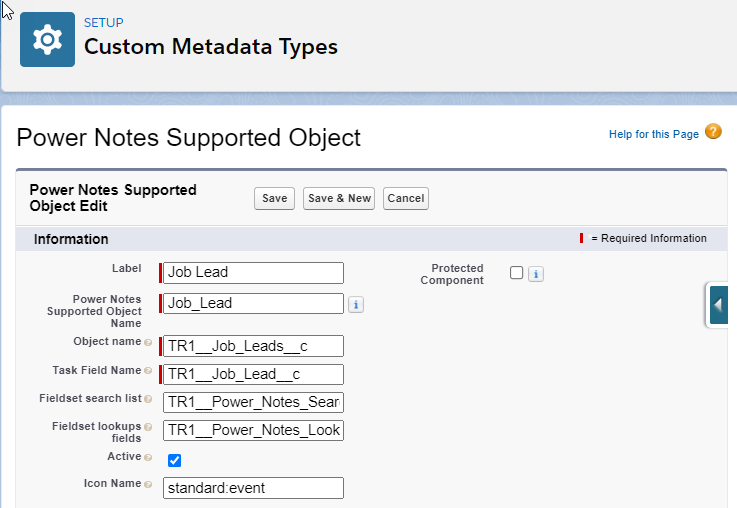
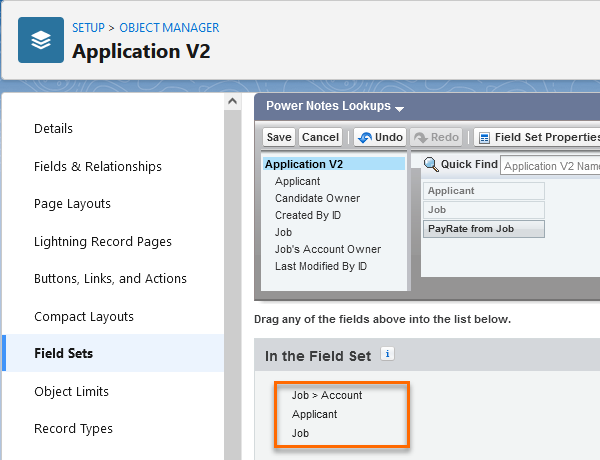
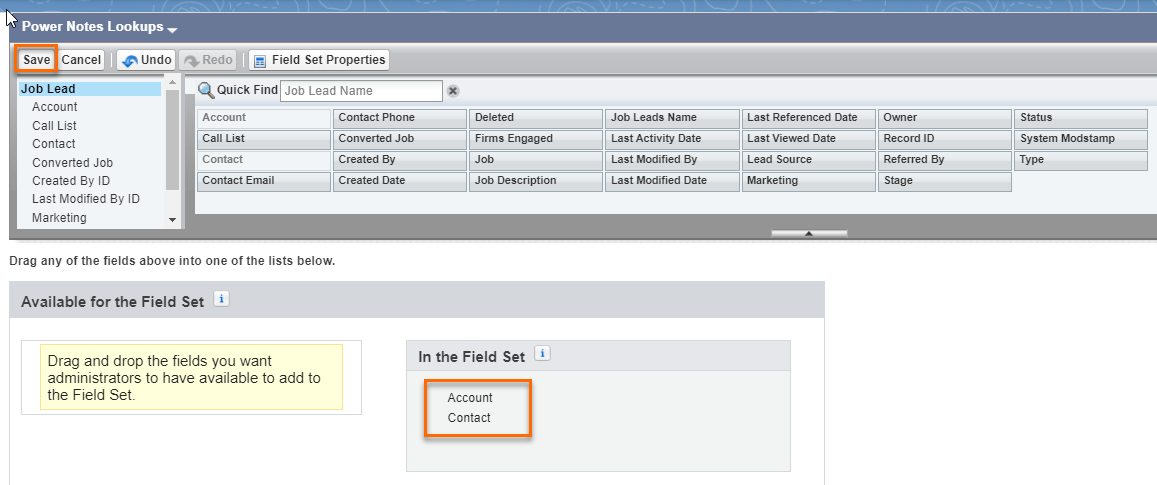
- Create two fieldsets to enter in the custom metadata record. The example shows TR1__Power_Notes_Search_List and TR1__Power_Notes_Lookups. Go to Setup > Object Manager > Job Lead then choose Field Sets and click New.
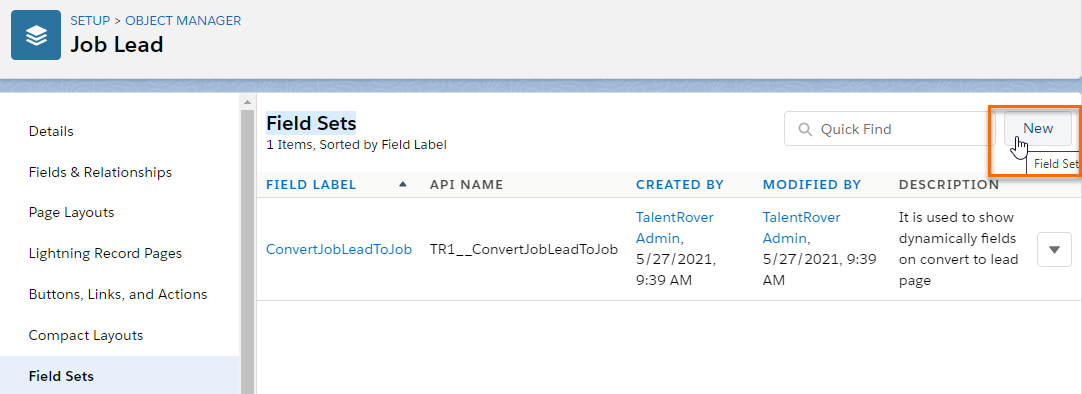
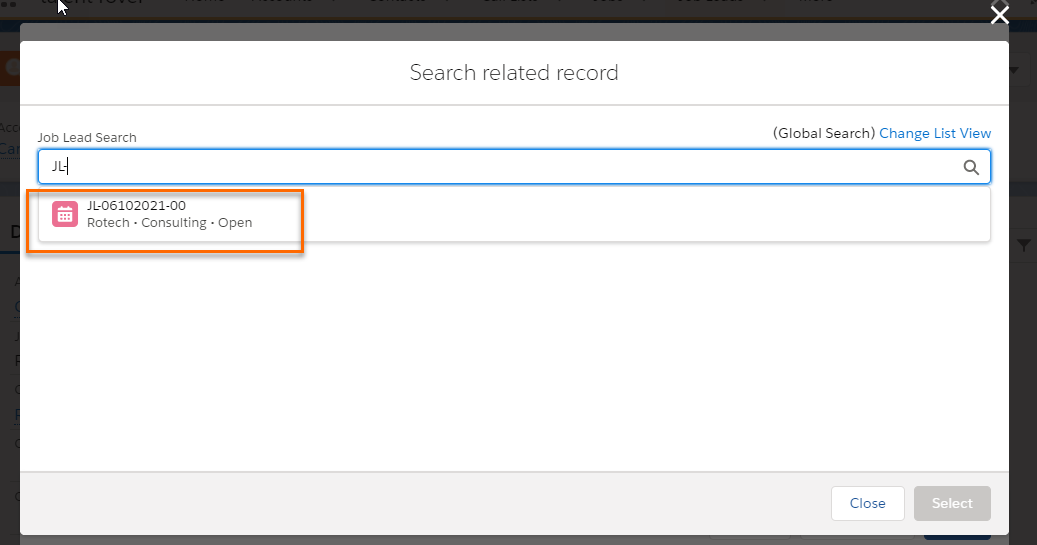
- Drag and drop the desired lookup fields to the fieldset to have them automatically pre-populate in the Related section of the New Power Note screen then Save. Only one lookup field per related object is supported.
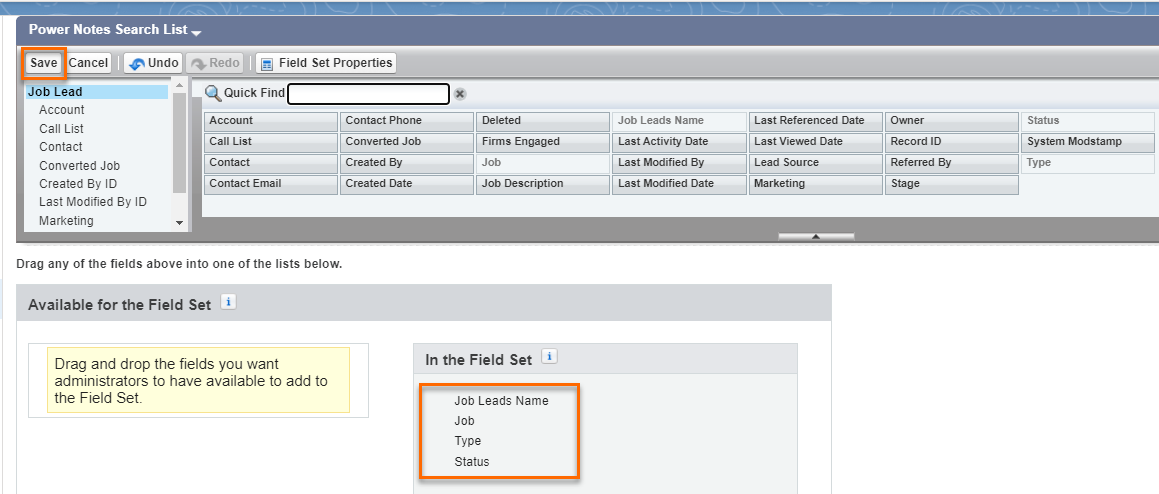
- Add the second fieldset in the same way. This field set contains the fields to be shown in the search results when performing a lookup on the New Power Notes screen Related section.
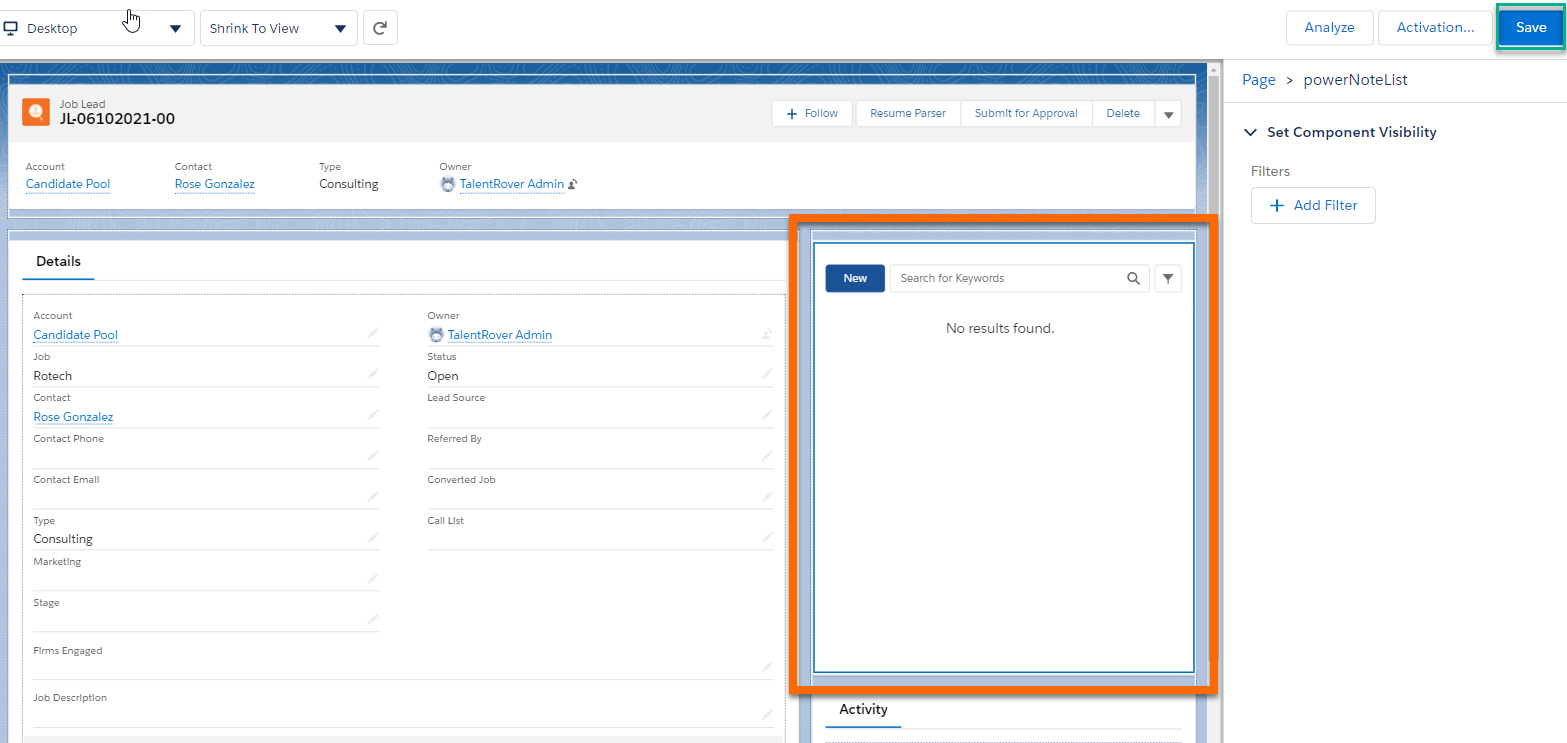
- Go to a Job Lead record page then click Edit Page to launch the Lightning App Builder.
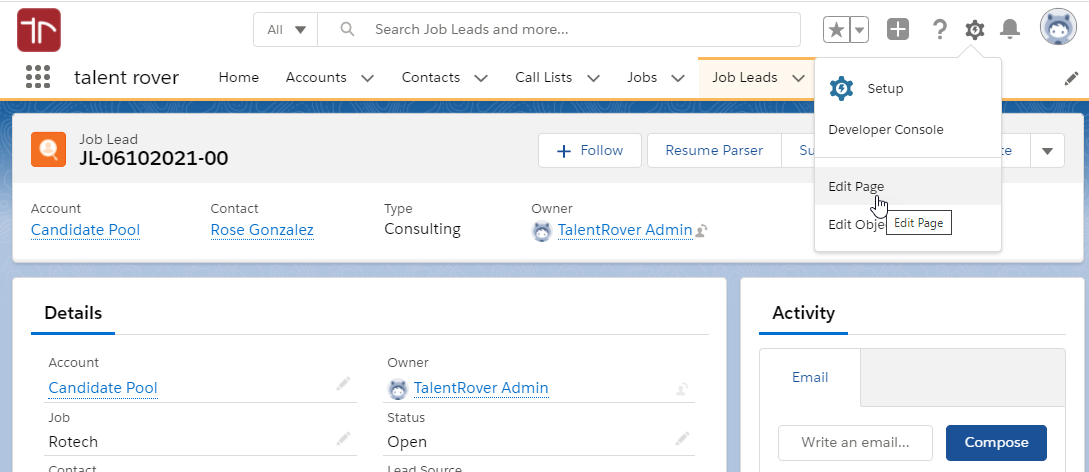
- Drag and drop the powerNoteList component to the page and click Save.
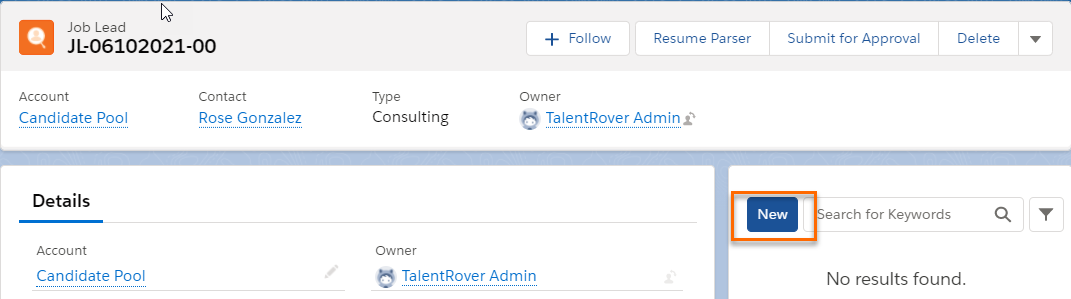
- Click the New button on the newly added Power Notes component.
- Confirm that the fields displayed match the fieldset you created earlier.
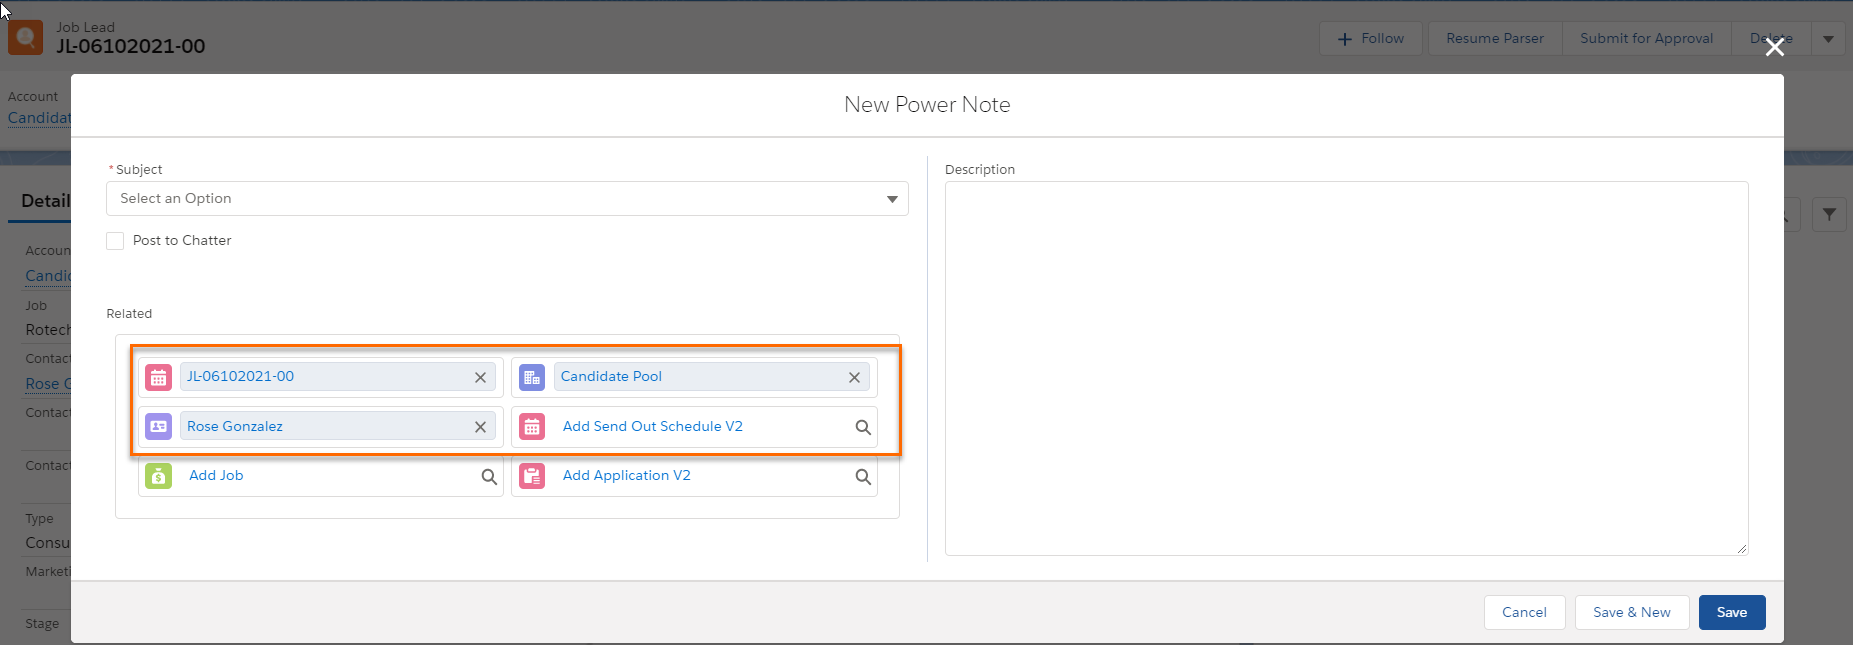
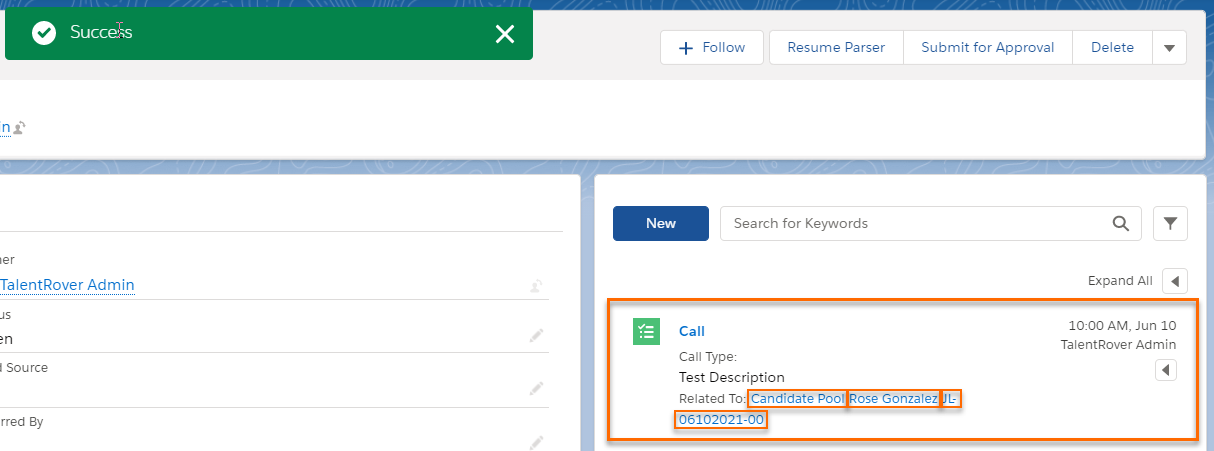
- Try removing the pre-populated related records and search for another record to confirm the second fieldset is working as expected.


- Fill out and save the power note and confirm the related records are displayed as expected on the new Power Note.
Embedding Power Notes into Custom Flows
The global newPowerNoteWrapper Lightning Web Component (LWC) is used to embed Power Notes into Custom Flows. This component subscribes to powerNoteExecute Lightning Message Service and expects parameters to pre-populate Subject, the Task fields that make up the Power Note form and Description (Rich Text area from the right side).
Structure
{
                messageData : {
                sourceIds: sourceIds,
                prePopulationObject: {Subject: “Call”},
                disableModalBackdrop: true
                }
}- messageData: The only field in powerNoteExecute. This object stores all required parameters.
- sourceIds: Array of Power Notes Supported Object Ids. Be sure that TR1__Power_Notes_Supported_Object__mdt record is Active for this Id type. This is required field.
- prePopulationObject: Object containing Task field-value pairs. Each key is Task (Activity) API Name. If you do not pass this parameter, the Power Note modal will open with no field pre-populated.
- disableModalBackdrop: Set this property to true to disable double modal background dimming. If you do not pass this parameter, the default value is false.
Excecution
- Embed newPowerNoteWrapper LWC in the desired Application (Component). It can only be embedded in an Aura component if Lightning Web Security is not activated in the org.
- Collect pre-population data and the publish message using powerNoteExecute Lightning Message Service packaged in Bullhorn Recruitment Cloud (TR1).
Add the lightning:messageChannel import tag to the component markup. Add TR1:newPowerNoteWrapper (lightning message listener and the component host).
auraButton.cmp
<aura:component implements="flexipage:availableForAllPageTypes,lightning:availableForFlowScreens">
   <lightning:messageChannel type="TR1__powerNoteExecute__c" aura:id="powerNoteExecuteChannel"/> <!-- DO NOT FORGET TO ADD "TR1__" PREFIX -->
   <center><h1><b>Aura Buttons</b></h1></center>
   <lightning:button variant="brand" class="slds-p-around_x-small" label="Create Call Note" onclick="{!c.createCallNote}" />
   <lightning:button variant="brand" class="slds-p-around_x-small" label="Create Interview Note" onclick="{!c.createInterviewNote}" />
   <lightning:button variant="brand" class="slds-p-around_x-small" label="New Interview Note" onclick="{!c.createNewInterviewNote}" />
   <lightning:button variant="brand" class="slds-p-around_x-small" label="New Note" onclick="{!c.createNewNote}" />
<TR1:newPowerNoteWrapper></TR1:newPowerNoteWrapper>
</aura:component>
Implement the lightning message sending to initiate power notes creation. Check the following function implementation examples: createCallNote, createInterviewNote, createNewInterviewNote, createNewNote.
auraButtonController.js
({
   // example of Subject and Note (Task) fields prePopulation
   createCallNote : function(component) {
       let sourceIds = ['0033F00000e4dGTQAY'];
       let prePopulationObject = {
           Subject: 'Call',
           Priority: 'Low',
           CallType: 'Internal',
           TR1__Call_Type__c: 'Other Call',
           Description: 'Loooong description'
       };

       let payload = {
           messageData : {
               sourceIds: sourceIds,
               prePopulationObject: prePopulationObject,
               disableModalBackdrop: true
           }
       };

       component.find('powerNoteExecuteChannel').publish(payload);
   },

   // example of Subject and Note (Task) fields prePopulation
   createInterviewNote : function(component) {
       let sourceIds = ['0033F00000e4dGTQAY'];
       let prePopulationObject = {
           Subject: 'Interview',
           Priority: 'EXTRA',
           CallType: 'Outbound',
           TR1__Call_Type__c: 'Other Call',
           TR1__Brief_Summary__c: 'Other Call',
           Description: 'Some notes'
       };

       let payload = {
           messageData : {
               sourceIds: sourceIds,
               prePopulationObject: prePopulationObject,
               disableModalBackdrop: true
           }
       };

       component.find('powerNoteExecuteChannel').publish(payload);
   },

   // example of Subject prePopulation
   createNewInterviewNote : function(component) {
       let sourceIds = ['0033F00000e4dGTQAY'];
       let prePopulationObject = {
           Subject: 'Interview'
       };

       let payload = {
           messageData : {
               sourceIds: sourceIds,
               prePopulationObject: prePopulationObject,
               disableModalBackdrop: true
           }
       };

       component.find('powerNoteExecuteChannel').publish(payload);
   },

   // example of blank New Power Note
   createNewNote : function(component) {
       let sourceIds = ['0033F00000e4dGTQAY'];

       let payload = {
           messageData : {
               sourceIds: sourceIds,
               prePopulationObject: null,
               disableModalBackdrop: true
           }
       };

       component.find('powerNoteExecuteChannel').publish(payload);
   }
})Add newPowerNoteWrapper LWC component into the custom Aura Component markup.
auraWrapper.cmp
<aura:component implements="lightning:availableForFlowScreens">
   <TR1:newPowerNoteWrapper></TR1:newPowerNoteWrapper>
</aura:component>
Add the buttons to a markup hosted on the same page with the auraWrapper.cmp example.
lwcButton.html
<template>
   <center><h1><b>LWC Buttons</b></h1></center>
   <lightning-button variant="brand" class="slds-p-around_x-small" label="Create Call Note" onclick={createCallNote}></lightning-button>
   <lightning-button variant="brand" class="slds-p-around_x-small" label="Create Interview Note" onclick={createInterviewNote}></lightning-button>
   <lightning-button variant="brand" class="slds-p-around_x-small" label="New Interview Note" onclick={createNewInterviewNote}></lightning-button>
   <lightning-button variant="brand" class="slds-p-around_x-small" label="New Note" onclick={createNewNote} ></lightning-button>
</template>
Implement the lightning message sending to initiate the Power Notes creation. Check the following function implementation examples: createCallNote, createInterviewNote, createNewInterviewNote, createNewNote.
Make sure TR1__powerNoteExecute__c is imported to the component controller.
lwcButton.js
import { LightningElement, wire } from 'lwc';

import { publish, MessageContext } from 'lightning/messageService';
import executePowerNote from '@salesforce/messageChannel/TR1__powerNoteExecute__c';  // DO NOT FORGET TO ADD "TR1__" PREFIX

export default class LwcButton extends LightningElement {

   @wire(MessageContext)
   messageContext;

   // example of Subject and Note (Task) fields prePopulation
   createCallNote() {
       let sourceIds = ['0033F00000e4dGTQAY'];
       let prePopulationObject = {
           Subject: 'Call',
           Priority: 'Low',
           CallType: 'Internal',
           TR1__Call_Type__c: 'Other Call',
           Description: 'Loooong description'
       };

       let payload = {
           messageData : {
               sourceIds: sourceIds,
               prePopulationObject: prePopulationObject,
               disableModalBackdrop: true
           }
       };

       publish(this.messageContext, executePowerNote, payload);
   }

   // example of Subject and Note (Task) fields prePopulation
   createInterviewNote() {
       let sourceIds = ['0033F00000e4dGTQAY'];
       let prePopulationObject = {
           Subject: 'Interview',
           Priority: 'EXTRA',
           CallType: 'Outbound',
           TR1__Call_Type__c: 'Other Call',
           TR1__Brief_Summary__c: 'Other Call',
           Description: 'Some notes'
       };

       let payload = {
           messageData : {
               sourceIds: sourceIds,
               prePopulationObject: prePopulationObject,
               disableModalBackdrop: true
           }
       };

       publish(this.messageContext, executePowerNote, payload);
   }

   // example of Subject prePopulation
   createNewInterviewNote() {
       let sourceIds = ['0033F00000e4dGTQAY'];
       let prePopulationObject = {
           Subject: 'Interview'
       };

       let payload = {
           messageData : {
               sourceIds: sourceIds,
               prePopulationObject: prePopulationObject,
               disableModalBackdrop: true
           }
       };

       publish(this.messageContext, executePowerNote, payload);
   }

   // example of blank New Power Note
   createNewNote() {
       let sourceIds = ['0033F00000e4dGTQAY'];

       let payload = {
           messageData : {
               sourceIds: sourceIds,
               prePopulationObject: null,
               disableModalBackdrop: true
           }
       };

       publish(this.messageContext, executePowerNote, payload);
   }
}
Additional Configuration Options
Option to Hide the New Button
You can hide the New button in the Power Notes component.
- Navigate to the Power Notes component. Click Settings > Edit Page.
- Go to Page > powerNoteList.
- Enable the Hide ‘New’ Button checkbox.
Display Task Records with Various Record Types on the Power Notes List
You can display different task types under the Power Notes component by adding other task record types to the Power Notes Subject object.
Get the Task Record Type Developer Name
- Go to Object Manager > Task.
- Open the Record Types section and click on the label for the appropriate Record Type.
- Copy the Record Type name field value.
Add the Task Record Type Developer Name to the Task Record Type Picklist on the Power Notes Subject Object
- Go to Object Manager > Power Notes Subject > Task Record Type.
- Scroll to the Values section and click on New.
- Paste the Record Type name copied earlier.
- Repeat to add more than one record type.
- The API Name on the picklist must be the same as the Developer Name on the Task Record Type.
A connected app needs to be created to use different record types for Power Notes. Use the drop down below to create a connected app to display multiple task types in Power Notes.
Power Notes needs access to the Metadata API for proper functionality so a Connected App and Named Credentials with the appropriate access is needed.
Create Connected App
- Connected App Name: UI API Connected App
- API Name: UI_API_Connected_App
- Contact Email: Admin email
- Enable OAuth Settings: Checked
- Callback URL: {your_domain}/services/authcallback/UI_API_Auth
- To find the proper domain name open Developer Console and copy it from the address bar.
- Final URL Example: https://customer-flow-4368-dev-ed.my.salesforce.com/services/authcallback/UI_API_Auth)
- Selected OAuth Scopes: Full access (full), Perform requests at any time (refresh_token, offline_access)
- Require Secret for Web Server Flow: Selected
- Require Secret for Refresh Token Flow: Selected
Create Auth. Providers Record
- Provider Type: Salesforce
- Name: UI API Auth
- URL Suffix: UI_API_Auth
- Consumer Key: Copy from UI API Connected App
- App Manager > UI API Connected App > View > Manage Consumer Details
- Consumer Secret: Copy from UI API Connected App
- Default Scopes: Full refresh_token offline_access
- Include Consumer Secret in API Responses: Selected
Create Named Credential
- Label: UI API Creds
- Name: UI_API_Creds
- URL: {your_domain}
- To find the proper domain name open Developer Console and copy it from the address bar.
- Example URL: https://customer-flow-4368-dev-ed.my.salesforce.com/
- Identity Type: Named Principal
- Authentication Protocol: OAuth 2.0
- Authentication Provider: UI API Auth
- Scope: Full refresh_token offline_access
- Start Authentication Flow on Save: Selected
- Generate Authorization Header: Selected
- Allow Merge Fields in HTTP Body: Selected
After clicking the Save button you will be redirected to the login page. Input your credentials and then allow access to the requested source. If you receive any errors wait 5-10 minutes. The Authentication process can fail as the Connected App creation takes 10 minutes.
Configure Default Subject Values for Tasks
Power Notes Subject is a mandatory picklist that shows a set of predefined values, so any Power Notes shown under the Power Notes component displays with one of these predefined values.
If your Org is set up to display other Task types along with Power Notes in the Power Notes component, users may see unfamiliar subject lines. A Power Notes Default fieldset has been included to add the required subject to the other Task types in case they weren't correctly configured.
Configuration Steps
- Go to Setup > Object Manager > Task Object > Field Sets.
- Configure the Power Notes Default fieldset.