Using the Transaction Uploader
The Transaction Uploader is a Tool used to efficiently upload candidate time, units, or hours directly into (BTE) via a spreadsheet. Transaction Uploader is accessed through BTE, and three standard templates are available for uploads. Learn more about how to use and work with the Transaction Uploader below.
Contact Bullhorn Support to request the Transaction Uploader be enabled.
Using Templates
There are three types of templates that can be used for the upload: Standard (Weekly), Daily and Ins/Outs. Each one provides a list of candidates or placements that are active within a selected period.
Download the templates here.
Expense Codes cannot be added using the Transaction Uploader.
The Standard Template is used to upload weekly totals to
.
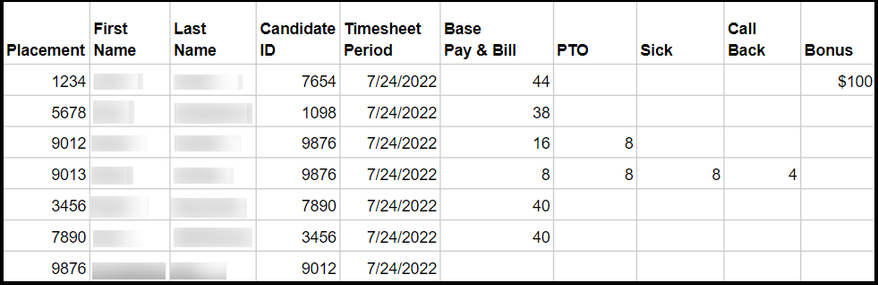
This template has the following columns prefilled:
- Placement
- First Name
- Last Name
- Candidate ID
- Pay Period
- Trans Date
The following headers are available to be filled in:
- Earn Code
- Base Pay/Bill Quantity
- Pay Rate
- Bill Rate
- If no Earn Code is listed, this will load with the base Earn Code.
- Pay Rate and Bill Rate headers can be used to allow entry of Earn Codes not on the placement's Rate Card. This can be done to designate a specific pay or bill rate.
The Daily Template is used to upload daily totals to
.
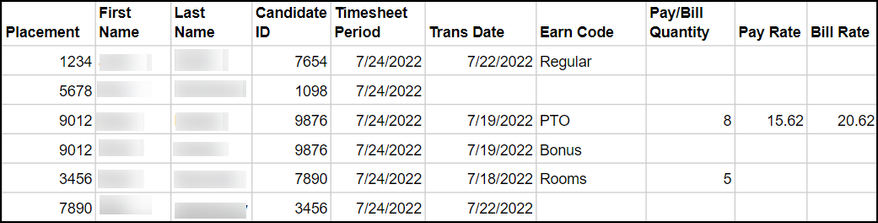
This template has the following columns prefilled:
- Placement
- First Name
- Last Name
- Candidate ID
- Pay Period
- Trans Date
Only one row will be created per candidate. Additional rows will need to be manually created.
The following headers are available to be filled in:
- Earn Code
- Pay / Bill Quantity
- Pay Rate
- Bill Rate
- If no Earn Code is listed, this will load with the base Earn Code.
- Pay Rate and Bill Rate headers can be used to allow entry of Earn Codes not on the placement's Rate Card. This can be done to designate a specific pay or bill rate.
The Ins/Outs Template is used to upload daily punches or daily times
to .
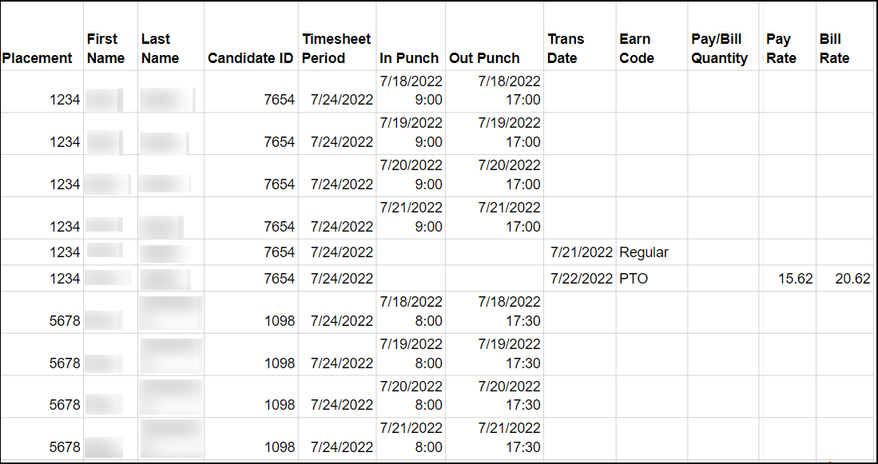
This template will have these columns prefilled:
- Placement
- First Name
- Last Name
- Candidate ID
- Pay Period
There will be seven rows created for each candidate. Rows can be added or deleted as needed.
The following headers are available to be filled in:
- In Punch
- Out Punch
- Trans Date
- Earn Code
- Pay/Bill Qty
- Pay Rate
- Bill Rate
- If no Earn Code is listed, this will load with the base Earn Code.
- Pay Rate and Bill Rate headers can be used to allow entry of Earn Codes not on the placement's Rate Card. This can be done to designate a specific pay or bill rate.
Using the Transaction Uploader
The Transaction Uploader can be used to upload any Earn Codes that are present at the corp level, even if they are not present on the Rate Card. The rate on the Rate Card will always be considered the source of truth:
- If the Earn Code exists on the Rate Card, the system ignores the Pay Rate and Bill Rate from the uploader and uses the rate on the Rate Card.
- If there is an Earn Code in the uploaded file that is not on the Rate Card, the system accepts Pay Rate and Bill Rate from the uploader as long as the Earn Code exists at the corp level.
- In , navigate to Tasks > Transaction Uploader.
- Select the file to upload. CSV is the only supported file type.
Transaction Uploader accounts for Daylight Savings Time (DST) when employees work across the time change in either Spring or Fall in DST eligible states.
-
Choose the Upload Preferences:
- Distribution of Transactions: For Standard Templates, choose if the transactions should be distributed across the days or on one day. If distributed across days, select the specific days.
- Compare Against Existing Transaction: Check the
transactions using the points below.
- Ignore file transactions if placement transactions exist.
- Add transactions on file regardless if transactions exist.
- Modify existing timesheet to respect totals on file.
- Approval Status: Choose the Approval Status of the
transactions you're uploading. Loading transactions as
Approved allows you to skip the manual approval process.
- Load All Transactions As Approved: Saves time by skipping the normal approval process workflow.
- Load All Transactions As Unapproved: If time is uploaded as unapproved, employees using WTE can reopen the timesheet and the uploaded time will still show in their UI.
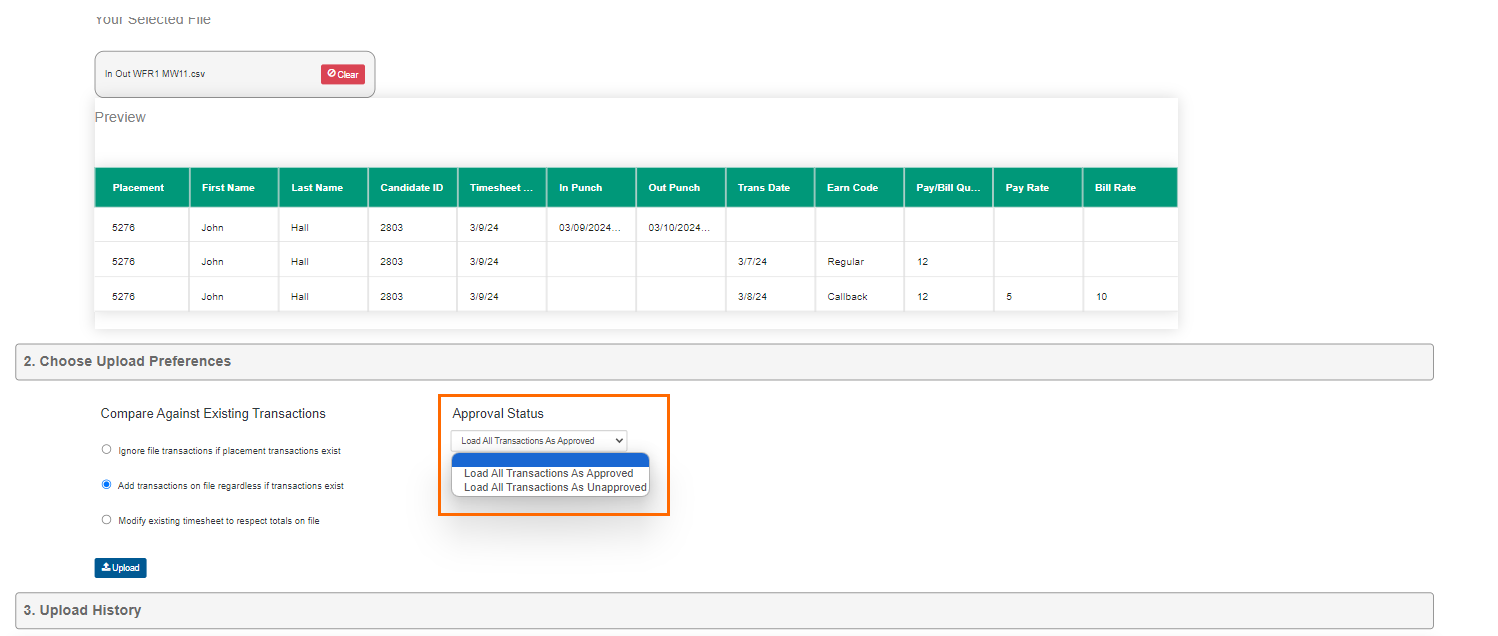
- Select Upload.
Upload History
The Upload History section will show the status of the uploads that
have been made.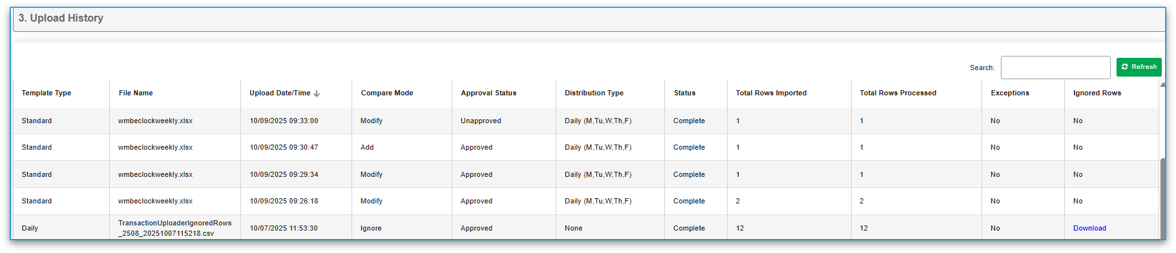
Upload History includes the following information:
- Template Type
- File Name
- Upload Date/Time
- Compare Mode
- Approval Status
- Distribution Type
-
Status
- Validating: The system is checking the format of the upload. It has not begun processing yet.
- Processing: The data in the upload is processing.
- Calculating: Timesheets are being evaluated for rules.
- Complete: The upload is successfully completed.
- Exceptions: See Transaction Uploader Exceptions Report for more information.
- Total Row Imported
- Total Row Processed
- Exceptions
- If there are exceptions, a link will appear in this column.
- Ignored Rows
- The row will include a link in this column if there are ignored rows and Ignore file transactions if placement transactions exist was chosen.