Translating a Document into a Different Language
Overview
This article covers how to create versions of onboarding documents in other languages that can be sent to employees based on their preferred language preference.
Supported languages include:
- English (default language)
- Dutch
- French
- German
- Spanish
Before You Begin
Permissions
You must have the proper permissions in order to adjust the preferred language setting. See Admin Permission for Document Languages for more information.
- If the permission is not available, please contact support to confirm that the Document Languages feature is enabled.
When creating document translations, you can only create one child document in each of the available languages.
- The Language dropdown on the translation modal will only show the unused options.
- Used languages will be grayed out.
- The Create New Translation action will become inactive when all languages are used.
Steps
- Navigate to the Onboarding tab.

- Select the Documents sub-tab.

- Locate the document that you want to base the translated version on.
- This is your parent document. Translated versions will be child documents.
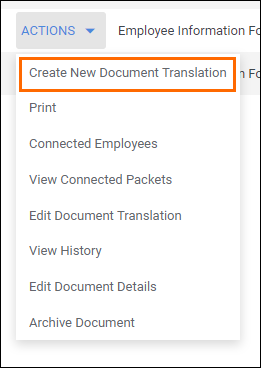
- From the document Action menu, select Create New Document Translation.

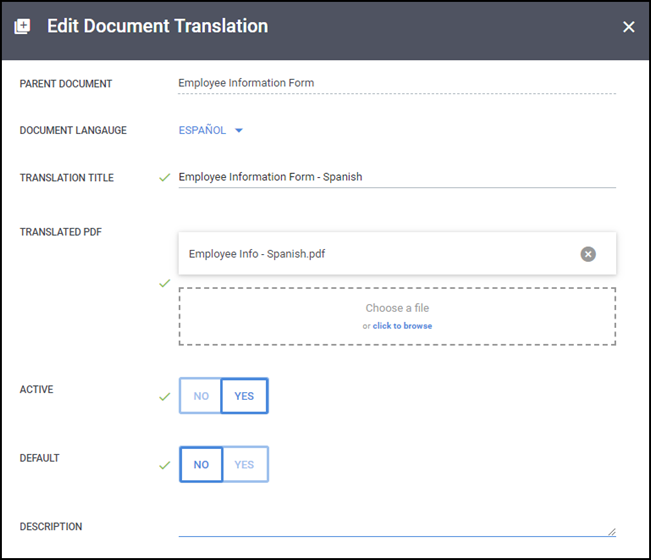
- In the Create New Document Translation popup, complete the following fields:
- Select the Document Language.
- Enter a Translation Title.
- This is the title you will see when selecting the document throughout the system.
- Upload a base PDF in the desired language.
- To make the document available to send, set the Active status to Yes.
- Set whether or not you would like to make this language the Default when sent:
- Yes - if an employee doesn't have a preferred language, they will receive this language version.
- No - if an employee doesn't have a preferred language, they will receive the Parent version of the document.
- If necessary, provide more information regarding the translation in the Description field.
- Select the Create New Translation button to continue to the Document Editor.

- The fields from the parent document will appear in the field bank on the left. Drag and drop the fields to the appropriate locations on the translated document.
- You can also add new fields to the document by selecting the Add New tab.
- For more information placing fields, see Adding, Adjusting, and Removing Onboarding Fields.
- Once you are satisfied with the field layout, select
 to confirm your changes.
Next Steps
For more information on the Document Languages feature, please see the following articles:
Was this helpful?
