: User Interface
Overview
There are the two components for the user interface in : a main Search page and a Search Results page, each offering sub-sections. All searches will be done within this interface. This article goes over how to use searches in both of these pages.
Search Page
Search Tab
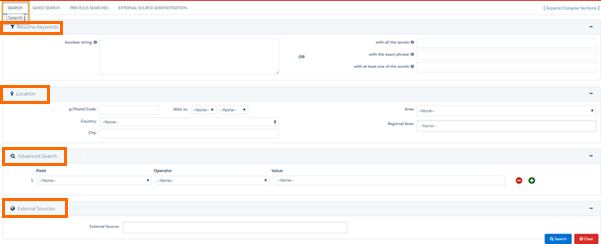
To start your search, enter values in any of the sections on this page:
- Keywords
- Location
- Advanced Search
- External Sources
After clicking on the Search button, you will be directed to the Search Results page.
Saved Search Tab
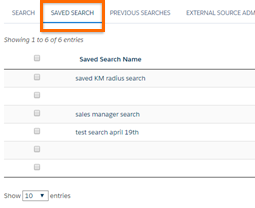
After the results of a search are brought back, the option is given to save that search by clicking a button on the Search Result page. The Saved Search tab stores all the saved searches.
The logged in user can only see the searches they saved.
Previous Searches Tab
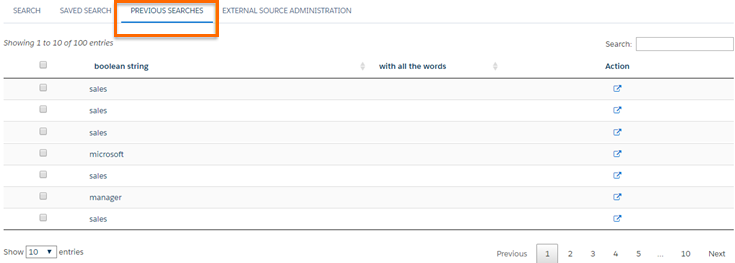
This tab stores all previous searches.
External Source Administration Tab
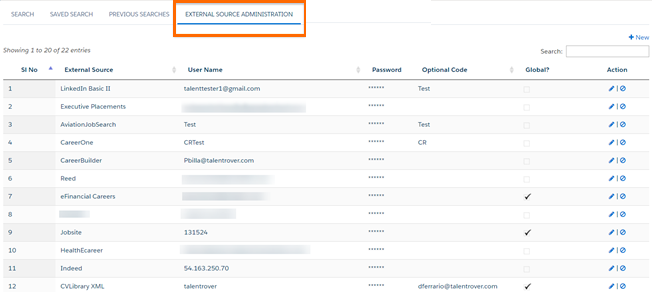
This tab is used to configure the External Job Boards that the user has accounts for. Please see this article for a description of this functionality.
Search Results Page
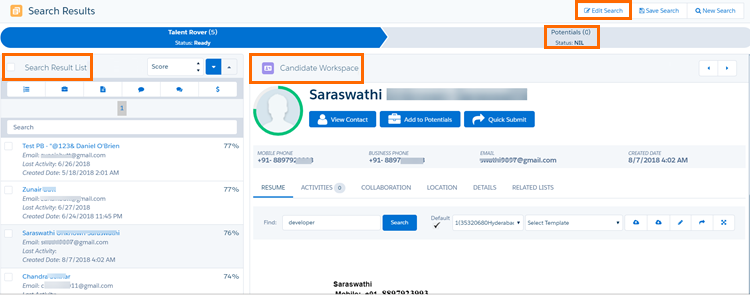
There are four main areas of this page offering different functionality:
- Search Buttons
- Search Result List
- Candidate Workspace
- Potentials Tab
Admin Note:
There are many actions possible from the Search Result List and Candidate Workspace that leverage ‘s tool (the Application Tracking System used to move applicants through the application process). Note that the Integration only supports Data Model . Please see available documentation on for more details.
Search buttons
Edit Search: Click this button to go back to the search page and change the current criteria.
Save Search: Click this button to save your search.
New Search: Click this button to start a new search: you will be navigated to a blank search page.
Exit Search & Match: In Classic Only - click to Exit . Lighting uses tab navigation.
Search Result List
Sort Order picklist: Click the sort icon  to choose how you want to sort the listing. By default, search results are ordered according to match Score.
's scoring algorithm is proprietary and so the information we can provide is limited. The algorithm is not just about 1:1 keyword ratio. The major components of the score are recency and length of experience, job title, and responsibility level (senior versus junior).
When calculating Candidate scores, takes into consideration if the profile contains the keywords from the query but also aspects such as how long the Candidate has had experience with the keywords from the query, and if their most recent employment contains the searched for keywords.
The scores range from 0.1 to 100. The scoring is not a percentage value so not all Candidates that have the keywords "Java" and "Developer" within their profiles will be given the same maximum possible score. emphasizes that the score should not be used to compare one Candidate to the next, but rather as an overall match to the search criteria itself. Rather than stacking or ranking them, recommends reviewing Candidates with a bucket mentality – so look at the top 20 scores as one bucket – because it is possible that someone with a slightly lower score might actually be a better match for a particular position.
Admin Note:
You can customize which items appear in the sort menu. Note that Score cannot be removed from the dropdown, but its position can be changed.
- Navigate to Setup > Build > Customise > Contacts > Field Sets.
- Click the Edit link next to the name of the SearchListFieldSet fieldset.
- From the field list, drag the Contact field that you want to add into the In the Field Set area.
- Do the reverse for the field(s) you want to remove.
- Click Save.
Add To Call List: You can add Candidates to an existing or create a new one by clicking the Numbered List icon  .
.
Here’s how you create a new Call List from the Search results:
- Select Candidates from the Results list.
- Click on the Mass Action icons and select Add To Call List.
- In 'all List Name, type the name of your new .
- As the system will not recognize that name, an option to Click To Add will appear along with choice of Record Type.
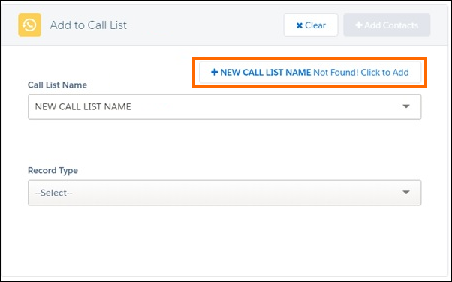
- To complete, click on +Add Contacts (top right corner).
This will result in a new Call List being created and the Candidates selected from the Result list to be added as s.
Add To Potentials: The Candidates selected from the list are added to the Potential Tab  for further action.
Add To New Applications: The Candidates selected from the list can be applied to a job directly from by using the New Applicants icon  .
.
Add To Long List: The Candidates selected from the list can be added to a Long List directly from by using this conversation icon  .
.
Add All To Long List: This Add to Long List icon  allows all Candidates returned by the search to be added to a Long List instead of adding page by page.
Export All Results: This Export icon  allows you to export your search results to .csv. If you only want to export a subset of Candidates, select and add to Potential Tab, you can then export to .csv only the required Candidates from there.
There is no cap to the size of the export, but a large quantity of data might take some time to download.
Admin Note:
To enable it this button navigate to: Custom Settings > Properties > Is Export Enabled In SearchAndMatch.
The data is downloaded on a .csv file: the columns in the spreadsheet correspond to the fields selected in the DetailFieldSet and are customizable at Setup > Build > Create >Contact> Field Sets > DetailFieldSet.
Place All Candidates: The Candidates selected from the list can be placed on a job directly from by using the  icon records will be created using ’s Mass Placement functionality.
Search Box: Allows quick searches within the subset of returned Candidates.
List of Candidates: When the Candidates are returned, the listing contains basic Candidate’s data.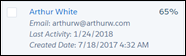
Admin Note:
The information shown in the listing comes from a Field Set and can be customized by navigating to:
Setup > Build > Create >Contact> Field Sets > DetailFieldSet.
Candidate Workspace
Candidate Workspace allows recruiters to work individually on the Candidates returned by the search. Candidate details, actions, and resume browsing are all accessible from here without having to leave .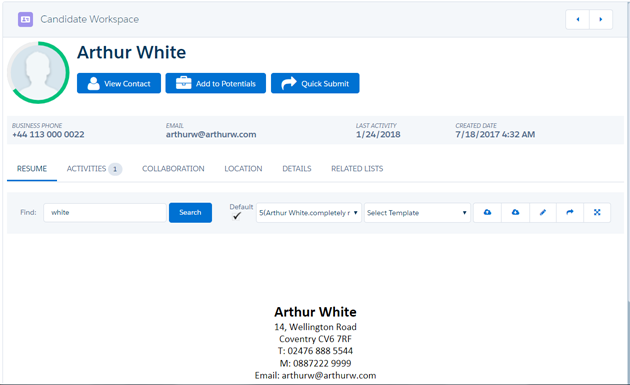
Candidate Workspace Banner
The banner at the top shows basic Candidate information for quick reference.
Admin Note:
To customize:
- Go to Setup > Build > Customise > Contacts > Field Sets.
- Click on the Edit link next to SummaryFieldSet.
- Drag the Contact field that you want to add from the field list into the ‘n the Field Set area.
- Do the reverse for the fields you want to remove.
- Click on Save.
Candidate Workspace Buttons
Next / Previous Candidate: Use the arrow icons  in the upper-right corner to move back and forth between Candidates.
View Contact: Click to navigate to the Candidate’s Contact record.
Add To Potentials: Click to add the individual Candidate to Potentials.
Quick Submit: Click to Submit a Candidate to a Client.
Candidate Workspace Tabs
Resume:The default tab that shows the Candidate’s resume. All the actions available in Resume Manager on Contact records are also available here.
- Find: Search for terms in the resume text. Basic Boolean operators are supported.
- Choose a template: Choose a template from the drop-down to open the resume editor in that template. You can save the resume in that template format.
- Upload resume: Click the first small button to upload another resume to this Candidate profile.
- Download resume: Download the resume to your computer.
- Edit the resume: Open the resume editor.
- Share: Open another browser tab and send the resume in an email message.
- Full screen: Click the small button on the right to expand the view to fill the entire screen.
The keywords entered in the boolean string field on the Search page will be highlighted in the resume in Candidate Workspace. The highlighting of keywords in the resumes is intended to help isolate the keywords, but it does NOT follow the same logic as boolean search, so it will not consider quotes, parenthesis etc.
-
For example, if you searched "Project Manager" (ie, exact phrase), when the results are returned you will see both "Project Manager" and any occurrence of "project" or "manager" highlighted in the resumes.
Activities: Displays a graphic of all activities for this Candidate. It matches the Activity on the Contact record.
Collaboration: This tab helps you to collaborate with other recruiters regarding this Candidate.
Location: This tab provides additional details about the Candidate location.
Admin Note:
To customize which items appear in this tab:
- Navigate to Setup > Build > Customize > Contacts > Field Sets.
- Click on the Edit link next to LocationFieldSet.
- From the field list, drag the Contact field that you want to add to the Location subtab into the In the Field Set area.
- Do the opposite for any field(s) that you want to remove.
- Click Save.
Details: This sub-tab contains basic Candidate information.
Admin Note:
To customize what appears on this tab:
- Navigate to Setup > Build > Customize > Contacts > Field Sets.
- Click on the Edit link next to DetailFieldSet.
- From the field list, drag the Contact field that you want to add to the Details subtab into the In the Field Set area.
- Do the opposite for any field(s) that you want to remove.
- Click Save.
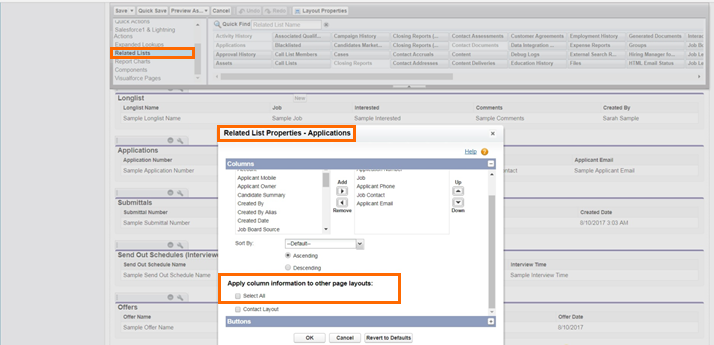
Related List: The s that appear on this tab will match the s on the Contact Page Layout known as Contact Layout.
Admin Note:
You can select a different Contact Page Layout to be used following these steps:
- Navigate to Setup > Build > Develop > Custom Settings > Properties > S&M Related List Layout.
- Enter the API name of the Page Layout.
- These Salesforce objects cannot be rendered in the Related List sub-tab:
- Notes & Attachments
- Open Activities
- Activity History
- Files
- When using a page layout other than “TR Contact Layout” changes to the Columns will only propagate to the Related List sub-tab if there is a check in the Apply column information to other page layouts box — as shown in the figure:
Potential Tab
This tab displays Candidates that have been marked as Potential after being returned by search. The Potential tab offers all same features as the tab while giving a recruiter the ability to isolate a subgroup of Candidates for further action.