Adding New Admin Users
Users have administrative access to the Time Management Console (TMC). Access is refined through permissions and access groups. In many cases, administrative access to is configured manually by existing Users. Depending on your access level, you may be able to add users to to manage labor details.
Initial Setup
Before setting up new Users, you should always check that the User doesn't already exist. Multiple active User accounts for a single User is not recommended. See Managing Existing Users for more information.
- Select Maintenance > Administration.
- In the Administration menu, select User Setup.
- To add a new User, select Add New Role-Based User.
- If this option is not available, select Add New User to set up the new administrator.
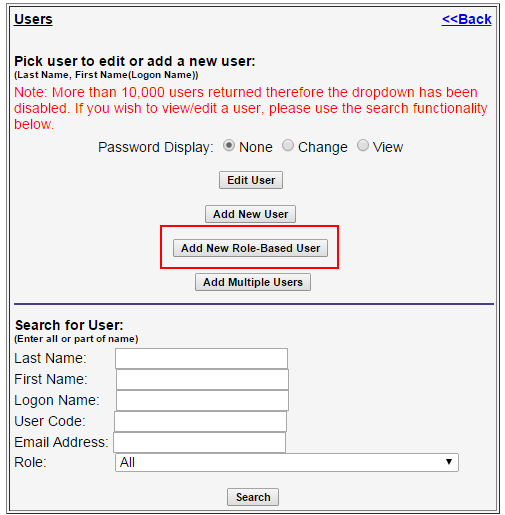
- If this option is not available, select Add New User to set up the new administrator.
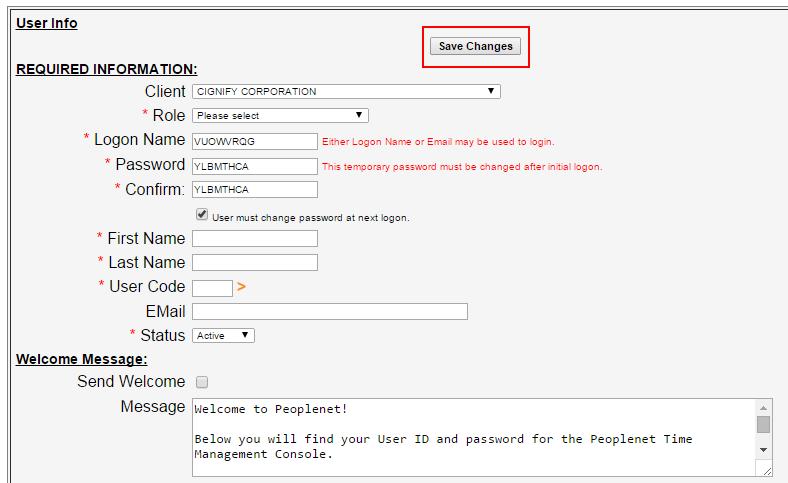
- On the next screen, enter in the Users information:
Leave the Logon Name, Password, and (password) Confirm fields with the system generated details.
- Role: Determines how much privilege an Admin User is allowed when navigating . Open the drop-down menu to make a selection. For more information on Roles see Creating New User Roles.
- First & Last Name: Enter the first and last name of the new User. It is important to enter correct details to allow the proper look-up of details and even future password resets.
- User Code: Enter the initials of the new User. This code acts as a visible audit trail and ties the User to time card edits, fixed punches, and more.
- Email: Enter the email address of the new User. The new User will enter this email address as a username when logging in to .
Send Welcome Message:
- If you would like for the new User to receive a Welcome Message with instructions on how to log in, select this option. This will trigger a log in email to be sent to the new User.
- If you choose to not send a Welcome Message, please make note of the temporary password displayed and provide it to the new User.
- Job Description: You may enter Web or Clock in this field to help distinguish it during logon for Users with access to multiple admin profiles.
- When you are done, select Save Changes to proceed.
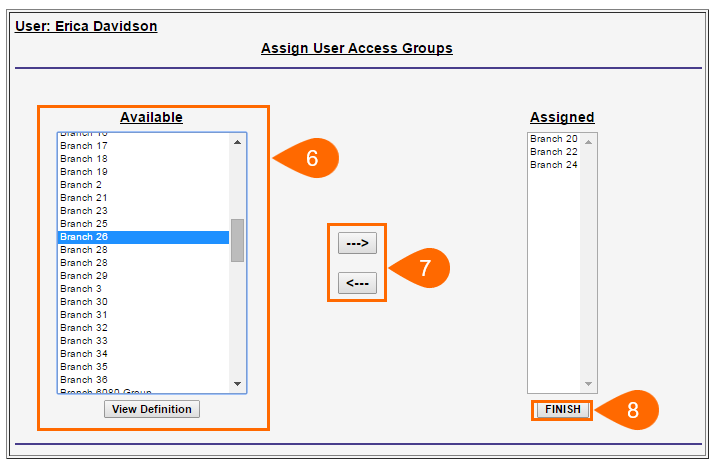
Assign User Access Groups
Access groups determine which details an Admin User will be able to manage after signing in to . Depending on your organization, access groups may be based on group name, customer name, branch number, client number or more.
Active User's must always be assigned to at least one access group.
- Locate and select an access group from the Available section.
- If you would like to add more than one access group, press and hold the Control key on your keyboard while making your selections.
- Select View Definition to view more details about an available access group.
- Use the right pointing arrow to move your selected access groups to the Assigned access groups section.
- If you need to remove an access group, select the access group in the Assigned section and use the left arrow to move the access group back to the Available section.
- Select Finish to save all details.