Data Privacy Module - User Guide
Overview
The Invenias Data Privacy Module supports Invenias users in achieving compliance with various Data Privacy legislation.
The Data Privacy Module is designed to help you on your journey to compliance, but achieving compliance will take more than just your software. It will require a company wide recognition and understanding of the legislation, and a commitment to ensure processes are evaluated, documented and adhered to.
The Feature can be used to comply with legislation such as GDPR. If you are looking to use the module for GDPR compliance and aren't familiar with the legislation we would advise to review this overview article first, then return to this guide.
This article will detail the various aspects of this feature, with some example workflows taking into consideration some typical scenarios you may encounter during a Client or Candidate engagement.
Click here for an admin guide on configuring the Data Privacy Record and all associated features.
These guidance materials should not be taken as a substitute for legal advice, but we hope they will provide a useful point of reference.
The article covers:
- Where can I view Data Privacy Settings for a Person?
- How do I Inform People we are holding their data?
- How do I Add or Update Lawful Basis and Purposes?
- How do I Request Consent?
- How do I Update Consent Settings for a Person?
- How do I Enforce Consent for Candidates on Assignments?
- Where can I view key Data Privacy settings and information?
- What should I do if I receive a Subject Access Request?
Where can I view Data Privacy settings for a person?
When opening a Person Record, Invenias prominently displays the key Data Privacy settings for the Person via a prominent shield icon in the record header. Hovering the mouse over the shield will display the Lawful Basis and Purposes and relevant dates:
Note: when creating a new Person Record, these fields will be populated with Default Purpose(s) and Lawful Basis which are saved into the central GDPR Record.
Under various Data Privacy legislations (e.g. GDPR), you have to record the Lawful Basis and Purpose(s) for why you are holding and processing information on a Person. Under GDPR this information must be clearly communicated to the person within 30 days of their data being saved or processed, or before you share the information with a third party. This is described under GDPR as the Right to be Informed.
The Data Privacy feature includes a simple user flow which supports capturing either the act of Informing a Person, or if you are using a Lawful Basis requiring Consent, the process of requesting, approving/managing the Consent flow.
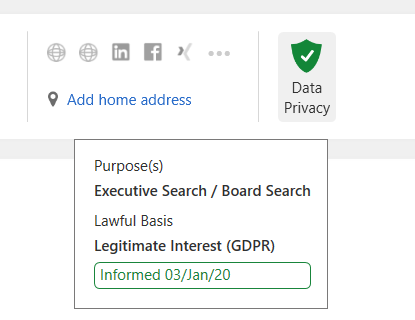
If the Lawful Basis selected for the person doesn't require consent, the information under the shield icon will display if the person has been informed or not.
In the example above, you can clearly see that the person has been informed, meaning they are aware that you are holding and processing their data on your database for the selected purposes.
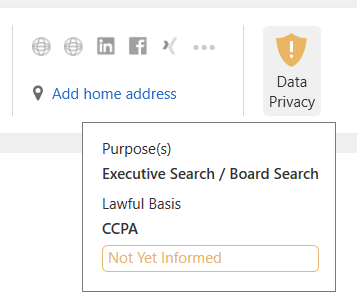
If they have yet to be informed, it will be clearly displayed as shown in the example below:
If the Lawful Basis selected requires consent from the person, this field displays whether the consent has been: Requested (with date requested), Approved (with Expiry date), Declined, or Withdrawn (with date).
In the example below, this person has a Lawful basis of Consent which has been approved, with an approval date of 25th July 2019:
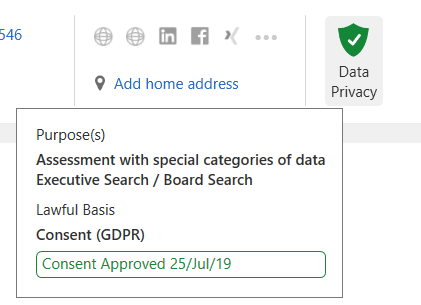
The green colour shows this Person has Consent Approved. For the other states (Declined, Requested, Withdrawn), a red cross signifies this that record doesn't currently have consent.
It's also possible to view this information from the People List by adding the columns into the view using the column chooser:
- Lawful Basis
- Purposes
- Consent Status
- Consent Expiry Date
- Data Privacy Requested by = (Name of user who last requested consent or informed a person)
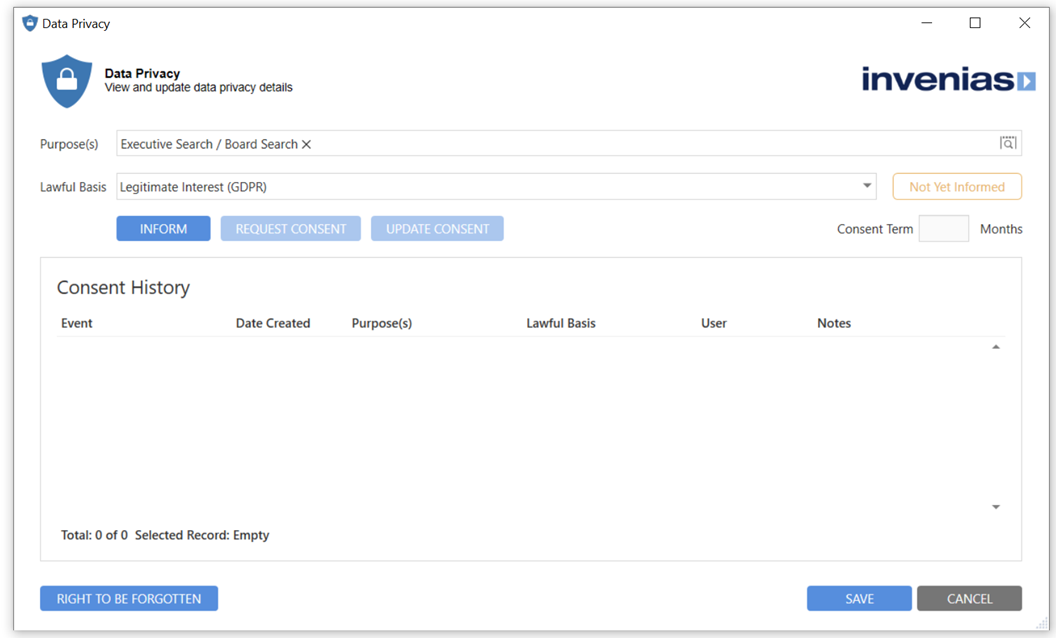
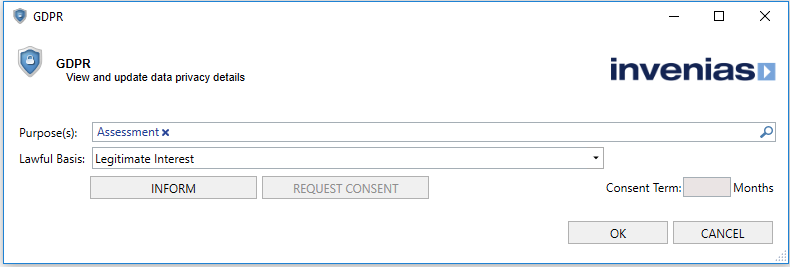
You can view a detailed history of all events in relation to Data Privacy by clicking into the shield icon in the Person Record Toolbar this will open the Data Privacy settings window as shown below:
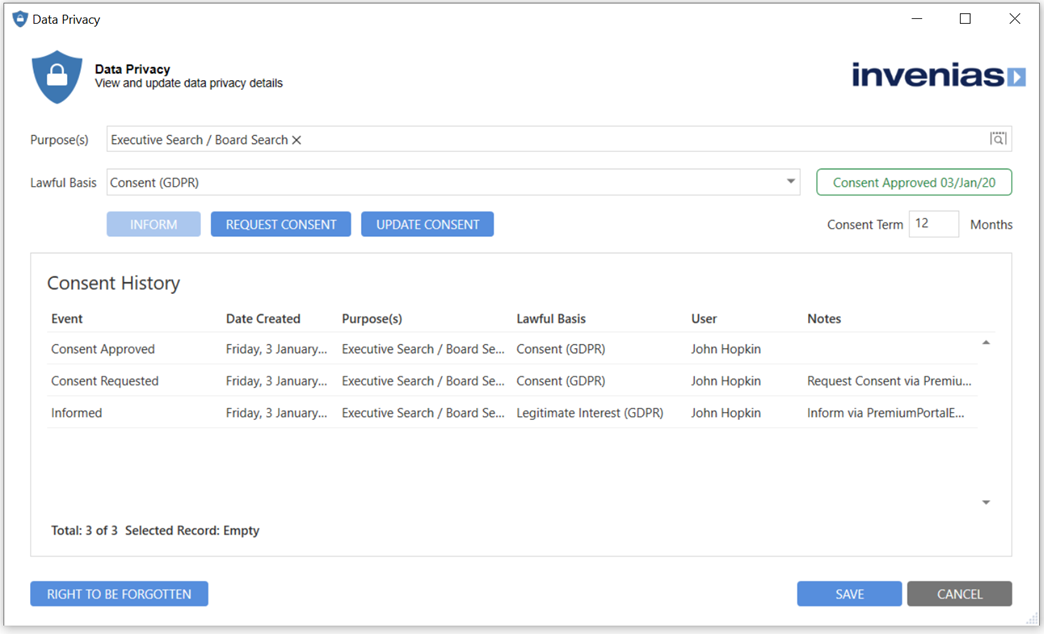
The history section displays all changes to Lawful Basis and Purposes, alongside all activity in relation to informing, or requesting consent from the person. In the example above, the person was originally informed but then consent was deemed necessary and requested. Following this, the person approved consent.
The other functionality in this window will be explained next in the following sections of this guide.
How do I inform people we are holding their data?
To comply with the Right to be Informed you are required to inform people on your database of the Lawful Basis and Purpose(s) why you are holding and processing their personal data. In Invenias, you can easily inform a person through a number of options.
In the example below, this person has been recently added to the database and has yet to be informed.
Clicking into the shield icon in the Person Record Toolbar this will open the Data Privacy settings window as shown below:

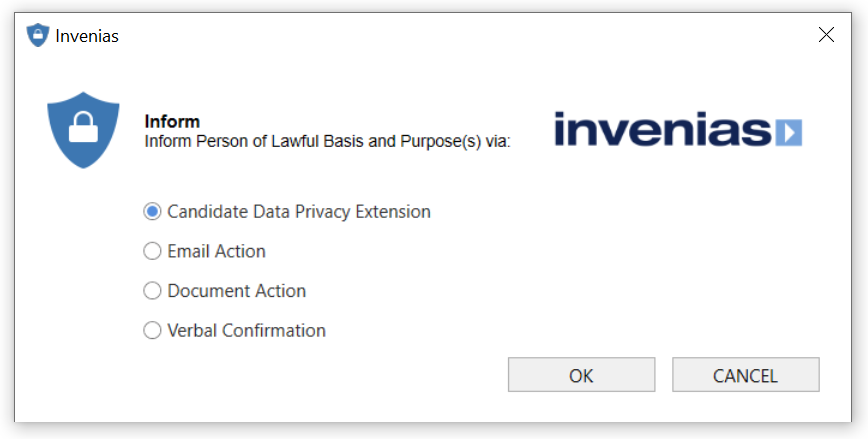
To inform the person, click INFORM, which presents the following options:

Option 1 - Candidate Data Privacy Extension
Select this option, click NEXT then OK to confirm. This will send the person a branded and customized Email, such as the example shown below:
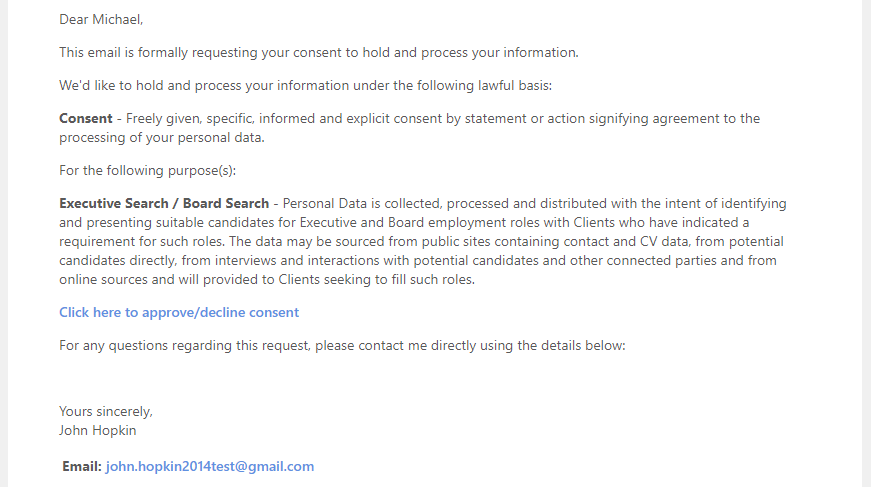
The Lawful Basis, Purposes and descriptions are included, alongside any additional content as configured by your organisation.
The person record updates to indicate that the person has been informed and no other actions are required.
The Data Privacy Premium feature option may not be enabled for your database. To learn more and get started with this premium feature, please contact your Invenias Account Manager.
Options 2 - Email
You can inform a person using an Invenias Email Action. You can select a template, add the subject, relations etc, similar to a normal email action. Invenias provides a default template for informing a person, but you are able to customise this if you wish, as you can with all other email templates in Invenias.
Once the email has been sent, the person record will update to indicate that the person has been informed alongside the date.
Options 3 - Documents
If you are meeting a person, for example for a consultant interview, you may wish to use this option to create a document, which you can present to the person. As with an email action, you can select a template, add relations etc. to create the document itself, as well as creating your own custom template if you wish.
After the document has been created, the person record will update to indicate that the person has been informed alongside the date.
Option 4 - Verbal Confirmation
This option allows a user to record that the person has been informed verbally.
This indicates that as a result of a conversation the person has been informed of the Lawful Basis and Purposes as to why their data is being held and processed.
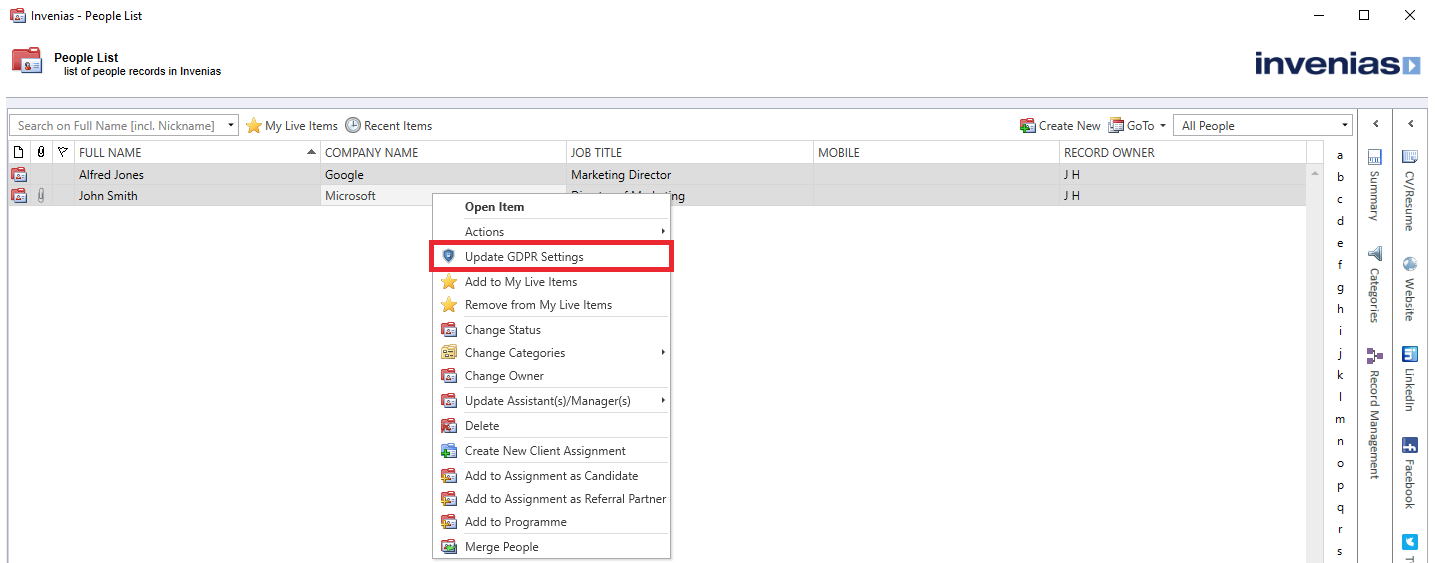
Informing in Bulk
You can also inform people in bulk from all People List views. e.g. Global People List, Candidate List within an Assignment, People Advanced Search Results, etc.
In the example below, a number of people have been highlighted in the People List and the user has right clicked to reveal the following menu options:
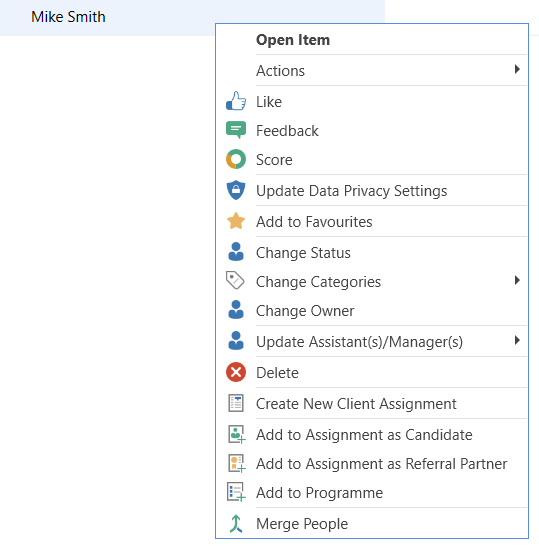
Click UPDATE Data Privacy Settings to open the following window:
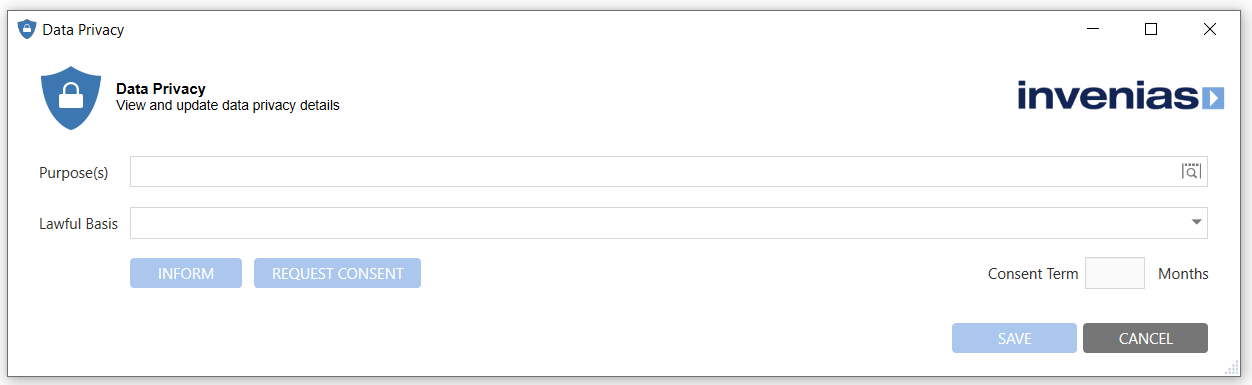
You will notice the options are similar to those from the Data Privacy Settings window in the Person Record.
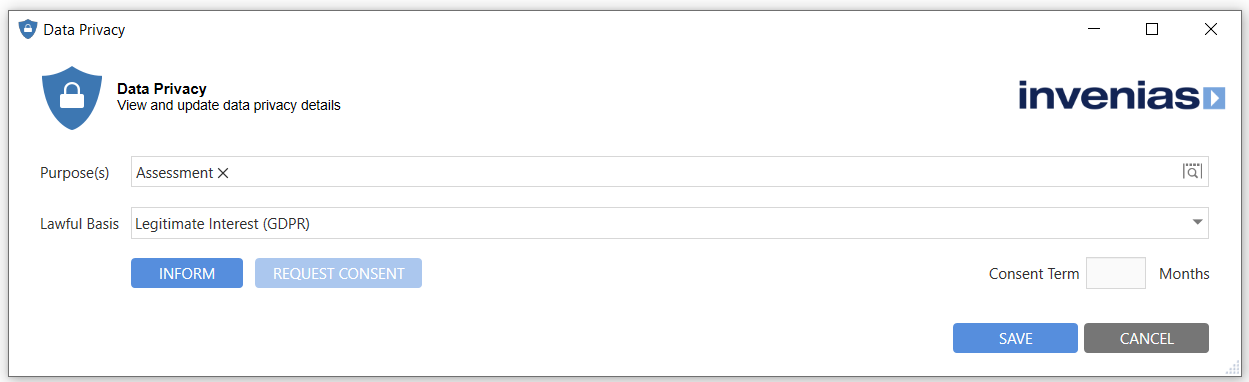
In this example we will add a purpose of Assessment by clicking the magnifier icon in the Purposes box, then selecting Assessment, then clicking Legitimate Interest as the Lawful Basis in the drop down underneath:
You can now click to INFORM and select from the same options as when informing from within a Person Record:
When informing in bulk and using the email action, we would strongly recommend to limit the selection of people to no more than 50 people in a single action. The exact number will depend on a number of environmental factors such as PC Specification, network latency, hardware resources. As the email will be sent through the user's Outlook account, this process will create an individual email for each person selected. This will inevitably cause performance problems and may crash Outlook. If sending en mass we would advise to use the Data PrivacyPremium feature which allows for a much larger selection (2500+) in a single action.
How do I Add or Update Lawful Basis and Purposes?
All people records will inherit the Default Purposes and Lawful Basis if set by an Administrator User in the central GDPR Record. In the majority of cases, this means that a user will not need to change these on a person. However, where individual settings need to be applied, Invenias supports a user changing the Lawful Basis and Purposes on a per person basis.
To change these settings on a person, open a Person Record, click on the shield icon in the record head to to open the Data Privacy Settings window, shown below:
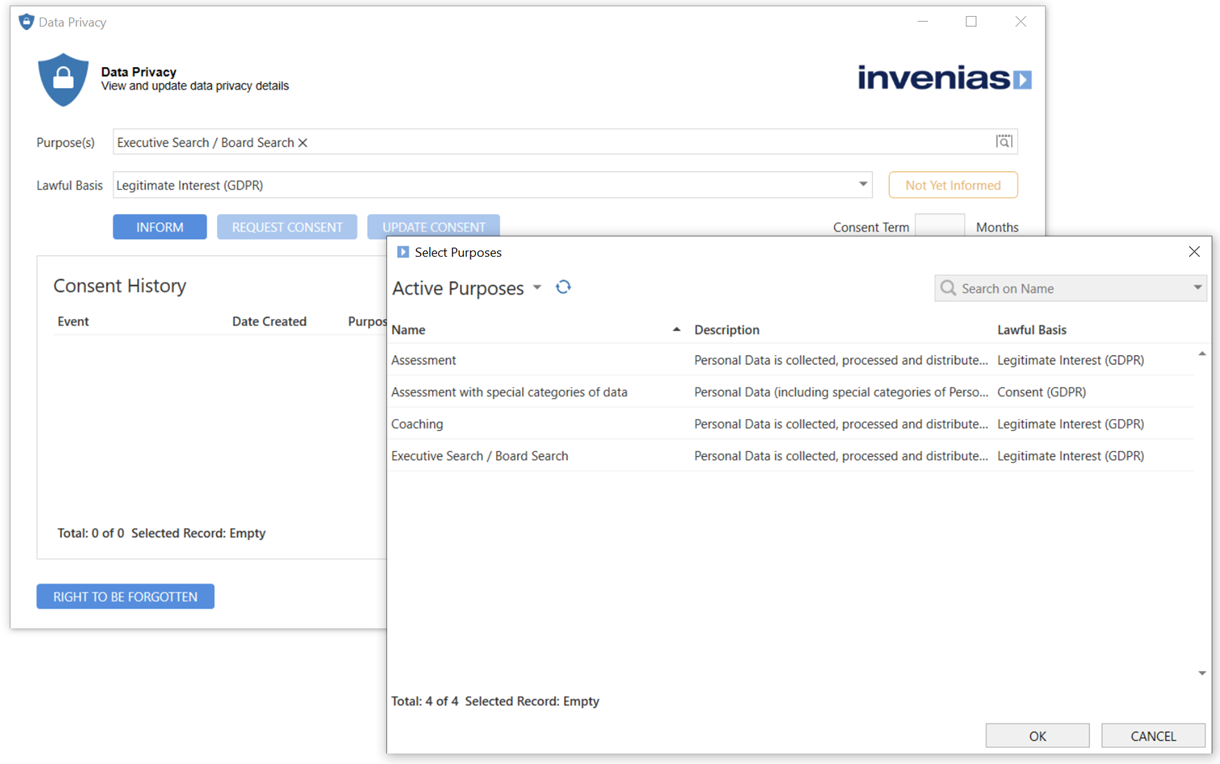
To Add a Purpose, click into the Purposes magnifier icon and select the purpose(s) you wish to add, then click OK:
To remove a Purpose, click the X Icon next to the Purpose name in the GDPR settings window.
After you have amended the list of Purpose(s) you will be prompted to Inform the person. Even if you previously informed them under different Purposes, the prior notification is now invalid. Please see the previous section above for a guide on how to Inform.
Adding a Purpose that Requires Consent
Some Purposes will require Consent as a Lawful Basis. If you selected a Purpose that Requires Consent, you must change the Lawful Basis to Consent. Invenias will prevent you from saving the Record unless you select Consent. In the example below, an Invenias User has added a Purpose that requires Consent, but the current Lawful Basis is Legitimate Interest:
If the User tries to click OK to Save these changes, they will be prompted to change the Lawful Basis to Consent, or Cancel to lose the changes.
To change the Lawful Basis, click into the Lawful Basis Drop down and click the Lawful Basis of Consent

You can now Request Consent from the person, as described in the next section.
Bulk Adding/ Changing Purposes and Lawful Basis
You can also update Lawful Basis and Purposes for People in Bulk from all People List views. e.g. Global People List, Candidate List within an Assignment, People Advanced Search Results, etc.
In the example below, a number of people have been highlighted in the People List, the User has right clicked to show the following options:
Click Update Data Privacy to open the following window:
You will notice the options are similar to those from the Data Privacy Settings option in the Person Record.
You can add the correct Purposes and Lawful Basis, then Inform/ Request Consent again as required using the same workflow and prompts as previously described when changing settings for a single person.
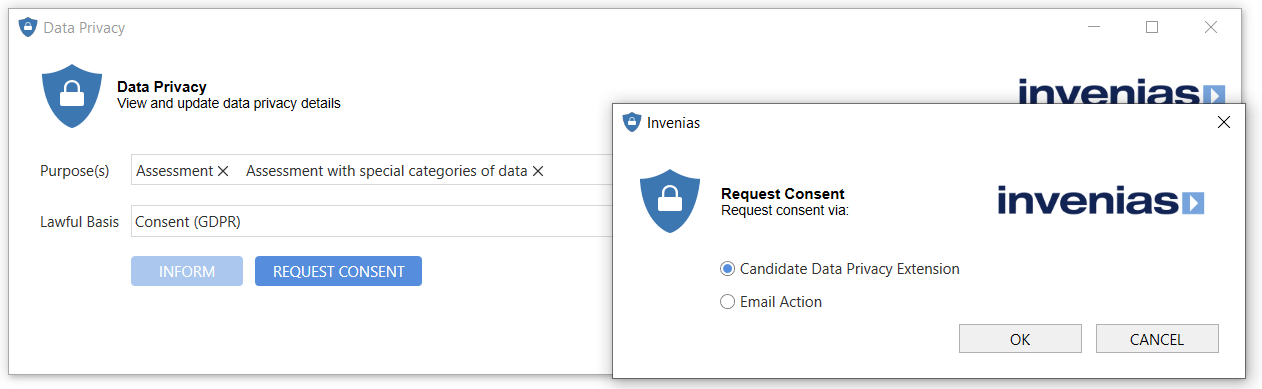
How do I Request Consent?
If you have determined that Consent is required for a Person, you can Request Consent from inside a Person Record by clicking the shield icon from the Record Toolbar:
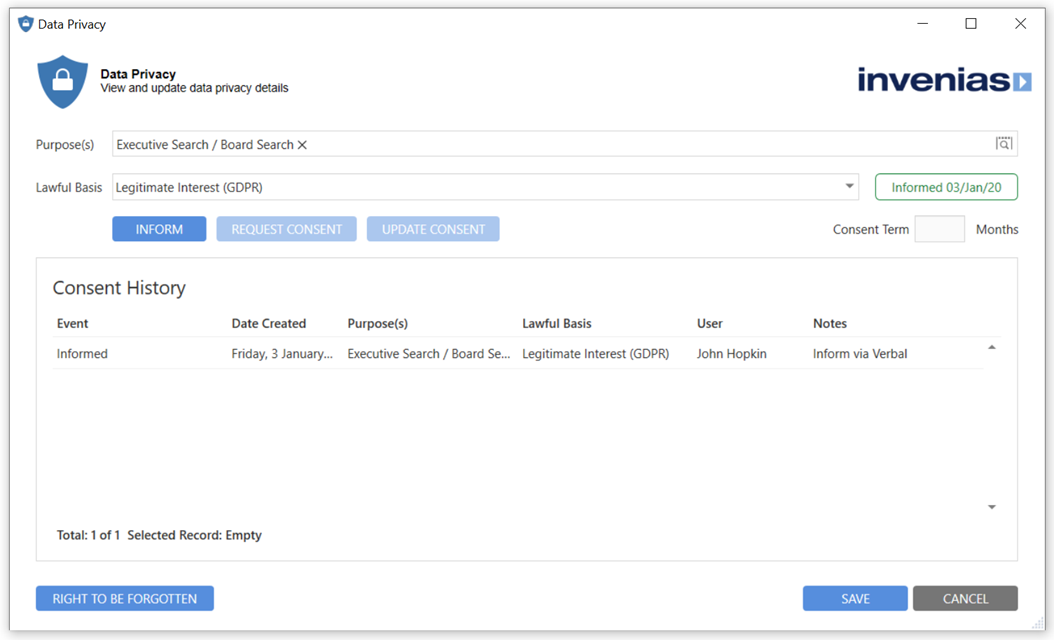
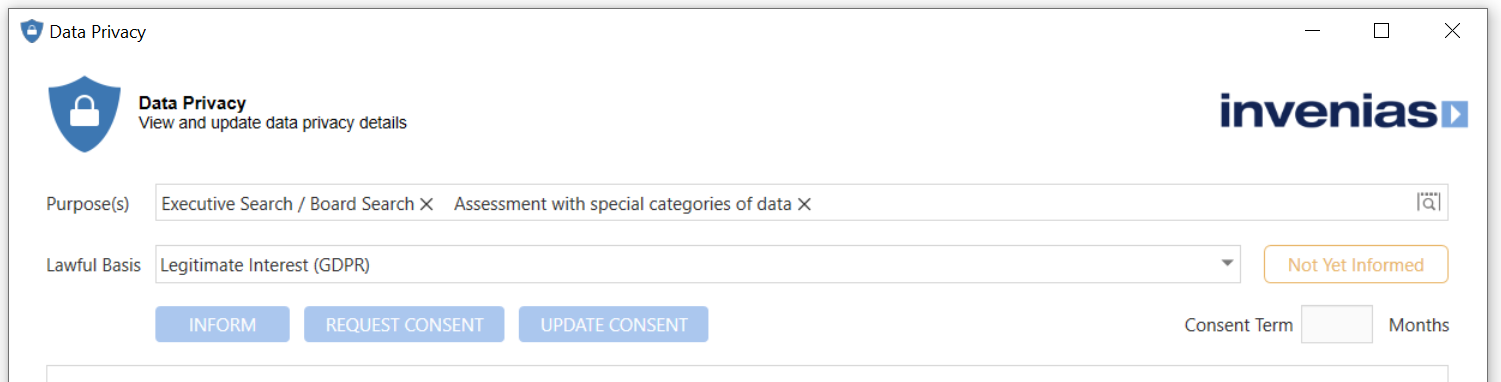
In this example the Person has previously been informed under the Lawful Basis of Legitimate Interest, however we are now required by a Client Company to capture additional information about the Person due to the requirements of a particular Assignment. The information we need to capture requires Explicit Consent under GDPR legislation.
To manage this in Invenias, you should check that the Purpose(s) assigned to the Person Record describes the scenario in which their data is going to be Processed. They must be accurate and contain a clear description of the intended use of the data and what data will be captured for the Purpose.
In this example the Invenias User needs to select the Purpose of Executive Search with the Processing of Special Categories of Data. The Lawful Basis needs to be updated from Legitimate Interest to Consent, by clicking into the Lawful Basis dropdown to change it to Consent.
Now a Lawful Basis requiring Consent is selected, the Request Consent button is now active:
Click Request Consent button.
This presents the following options:
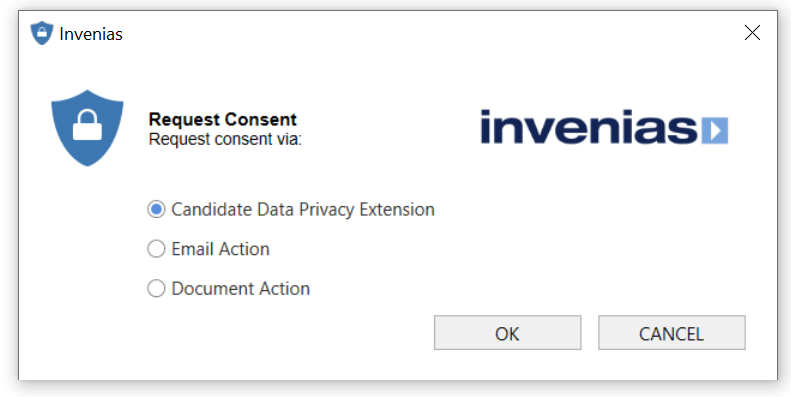
Option 1. Automated Email & Update
This option will send the person a branded and customized Email (click HERE for config guide).
The person receiving the email can click the embedded links in the email to Approve or Decline the Consent Request, or request a call from the user who sent the email.
The Lawful Basis, Purposes and descriptions are included, alongside any additional content (such as links to a Privacy Policy) as configured by your administrator.
When clicking on any of the options, the person is taken to a confirmation webpage, branded to reflect your organisation:

After the person clicks to Approve or Decline their consent, the Invenias Person Record updates automatically to indicate their decision and no other actions are required.
In-addition, the Invenias user and the person will receive a confirmation email after clicking any of the 3 options. The confirmation email sent to the Invenias user will also capture the IP address of the person who clicked on the links. The IP is captured should the consent update ever come into question.
The GDPR Premium feature may not be enabled for your database. To learn more and get started with this premium feature, please contact your Invenias Account Manager.
Option 2 - Email Action
Selecting Email Action will open a familiar Invenias email action. You can select a template, add the subject, relations etc, similar to a normal email action. Invenias provides a default template for requesting consent from a person, but you are able to customise this if you wish, as you can with all other email templates in Invenias.
After the email has been sent the Person Record will update to indicate that consent has been requested from the person alongside the date.
Option 3 - Document Action
A document action can be used to create a document requesting consent. If you are meeting a person, for example for a consultant interview, you may wish to use this option to create a document to present to the person for their approval. Similar to with an email action, you can select a template, add relations etc then create the document itself.
After the document has been created the Person Record will update to indicate that consent has been requested from the person alongside the date.
How do I Request Consent in Bulk
You can request consent in bulk by highlighting a selection of people in any list, right clicking on your selection and clicking Update Data Privacy Settings from the menu:

From the following window you can change the Lawful Basis to consent, select your purposes and then click to request consent:
The prompts and options will be identical to those you will view when requesting consent on a single person.
How do I Update Consent Settings for a Person?
Once consent has been requested, this will be indicated in the Person Record with the requested date clearly visible in the main record and under the consent history in the Data Privacy Settings window.
If you requested consent using the Data Privacy Premium feature, the Consent Status will be automatically updated when the email arrives. If you requested consent using a document or email action and the person responds, you can record this by updating the Consent Status for the person.
In the case of an email, if the person replies to the consent request email indicating they Approve or Decline, you can update the Consent Status from a shortcut in the Save to Invenias menu. When the email arrives, click Save to Invenias and you notice the highlighted option below:
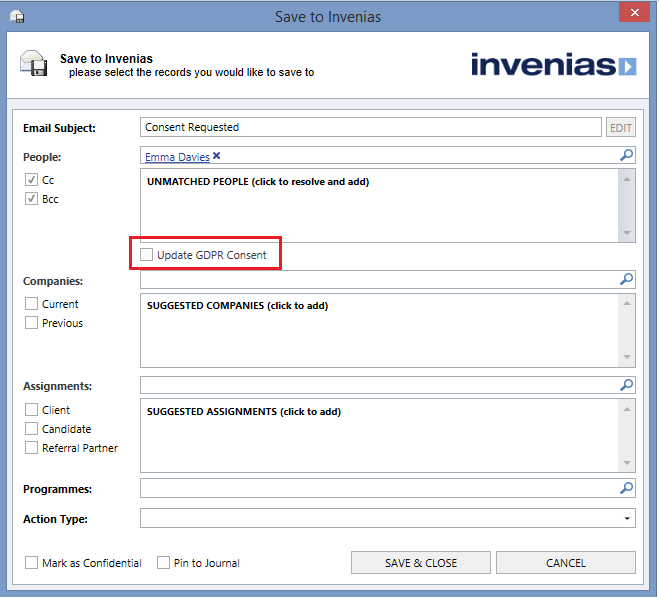
Note. The Update Consent option will only be actionable providing there is only 1 Person in the People field, and the person has a Lawful basis of Consent.
After checking the box and clicking OK, the Update Consent window will open, allowing you to select the relevant Consent Status (e.g. Requested, Approved, Declined, Withdrawn), along with adding a note if required:
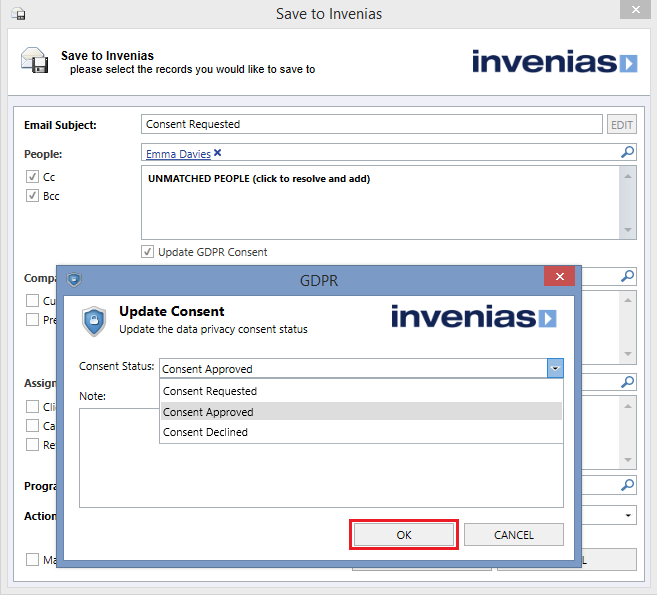
You can also update Consent Status by opening the Person Record, then opening Data Privacy Settings, then clicking Update Consent:
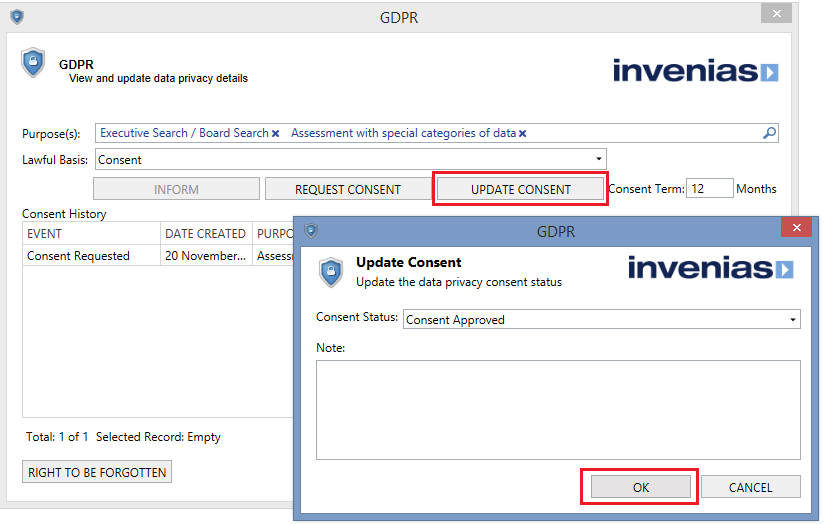
Select the relevant option, optionally add a note, then click OK. This will update the record and date stamp the activity.
How do I Enforce Consent for Candidates on Assignments?
There are various scenarios in relation to how a company using Invenias may wish to enforce the requirement for consent for Candidates in Assignments.
You may wish to apply a global rule that All Candidates in All Assignments that reach a certain progress status require consent. Alternatively, you may wish to manage enforcement on a per Company or per Company Location basis, or you may wish to control consent on specific Assignments only.
To satisfy these various requirements, Invenias offers 3 levels of Consent Management.
1. Global Consent - Enforce Consent for all Assignments.
2. Company / Company Location Consent. Enforce Consent for Assignments on a per Company, or Company Location basis.
3. Assignment Consent. - Enforce Consent on a per Assignment basis.
1. Global Consent
If you wish to apply a requirement for consent for all new and existing Assignments on your database, an admin user can set this in the Data Privacy Record.
2. Company / Company Location Consent
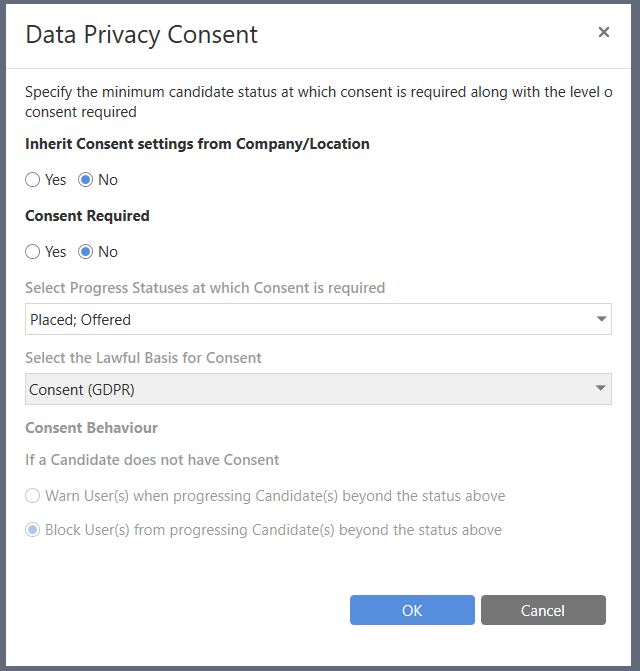
It's possible to enforce consent in this manner, by opening up a Company Record, then clicking Data Privacy Settings from the toolbar:
This opens the following menu:
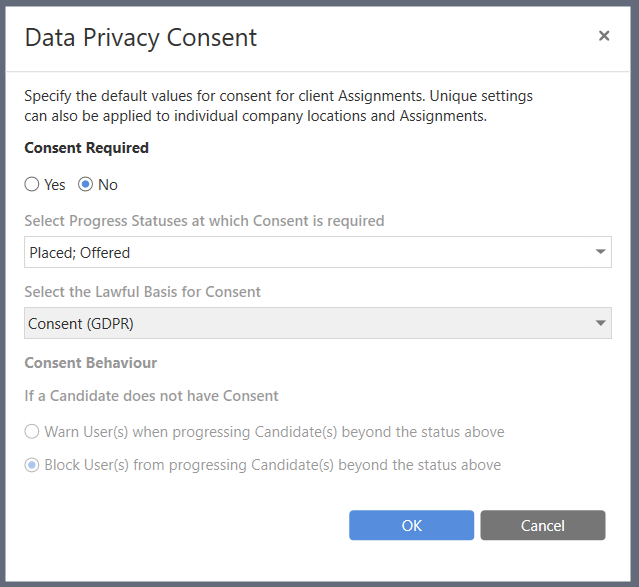
This menu allows a user to set whether consent is required for all Client Assignments and if required, at what stage in the process consent is required for all candidates. A Client Company may request that consent is only required for candidates at the Shortlist or Client Interview stage. You can be compliant with the request by selecting the appropriate Progress Status at which consent is required.
If consent is required, you can set the behaviour to either Warn or Block a user from adding or progressing candidates through all Assignments for this company. If block is selected, the user will be unable to add or progress the candidate past the Progress Status selected. With Warn, they are notified with a warning prompt but are permitted to progress the candidate.
By default, all locations in a Company Record will inherit the Data Privacy consent settings applied to the Company Record. However, you can set Data Privacy settings uniquely for individual locations in a Company Record.
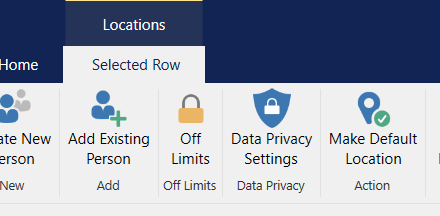
For example, you have a Company Record with many locations in various places across the globe, however a particular office has a higher level of consent requirement compared with the other locations. In this scenario, you can edit the GDPR Settings for this particular location by clicking to the Locations Tab in the Company Record, selecting the particular location by clicking into the row, then clicking Data Privacy Settings in the toolbar:
From the Data Privacy settings window, you can choose to inherit or override consent settings for this location:

Permission Required: Please note that changing Data Privacy Settings on an Company or Company Location requires the User Permission "Edit Data Privacy Settings on Company and Assignment Records".
3. Assignment Consent
By default, Assignment Records will automatically inherit the Data Privacy settings which are applied to the Company/Company Location. However, you can also override these settings and apply consent settings individually to an Assignment. Open the Assignment Record and click Data Privacy Settings from the toolbar:
To open the following menu:
From this menu you can view if the Assignment is currently inheriting settings based on the Company, Company Location selected and choose to override and set unique settings if you wish.
If consent is required, you can set the behavior to either Warn or Block a User from adding or progressing candidates through this particular Assignment.
Permission Required: Please note that changing Data Privacy Settings on an Assignment requires the User Permission "Edit Data Privacy Settings on Company and Assignment Records".
Where can I view Key Data Privacy Settings and Information?
All Invenias users are able to view a new central Data Privacy Record by clicking to the Invenias tab in Outlook, then clicking into the Data Privacy shield icon:

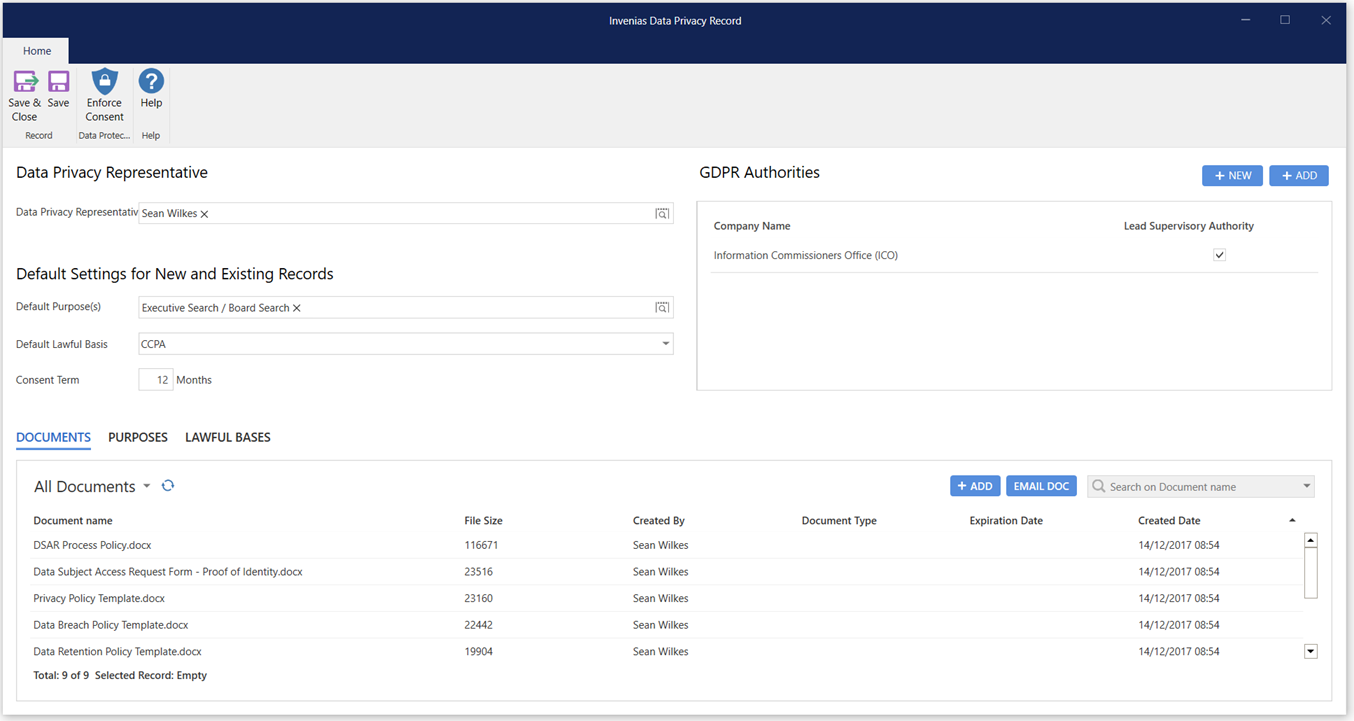
This opens the Data Privacy Record (shown below). This record provides a central location for viewing and managing Data Privacy related settings and as a location to store Data Privacy related compliance documentation.
Permission Required: Please note, all Users are able to view the GDPR Record. However, to Edit the GDPR Record, you need the "Edit Data Privacy Record" permission.
Data Privacy Representative - This field is intended to be used to nominate an Invenias user who will manage GDPR related questions and inquiries, such as Right of Access requests.
Consent Term - The default number of months to use when requesting consent from a person.
Default Settings for New and Existing Records - The Default Lawful Basis and Purpose(s) to be applied to all new and existing People Records.
Purposes - All Purposes and their descriptions in the database.
Data Privacy Authorities - A Supervisory Authority is a body that deals with data privacy related matters such as a data breach. Each country in the EU has their own Supervisory Authority. In the UK, this body is the Information Commissioners Office (ICO).
Lawful Bases - All Lawful Bases and their descriptions which are enabled on your database. By Default the list will contain all six Bases which are specified in the GDPR. If there are Lawful Bases which you will not use, it's possible to de-activate these to make managing GDPR clearer.
Documents - In this section you can capture all documents in relation to GDPR compliance. These could include:
Privacy Policy, Legitimate Interest Assessment, Data Transfer Policies, Data Breach Process.
Permission Required. Only Users with the User Permission Edit Data Privacy Record, are able to edit any of the settings in this Record.
What should I do if I receive a Subject Access Request?
A Subject Access Request (SAR) or Right of Access Request, is a request from a person to view all personal information which is being held and processed about them.
Invenias has created a new Default Report and published guidelines on how to satisfy a request. If you receive a request it's important to ensure that the request is passed to whoever in your organisation has been nominated to manage SARs. Under GDPR legislation you must respond within 30 days of the request being submitted.
Click here for an admin guide on how to Process such a request.