Customizing the Credential Overview Card
The Credential Overview Card in Bullhorn is a powerful tool for quickly viewing key credentialing information at a glance. Customizing this card allows you to display the most relevant details for your organization, ensuring that you and your team have instant access to the information that matters most.
Once configured, recruiters, compliance managers, and credentialing specialists can follow the steps in Using the Credential Overview Card to swiftly determine whether the necessary credentials have been obtained for a Placement.
You must be an Admin user to follow the steps in this article.
Before You Begin
In order to utilize the Credential Overview Card, Credentialing v2 must be enabled. To have Credentialing v2 enabled, please Contact Bullhorn Support.
Once enabled for the Compliance Manager, choose your credentialstatussettings parent buckets carefully. These can not be changed.
Before updating this setting, determine the following information:
- Status Groups: Define 2-4 groups.
- Statuses: Assign each status to a group.
- Completion Indicator: Decide which group marks credential completion.
- Colors: Choose from the following:
- Green (#8CC152)
- Blue (#4A89DC),
- Red (#DA4453),
- Grey (#E2E2E2).
Updating System Settings
The CredentialStatusSettings system setting can be customized to meet the needs of your credentialing process. This allows admins to categorize the state of a credential.
The credential status list can be updated in Field Maps. See the article on Customizing Fields on the Credentialing Tab.
- Navigate to >>.
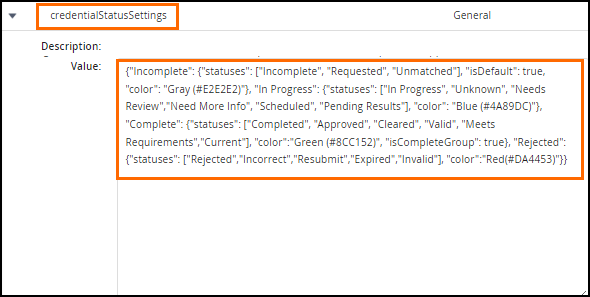
- Filter the list for CredentialStatusSettings and expand the setting.

- Using the information from the How it Works section below, make the necessary changes.
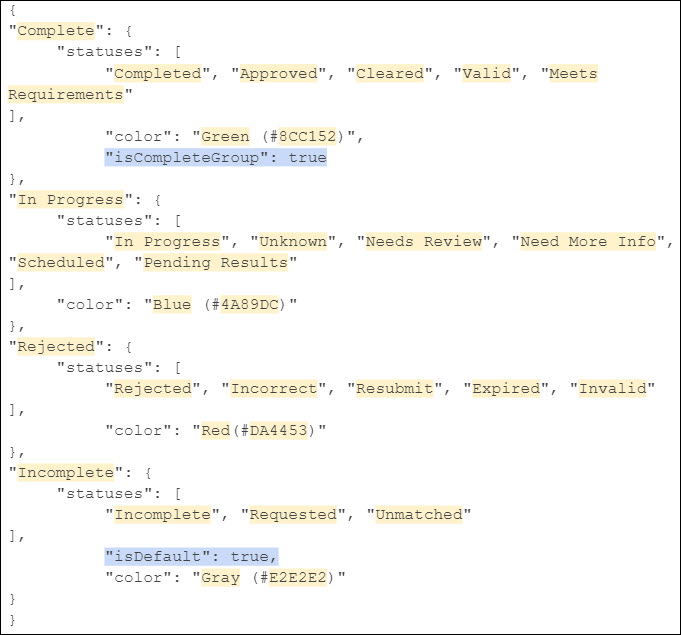
- The variables highlighted in yellow in the image below can be updated or removed.
- The variables highlighted in blue should be moved to the appropriate status group

- Click Save.
How it Works
The setting value uses a JSON script that contains the following information:
- Status Group: A grouping of credential statuses to display the status in the workflow.
- For example, a status group called In Progress could contain the credential statuses of In Progress, Needs Review, and/or Pending.
- The credentialStatusSettings system setting must contain at least two Status Groups, but no more than four.
- The Progress Meter and Status Buttons shows the status groups as they are listed in credentialStatusSettings from left to right.
- Statuses: A list of credential statuses that make up the Status Group.
- For example, the statuses Incomplete, Requested, and Unmatched could make up the Incomplete Status Group on the Credential Overview Card.
- There can be as many statuses as needed under each status group.
- Statuses should not be repeated.
- Color: The color that the Status Group will display as; this will show on the Progress Bar and the buttons within the Credential Overview Card.
- There are four available colors to represent the status groups.
- Colors should not be repeated in order to have the best visual experience in the Credential Overview Card.
- isDefault: Indicates the Status Group that isused to count any credential in a status that is not accounted for within the credentialStatusSettings system setting.
- Any Status Group can use isDefault.
- isDefault can only be used with one status group.
- isCompleteGroup: Indicates the Status Group that is used to calculate the completion progress.
- Any status group can use isCompleteGroup.
- isCompleteGroup can only be used with one status group.
- This is required in order to accurately calculate the progress.
Default System Settings
The below table shows the default settings under credentialStatusSettings.
| Status Group | Statuses | Color | isDefault | isComplete |
|---|---|---|---|---|
|
Complete |
|
Green (#8CC152) | X | |
| In Progress |
|
Blue (#4A89DC) | ||
| Rejected |
|
Red (#DA4453) | ||
| Incomplete |
|
Grey (#E2E2E2) | X |
Default Script
This is the default JSON script that can be copied and pasted to resolve issues:
{"Complete": {"statuses": ["Completed", "Approved", "Cleared", "Valid", "Meets Requirements"],"color":"Green (#8CC152)", "isCompleteGroup": true}, "In Progress": {"statuses": ["In Progress", "Unknown", "Needs Review","Need More Info", "Scheduled","Pending Results"],"color": "Blue (#4A89DC)"},"Rejected": {"statuses":["Rejected","Incorrect","Resubmit","Expired","Invalid"],"color":"Red(#DA4453)"},"Incomplete": {"statuses": ["Incomplete", "Requested", "Unmatched"], "isDefault": true, "color":"Gray(#E2E2E2)"}}Field Maps
- Navigate to > >.
- Locate CandidateCredentials and expand the status field.
- Add the child statuses listed within the Status Groups in this field.
- Example: If the “Complete” Status Group contains "Completed", "Approved", "Cleared", "Valid", "Meets Requirements", “Verified”, then the CandidateCredential status field should have all of those statuses listed in addition to all other child statuses.
View Layout
Fields can be added and removed from the cards with View Layout.
- Navigate to >>.
- Select the Placement entity.
- Navigate to the Candidate Credential Overview Card Tab from the entity list.
- Add or remove fields from the view.
- Click Save.