Mass Placements
Overview
This article describes how the Mass Placement feature works in with Lighting.
Mass Placements give you the ability to place and create a for a large volume of Candidates at once and can be created from the following locations:
- The ATS tab
- Search and Match results
- Call Lists
Mass Placement from the Tab
The tab is located on the Job record. Clicking the Mass Placement button in the Action Toolbar starts the process. Mass Placement is a two step process: Selecting Candidates and Entering Data.

Selecting Candidates
You have two options to select Candidates:
- Option 1: Select multiple Candidates in the by selecting the checkboxes by the names of the desired Candidates or select all Candidates on the page using the top left checkbox. If you're in the Kanban View, you can also use the checkbox in the Stage column header.
- After selecting Candidates click the Mass Placement icon to open the Mass Placement pop-up window.
- Option 2: To include all Candidates for a Mass Placement click the Mass Placement button without selecting any Candidates.
- Next, choose the option to Mass Place all Candidates from a particular stage. You can select more than one stage or click All.
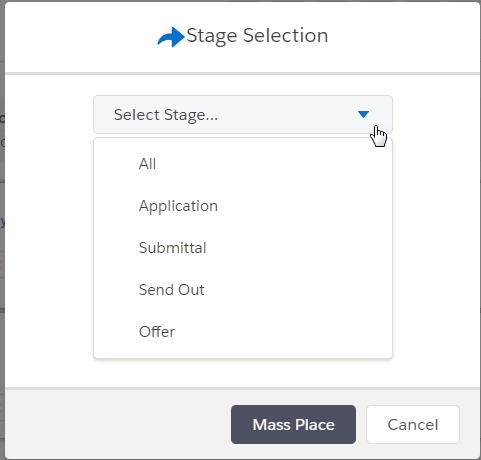
- When you click the Mass Place button, the Mass Placement popup window appears.
- Next, choose the option to Mass Place all Candidates from a particular stage. You can select more than one stage or click All.
After selecting Candidates click the Mass Placement icon to open the Mass Placement pop-up window.
Entering Data
The following sections appear on the Mass Placement pop-up window:
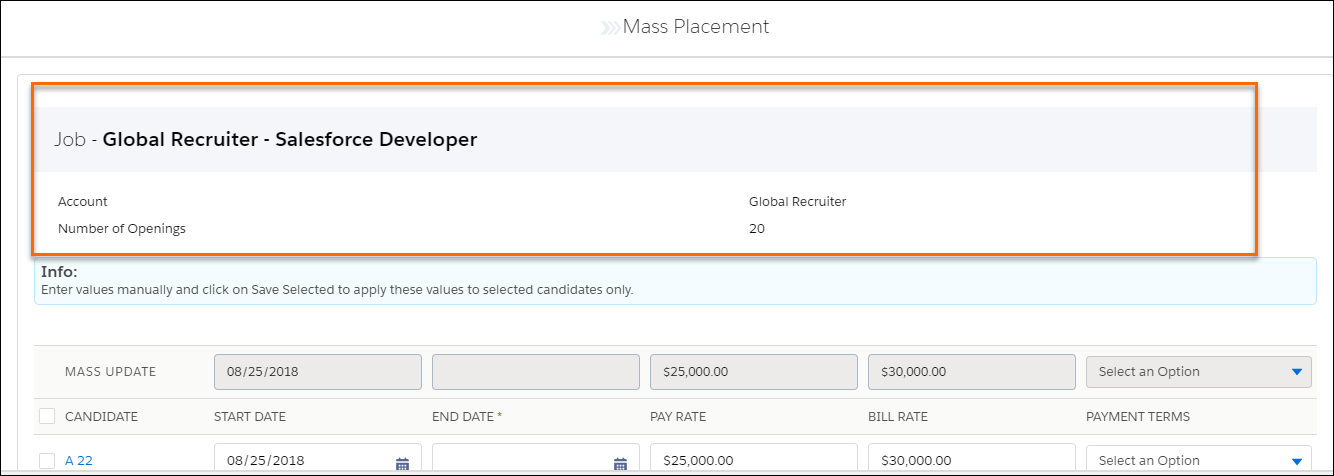
- Job / Information
- Mass Update row
- Closing Report fields
- List of Candidates
- Save and Cancel buttons
Job / Information
The top section of the page can be customized to show fields from the Job or objects:
Admin Note
By default, the fields that can be added and removed come from the following Field Set:
- Setup > Object Manager > Job > Field Sets > TR1__ATS_Mass_Placement_Job_Info
If you use custom Job record types, you may decide to use a different Field Set:
- Create a Field Set against the Job object with the fields you want to include.
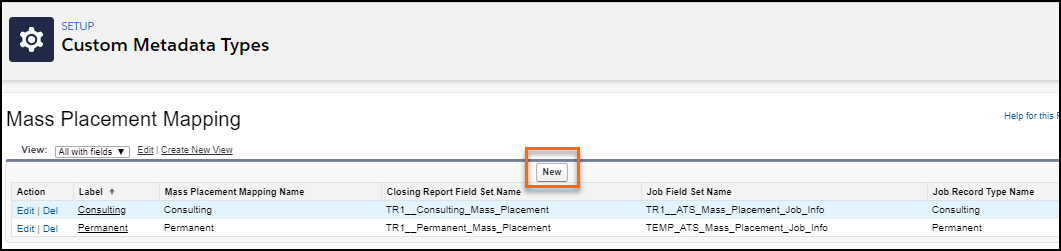
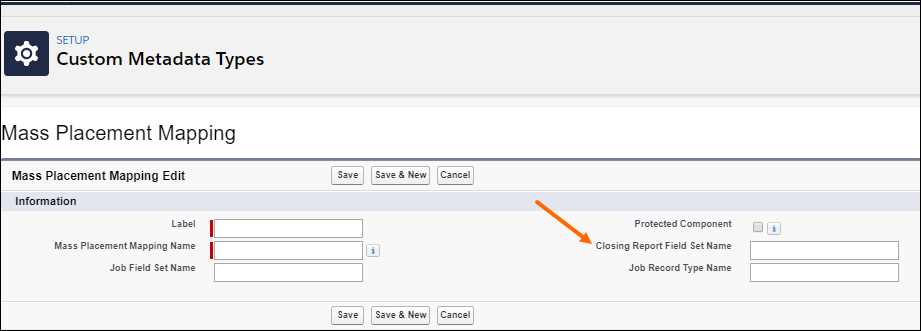
- Navigate to Setup > Custom Metadata Types > Mass Placement Mapping.
- If there is already a record here for your custom Job record type: Click Edit and add the name of the Field Set in TR1__Job_Field_Set_Name__c:
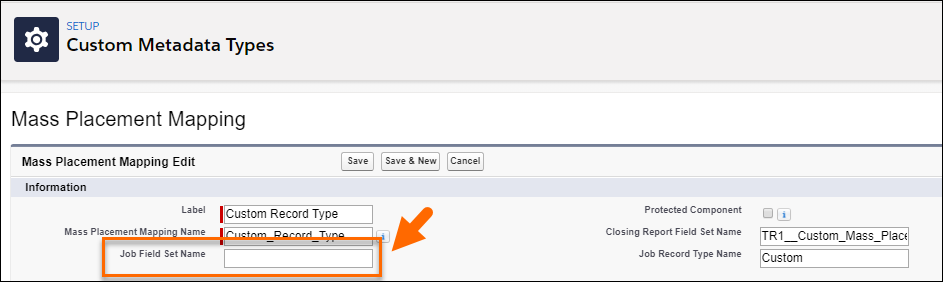
- If there is not yet a record for your custom Job record type: Click New and populate the necessary information, including the name of the Job Field Set you want to reference at the top section of the Mass Placement page. When you're done, click Save.
- If there is already a record here for your custom Job record type: Click Edit and add the name of the Field Set in TR1__Job_Field_Set_Name__c:
Closing Report Fields
The set of fields shown on this page can be customized and depend on the data you want populated when users create s. Different Field Sets can be created for the different s.
Admin Note
We support both the s that come as part of the package, as well as custom s.
To configure the Field Set that is used on the Mass Placement page, follow these two steps:
- Create a Field Set against the object if you haven't already. This is not necessary for Consulting and Permanent s as the Related Field sets are already included the package but is necessary for custom Record Types:
- For Consulting Jobs: Setup > Build > Create > Objects > Closing Report > Field Sets: Consulting Mass Placement.
- For Permanent Jobs: Setup > Build > Create > Objects > Closing Report > Field Sets: Permanent Mass Placement.
- Navigate to Setup > Custom Metadata Type > Mass Placement Mapping and create a Custom Metadata Type record for your s.
- Once you have created the Custom Metadata Type record, enter the relevant Field Set API name in the Closing Report Field Set Name field.
We offer the option to configure the fields on the Closing Report edit page that will be pre-populated with the values taken from corresponding Job fields (e.g. Bill Rate and Pay Rate). This configuration will apply to s created in the and through Mass Placement.
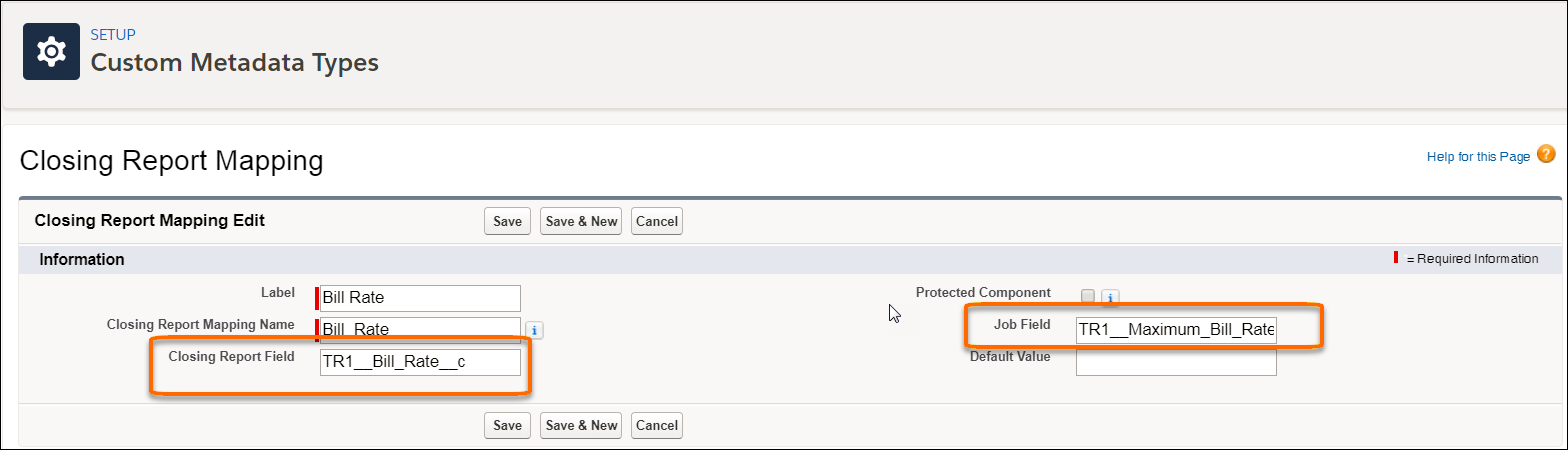
- Navigate to Setup > Custom Metadata Types > Closing Report Mapping [Manage Records] and click New.
- Create a Custom Metadata Type record for each field you want to pre-populate. Enter the API name of the Closing Report field and the API name of the corresponding Job field.
How to Enter Data
There are a few options available to you depending on the data you want to appear on s:
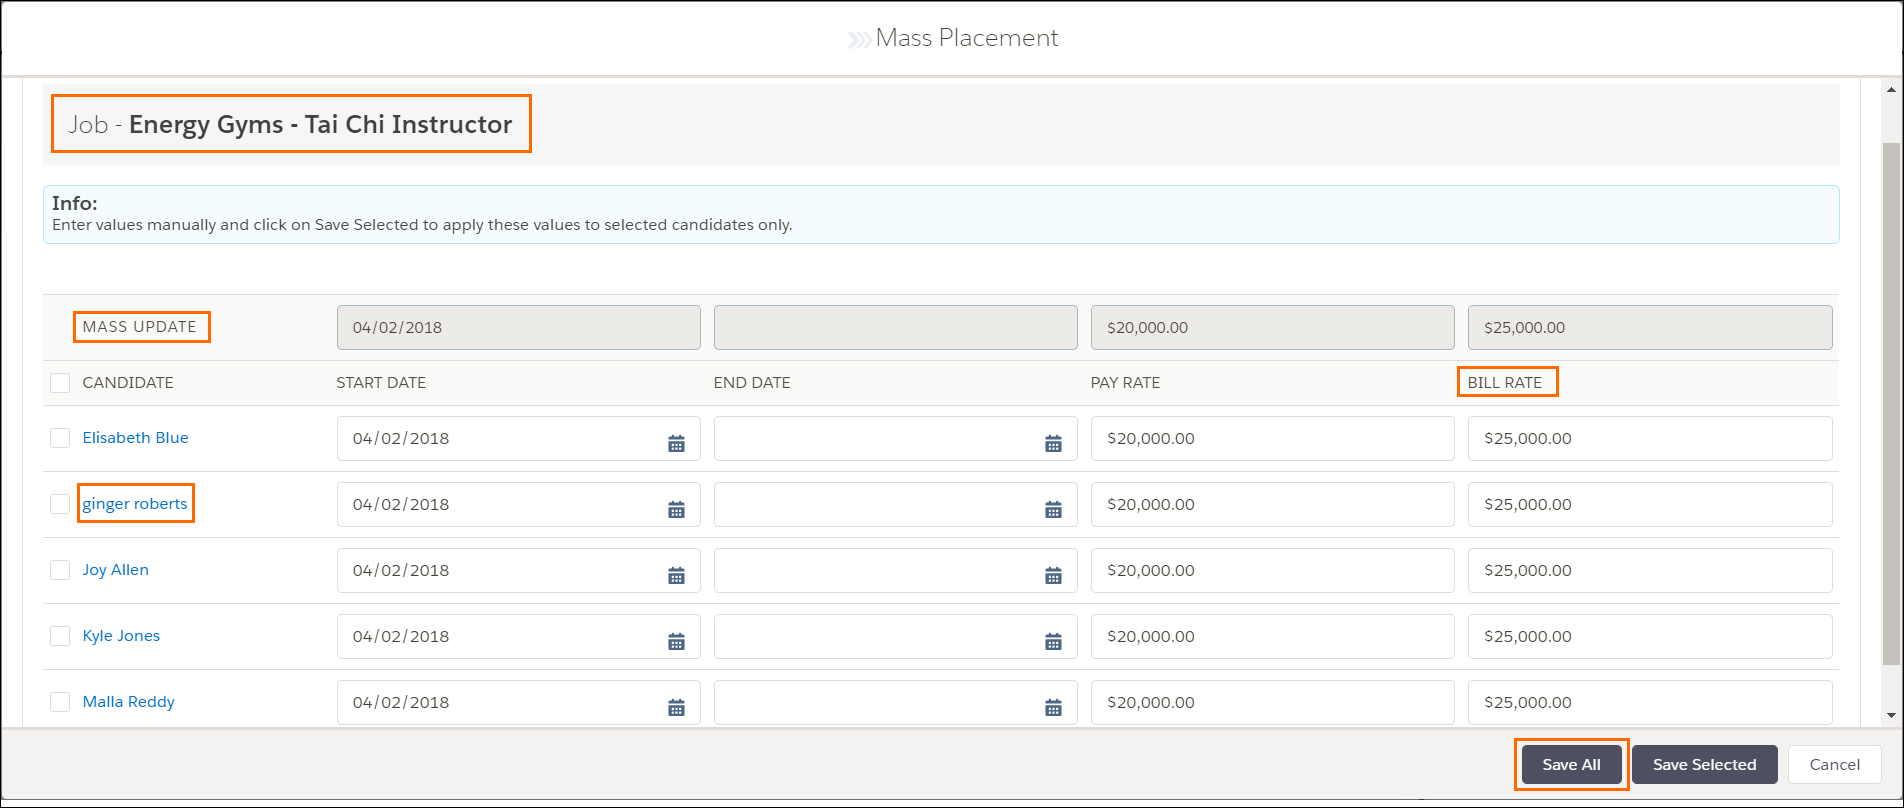
- Option 1 - No editing: This means all s are created and pre-populated with values that are the same for all Candidates. Click Save All.
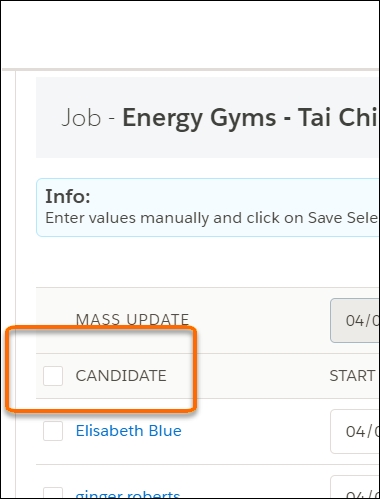
- Option 2 - Edit or populate any of the fields and apply them to all Candidates: Click the top left checkbox to select all Candidates and the Mass Update row will become editable. Any value you enter in any of the fields in the Mass Update row will propagate to the same field for all of the selected Candidates. Click Save Selected.
-
Option 3 - Enter different values for the selected individual or groups of Candidates: Select the desired Candidates and enter a value in the relevant field in the top row or each individual row. Repeat this as required and click Save Selected.
You have the option to select all Candidates for a Mass Placement, regardless of the number. However, only the first 500 Candidates will be shown on the Mass Placement page.
Once the first 500 have been placed and a has been created for each of them, they will disappear from the page and the remaining Candidates will be visible and ready to be processed. While only 500 Candidates can be processed at once, you can remain on the page to continue with the Mass Placement if several hundred need to be placed.
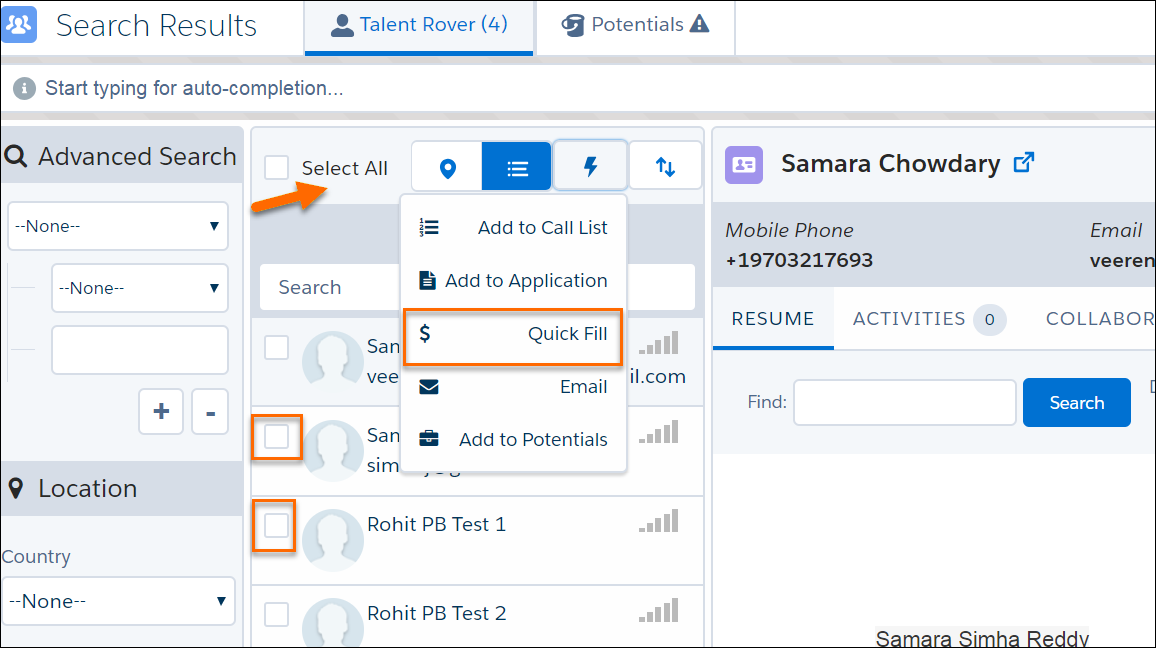
Mass Placement from Results
Mass Placements can be performed from the user interface once Candidates are displayed after a search.
- Select Candidates individually from the Candidate List or click the Select All checkbox.
- Click the Quick Fill link from the Quick Action drop-down.
The data model is only supported in if the Provider is .
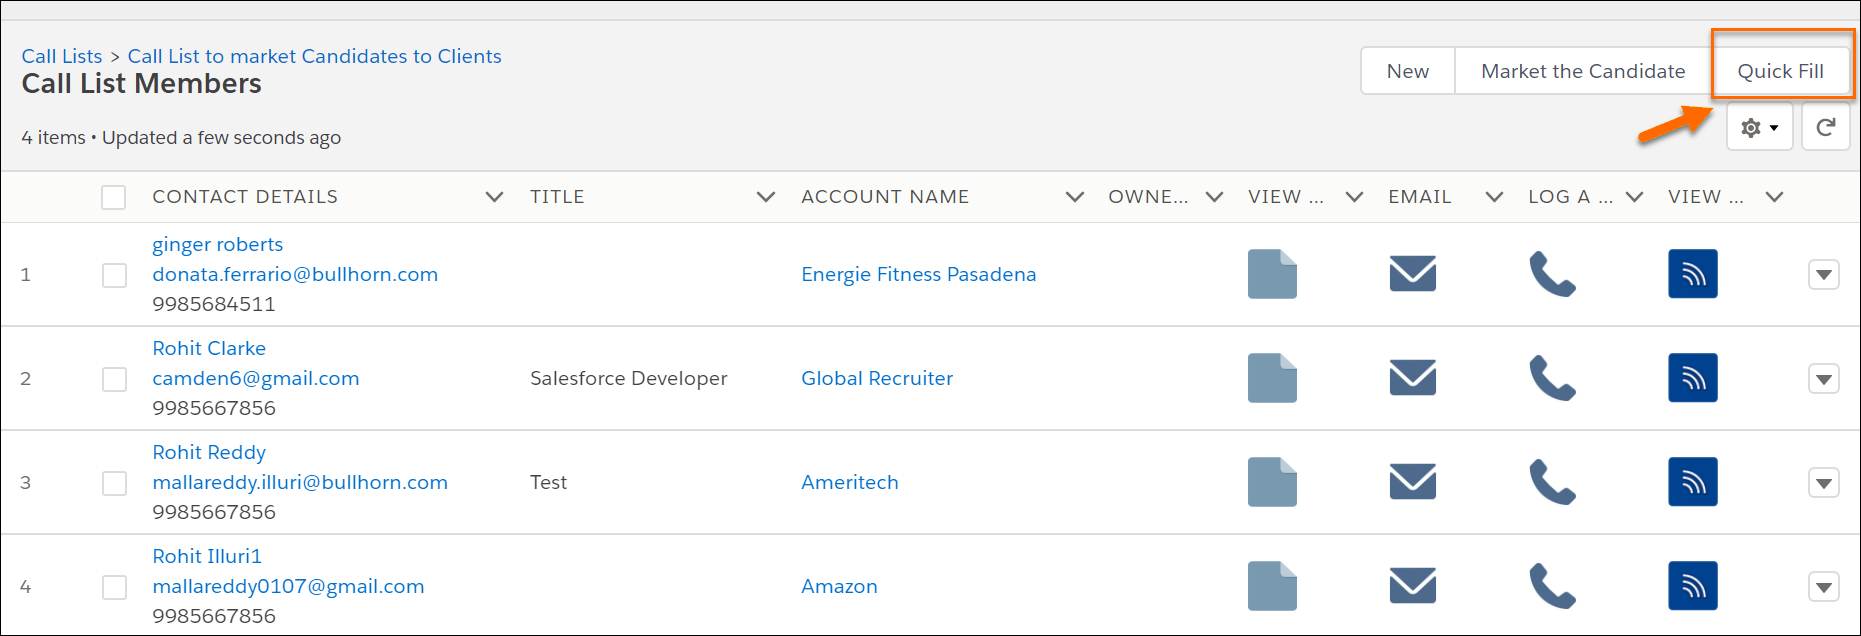
Mass Placement from s
Mass Placement is also available from the s on a .
- Navigate to a .
- Go to s to open the page.
- Click Quick Fill at the top right to open the Quick Fill page and add all .
- If you only want to place a few Candidates, make your selection from the list of Call List Members before clicking Quick Fill.
- If you only want to place a few Candidates, make your selection from the list of Call List Members before clicking Quick Fill.