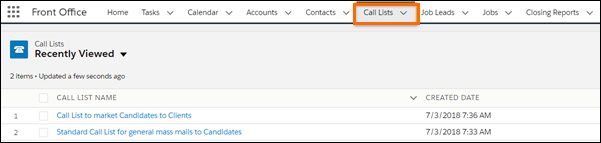
Call Lists
Overview
is a custom object that allows recruiters to curate lists of candidates or clients then send them mass email.
Basics
A can be created and used from the tab as well as from the Applicant Tracking System (ATS) and the results page. s can also be added from a Contact record page or .
There are two s:
- Standard: This can be used for any mass mail. In , mass mails are typically used to reach out to Candidates and alert them about new positions.
- Candidate Marketing: This is designed to mass mail Client Contacts (potential employers) about candidates. When the is created you will enter the name of the candidate you want to market. When you send a mass mail you can attach files directly from the Candidate’s Contact Document (where resumes are stored). s of Candidate Marketing s are usually Client Contacts.
Admin Note:
Mass emails are sent through (not ) so in order to start using Call Lists, users need to enable their email domain with Amazon. Contact Support to get assistance with this process.
Creating and Managing s
In this section, you will find:
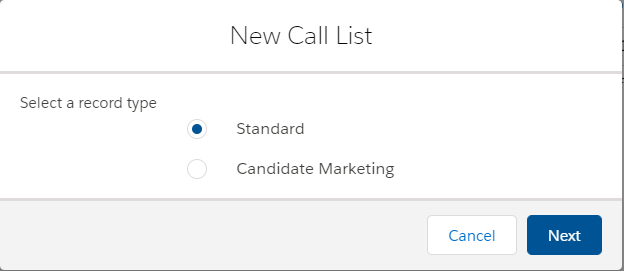
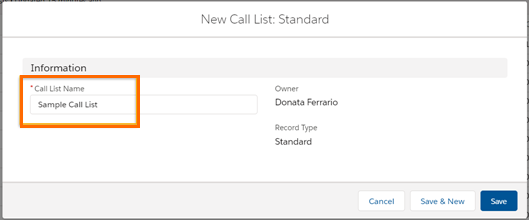
Create a New
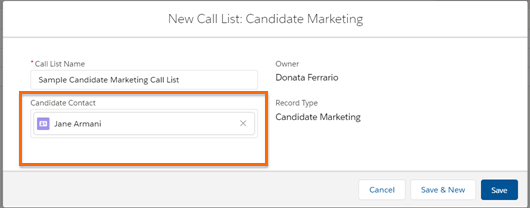
- Go to the tab and click New.

- Select the Record Type.
- Enter a Name for the .
- If you are creating a Candidate Marketing list enter a Candidate Contact name.
- With release v3.390 there is an option to select multiple Candidates. See Candidate Marketing Call Lists with Multiple Candidates below for more details.
- With release v3.390 there is an option to select multiple Candidates. See Candidate Marketing Call Lists with Multiple Candidates below for more details.
Admin Note:
s are not shared by default. There are three ways of sharing a , listed below in order of most to least restrictive:
- Add the Sharing button to the page layout and users can manually share each as needed. A user can only share a if they are the owner.
- Enable Modify All permission for the object at profile level or via a Permission Set
- Make the object Public Read / Write in Sharing Settings and set up a sharing rule so that All Users share with All Users.
Add s
- Go to the section on a record.
- Click on New.
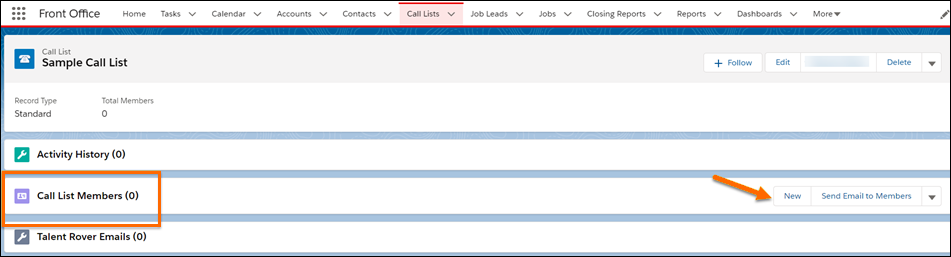
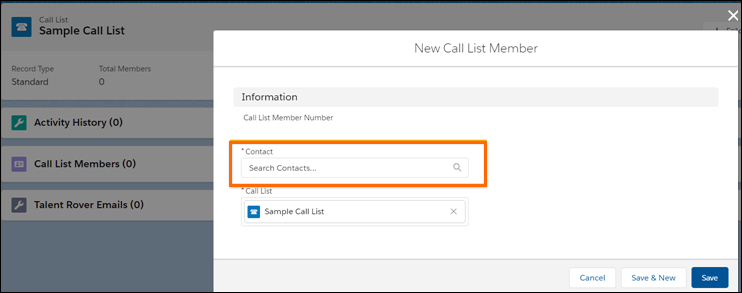
- The New Call List Member popup contains a lookup field to the Contact object to search for members to add.
You can also quickly create a and add s from Contact s. From the select the desired candidates and click the Add To button. The may need to add the button to the page layout.
Admin Note:
s that use Contacts can limit the Contact lookup field to a specific . See this article for details: Add s based on Contact.
Manage s

is a child object to . It displays details in a on the page.
The following actions can be performed from the s .
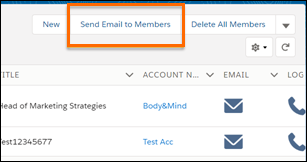
- Send Email to Members: Tick the checkbox next to the s to include and click this button to send a mass email.
- Delete Selected Members: Tick the checkbox near the names then use this button to remove them from the .
- Delete All Members: Use this button to delete all members from the at once.
- New Application: Use this button to apply s to a Job without having to navigate to the ATS.
- Add To Longlist: Use this button to create a Longlist record for s and relate to a Job. ( only. See this article for more details: Long Lists.)
- Mass Placement: This allows recruiters to mass place Candidates directly from s. ( only)
Admin Note:
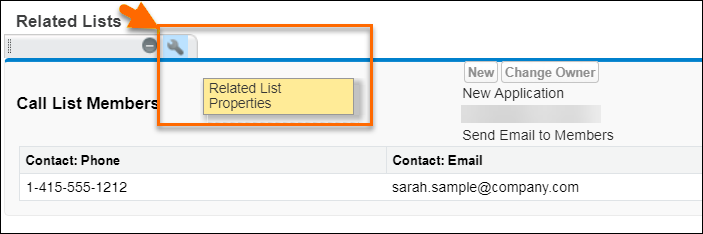
Action buttons can be added or removed from the page layout. The columns displayed on the s can also be customized.
- Go to object > Edit Page Layout > Related List >
- Click on Related List Properties to add or remove columns and buttons.
The Contact Details field cannot be ordered alphabetically. If you want to order s by Last Name add the Last Name field and use that to sort.
Combine s
It is possible to merge s together using the Combine button.
- Go to any record and click on Combine Call List.
- Select your Target where all your combined s will go. The you are in is selected by default, but you can choose another existing (use the lookup), or create a new .
- Once you have designated your Target click Continue.
- Add s from the Add Members from these s section by selecting a . This will add all members. If you've selected multiple s you have the option to add s only if they belong to all the selected s.
- Next, you can enter s in the Exclude Members from these s section, to excludes belonging to those s.
- This allows you to add all s that are in 'a' and 'b' to your Target but not if they are also in 'c'.
- To complete the merge, click on the Combine Call List button at the bottom of this page.
Admin Note:
To use this functionality add the Combine button to the page layout.
Access s from and
It is possible to create or update s from the and from the result page in following these steps:
- Select Candidates from the Results list in or from the page.
- Click on the Mass Action icons and select Add To Call List.
- In Call List Name type the name of your new .
- Choose Click To Add along with choice of Record Type.
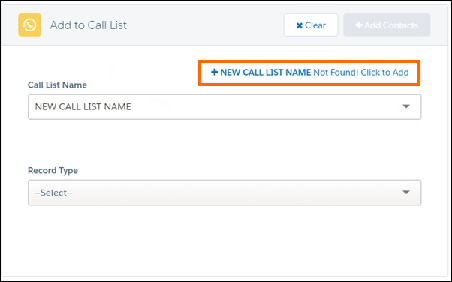
- Click on Add Contacts
To add Candidates to an existing , type the name of the in the Name field and click on Add Contacts.
Send Mass Emails to s
In this section, you will find:
- Set a Default Email Address Field
- Email Signatures
- Troubleshoot Adding Call List Members
- Use Templates and Attachments
- Call List Email Sending Limits
- Unsubscribe from a Call List
Select s by ticking the checkbox by their name and then click the Send Email to Members button. To send the email to all s, click on the button without making a selection.
After clicking the button the Send Email page opens. It will show the list of recipients, the option of selecting a template, the email body text box, and the Add Attachment options.
If the list of recipients is a BCC list, the recipients DO NOT see the others in the list.
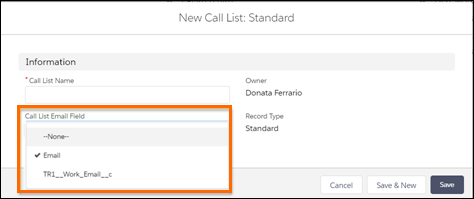
Set a Default Email Address Field
By default, emails sent from s are sent to the email address pulled from the Contact record. Two alternative configurations are possible:
- Set either Email or Work Email (TR1__Work_Email__c) as the recipient’s email address for all emails sent from s
- Select which Contact Email field should be used at individual level when you create a new .
Admin Note:
For with = Standard:
- Go to Setup > Custom Settings > Properties > [Manage Records] > Standard CallList Email Field and enter either Email or Work Email.
For with = Candidate Marketing:
- Go to Setup > Custom Settings > Properties > [Manage Records] > Candidate Mktg Call List Email Field and enter either Email or Work Email.
If these Custom Settings are left blank, the system will use Email as the default email.
Add the TR1__Call_List_Email_Field__c field to the page layout so any user creating a new Call List is given the option to select either Email or Work Email as the default for that list.
Troubleshoot Adding s
If the selected Call List Members don’t get added to the Send To field, it might be for one of these reasons:
- The Candidate Status picklist on the Contact record for the is set to Assigned, Placed, or DNU.

The status values that control exclusion from the email are set in a package Custom Label (Candidate DNE Statuses) and can be customized. This filter only applies to Standard Call Lists, not to Candidate Marketing Call Lists.
- If the default email field designated in the Custom Setting (Email or Work Email) is not populated on the Contact record, then the will not be included.
- On the Contact record, the Email OptOut checkbox is ticked.
Email Sending Limits
Call List Emails are sent via , so limits don't apply.
If the Call List size is on the large side the Email Status field may fail to update due to timing out. To avoid this and keep email tracking accurate, stay below 5,000 emails per blast.
Email Signatures
You can automatically include your signature in emails by using the standard email signature functionality. To set one up go to Your Name (top right of screen) > Settings > Emails > My Email Settings > Email Signature
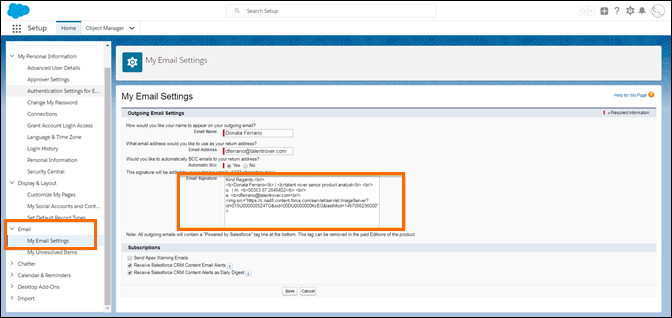
If the signature uses plain text strings, it will not preserve any formatting or line breaks in emails. It is recommended to use an HTML signature which permits formatting and use of a logo or image.
Admin Note:
To have s use the email signature activate this Custom Setting: Setup > Custom Settings > Properties > Use Signature in Call Lists.
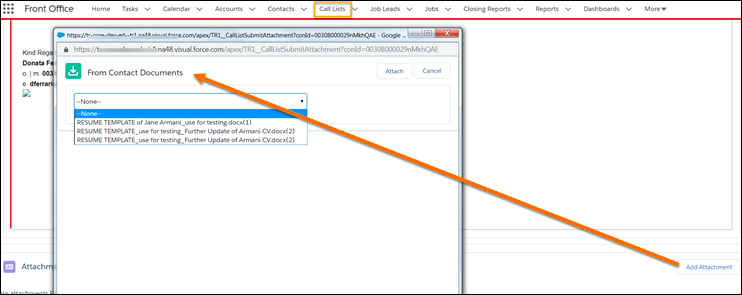
Use Templates and Attachments
Templates can be used in s emails as long as they do not use template merge fields. The only supported merge fields are {!FirstName} and {!LastName} but they must be inserted directly in the Email message (subject or body) rather than included in a template.
Attachments can be added from your computer when you are using a Standard , and from the Contact Document when you are using a Candidate Marketing .
Admin Note:
When you are sending emails from a Candidate Marketing , the candidate’s resume is attached to the email by default. You can disable this action by using this Custom Setting:
Setup > Custom Setting > Properties > Do Not Attach Resume In Call List
Unsubscribe from a
When an email is sent from a , it contains an Unsubscribe link:
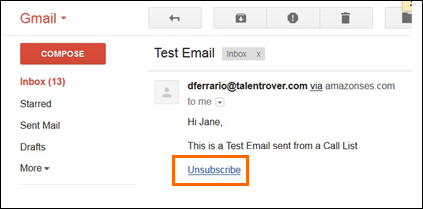
Recipients who click on that link will not receive any further email sent from a from that particular . If the Unsubscribe link was clicked by mistake or if the recipient wants to receive emails again, create a case with Support.
Important details:
- This only applies to emails sent from s, not to emails sent from any other place in (like Contact > Activity > Send an Email).
- When a recipient clicks on the Unsubscribe link, there is no field update on the corresponding Contact Record (such as an Email OptOut), however a task record is created against the Contact's Activity History with a Subject of Email Suppressed, followed by the name of the Call List. You can create a Task report filtered by “Subject contains Email Suppressed” to keep track of who unsubscribed.
- Unsubscribe has been implemented to comply with requirements. If recipients are not given the option to unsubscribe, the sender can be blocked.
- If your needs to remove this option, please contact to discuss but be aware that the request might be declined depending on feedback.
Candidate Marketing s with Multiple Candidates
This feature requires package release v. 3.390 or higher and the must use Lightning. The existing Market the Candidate button on the is replaced by the Market Candidate button.


This feature no longer uses the Candidate Contact field which can be removed if you are switching to this version. Instead, there is a new Email edit page that contains a Candidates lookup field, letting you select multiple candidates.
Admin Note:
Follow these steps to replace the button:
- Go to Setup > Object Manager > Call Lists > Page Layouts.
- Select the page layout for Candidate Marketing in Lightning.
- Go to thes and edit the Properties (click on the wrench icon).
- Go to the Buttons section and remove Market the Candidate and replace with Market Candidate then Save.
To remove the Candidate Contact field, follow these steps:
- Go to Setup > Object Manager > Call Lists > Fields & Relationships > Candidate Contact (TR1__CandidateContact__c).
- Click on the field name and then the Set Field Level Security button.
- Remove visibility for all relevant profiles.
Email Editing Page Fields
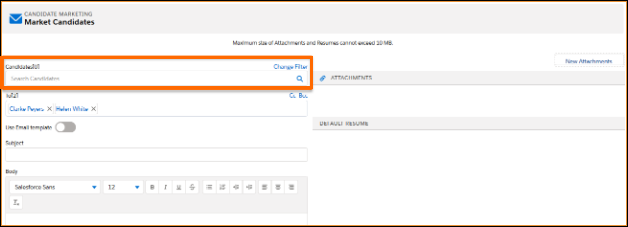
When clicking the Market Candidate button, the email editing page will be displayed. All s will automatically be selected as recipients if no individual selection is made. This is what the page includes:
- Candidates lookup field
- Recipients list (To, CC and Bcc)
- Email Templates selection
- Email Editor
- Preview
- Attachments
- Default Resume
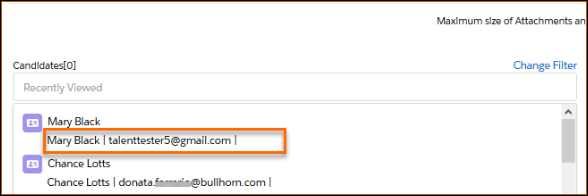
Candidates lookup field: Candidates can be filtered using Contact s. Use the Change Filter link on the right to switch between lists. If Global Search is selected in the drop-down, you will search all Contacts you have access to.
To help identify the Candidate in the lookup field, you can add information from Contact record fields:
Admin Note:
To customize the fields shown go to Setup > Object Manager > Contact > Field Sets > ATSv2 CallList CandidateLookup (TR1__ATSv2_CallList_CandidateLookup).
It is recommended to add only two or three fields. If you add a field with the Type is lookup, you will only see the Record ID. If you add a field with the Type is Rich Text the formatting will be ignored.
Email Templates: Email Templates are available by enabling the Use Email Template toggle on the screen.
HTML, Custom, and Text template formats are supported along with Contact and User merge fields.
Preview: This read-only feature lets you check how merge fields are rendered in both the email subject and the email body. If there is more than one recipient only the first recipient will be merged.
Default Resume: If the candidate has a resume stored in the Contact Document object and flagged as Default, the resume will be displayed. If there are multiple versions of a resume available, users will be able to select the preferred version to send as attachments in the email.
Attachment: Files can be uploaded using the New Attachment button and sent in the email along with resumes. The total attachment size per email is limited to 10 MB, including the resume and uploaded attachments.
Activity records: When an email is sent, a Task (Activity) is created for each Candidate/ Client combination. For example, when marketing three candidates to three client contacts, nine tasks will be created.
Admin Note:
You can adjust how Activity Records are created:
Go to Setup > Activity Settings and enable the Allow Users to Relate Multiple Contacts to Tasks and Events checkbox.
If Allow Users to Relate Multiple Contacts to Tasks and Events isn't enabled, when marketing three candidates to three contacts, six tasks will be created.