Shift Differential Setup
This is Time & Labor functionality. To have Time & Labor enabled, contact your Account Manager.
The Shift Differential feature empowers you to define and apply shifts to placements, and provides you the ability to pay and/or bill distinct rates based on the hours a candidate works per shift.
Contact your Account or Relationship Manager to enable Shift Differential.
In order to use Shift Differentials, the earn codes you need for paying a shift diff must be configured for your Agency and set properly on the rate card
- For information on how to add an earn code, see Earn Code Overview and Enablement.
- For information on how to add or edit a rate card, see Placement Rate Cards.
After Shift Differentials have been enabled, you need to set them up. Follow the steps below to complete the Shift Differential setup.
Add Shift Differentials to the Company and Map Earn Codes
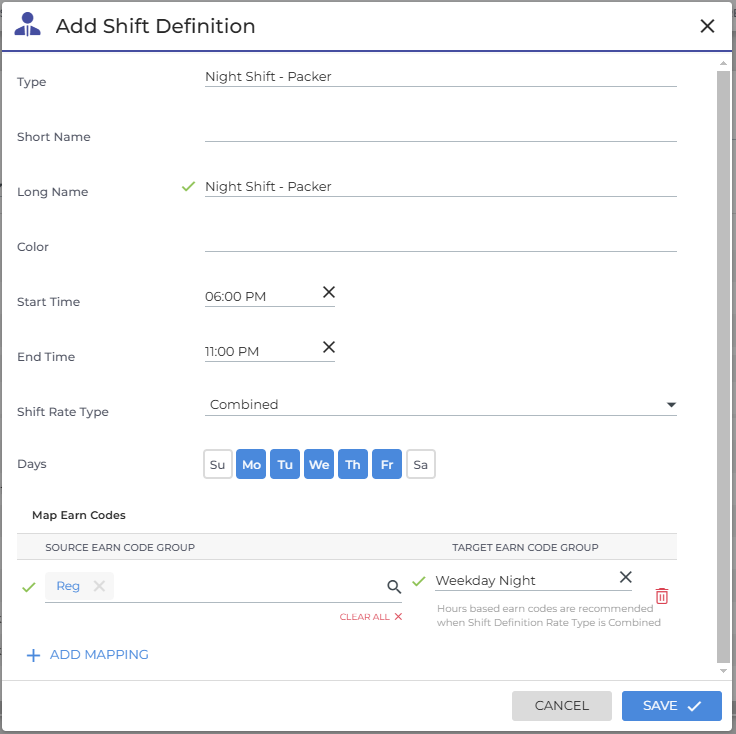
A Shift Differential needs to be added for each shift that has a different rate. Adding a Shift Differential to the Company defines the shift so that it may be used later.
- Open a Company record and navigate to the Shifts tab.
- Click Add Shift Definition.
-
In the Add Shift Definition pop-up, enter the following
information:
- Type: Enter what type of shift you are creating.
- For example, Night Shift.
- Short Name: Enter the shorthand version/nickname of your
shift.
- If no shortened version of the name exists, enter the same name as the Long Name.
- Long Name: Enter the name you want to give the shift.
- This should be the same name you designated on the rate card you create for this shift.
- Shift Rate Type: Choose between Combined and Differential.
Combined: Original Shift Differential functionality, combines the base rate and differential rate. Intended to be used with hours-based Earn Codes.
Differential: Alternate Shift Differential Functionality, allows the base rate for a shift and the differential rate for a shift to be calculated separately. Intended to be used with units-based Earn Codes.
- Start Time: Enter the time you would like the shift to start.
- End Time: Enter the time you would like the shift to end.
- Days: Select the days of the week to which you would
like the apply the Shift Differential rate.
- Type: Enter what type of shift you are creating.
-
If the shift requires a different rate than your base rate, click
Add Mapping.
- If you don't want to add any earn code mapping, skip the next two steps.
- Click the Source Earn Code Group field then select the earn code you want to associate with this shift.
- Click the Target Earn Code Group field then select the earn code to which you want to map the source earn code to.
- Click Save.
To learn more about earn codes, see Earn Codes.
Rate Card Configuration
Configure rate cards to ensure that the rate for the identified shift is available on the rate card.
If the appropriate rate cards were not added beforehand or need to be adjusted, see Placement Rate Cards.
- In the Placement record, click the Rate Cards tab.
- Click Edit.
-
Add the desired rates for each of the Source Earn Code and
Target Earn Code you mapped above.

- Click Save.
Assign Shifts
Shifts don't flow down automatically from the company to the Job. They must be manually assigned to the Placement so that the correct shift can be identified and priced when the worker clocks-in/clocks-out.
-
In the Placement record, navigate to the Placement Shift Sets tab.
-
Click Edit.
-
Click Assign Shift Definitions.
-
Click the Shift Definitions field and enter the Shift Differential you created.
-
Select the Shift Differential.
-
Click Assign.
After your time has been entered and identified as specific shifts, pay and bill transactions will reflect the shift differential rates accordingly.