| Package: Recruiting(JS2) |
Keyword Search Overview
![]()
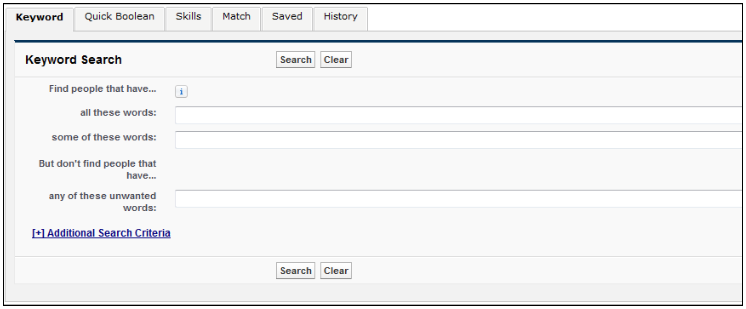
Keyword Search examines the resumes in Candidate records and allows you to filter on selected Candidate record fields and the radius from the Candidate home zip code.
The best way to use Keyword Search is as follows:
-
In the Find people that have all these words field, enter one or more keywords separated by a space. The search results must contain all of the keywords entered in this field.
-
In the Find people that have some of these words field, enter one or more keywords separated by a space. The search results must contain at least one of the keywords entered in this field.
-
In the But don't find people that have any of these unwanted words field, enter one or more keywords separated by a space. The search results must not contain any of the keywords entered in this field.
When using the all these words, some of these words, and any of these unwanted words fields, keep the following general search rules in mind:
-
In the all these words field, a space acts as the logical AND operator. For example, ASP and PHP will return Candidates who mention both ASP and PHP.
-
In the some of these words field, a space acts as the logical OR operator. For example, ASP or PHP will return Candidates who mention either ASP or PHP.
-
In the any of these unwanted words field, a space acts as the logical OR operator. For example, ASP or PHP will not return any Candidates who mention either ASP or PHP.
-
An asterisk (*) acts as a wildcard. For example, photo* will return photo, photos, photoshop, etc.
-
A question mark (?) replaces any single character. For example, jo?n will return Candidates who mention john, joan, etc.
-
Quotation marks (" ") convert multiple words into phrases. For example, "SQL Server" will return only Candidates who mention SQL Server, but not Candidates who mention Server SQL or SQL without Server next to it.
Note: The length of the search string must be three or more characters. Search strings with one or two characters are ignored.
-
-
To search on additional fields, click the [+] Additional Search Criteria link at the bottom of the screen.
-
Optionally, enter one or more keywords into the following fields:
-
First Name
-
Last Name
-
Title
-
Company
-
School
-
-
Optionally, narrow down the list of Candidates to those who live within a certain area by:
-
Selecting "Located In or Near" from the Location drop-down list.
-
If you are searching within the United States, select United States from the Country drop-down list, enter a zip code into the Postal Code field, and then select the number of miles to search from the specified zip code from the Within drop-down list. Possible values are:
-
10
-
25
-
35
-
50
-
75
-
100
-
-
If you are searching in a country other than the United States, select the country from the Country drop-down list and then enter the name of the city you want to search in the City field.
-
-
If you do not want to filter on a Candidate's location, leave the Location field set to Anywhere.
-
-
Optionally, narrow down the list of Candidates to those who are available to start by a specific date. Either enter today's date by clicking the link to the right of the Date Available field or click within the Date Available field and select a date from the calendar that displays.
-
Click the Search button to run the search or click the Clear button to clear the screen and start a new search. The search results are displayed at the bottom of the Keyword Search screen.
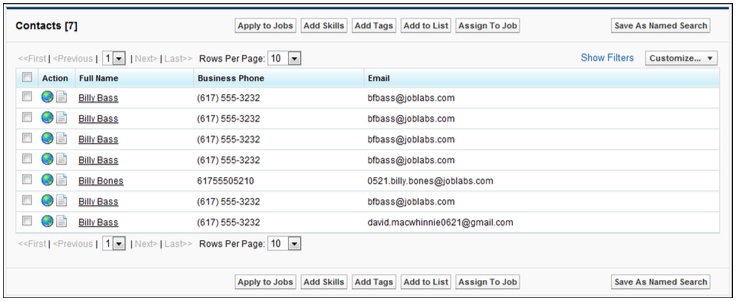
If there are more than ten contacts returned for a search, multiple pages are added to the results. You can jump to any page in the search results by selecting the First, Previous, Next, or Last links, or by selecting a specific page from the drop-down list. In addition, you can select how many results you want displayed on a page (10, 25, 50, 100, or 200) from the Rows Per Page drop-down list.
Note: When performing a Keyword Search, up to 2000 search results can be displayed. In addition, the results returned contain a text version of each Candidate's resume. If you click the Resume icon , the resume is displayed and the terms that were searched are highlighted.
Search Filters
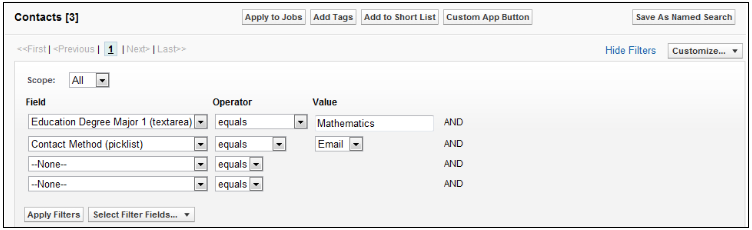
If you still need to narrow down the list of Candidates, add one or more filter values. These are queries against fields in the Candidate record.
-
From the Keyword Search screen, navigate to the Show Filters link.
-
Pick a value from the first Field drop-down list.
Note: To modify the list of fields that are listed under the Field drop-down lists, click Select Filter Fields. In the resulting screen, check the fields that you would like see and then click Save. -
Optionally, pick a different value from the Operator drop-down list.
The available values change, depending on what you selected in the Field drop-down list. -
Enter a value in the Value field.
-
Optionally, repeat steps 2 through 4 to create additional filters.
-
Select Apply Filters.
-
Optionally, you can Save As Named Search.
-
Choose Candidate(s) from the List View at the bottom of the screen.
Customizing the Search Results Columns
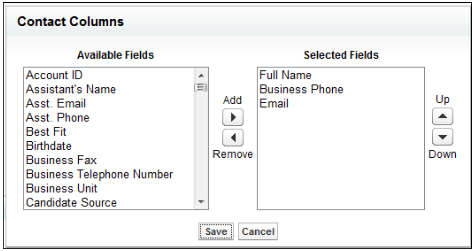
You can customize the columns that display in the search results. Each customization is End User-specific and will dis- play the same way for each search an End User initiates. To customize the search results columns:
-
Go to Customize...
-
Pick a field that you want displayed as a column in the search results by selecting the field in the Available Fields box and then clicking Add to move it to the Selected Fields box.
If you do not want a field displayed as a column in the search results, select it in the Selected Fields box and then click Remove to remove it from the Selected Fields box. -
To arrange the order of the columns, select a field in the Selected Fields box and then click Up or Down to move it to the desired location.
-
Save your changes or Cancel to do nothing.
The search results will refresh displaying the changes you made.
Processing Candidates
A successful search of any type creates a List View of Candidates. At this point you may select one or more Candidates and:
-
Apply them to jobs
-
Add skills that better define them
-
Add tags that better categorize them
-
Add them to Short Lists that associate them with other similar Candidates
-
Assign them to a specific Job Order
Applying to Jobs
Having selected a Candidate from the List View after a successful search, you may create an Application that associates him or her with a Job Order.
-
Optionally, navigate to Apply to Jobs.
-
Click
 to open a search dialog and to select a Job Order.
 -
Select Apply to Position and OK or Cancel to do nothing.
Adding Skills
Having selected one or more Candidates from the List View after a successful search, you may add skills to these record(s).
-
Optionally, navigate to Add Skills.
-
Select skills and either Save Skills or Cancel to do nothing.
Adding Tags
Having selected one or more Candidates from the List View after a successful search, you may add tags to these record(s).
-
Optionally, navigate to Add Tags.
-
Add tags to the Personal Tags and/or Public Tags lists and either Add Tags or Cancel to do nothing.
Adding to a Short List
Having selected one or more Candidates from the List View after a successful search, you may add them to a Short List.
-
Optionally, navigate to Add to Short List.
-
Add the Candidates to an existing or new Short List.
Assigning to a Job Order
Having selected one or more Candidates from the List View after a successful search, you may assign these candidates to a Job Order.
-
Optionally, navigate Assign To Job.
-
Click
to open a search dialog and to select a Job Order. -
Select Assign to Position and OK or Cancel to do nothing.
You can also view this video for more information: