Configuring Amplify Transcribe
Learn how to configure Amplify Transcribe for your organization. All settings are managed through the Transcribe Config tab in Amplify Admin.
For a guide to setting up and using Transcribe as an end user, see Using Amplify Transcribe.
Enable Amplify Transcribe
Amplify Transcribe is switched off by default, but can be enabled by an Admin via the Labs tab. For more information, see Amplify Labs.
To enable Transcribe:
-
Go to Menu > Admin > Amplify Admin > Labs.
-
Toggle Transcribe on.

Once enabled, you'll have access to the Transcribe Config tab within Amplify Admin, where you can provision Transcribe to your selected users and configure company-wide settings as outlined in the rest of this article.
By default, all users have access to Transcribe once it's switched on. To restrict access to specific individuals, use the Enabled Users setting on the Transcribe Config tab.
Access Transcribe Settings
-
Go to Menu > Admin > Amplify Admin.
-
Click the Transcribe Config tab.
-
Configure the settings as outlined below.
-
Click Save when finished.
Available Settings
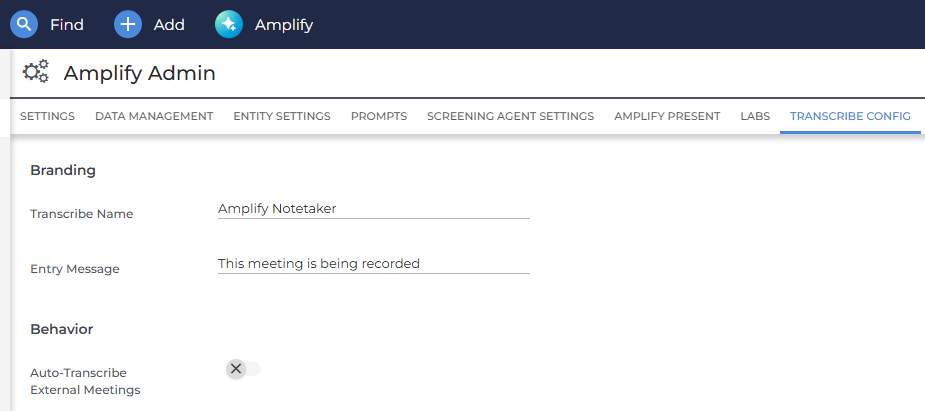
Branding
These settings control how the Transcribe bot identifies itself when it joins a meeting.
-
Transcribe Name: Sets the name displayed to other meeting attendees when the bot joins. This applies to all users in your corporation by default, but individual users can set their own bot name in their personal settings.
-
Entry Message: Sets the introductory message displayed to attendees when the bot joins. Use this to let attendees know the meeting is being recorded. This applies to all users in your corporation.
Behavior
This setting controls which meetings Transcribe automatically records.
-
Auto-record external meetings: When enabled, meetings where at least one invitee has an external email domain (one not assigned to any ATS users in your corporation) will appear pre-checked in your Meetings tab. This means the bot joins those meetings automatically. Users can uncheck individual meetings to opt out before the call starts.
Enabled Users (Early Access Only)
Use this setting to restrict Transcribe access to specific Bullhorn users. Enter user names in the field to limit access. Leave it blank to give all users access.
AI Processing
These settings control how Transcribe processes call recordings.
Compliance Prompt
The compliance prompt is a master prompt that runs across the full transcript at the end of every call. Use it to:
-
Clean up spoken language (for example, removing filler words like "um" and "er")
-
Redact specific content from the transcript (for example, confidential information for compliance purposes)
Note type Configurations
Note type configurations are the core of how Transcribe generates structured, role-specific outputs. For each note type you select from the dropdown, you can configure a prep sheet and a custom processing prompt.
Prep Sheet
A prep sheet is a checklist shown to the user before and during a call. Use it to guide your team on what to cover — for example, asking about a candidate's experience, salary expectations, and notice period during a prescreen call.
Transcribe also uses the prep sheet when generating its post-call commentary, assessing how well the conversation addressed each item.
Custom Processing Prompt
The custom processing prompt tells Transcribe how to process the transcript for a specific type of call. For example, a prescreen prompt might instruct Transcribe to evaluate the candidate against specific criteria, while a business development prompt might focus on identifying next steps and key objections.
This prompt works alongside the compliance prompt — you don't need to repeat anything from the compliance prompt here, as it runs automatically on every call. Use the custom processing prompt to provide additional instructions specific to each call type.
Parent / Child Configurations
For greater granularity, note types support parent / child configurations. Each parent configuration maps to a Bullhorn note type (for example, "Prescreen"). Under a parent, you can create multiple child configurations such as "Prescreen: Intake" and "Prescreen: Technical", each with its own prep sheet and summarization prompt.
Child configurations don't need to correspond to separate note types in Bullhorn. They sit under the parent note type and let you tailor Transcribe's behavior for different variations of the same call type. When a meeting is saved, the note will be saved under the parent note type.
When a user opens a meeting, Transcribe attempts to infer the correct child configuration from the meeting name or description. If it can't determine the type automatically, users can select it manually from the Call Type drop down before or during the call.
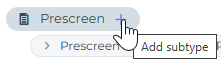
To add a child configuration:
-
Click the + on a configured note type (for example, Prescreen).
-
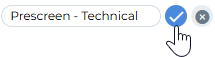
Enter a name for the child configuration (for example, "Prescreen - Technical.")
-
Click the check icon to save it. You can add multiple child configurations under each parent.
-
Click the child configuration name to open its settings and configure the prep sheet and custom processing prompt.
-
When finished, click Save.
Advanced Settings
These settings control how the Transcribe bot behaves in edge cases — how long it waits if no one joins, how long it stays after everyone leaves, and when it exits a waiting room. Adjust these to reflect realistic meeting behavior in your organization.
-
Auto-Leave When Only Bots Remain: When enabled, the bot automatically leaves a meeting if all other attendees have left and only other bots remain.
-
Waiting Room Timeout (seconds): The number of seconds the bot will wait in a meeting's waiting room before leaving if it isn't admitted.
-
No One Joined Timeout (seconds): The number of seconds the bot will wait in a meeting before leaving if no other attendees join.
-
Everyone Left Timeout (seconds): The number of seconds the bot will wait after all other attendees have left the meeting.