GDPR: Managing Preferences for Communication
Give your Candidates and Sales Contacts control over their communication preferences while staying compliant with GDPR. Managing preferences ensures that every recipient receives only the communications they consented to, helping improve engagement and maintain compliance.
Common Reasons You Might Manage Preferences
-
You need to comply with GDPR or other data protection laws.
-
You want to give Candidates and Contacts the power to choose which emails they receive.
-
You’re reducing unsubscribe rates by offering flexible opt-in options.
-
You want to separate recruiting communications from general marketing.
-
You’re setting up new Automation templates that require footer links.
-
You’re improving deliverability and reducing spam risk.
Create a GDPR Preferences Survey
You’ll start by creating a survey that lets Candidates and Contacts manage their consent preferences.
-
In Bullhorn Automation, click Engagements
 Using Automation to interact with Candidates and Clients. Typically done through Survey and chatbot. in the left navigation.
 -
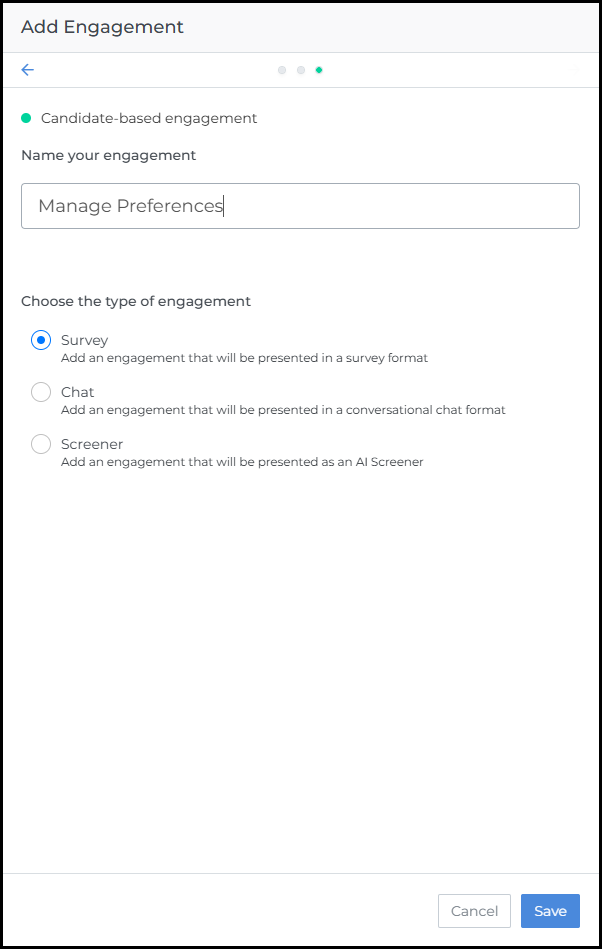
Click Add Engagement, then select Start from Scratch.
-
Choose Candidate-based engagement.
-
Enter a name such as Manage Preferences.
-
Under Choose the type of engagement, select Survey, then click Save.
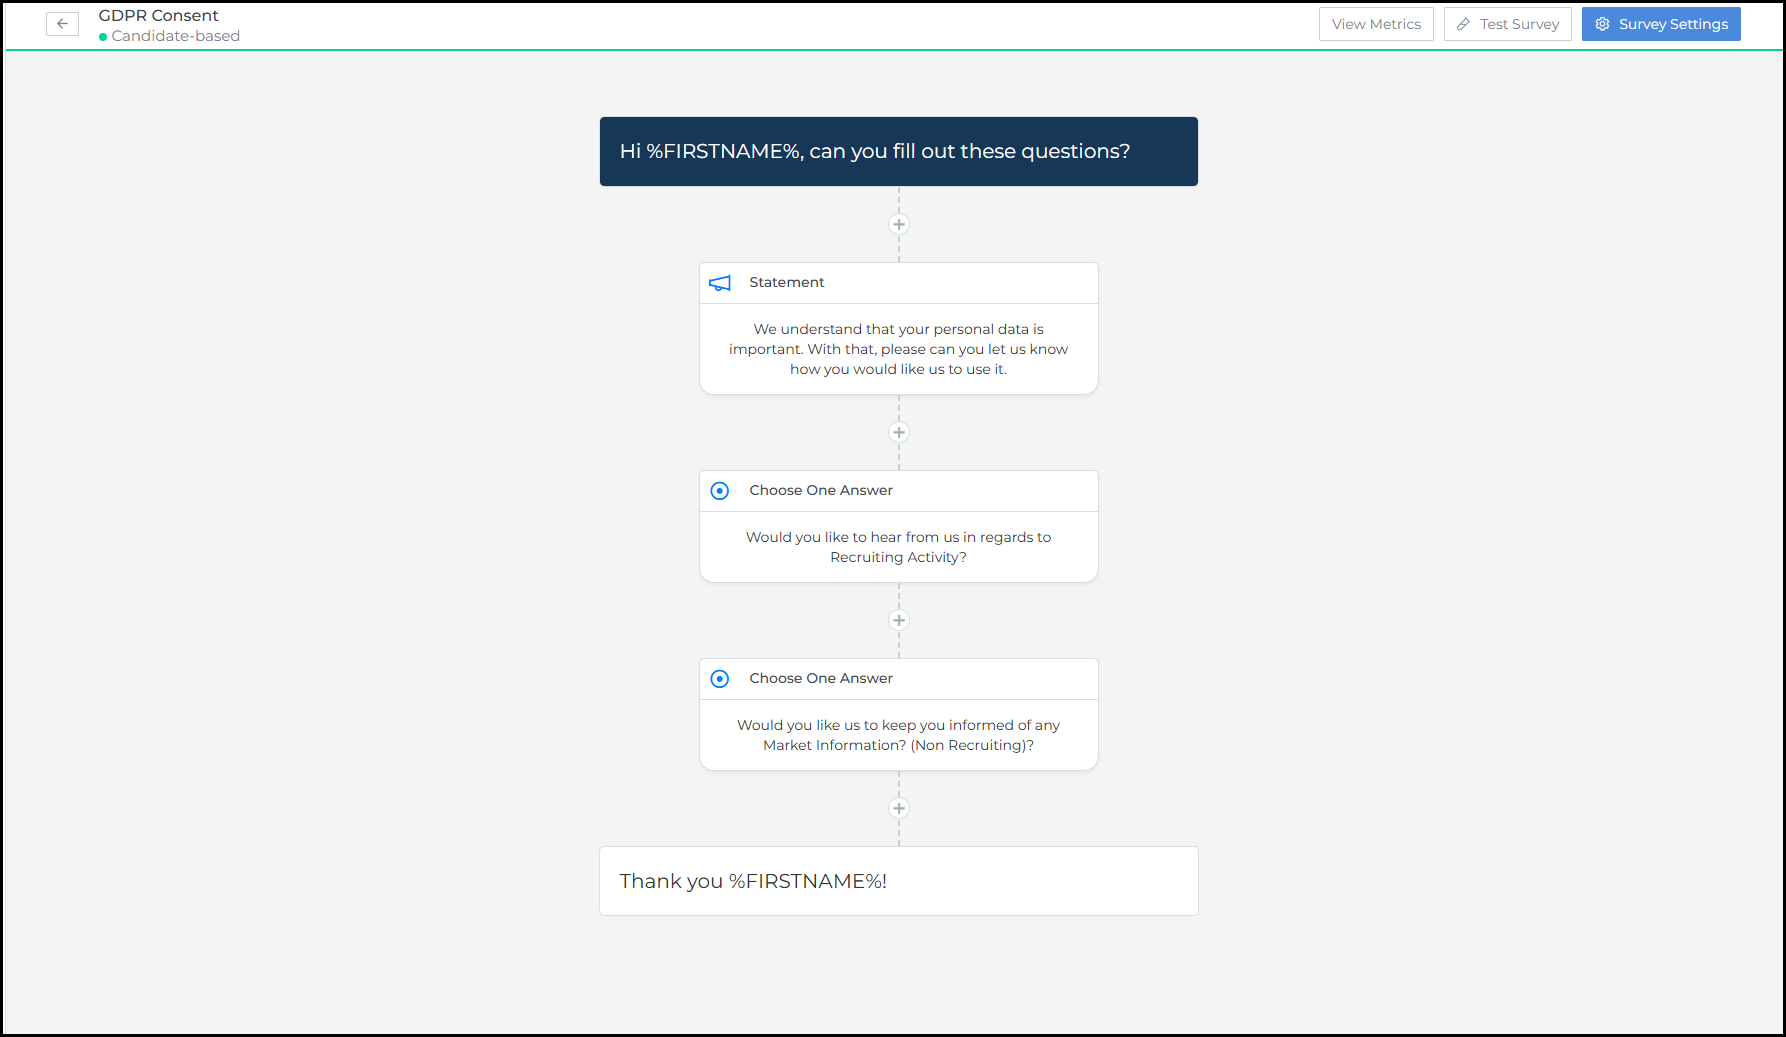
A blank survey canvas will open.
Add an Introduction Statement
This helps explain why the recipient is completing the survey.
-
Click the + icon and select Statement.
-
Enter the text for the introductory statement
-
Example: “We understand that your personal data is important. With that, please can you let us know how you would like us to use it?”
-
-
Click Save.
Add a Question for Recruiting Activity Consent
-
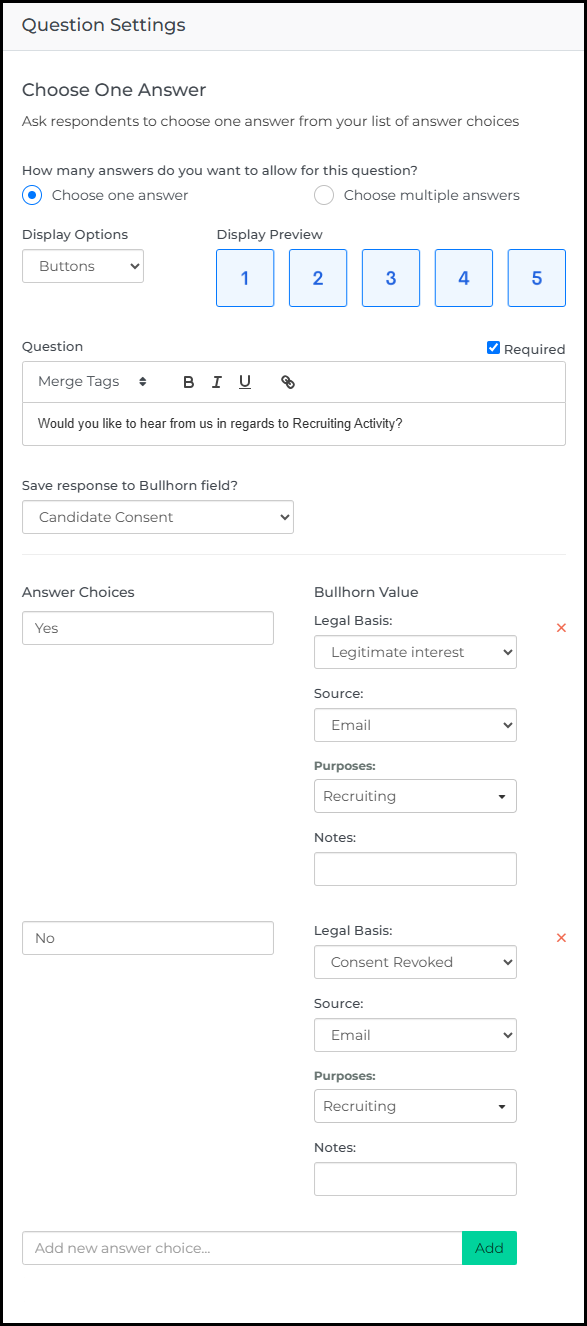
Click the + icon and select Choose One Answer.
-
Complete the fields:
-
How many answers to allow: Choose One Answer
-
Display Option: Buttons
-
Question: “Would you like to hear from us in regards to Recruiting Activity?”
-
Save response to Bullhorn field: Candidate Consent
-
-
Add answer choices:
-
Answer 1: Yes
-
Legal Basis: Legitimate Interest
-
Source: (Select based on your setup)
-
Purposes: Select the applicable option(s) Ex. Recruiting, Executive Recruiting
-
-
Answer 2: No
-
Legal Basis: Consent Revoked
-
Source: (Same as above)
-
Purposes: (Same as above)
-
-
-
Click Save.
Add a Question for Marketing Consent
-
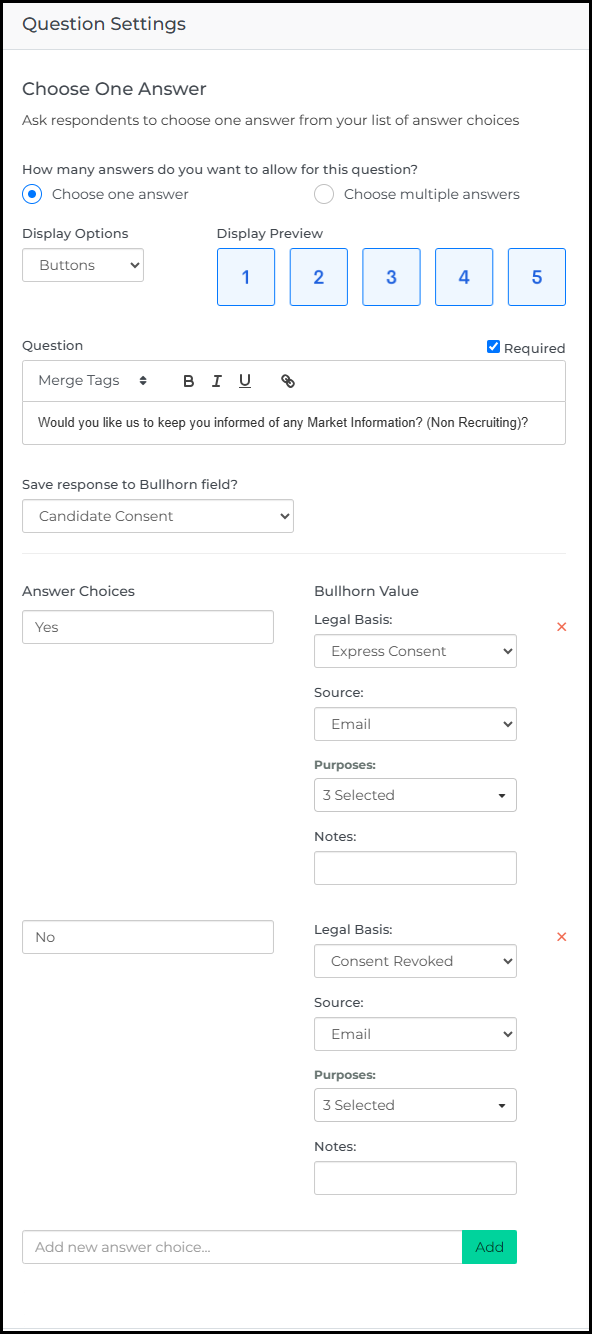
Click the + icon and select Choose One Answer.
-
Complete the fields:
-
How many answers to allow: Choose One Answer
-
Display Option: Buttons
-
Question: “Would you like us to keep you informed of any Market Information? (Non Recruiting)?”
-
Save response to Bullhorn field: Candidate Consent
-
-
Add answer choices:
-
Answer 1: Yes
-
Legal Basis: Express Consent
-
Source: (Select based on your setup)
-
Purposes: Select the applicable option(s) Ex. Direct Mail, Email Marketing, Newsletters
-
-
Answer 2: No
-
Legal Basis: Consent Revoked
-
Source: (Same as above)
-
Purposes: (Same as above)
-
-
-
Click Save.
When finished, your survey should show a clean flow from statement to thank-you message.
Although Manage Your Preferences utilizes a Candidate based Survey for both Candidates and Sales Contacts, it is not recommended to use a Candidate based Survey for Sales Contacts in any other context. There are certain limitations this could cause outside the parameters of the Manage Your Preferences use case.
Add a Custom URL to Your Email Footer
Once your survey is ready, link it in your email footer so recipients can easily update their preferences.
Get the Survey URL
-
In Bullhorn Automation, open your Candidate Preferences Survey.
-
Click Test Survey in the top-right corner.

-
A preview window will open showing your live survey.
-
Copy the URL from your browser’s address bar.
-
Keep everything before &testCandidateId=.
-
Example: https://yourcompanywebsite.com/?surveyId=XXXX&testEntityId=XXXX
-
-
Save this URL for use in your footer.
Add the Survey Link to Your Footer
-
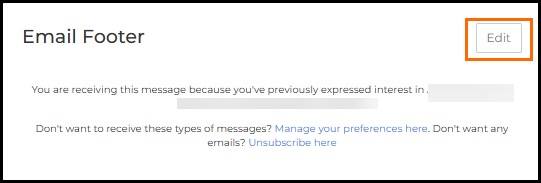
Go to Settings > Email Footer, then click Edit.
-
In the editor, enter your footer message.
-
For example: “You are receiving this message because you’ve previously expressed interest in Acme Recruiters. Don’t want to receive these types of messages? Manage your preferences here. Don’t want any emails? Unsubscribe here.”
-
-
Highlight Manage your preferences here, click the link icon, and paste your survey URL.
-
Click Save.
Include your company name, and a short statement about why the recipient is receiving the message. These details are required for compliance and improve deliverability.
Build Lists to Manage Consent
Use lists to group Candidates and Contacts based on their consent responses. This ensures your Automations target only recipients who have given the correct permissions.
Start with an Advanced Search
-
In Bullhorn Automation, click Contacts in the left menu.
-
Click Advanced Search.
-
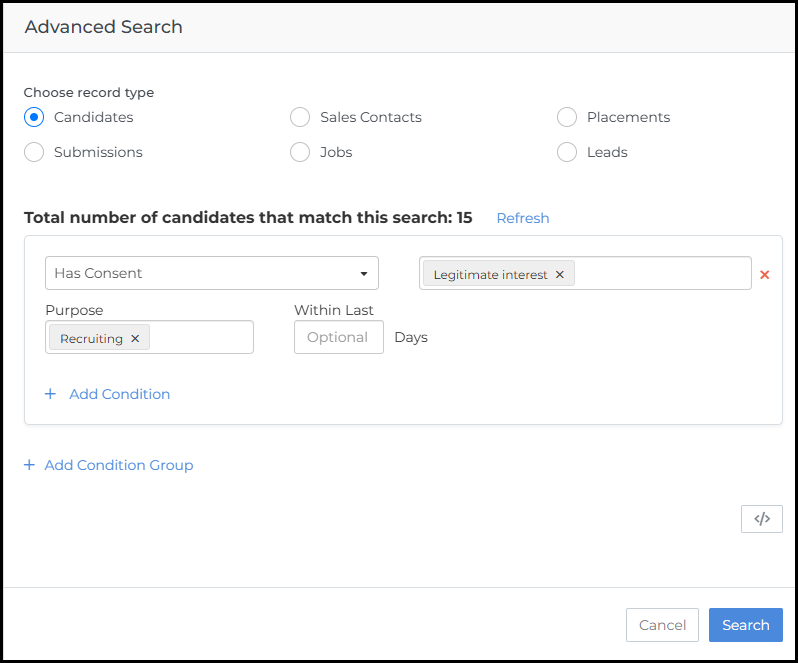
Choose your Record Type, for example, Candidates.
-
In the first condition drop-down, select Has Consent.
-
Complete the remaining fields, see the examples below.
-
Click Search.
Apply the Same Process for Sales Contacts
Repeat the same steps using Sales Contacts as the Record Type.
Understand Consent Search Options
-
Does Not Have Consent: The person hasn’t given any consent (no yes or no).
-
Has Consent: The person has provided a response (yes or no).
Example: Create a List for Candidates with Consent
-
Select Has Consent.
-
Choose Legitimate Interest as the Legal Basis in the box to the right.
-
Under Purpose, select the appropriate option(s), like Recruiting.
-
Click Search to view the filtered results.
Example: Create a List for Revoked Consent
To identify who has opted out:
-
Select Has Consent.
-
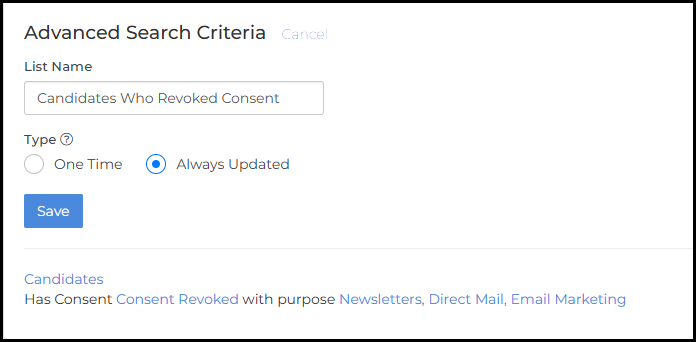
Set the Legal Basis to Consent Revoked in the box to the right.
-
Choose the relevant Purpose(s).
-
Click Search to view the filtered results.

Save the Search as a Dynamic List
-
Click Save as List at the top of the page.
-
Name the list, such as Candidates with Consent for Recruiting.
-
Choose the Type:
-
Always Updated : Automatically refreshes as data changes.
-
One Time: A static snapshot.
-
-
Click Save.
Your consent-based lists are ready to be used in Automations to make sure messages are only sent to recipients who’ve opted in appropriately.
Troubleshooting
If your Manage Preferences link doesn’t open the survey
Check that the URL in your Email Footer matches the survey link from the Test Survey preview.
If consent data isn’t syncing
Verify that the Consent Module is enabled for both Candidates and Sales Contacts, and that Bullhorn Automation Support has confirmed sync.
If the Unsubscribe link doesn’t work
Ensure the link hasn’t been removed or edited in the Email Footer HTML.
FAQs
Can I use the same survey for Candidates and Contacts?
Yes. You can duplicate your Candidate survey and adjust it for Contacts if needed.
What happens if someone clicks Unsubscribe instead of Manage Preferences?
They’ll be removed from all communication. Manage Preferences lets them choose which messages they still want.
Can I customize the survey design?
Yes, branding from Settings > Email Branding applies to your surveys.
Do I need to publish the survey?
Yes. Surveys must be published before linking them to your footer.
Can I add more consent questions later?
Absolutely. You can update or add questions anytime to reflect changes in your consent policy. For example, some clients use this survey to find out the contacts preferred method of communication like text, phone, or email.