Manage Access Groups
Overview
Access Groups, or clusters, determine what users are able to see when signed in to
. Depending on your organization, Access Groups may be based on group name, customer name, branch number, client number, or more.- In many cases, Access Groups are manually created. In some cases, Access Groups are created automatically.
This article covers how to add and edit Access Groups.
Steps
Add or Edit an Access Group
- After signing in to
- From the Administration menu, select Access Groups.
When the menu loads, it will display Access Groups and tools used to quickly change your view based on specified characteristics.
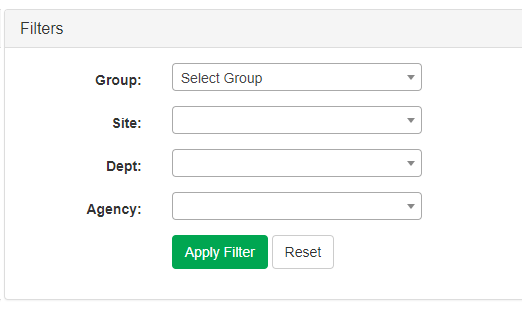
- You can use any of the Filters in the upper part of the screen to adjust your view. This can be helpful in narrowing the access groups shown based on your preferences.
- To set a filter, adjust the available menu options as needed. To see any matching groups, click Apply Filter. You can go back to the default view by clicking Reset.
Access Groups that have already been created will display in the lower part of the screen. By default, the view will include all active groups only.
- You can click Inactive Only or All to change your view to include groups with those qualities.
- You may enter name details in the Search field to find Access Groups.
- To make changes to an existing Access Group, select it by clicking on its name.
- If you need to create a new Access Group, click + Add New.
- If you are creating a new Access Group, you will first need to create a name. Enter the name for the group in the provided field and then click Create.
- If you are creating a new Access Group or updating an existing access group, click + Add Definition.
Access Group Definitions
When the Add an Access Group Definition window opens, you'll be able to configure your definition as needed. There are several access group definitions available. Click an item below to learn more about that definition type.
Agency limits user access based on agency assignment in
.- Select Agency in the Type drop-down menu.
- Select a Group from the list.
- Choose an Agency in the menu.
- You will only see agency options here if they exist within the group/branch you selected above.
- When you're done setting Agency type options, click Submit to add the definition.
You may only add one group or agency option at a time, but you may add more definitions as needed.
Clock Site allows users to see specific clocks only within a group.
- Select the Clock Site type.
- Select the Group where the clock site can be found.
- Select the Site. This is where employees are assigned to work.
- You may add more than one clock site to the definition at a time. While the Site menu is open, click on any site you want to add.
- To remove a site after selecting it, click the X that appears to the left of the name and number of the site.
- When you're done setting Clock Site type options, click Submit to add this definition.
Clock Site/Agency limits the view of work details based on the clock site and agency settings for an employee. This is similar to Clock Site but features more filters.
- Select the Clock Site/Agency type.
- Select the Group where the clock site can be found.
- Select the Site. This is where employees are assigned to work.
- You may add more than one clock site to the definition at a time. While the Site menu is open, click on any site you want to add.
- To remove a site after selecting it, click the X that appears to the left of the name and number of the site.
- Choose an Agency in the menu.
- You will only see agency options here if they exist within the group/branch you selected above.
- When you're done setting Clock Site/Agency type options, click Submit to add this definition.
Clock Site/Department allows users to see information only for employees assigned to a specific clock site and department.
- Select the Clock Site/Department type.
- Select the Group where the clock site can be found.
- Select the Site. This is where employees are assigned to work.
- You may add more than one clock site to the definition at a time. While the Site menu is open, click on any site you want to add.
- To remove a site after selecting it, click the X that appears to the left of the name and number of the site.
- Choose a Dept in the menu. You will only see department options here if they exist within the group/branch you selected above.
- You can also add more than one department to the definition at a time.
- When you're done setting Clock Site/Department type options, click Submit to add this definition.
Department allows users in the Access Group to see all employees that are assigned to a specific department or group of departments.
Department/Shift allows users to see time details for employees that worked a specific shift for a department.
Requires Shift Tracking
- Select the Department/ Shift type.
- Select the Group where the clock site can be found.
- Select the Department. This is where employees are assigned to work.
- Choose a Shift in the menu.
- You will only see shift options here if they exist within the group/branch you selected above.
- If there are no shifts defined, you will not be able to set this option. For more on Shift Setup, see Department Shift Setup.
- When you're done setting Department/Shift type options, click Submit to add the definition.
Division ID creates a definition for the Access Group based on the Division ID assigned to employees.
Employee allows users to see details for a specific group of employees in
.- Select the Employee type.
- Select the Group where the employee can be found.
- Select the Employee Name. This is where you can search for and add to the definition.
- You may add more than one department to the definition at a time. While the Employee menu is open, search for any employee you want to add by name, using your keyboard.
- To remove an employee after selecting, click the X that appears to the left of the name.
- When you're done setting Employee type options, click Submit to add this definition.
Worked Department limits the details view to employees that worked in a specific department. This is similar to the Department option, but the view will not include employees unless they have generated hours assigned to a department in the definition.
- Select the Worked Department type.
- Select the Group where the employee can be found.
- Select the Dept. Add a worked department in this menu.
- You may add more than one department to the definition at a time. While the Employee menu is open, search for any employee you want to add by name, using your keyboard.
- To remove an employee after selecting , click the X that appears to the left of the name.
- When you're done setting Employee type options, click Submit to add this definition.
Lines for Access Group Definition will appear in the lower portion of the screen when you submit them.
- To save these details, select Update.
- To disable the Access Group, select Deactivate.
- You may return to the Access Group menu by clicking Back To List.
You can also click Users to see a list of Time Management Console users assigned to the Access Group. You won't see any names listed here if no one is assigned to the Access Group.