Invoicing
Overview
Invoices can be generated for your clients directly within Invenias. You will need to be using Billing to use the Invoicing functionality. With both Billing & Invoicing enabled, you can create Invoices and attach Billing Events to them.
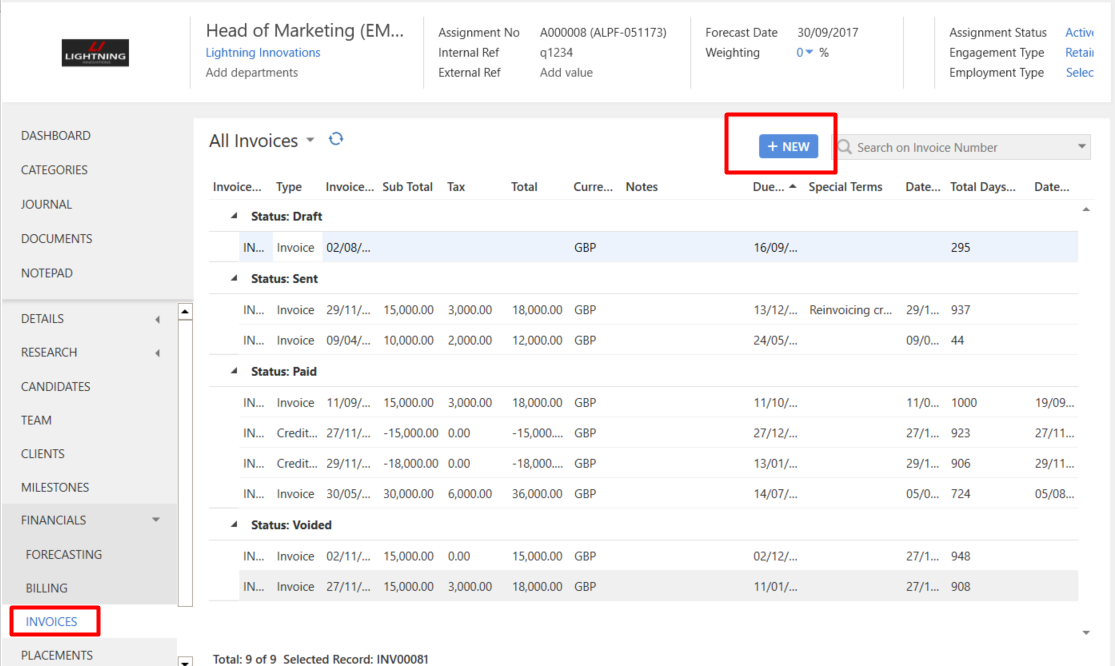
The Invoices for each Assignment can also be found within the corresponding Company Record, and a global Invoices List View allows you to see the all Invoices in your database.
Once you turn on the Invoicing module, the only way to move a Billing Event to a Billed status is to add it to an Invoice Record and then move that Invoice to a Sent Status. Also, even if an Invoice is still showing as being at Status of a Draft, once an Invoice Record has had an Invoice number assigned to it, that invoice can not be deleted
This article covers:
- Creating an Invoice for an Assignment
- Adding Billing Events from an Assignment
- Invoicing Workflow
- Voiding an Invoice
- Global Invoices List View
- Enabling Invoicing
- Configuring Invoicing
Creating an Invoice for an Assignment
Permission Required: Please note, to see the Invoices tab the "Viewing Invoicing" permission is required and to create Invoices the "Create Draft Invoices" permission is also required
To create an Invoice, navigate to the Invoices tab within an Assignment and click on the Create New Invoice button:
This will open a new Invoice form, which will be pre-filled with the following information from the Assignment:
- Company
- Assignment
- Billing Contact
- Billing Address
- PO Number
- VAT Number (of your Client)
- Currency
- Payment Terms & Invoice Date, which will be today's date initially but can be edited
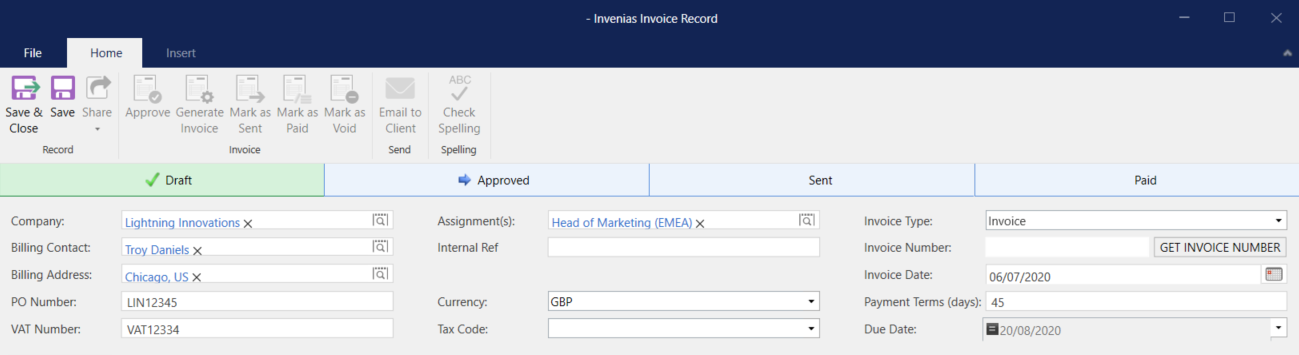
You will need to select the Tax Code you wish to apply to all of the Billing Events you add to this Invoice. Tax Codes can be configured in Systems Preferences by an Administrator.
Adding Billing Events from an Assignment
Permission Required: Please note, to see add Billing Events to an Invoice, the "Create Draft Invoices" permission is required
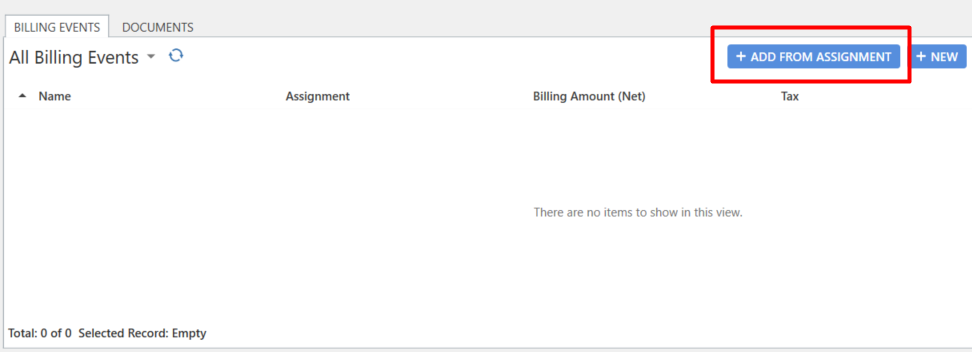
After creating an Invoice, clicking Save in the record will enable the +ADD FROM ASSIGNMENT button.
Clicking this button will launch a lookup window, which will be a filtered list showing all Billing Events for that customer that are flagged as Ready to be Billed and are not yet marked as Billed. Select the Billing Event you want to include in the invoice and click OK. This list is not filtered to show only Invoices for this Assignment because Invenias allows you to create Consolidated Company Invoices so you can to bill for multiple Billing Events across various Assignments using the one Invoice.
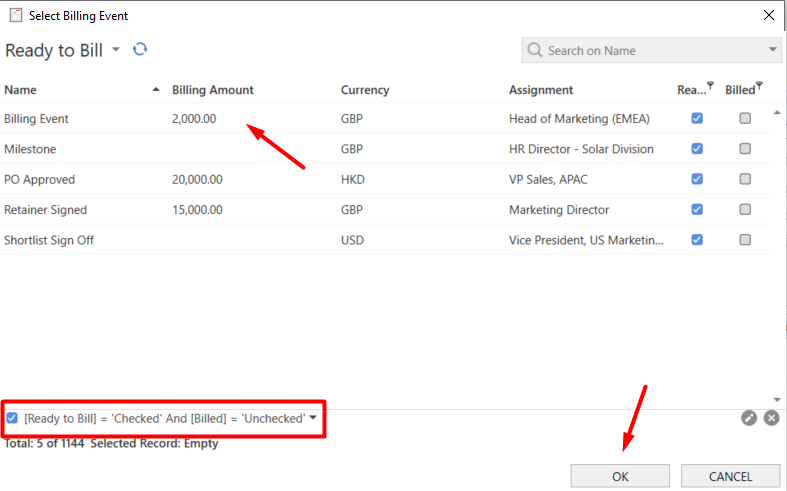
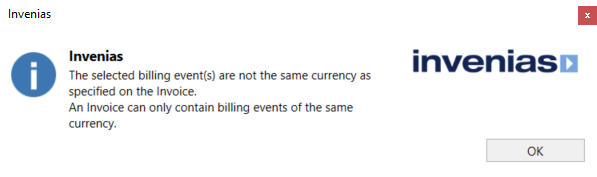
If the Billing Event and Invoice Currency do not have to be the same, you will get this warning. Change the Currency of either the Invoice or the Billing Event and return to this stage if this difference is an error.
Invoicing Workflow
Once you have added your Billing Events to the Invoice Record, you can then manage that Invoice using the following workflow, and these stages are complemented by matching permissions:
- Draft
- Approved
- Generated
- Send
- Paid
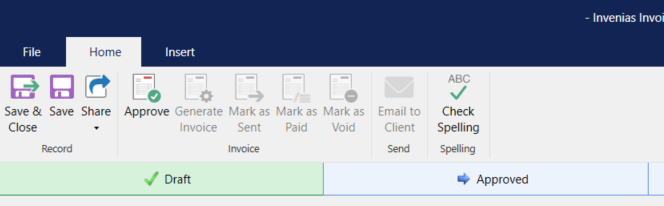
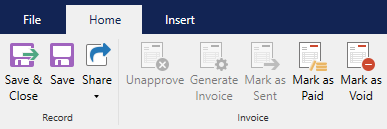
All new Invoices will be created with the Draft status, and the buttons in the Ribbon Toolbar of the Invoice will move it through the workflow.
Approving an Invoice
Permission Required: Please note, to approve an Invoice, the "Approve/Unapprove Invoices" permission is required
All Invoices first need to be approved. To approve the Invoice, click on the Approve button.
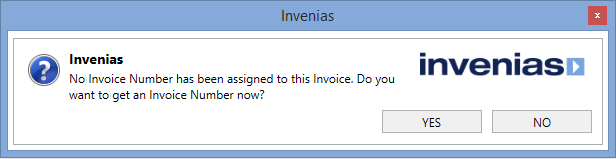
If the Invoice does not yet have an Invoice Number, Invenias will prompt you to assign one. A reminder that once an Invoice has been assigned an Invoice Number you can not delete that Invoice Record.
Once the Invoice has been approved, it will then be locked to prevent any information changing (e.g. the billing items, currency tax code, Special Terms, Notes etc.). To make the Invoice editable again, you'll need to click on the Unapprove button, which will move the Invoice back to a Draft status.

Generating an Invoice
Permission Required: Please note, to generate an Invoice document, the "Generate Invoices" permission is required
After an Invoice has been approved, you can generate the Invoice document by clicking on the Generate Invoice button. This will launch the Generate Invoice window, where you can select a Document Template for the Invoice and the format of the generated document (either PDF or Microsoft Word).
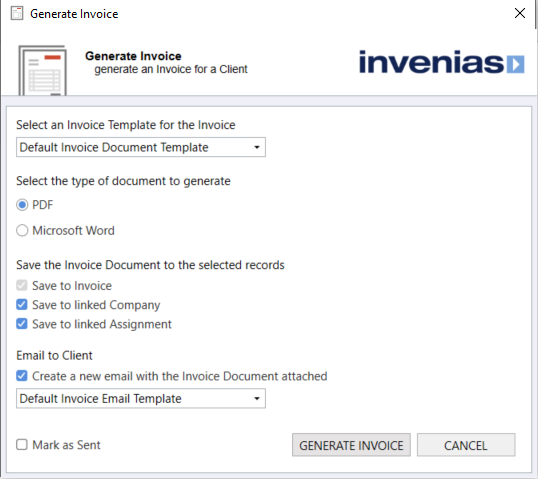
As well as creating the Invoice document, you can change the settings for the records which the document will be saved to. Within the same window, you can choose to attach the Invoice to an email, which will be sent to the Billing Contact and select an Email Template to populate the body of the email. If you are emailing the Invoice to your client, you may wish to also check the Mark as Sent option, described below.
Deleting generated Invoice documents
You have to return an Approved Invoice to an Unapproved state before you can delete a generated Invoice. As you generate the Invoice, if you opt to mark the Invoice as Sent, you will not be able to delete the attached document or return the Invoice record to an Unapproved status. So please be sure that the Invoice is accurate and correct before marking the invoice as Sent.
Marking an Invoice as Sent
Permission Required: Please note, to mark an Invoice as sent, the "Send Invoices" permission is required
If you didn't tick the box to Mark as Sent when generating the invoice, click the Mark as Sent button in the Ribbon Toolbar.

Once sent, you will no longer be able to modify the Invoice. If you have incorrectly sent the Invoice, you will need to Void it. Sending the Invoice will automatically mark all associated Billing Events as billed and prevent Users from making any further changes to those Billing Events.
Marking an Invoice as Paid
Permission Required: Please note, to mark an Invoice as paid, the "Pay and Void Invoices" permission is required
After your client pays their Invoice, you should click on the Mark as Paid button.

This will launch the Mark Invoice as Paid confirmation popup, asking you for the date the invoice was paid. You will need to confirm the information is correct before completing because it cannot be changed afterwards.
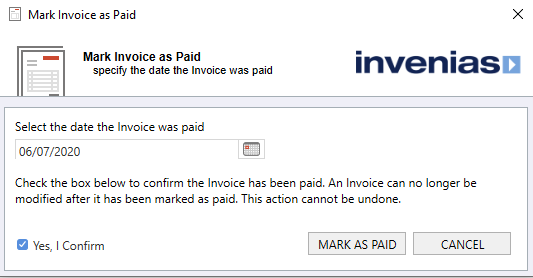
Marking an Invoice as paid will automatically mark all associated Billing Events as paid.
Voiding an Invoice
Permission Required: Please note, to mark an Invoice as void, the "Pay and Void Invoices" permission is required
You may need to Void an Invoice that has been sent, which you can do by clicking the Mark as Void button.
This will launch the Void Invoice window, asking you for an optional Void Reason and an option to create a credit note, if the Invoice has been Marked as Sent.
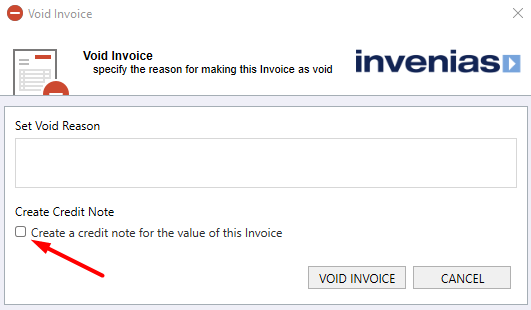
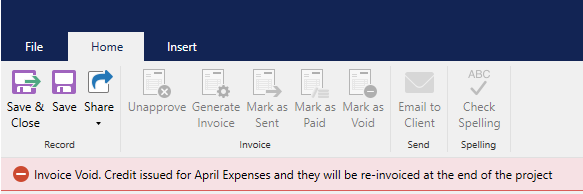
After voiding the Invoice, a banner will be added to it as a warning to other Users that is it voided, detailing the reason if set in the Void Invoice window.
If you selected the Create Credit Note option, Invenias will automatically create a new Invoice (of type Credit Note) for you, filled in with all the information from the original Invoice, including a Billing Event with the correct negative value to counteract the balance of the original Invoice.
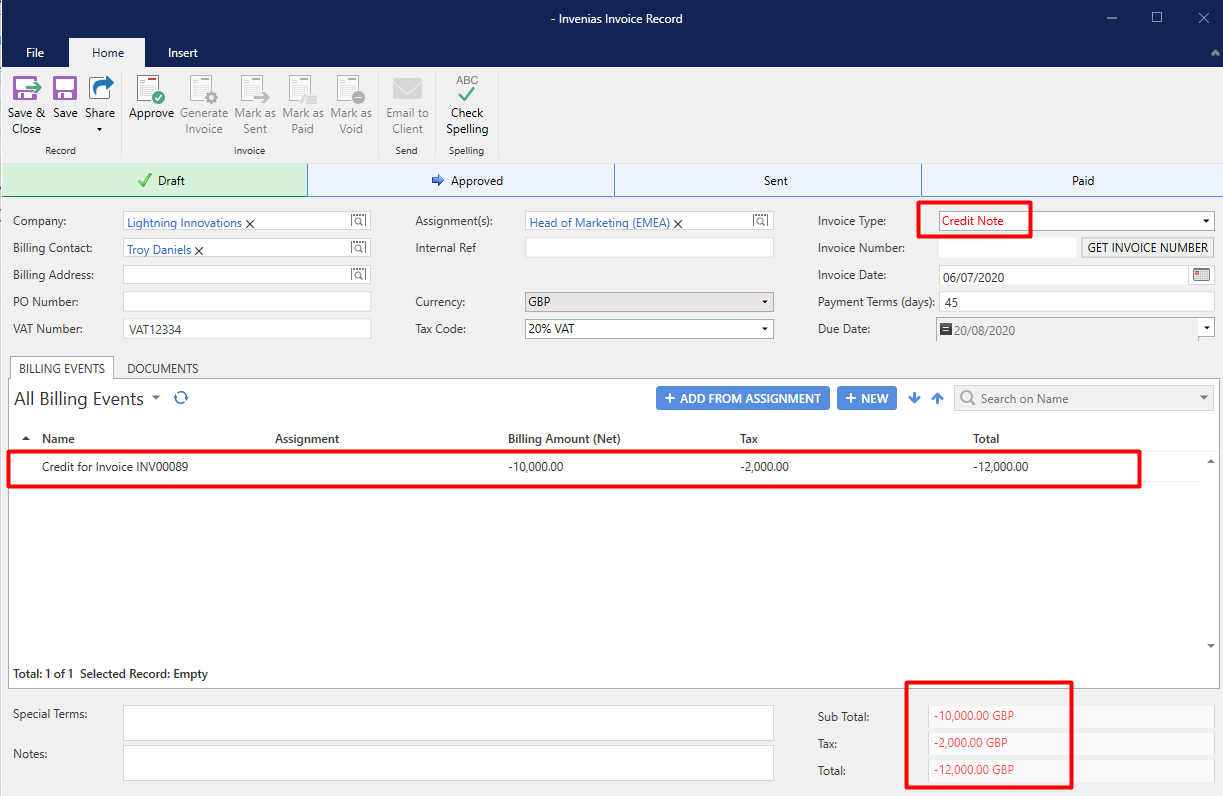
The Credit Note will need to progress through the same workflow an Invoice goes through approving, generating, sending and paying.
Global Invoices List View
Permission Required: Please note, to see the all Invoices, the "Viewing Invoicing" permission is required
All Invoices can be found in your sales ledger and accessed from the Outlook Ribbon Toolbar by navigating to Invenias > Invoices

This will launch the Invoice List, showing all Invoices.
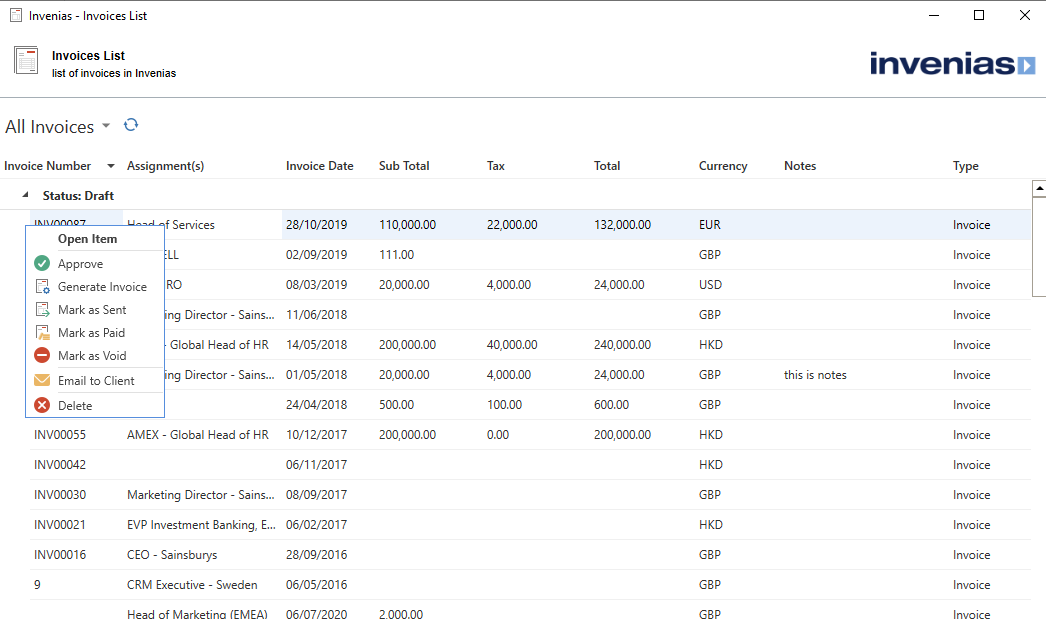
From here you can open any of the Invoices and if you progress Invoices through the workflow by using the Context Menu activated by right clicking on any Invoice(s).
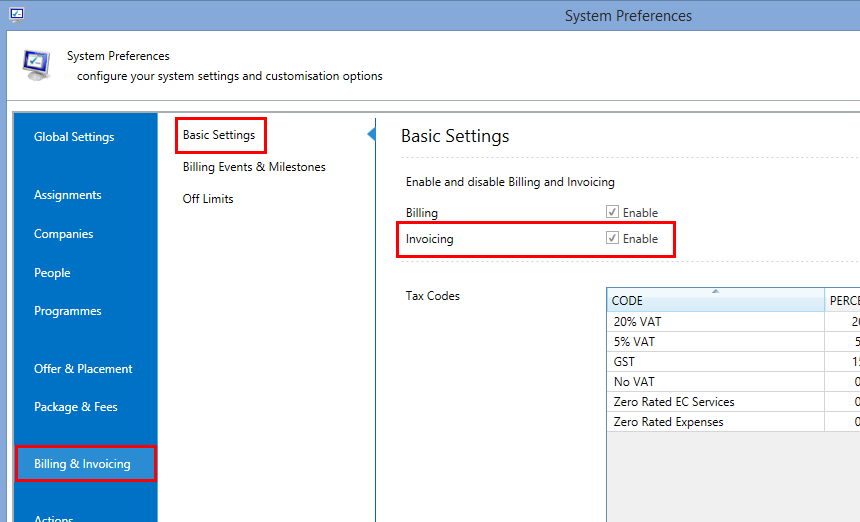
Enabling Invoicing
Permission Required: Please note, to access System Preferences you need the "Access System Preferences" permission
Invoicing can be enabled within System Preferences, by navigating to Billing & Invoicing > Basic Settings and checking the Invoicing option:
Configuring Invoicing
Permission Required: Please note, to access System Preferences you need the "Access System Preferences" permission
The following settings can be configured for Invoicing:
- Tax Codes
- Invoice Number Format
- Tax Number Field Name
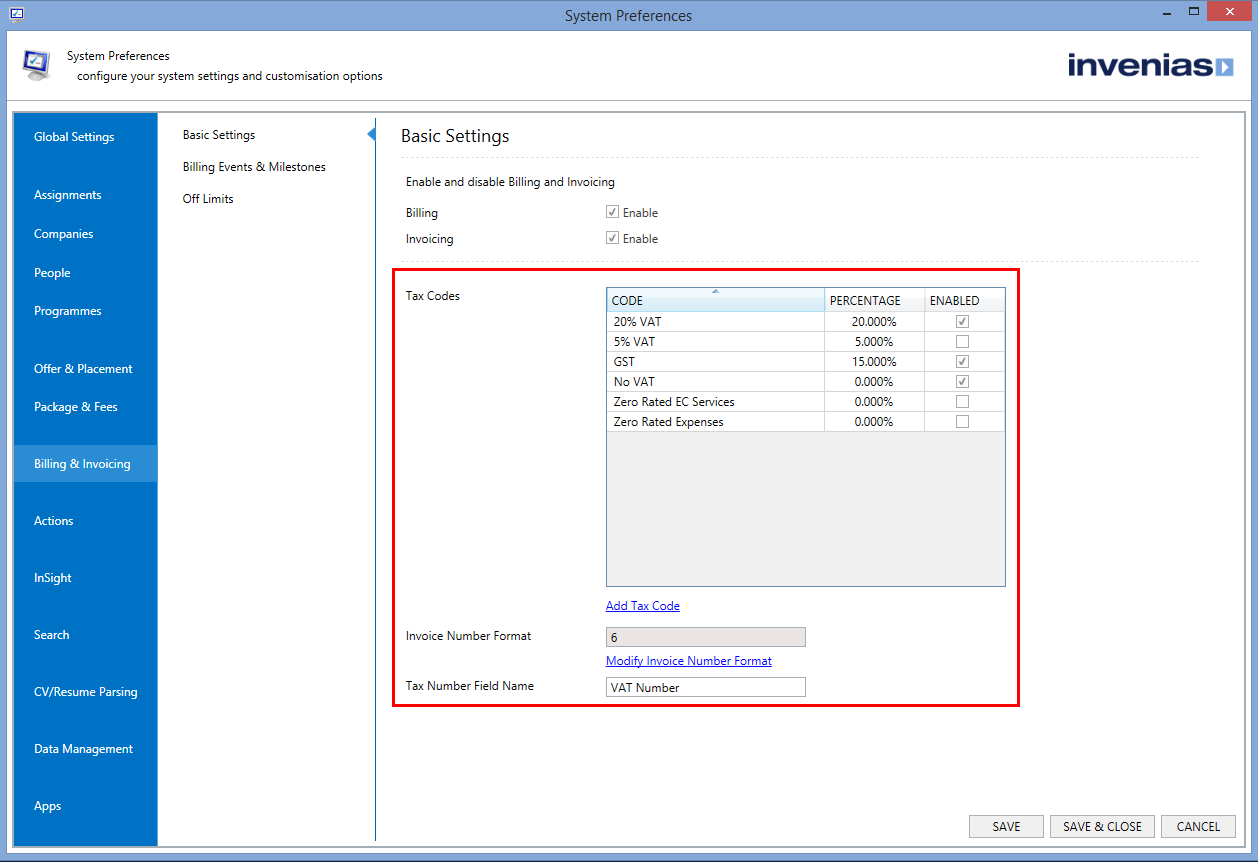
Tax Codes
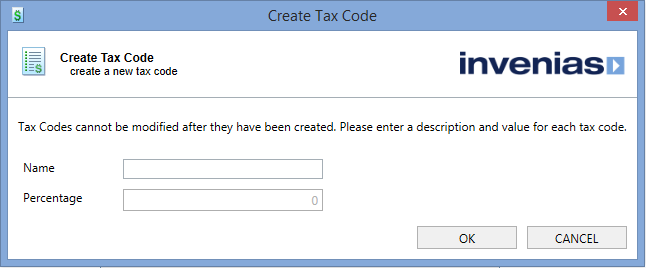
A list of Tax Codes can be configured and only those enabled will show within the Invoice form. To create a new entry, click on the Add Tax Code link.
This will launch the Create Tax Code window, where you can enter a Name and Percentage, for example "20% VAT" and "20".
Invoice Number Format
You can modify your Invoice Number formatting by clicking on the Modify Invoice Number Format link, which will launch the Invoice Number Format window. From here you can create a suffix for your Invoices (for example INV-000001) to ensure they follow your existing standard.

Due to Invoices needing to be sequential in Invoice number, we've also given the option to determine what number your invoices start at from Invenias, so that way you can seamlessly transition from your previous invoicing system.
Tax Number Field Name
Invenias is used by companies worldwide and therefore you may wish to modify the names for certain fields. You can therefore re-label the Tax Number Field Name if you're not using a "VAT Number".