Merging Records
Overview
There are many scenarios which result in the creation of duplicate Records in a database. In some cases this can be the result of a User creating a new record through Parsing whilst ignoring the possible duplicates prompt when a record already exists in the database, or as a result of a migration of data from another software provider.
An Invenias User can choose to merge duplicate Records together, allowing the User to choose which information from either Record to keep in the newly created record.
This article covers:
Company Quick Merge (Essentials)
Please note that you will need "Merge Records" User permission enabled to be able to merge records.
Released as part of 2022.03 (March release). In the Essentials web app, you can select up to 6 companies and merge them together into your choice of keep record.
To iniate a merge, open any Companies list, (e.g. Global Companies) and select up to 6 rows, then right click and select Quick Merge.
A window will open, to display key information about the data held in the selected records.
In the majority of cases, there will be 1 record that has a much larger amount of existing data compared with the other records and we would advise to select that record.
Select the Keep record and click Merge
The merge will begin as a background process, meaning you can wait for the merge to complete, or close this window and the merge will continue in the background.
Once complete, the keep record will contain a journal note which details the merge, which records were merged, who initiated the merge and lists any fields and relations which were removed due to a conflict. E.g. if more than 1 record has an email address saved, we will prefer any data in the keep record, if there is none, we will take the email address from most recently modified record and list any others in the journal note.
Company Merge (Desktop)
In the desktop app, you can merge two Company records together, resulting in all People, Journal Items and Locations being merged in to a single Company record.
Please note that you will need "Merge Records" User permission enabled to be able to merge records.
Step 1 - Merge or Delete?
You may find that a duplicate Company record has no useful information and can actually be deleted rather than merged. Open the Company Records you are looking to merge to examine the data. Look at the People List in the Company (to see past and present people linked to the Company click "See Previous Employees"). If there is nobody linked to the Company as a Current or Previous employee and there is no other data that you want to keep in any of the other fields in the Company record (Journal, Documents etc) then a merge is unnecessary and you can simply delete the record.
Please note that you will need "Delete Records" User permission enabled in MyInvenias to be able to Delete records.
Step 2 - Check and Rename Locations:
Duplicate Company records are often created to represent a Department, Division or Office Locations.
If the Company has been created to identify people that work in a specific office just rename the Location to identify this office and consider updating the address of that Location with at least a City and Country.
If the Company has been created to identify people that work in a specific Division or Department then, as well as updating the Location with the physical location of that office, include the division name in the Location Name. This will then be visible in the People lists and aid identifying People who came from that Division.
Step 3 - Check Locations for Assignments and People
Once the Location Names in the two records you are merging have been updated, check that all the Assignments and People in those records are linked to the appropriate Location. It's important to ensure that after the merge you will still be able to identify which division, team or office the person/assignment was in before the merge.
Step 4 - Merge the Company records
You can start the merge by highlighting 2 Companies in the Companies list, right clicking and selecting Merge. You can also start the Merge process from the File Tab in a Company record by clicking the Merge shortcut.
From either location this will open the merge wizard shown below:
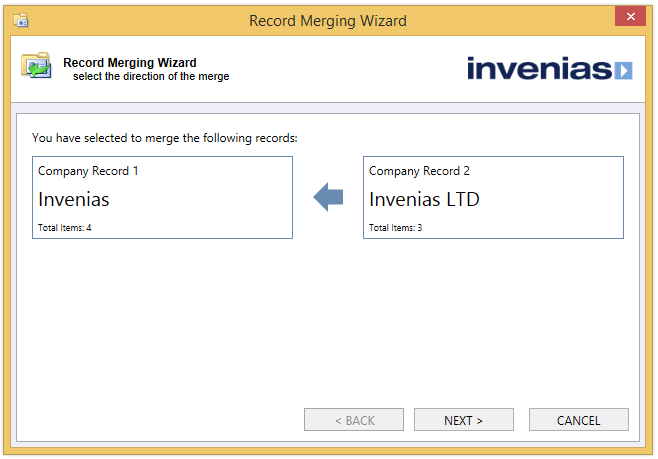
The 2 Record names are shown for clarity, along with the Total Items or data entries in the 2 records. In this example the direction of the merge indicates that "Invenias LTD", will be merged into "Invenias", to result in a single record called "Invenias". Typically we would advise to merge into the Record that has the most existing data. You can click the arrow to reverse the direction if you wish.
Click next to move onto the conflicts management phase.

Depending on the data contained in the 2 Records selected to be merged, you can be asked to sometimes choose which data you want to keep as part of that merge.
This part of the merge wizard will show any fields in both records that contain data, allowing the user to choose which data to keep in the merged record.
In Company Records "Email", "Business Tel" and "Business Fax" are stored in the "Default Location", so these fields will be retained from both records after the merge. However, in Company records the following fields will create conflicts during a merge which means only one version of each field can be kept:
- Phone numbers - Business Tel 2, Accounts Tel, Support Tel, Sales Tel, ISDN
- Email & IM - Email 2, Email 3 & Skype
- Client Status & Source
- VAT Number, Client Ref No., Registration Number & Payment Terms on the Company Profile tab
In addition, within Company records, the merge wizard will ask you to decide if you want to keep one version or merge the content from these fields:
- "Company Profile" text field
- Notepad
In this example we will choose to keep all the information in "Invenias", except the Website field which we will take from the "Invenias LTD" record. Click Next to resolve any conflicts with the Default Location for the merged record:
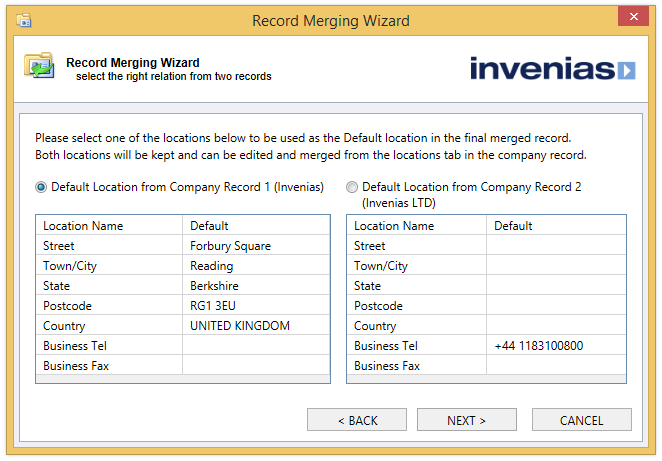
In this example we will retain all the information for "Invenias". Click Next to continue to show the final confirmation phase:

Click FINISH to complete the Merge.
Step 5 - Post Merge Guidelines.
Once all duplicate Company records have been merged in to a single Company, any duplicate Locations in the Company Record can then also be merged to give one Location for each Office (don't do this if Location Names also include Departments/Division information).
Finally, update any Synonyms in the new merged Company to reflect the Division Names (where they don't include the Company Name), Products and Subsidiaries that were referenced in the Company records before the merge, so that in the future the duplicate check includes these details in any possible matching when creating records or parsing.
Merging People Records (Desktop)
Please note that you will need "Merge Records" User permission enabled to be able to merge records.
To merge 2 people records together, select them both in the people, right click and select Merge, or click Merge in the File Tab of one of the Records to start the Merge Wizard.
From either location this will open the merge wizard shown below:
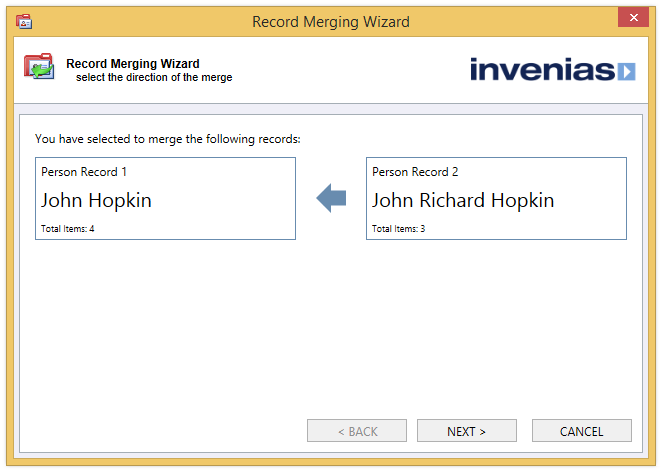
The 2 Record names are shown for clarity, along with the Total Items or data entries in the 2 records. In this example the direction of the merge indicates that "John Richard Hopkin", will be merged into "John Hopkin". Typically we would advise to merge into the Record that has the most existing data. You can click the arrow to reverse the direction if you wish.
Click next to move onto the conflicts management phase.
Depending on the data contained in the 2 Records selected to be merged, you can be asked to sometimes choose which data you want to keep as part of that merge.
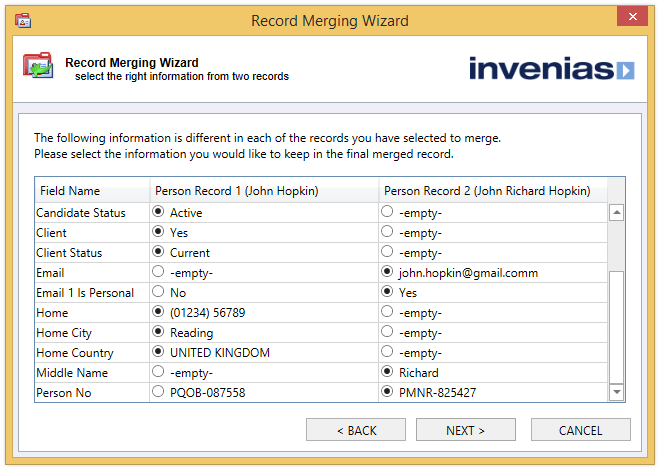
This part of the merge wizard will show any fields in both records that contain data, allowing the user to choose which data to keep in the merged record.
In this example we will choose to keep all the information in "John Hopkin", except the Email and Middle Name which we will take from the "John Richard Hopkin" record.
Click Next to resolve any conflicts with the Default Position for the merged record:
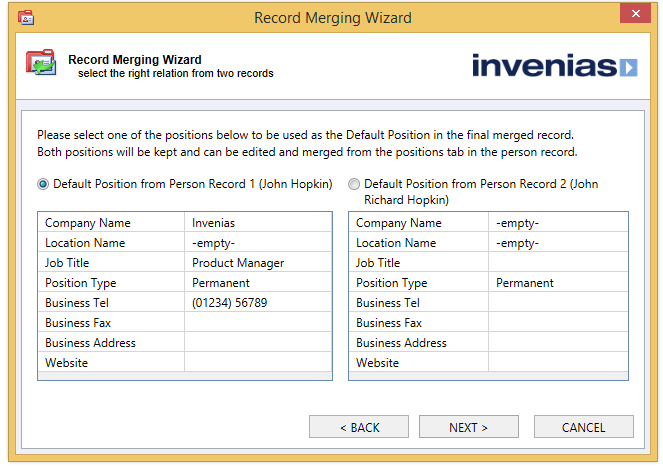
In this example we will retain all the information for "John Hopkin". Click Next to continue to show the final confirmation phase:
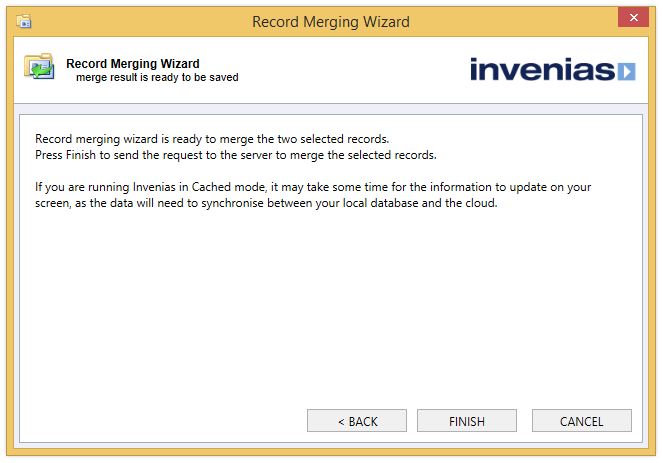
Click FINISH to complete the Merge.