Amplify Prompt Studio
Amplify Prompt Studio is where you create and manage all saved prompts used across Amplify Assistant, Amplify Chat, and Amplify Enrich. You can build prompts from scratch, customize standard templates, and define the data sources the AI should reference when generating responses.
All prompts created here are shared across your organization, helping you standardize actions, messaging, and insights.
Creating a Prompt
-
Go to Menu > Admin > Amplify Admin.
-
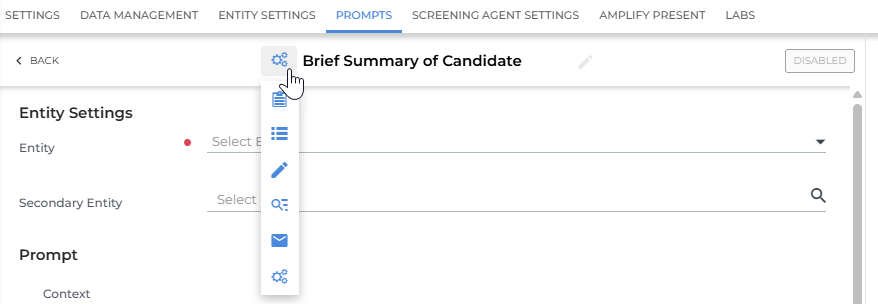
Click the Prompts tab.
-
Select Add Prompt in the top-right corner.

-
To edit an existing prompt, click its name to open it.
-
-
Choose the Entity you want to create your prompt for, and a Secondary Entity if required.
-
Entity: Determines which fields Amplify can reference, and which record type the prompt appears on in Amplify Assistant.
-
Secondary Entity: Select this if the prompt needs data from a related record.
-
-
Choose how you want to build your prompt:
-
Generate with AI: Describe what you want the prompt to do, and AI generates the context, instructions, and data point selections for you.
-
Create from Existing: Copy an existing prompt (custom or default) as a starting point, with all fields and data points pre-filled.
-
Custom Prompt: Start from scratch with full control over all settings.
-
-
Enter any required details and click Create Prompt. You'll be taken to the configuration page to complete the remaining sections, outlined below.
Configuring Prompt Settings
Name and Icon
Give your prompt a clear, descriptive name and select an icon to help users quickly identify it in Amplify Assistant, Amplify Chat, and Prompt Studio.

Click the icon to choose from the available options.
Entity Settings
These settings determine which records the prompt works with and what data it can access.
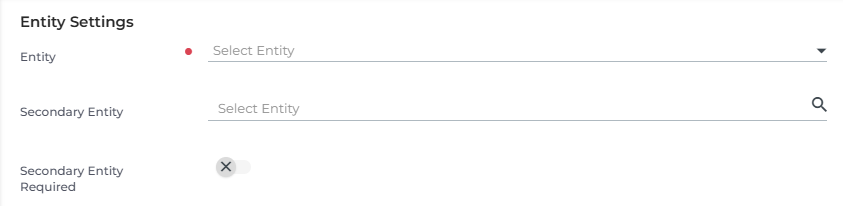
Entity (Required)
Choose the primary entity for the prompt (Candidate, Contact, Job).
This determines
-
Which fields Amplify can reference
-
Where the prompt appears in Amplify Assistant
Secondary Entity (Optional)
Select a secondary entity if the prompt needs data from a related record.
Example: A Candidate prompt may include Job as a secondary entity to reference job details during response generation.
When a prompt uses a secondary entity, users can pick the related record when running the prompt.
Prompts with a secondary entity cannot be used for Amplify Summary Cards.
Secondary Entity Required
Turn this on if users must select a secondary entity before running the prompt. If left unchecked, the secondary entity will be optional.
Prompt
This section defines the actual instruction the LLM![]() An AI language model (or LLM) is a system trained on large amounts of text that can read, interpret, and generate human-sounding language. Amplify uses one to read your Bullhorn records and produce output based on the prompts you configure. It does not search the internet or access outside data on is own. It only works with what you give it. will follow, as well as the voice and style of the response.
An AI language model (or LLM) is a system trained on large amounts of text that can read, interpret, and generate human-sounding language. Amplify uses one to read your Bullhorn records and produce output based on the prompts you configure. It does not search the internet or access outside data on is own. It only works with what you give it. will follow, as well as the voice and style of the response.
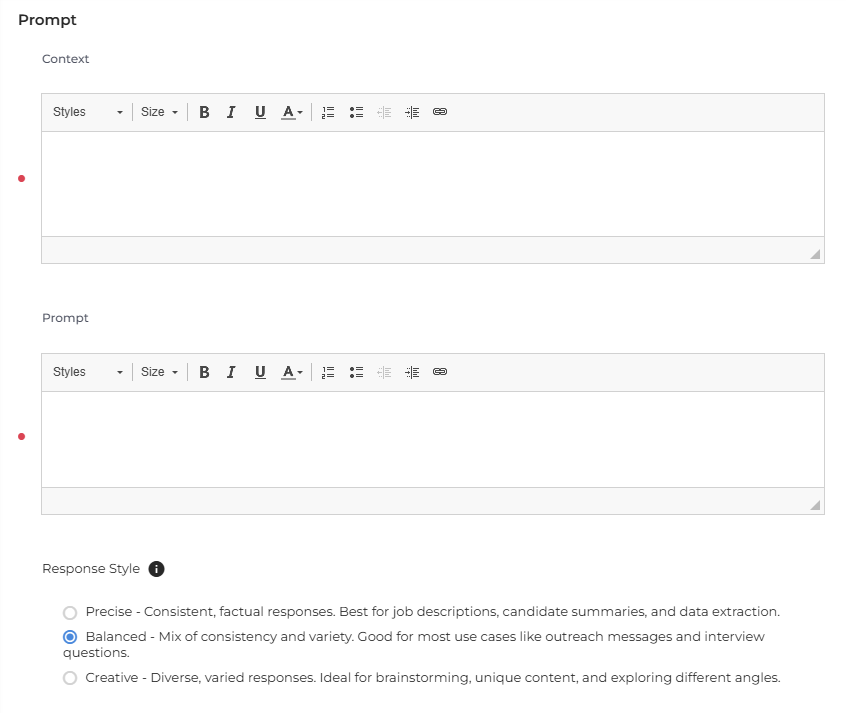
Context (Optional)
Context sets the “voice” or point of view Amplify should use when generating the response. Think of it as telling the AI who to write as (e.g., recruiter, hiring manager, sales rep). If the prompt was previously tied to a Role, the Context field will populate automatically.
Prompt
Write the instructions Amplify should follow. Use clear, directive language and include details such as:
-
Tone (friendly, formal, etc.)
-
Format (bullet points, paragraph, email draft, etc.)
-
Length constraints
-
Language requirements
Helpful resources:
Response Style
Choose how creative you want Amplify to be when generating the output:
-
Precise: Consistent, factual responses. Best for job descriptions, candidate summaries, and data extraction.
-
Balanced: Mix of consistency and variety. Good for most use cases like outreach messages and interview questions.
-
Creative: Diverse, varied responses. Ideal for brainstorming, unique content, and exploring different angles.
Default Data Points
Use this section to define which data Amplify should use automatically when generating responses. Users can still adjust these when they run the prompt.
Selecting Data Points
Click the search field to view available fields for the primary entity (and secondary entity if included). You can select nearly any field associated with each entity.
Confidential fields (where Confidential = true or null) and byte-type fields cannot be selected.
You can also add these sources to provide deeper context:
-
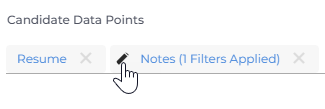
Notes
-
Emails
-
Submissions
-
Placements
You can apply additional filters to each of these sources by clicking the pencil icon.
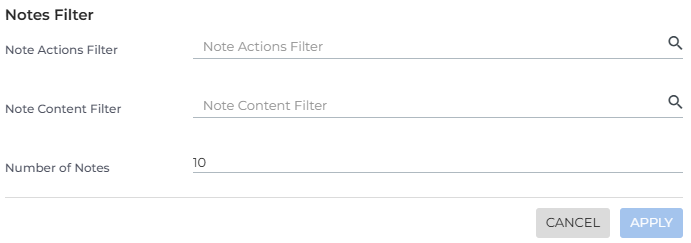
Notes Filters
-
Note Actions Filter: Limit notes by specific actions (e.g., Interview, Call).
-
Note Content Filter: Include only notes containing specific keywords.
-
Number of Notes: Choose how many recent notes to include (1–10). Amplify will use the most recent notes that match your filters.
Emails Filters
-
Email Subject Filter: Only include emails with certain keywords in the subject line.
-
Email Content Filter: Only include emails containing specific keywords in the body.
-
Number of Emails: Choose how many recent matching emails to include.
Submissions Filters
-
Number of Submissions: Choose how many recent submissions to include.
Placements Filters
-
Number of Placements: Choose how many recent placements to include.
Settings
This section controls how your prompt behaves when it runs, including which actions are available and where the prompt appears in Bullhorn.
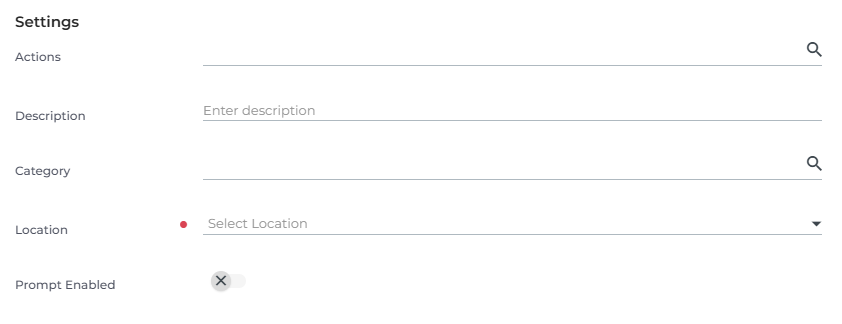
Actions
Define which actions appear in the Actions drop down when the prompt generates a response.
-
Add Note: Creates a note with the generated content.
-
Send Email to Candidate: Opens the email composer with the content pre-filled.
-
Send Email to Contact: Opens the email composer with the content pre-filled.
-
Update Primary Entity Field: Updates a record field directly using the prompt output (e.g., Candidate Summary).
Description
Add a brief description to help users quickly understand the purpose of the prompt. If no description is set, the first couple of sentences of the prompt will be displayed.
Category
Choose a category to help organize prompts within Prompt Studio.
Location
Specify where the prompt should appear:
-
Amplify Card/Amplify Card - More Prompts: Makes the prompt available in Amplify Assistant, Amplify Chat, and (if compatible) in the Enrich automation step.
-
Automation: Restricts the prompt to the Enrich automation step only. These prompts do not appear in Amplify Assistant or Chat.
Prompt Enabled
Turn this toggle on to make the prompt available to users. Turn it off to hide the prompt without deleting it.
When you're done, click Save.
Testing a Prompt
Once you've configured your prompt, we recommend testing with several records before enabling it to ensure it behaves as expected. The area on the right side of the screen allows you to preview and validate your prompt.
How to Test a Prompt:
- In the Select Entities to Preview search box, type to find a record to test the prompt with.
- Make sure you select a relevant record with good quality data.
- Make sure you select a relevant record with good quality data.
- Click Update to generate the prompt. The output will appear in the Output Preview area.
- To test the same prompt again, click Regenerate.
- You can continue to refine the prompt within the editor. After you make a change, "change added" will display and you can click Update to test again with the updated prompt.

Show LLM Request
If you’d like to see the full details of what’s being sent to the LLM and the complete response it returns, toggle on Show LLM Request at the top of the output preview area.
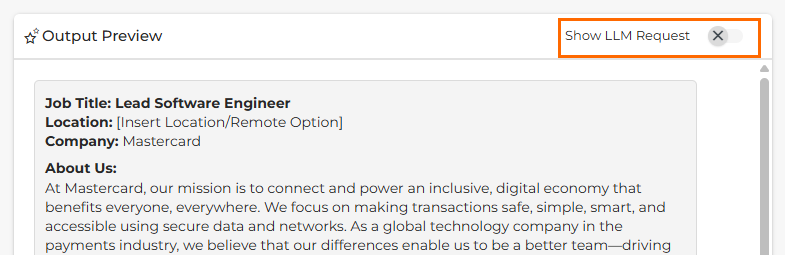
This advanced view provides transparency into how the LLM processes your prompts. It’s especially useful for troubleshooting unexpected results and fine-tuning your prompts for better outcomes.
