Creating Your Own Screener Notifications
You can create your own custom screener notifications to make sure your team receives the information that matters most to your workflows. This guide walks you through building your own notification template and setting up an automation that sends it out whenever a candidate completes a screening.
Reasons to Create your own Screener Notification
-
The default screener notification doesn’t include all the details your team needs.
-
The default screener notification includes more information than necessary, and you want to focus only on what’s relevant.
-
You want to send notifications only when a candidate meets a certain score threshold.
-
You want to filter notifications based on other criteria, such as answers to chat questions prior to the screening, specific skills, etc.
How to Create Your Own Screener Notification
Step 1: Build the Template
-
In Bullhorn Automation, go to your Library.
-
Click Add Email Template.
-
Select From Scratch – Drag and Drop.
-
Customize the template using logos, text blocks, titles, and any formatting you prefer.
-
To include screening information, insert Merge Tags and add fields from the screener such as Score, Summary, Rating, and more. (See the full list below.)
-
You can also include merge tags from related entities, such as Candidate or Job details. For example, adding the Job Description and Candidate Skills can help recruiters compare screening results to the job requirements.
-
-
When you’re ready, save the template.
Screener Merge Tags
You can include any of the following screener fields in your notification:
| Screener Field | Merge Tag | Description |
|---|---|---|
|
Screening Duration |
%SUBMISSION_SCREENINGDURATION% |
How long the candidate took to complete the screener |
|
Score |
%SUBMISSION_SCREENINGSCORE% |
The candidate’s screener score |
|
Status |
%SUBMISSION_SCREENINGSTATUS% |
The status of the screening (Invited, Complete, Incomplete) |
|
Summary |
%SUBMISSION_SCREENINGSUMMARY% |
The screening summary and transcript generated by Amplify |
|
Feedback Rating |
%SUBMISSION_SCREENINGFEEDBACKRATING% |
The candidate’s rating of their screening experience (1-5) |
|
Feedback Comment |
%SUBMISSION_SCREENINGFEEDBACKCOMMENT% |
The candidate’s written feedback |
|
Completed DateTime |
%SUBMISSION_SCREENINGCOMPLETEDDATETIME% |
The date and time the screening was completed |
Step 2: Build the Automation
Next, set up an automation that sends your custom notification.
-
Create a Submission based automation with the following settings:
-
Choose the type of automation: Standard
-
Choose the type of contact: Candidate
-
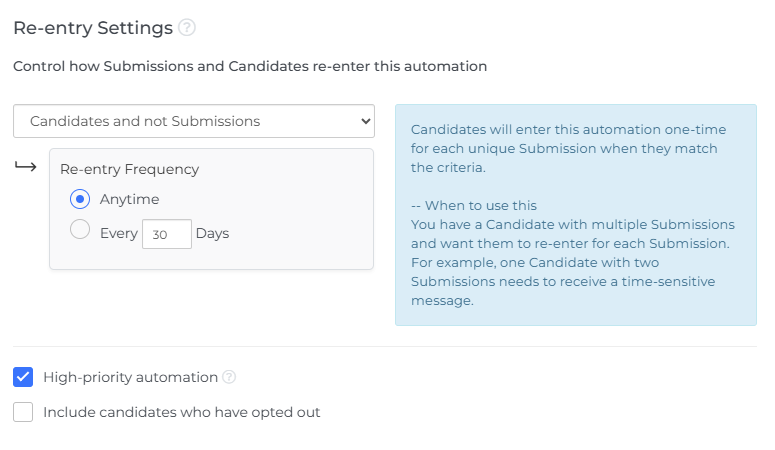
Re-entry settings: Candidates and not Submissions → Anytime.
We recommend marking this a high priority automation to ensure notifications are sent as quickly as possible.

-
-
For your list criteria, use:
-
Taken Engagement → Select your screener engagement.
-
Submission Screening Score > Greater Than → Choose a threshold (for example, 70).
-
This is optional but helps filter notifications by only alerting recruiters to higher scoring candidates.
-
-
Any other criteria you want to filter notifications by.
-
-
Add a Send Notification step and select the template you created.
-
Set the frequency to Immediate so recruiters are notified as soon as a candidate achieves a qualifying score.
-
Set the recipient to the appropriate contact, such as Candidate Owner, Submission Owner, Job Owner, or Job Assigned User(s).
-
Smart Tokens or generic email addresses (e.g. screeningreviewteam@acme.com) are also supported.
-
-
-
Add an End step.
-
Save and turn on the automation.
Step 3: Turn Off the Default Notification
Finally, to prevent duplicate messages, turn off the default screener notification.
-
Go to Engagements.
-
Open your screener engagement.
-
Select Screener Settings.
-
Deselect Send notifications after each screener complete.

-
Save.
We still suggest keeping Add screener responses to a single note enabled so that you have an easily-auditable record of every completed screening and easy access to the transcript.