DKIM and DMARC Records
Email security is critical for making sure your messages are trusted and delivered successfully. This guide explains what DKIM and DMARC are, why they matter, and how to enable and configure them for Bullhorn ATS. By setting these records correctly, you’ll reduce the chance of emails being marked as spam or spoofed.
Understanding DKIM and DMARC
DKIM (DomainKeys Identified Mail) helps ensure that emails sent from your domain are not altered in transit by signing each message with a cryptographic key. This makes it easier for recipient servers to confirm that the message is authentic. For more information, access DKIM Records.
DMARC (Domain-based Message Authentication, Reporting & Conformance) builds on DKIM and SPF by telling Internet Service Providers (ISPs) how to handle unauthenticated emails. This reduces the risk of phishing and spoofing attempts against your domain. For more information, see DMARC Records.
If you’re not sure whether your domain already has DKIM or DMARC configured, check with your IT team or domain registrar.
Updating Your DMARC Records
These steps describe how to add or update a DMARC record in your domain host’s DNS settings. Steps may vary depending on your provider.
-
Log into the administrative section of your domain host.
-
Open the DNS Records or DNS Management section.
-
Check if there is already a record for _dmarc.your_domain.com.
-
If it exists, no additional changes are required.
-
If it does not exist, create a new TXT record with the following values:
-
Name: _dmarc.your_domain.com
-
Contents: v=DMARC1; p=none;
-
If you’re unsure about these steps, contact your domain registrar support for assistance.
-
Enabling DKIM on Mass Mails
To comply with DMARC and ensure better deliverability for Bullhorn mass mails, you’ll need to create a CNAME record and then contact Bullhorn Support.
To enable this, you’ll need to use Bullhorn’s SPF record listed in this file. For more details on SPF records, Updating Your SPF Records.
-
Log in to your DNS hosting provider.
-
Locate the section to add a CNAME record (commonly under DNS settings).
-
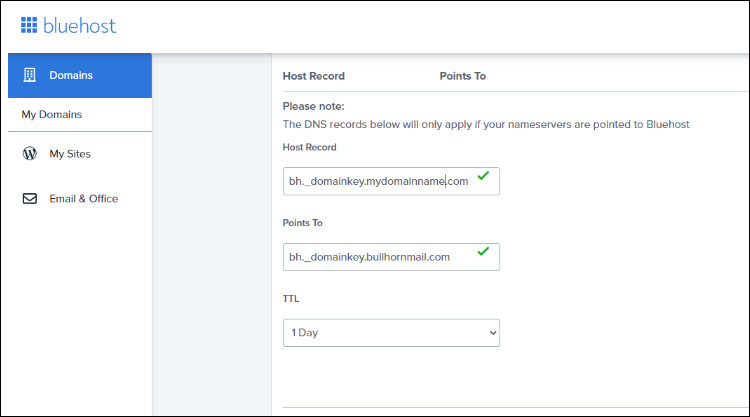
Create the CNAME record with the following values, replacing mydomainname with your own domain:
-
Host/Name: bh._domainkey.mydomainname.com
-
Points To: bh._domainkey.bullhornmail.com
-
-
Save your changes.
-
Contact Bullhorn Support and let them know you’re ready to enable DKIM on mass mails. Bullhorn will complete the process on our end.