Managing Email Message Templates
Learn how to create, edit, and organize email templates in Bullhorn. Templates let you save common messages, and you can use personalization tags (merge fields) to automatically insert recipient-specific information when you send.
Before You Begin
About template visibility:
-
Public templates can be edited or deleted by any user in your company.
-
Private templates are visible only to you.
About personalization tags:
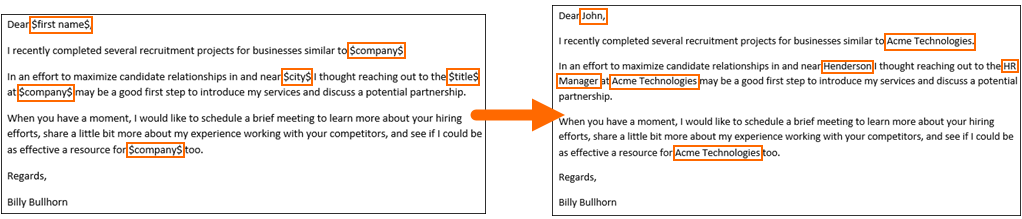
Tags only populate when used in mass mailings—they won't work in individual emails. If you include a tag in a personal email, recipients will see the tag itself instead of their information.
About receipts:
When you send a template with tags, recipients see the personalized message with tags replaced by their actual data. However, your receipt shows the message as it was sent from your bullhornstaffing.com alias, displaying the tags as-entered (not personalized). This is normal.
Create a Message Template
-
Open the Compose Message screen.
-
Select Message Templates and choose New.
-
Fill in the template details:
-
Owner: Auto-populates with your name.
-
Template Name: Enter a name for your template.
-
Visibility: Select Private to make it visible only to you, or leave as Public for team access.
-
Message Text: Compose your message. See Composing a Message for details. You can add personalization tags here—see the reference table below.
-
Attachments: Attach files up to 10 MB in size.
-
-
Click Save.
You're now back on the Compose a Message screen and can select your template from the Message Templates dropdown.
Edit or Delete a Message Template
-
Go to Compose a Message.
-
Select Message Templates and choose Organize.
-
Select the template name you want to edit.
-
On the Edit Email Template screen, you can edit the template or delete it using the Delete button.
Personalization Tags (Merge Fields)
Add these tags to your template to automatically insert recipient details. Tags must match the exact formatting shown in the table below—if they don't, recipients will see the tag text instead of the personalized information.
Use the Personalization dropdown on the Compose a Message screen to insert tags without typing. Then copy the message into your template.
|
Field Value |
Tag |
Description |
|---|---|---|
| Full Name | $name$ |
Recipient's first and last name. |
| First Name | $first name$ |
Recipient's first name. |
| Last Name | $last name$ |
Recipient's last name. |
| Nickname | $nickname$ |
Recipient's nickname. If no nickname exists, the first name will display. |
| Salutation | $salutation$ |
Recipient's title |
| Name Suffix | $name suffix$ |
Recipient's suffix after their name (e.g., Jr. or Ph.D.). |
| Middle Name | $middle name$ |
Recipient's middle name. |
| Job Title | $title$ |
Recipient's job title. |
| Company | $company$ |
Recipient's company name. |
| Address | $address$ |
Recipient's primary address. |
| City | $city$ |
Recipient's city. |
| State | $state$ |
Recipient's state. |
| Zip Code | $zip$ |
Recipient's zip code. |