Composing a Message
Learn how to use Bullhorn's message composer to write and send emails directly from the ATS. You'll configure recipients, add templates and signatures, format your message body, and set tracking options before sending.
When to use Bullhorn's Email Composer
Use this feature for mass mailings, client submissions, and forwarding job information. For standard day-to-day emails, use your company's email client (Outlook, Google, etc.) instead—those clients preserve your emails on your company's server.
Sections of the "Compose a Message" Screen
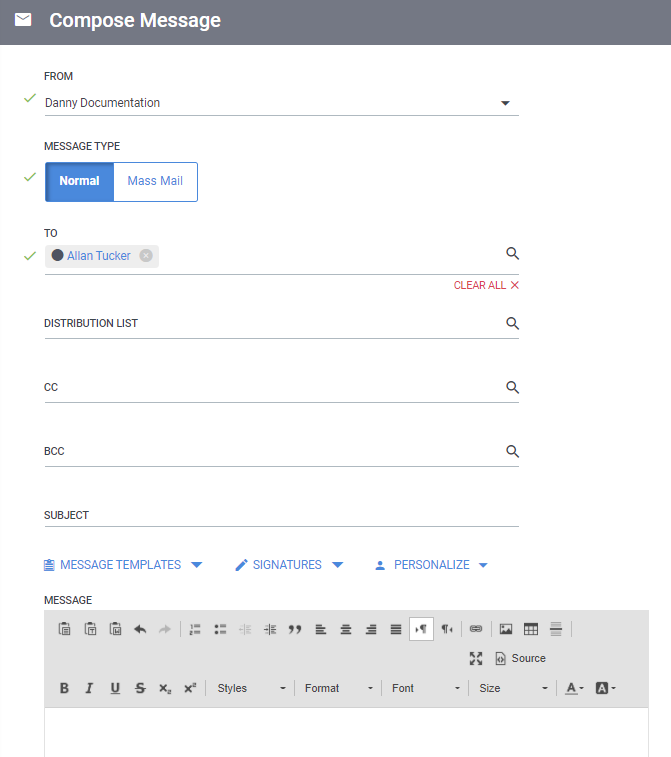
Recipients, Type, and Format
This section controls who the email is from, where it goes, and how it's treated:
-
From: Defaults to your Bullhorn user, but can be changed if you have multiple email addresses set up in the system.
-
Message Type: Choose Normal to show all recipients' email addresses, or Mass Mailing to hide them from each other (typically used for distribution lists).
-
To: Use only for 10 or fewer recipients. Leave blank if you're using a distribution list.
-
Distribution List: Auto-fills if you're sending a mass mailing. See Sending a Mass Mailing for details.
-
CC: Include individual recipients. Visible to all other recipients. Not available for mass mailings.
-
BCC: Include individual recipients privately. Hidden from other recipients. Not available for mass mailings.
-
Subject: The email subject line.
Email Body
Message Templates
Select a template from the Message Templates drop-down to populate a pre-written message into the message field.
Signature
Your default signature loads automatically when you open the composer. To use a different signature, select from the Signatures dropdown. Signatures work independently of templates—changing one won't affect the other.
Personalize
Click Personalize to add recipient details from their Bullhorn record into your message. You can select single or multiple fields to customize the message as much as you want.
Message
Enter the body text in the Message field. Any template or signature you selected will already be there. Use the built-in editor to format as needed.
Copying and Pasting Text
To preserve formatting from an external source, click one of the Paste buttons in the editor, or press Ctrl+Shift+V to paste without formatting. After pasting without formatting, select the text and adjust the font and size as needed.

If you paste text directly without using these methods, formatting may not display correctly for recipients.
Adding an Image
To include an image in your message, select the Image icon ( ). Images in your message require an image URL. The image must be hosted online in order to use an image URL.
Recipient email clients may not display images by default.
Adding a Link
To link an image or text to a website:
-
Highlight the image or text.
- Click the Link icon (
 ).
). -
Paste the URL into the URL field.
-
Click OK.
Attachments
You can attach files up to 10 MB from candidates, client contacts, job postings, client companies, or your computer. If total attachments exceed 10 MB, they're replaced with a download link instead of being attached directly.
Communication Settings
These options control how the message is processed and formatted:
-
Priority: Select High to mark the message as high priority. Note: the recipient's email client determines whether this displays.
-
Return Receipt: Include a return receipt request.
The recipient's email client may not support this.
-
Sensitivity:
-
Normal: Bullhorn users with appropriate permissions can view the email on the record's Activity tab.
-
Confidential: The email is not tracked in Bullhorn.
-
Availability depends on your user type entitlements. Contact Bullhorn Support to enable this field for your user type.
-
-
Message Format: Defaults to Rich Text (HTML). Only change to Plain Text if you need to send without formatting.
Plain text messages ignore all formatting in the message field.
Actions and References
These fields set what happens after you send:
-
Record Action: Automatically attach a note to the candidate record with the message subject and body. The value you select here populates the note's Note Action field.
-
Job, Placement, Candidate
-
Log as Client Submission: Select Yes to prompt for a candidate record. When you send, a client submission is logged for that candidate and the job in the Job Reference field. (No submission is created if you don't fill in the Job Reference field.)
-
Schedule Next Action: Select Add Appointment or Add Task to open that screen after sending. Referenced records auto-populate to help you schedule.