Field Mappings
Field Mappings are an admin tool that shape how users interact with Bullhorn. By editing Field Mappings, you're managing the structure and behavior of your forms for records like Candidates, Contacts, Jobs, and Placements.
When changing fields, use custom fields instead of reusing existing ones. Changing fields can break how the system works, disrupt workflows, or cause problems with reports and integrations.
Common Reasons to Use or Edit Field Mappings
You might need to use or edit Field Mappings to:
-
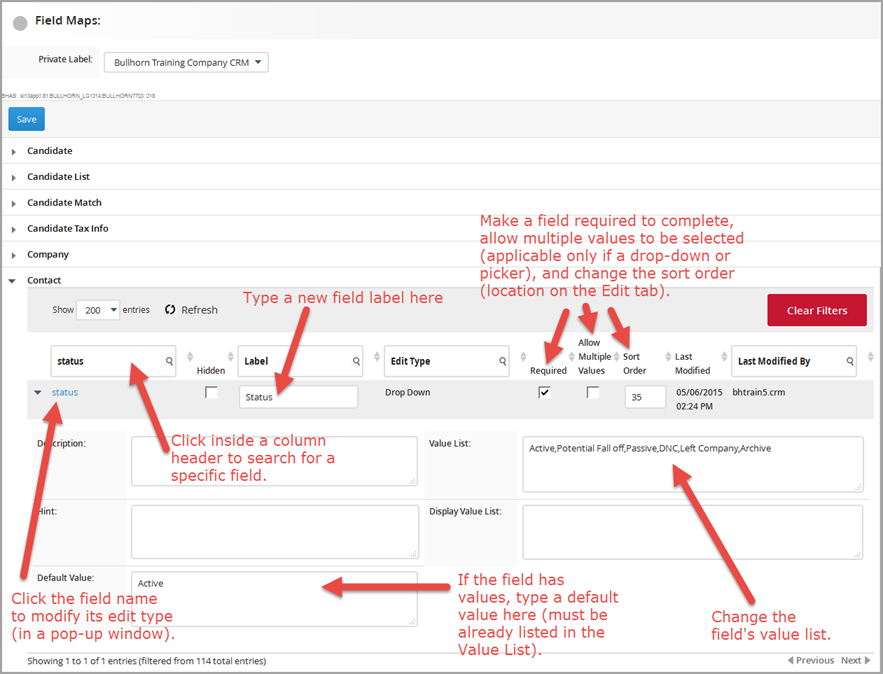
Add or modify fields: Add a new custom field or manage options within existing ones, such as adding, removing, or renaming dropdown values (e.g., Candidate Status, Industry).
-
Control field behavior and visibility: Define field properties like default values, multi-select behavior, or set them as required or optional on forms.
-
Customize field layout: Rearrange fields by changing their order, or rename their labels on a form to align with your team's workflow.
-
Manage data and integrations: Map or copy field values between different record types (e.g., Candidate to Contact) and ensure consistent data syncing for integrations or payroll systems.
-
Troubleshoot field issues: Resolve problems with fields that aren't saving correctly or are displaying incorrect or missing data.
Access Field Mappings
Access Field Mappings from the Bullhorn menu by selecting Admin > Field Mappings.
Each set of field mappings is broken down by entity. For example, to change the values that appear within the Status drop-down on the Contact record, expand the Contact entity and locate the Status field. If necessary, you can use the column headers as filters.
Edit Field Mappings
- Log into Bullhorn and navigate to >>.
- Select the entity you wish to edit and complete any required changes.
- Select Save at the top of the page.
- Log out and then back into Bullhorn.
Because all records (except for companies) must have owners in Bullhorn, the Owner field must always be required. If you un-select the Required checkbox for an Owner field and then attempt to create and and save a record without an owner, you'll see an error message.
Troubleshooting Field Mappings
If you encounter issues with field mappings, use the following tips to diagnose and resolve common problems.
Data Truncation and Character Limits
If you receive an error stating that data must be truncated, it means the text you're trying to save exceeds the field's character limit. You can check the limit in two ways:
- Go to field mappings and click on the hyperlinked field mapping name. The popup box has the character limit listed under Text FieldLimit.

- Visit the Entity Reference Guide in the developer documentation and navigate to your desired entity. Open the entity and find the corresponding field mapping. In the column Type you will see a number in parenthesis that indicates the limit (i.e String (100) means 100 character limit).
Field Won't Save or Appears Blank
If your field won't save or the data disappears after you save, it may be a character limit issue. The CustomText field has a limit of 100 characters. For longer text, you must use the CustomTextBlock field type, which has no character limit.
Incorrect or Missing Data
If your field is blank or showing the wrong data, use the following list to troubleshoot.
-
Hidden Field: First, ensure the field is not hidden. Go to Menu > Admin > Field Mappings and confirm the Hidden radio button for your field is off.
-
Repurposed Fields: If you're seeing unexpected data, a field may have been repurposed. This can cause legacy data to reappear. Always use custom fields for new data.
-
Value Lists: Updates to a value list or display value list only affect new records created after the change. Older records may still display values that have since been removed from the list.
-
Field Syncing: If a mapped field isn't syncing with a payroll or other integration, the field type in Bullhorn ATS may not match the required field type in the destination system. Verify that the field types align to ensure a proper sync.
-
Candidate Mappings: If candidate field mappings are incorrect, verify that the Source, Value List, and Display Value List match exactly. Review the field settings under Menu > Admin > Field Mappings for the candidate entity.
Address Missing from Job Records
If you're unable to find the address field when adding a job, despite it being unhidden in Field Mappings, follow the steps below:
- Go to Menu > Admin > Field Mappings.
- Expand the Job entity and filter for fullAddress.
- Unhide the fullAddress and change the Sort Order so that it is the same as the address field.
- Repeat this for each Job track (Job II, III, and IV).
- Click Save.
Field Missing from Job, Opportunity, or Placement Record
This usually happens when the field is not properly configured on the entity master track or if there are sort order conflicts. While information may save initially, it can disappear when clicking the Edit tab.
To fix this:
-
Go to Menu > Admin > Field Mappings.
-
Select the entity where the field was configured.
-
Verify setup on all available tracks.
-
If missing from the master track, add the field.
-
Check for and resolve any sort order clashes (sort orders must be unique).
-
Click Save.
-
Log out and back in to confirm the changes.
Mapped field not syncing with payroll or another integration
This usually occurs when the field type in ATS doesn’t match the field type in the sync destination. Verify that the field types align. If the issue continues, contact Support for assistance.