Omnitable Configuration Guide
Bullhorn Recruitment Cloud’s Omnitable is a generic, reusable component that can be added to pages to show a fully configurable and customizable list of records and actions.
It was designed to mimic and expand upon the existing Salesforce List Views, providing both consistency with the platform native behavior and additional functionality for Bullhorn Recruitment Cloud users.
Below are the Omnitable features:
- Customizable Columns
- Column Sorting and Custom Sorting
- Custom column renderer
- Infinite Scroll
- Support for Packaged and Custom Actions
- Support for Nested Menus (Actions)
- Support for Contextual Data Viewer
- Saved Omnitable Views comprising filtering and selected columns to display.
- Quick Search (no configuration options)
- Column Filtering (no configuration options)
System Requirements
Bullhorn Recruitment Cloud 2025.06
Configuration
Step 1: Omnitable Basic Configuration
Add an Omnitable as Standalone or as Related Lis to any object then configure what fields to display.
At its most basic, an Omnitable can simply be a list of records from an object displayed in table format where the columns of the table are fields from that object. Users will be able to see the data, configure the columns, do some filtering, sort and order the data.
For the basic configuration, navigate to the following location:
During the configuration, please be aware of the distinction between these two fields:
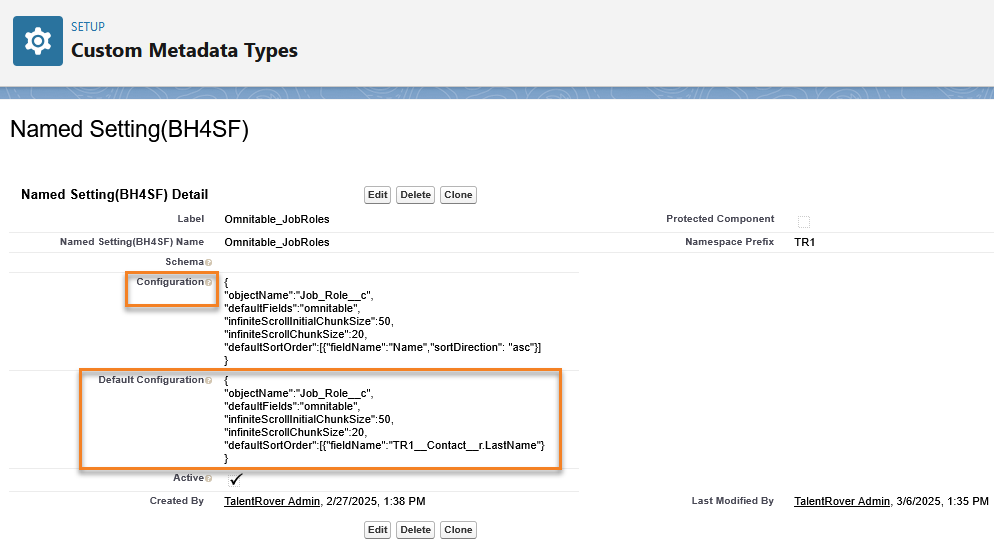
- Default Configuration: This field is intended to be read-only for customers (if configurations are packaged). In this way, it will be updated on upgrades.
- Configuration: This field is for the customization of packaged Omnitables. After upgrading, customers can see the updated default, and easily revert to it if desired.
The configuration for each Omnitable is stored as JSON on the Named Setting Custom Metadata Type, with a Name prefix of "Omnitable_" followed by the apiName of the Omnitable configuration.
This apiName is used to link an Omnitable instance to its configuration. The JSON is then stored in the Configuration field of the Named Setting record.
Please be aware of the distinction between these two fields:
-
Default Configuration is intended to be read-only for customers (if configurations are packaged). In this way, it will be updated on upgrades.
-
Configuration field is for the customization of packaged Omnitables. After upgrading, customers can see the updated default, and easily revert to it if desired.
At its most basic, an Omnitable can simply be a list of records from an object displayed in table format where the columns of the table are fields from that object. Users will be able to see the data, configure the columns, do some filtering, sort and order the data.
Available JSON Configuration Settings
The Baseline Configuration section of the JSON Configuration Settings table lists the minimum configuration required to create an Omnitable that can be added to a page layout:
- Object name
- Field set to be referenced to define the table columns,
- Chunk size for the infinite scroll behavior
You can then start adding more functionality to the baseline configuration, like for example by defining which field/column the table should be ordered by default, or referencing a second field set to define the ‘available’ columns for the users (if different from the default list of columns), or adding Actions: the remaining settings listed under ‘Baseline Configuration’ cover all the functionalities currently available to the Omnitable:
- Add an Omintable to an object as related list
- Define the set of columns available to the end user to customize the columns of the Omnitable
- Default Sort Order for the Omnitable
- Add Actions
- Define Action Categories (if using Nested Menus for Actions dropdown)
The remaining sections of the Omnitable Additional Resources list the settings available to further customize each functionality.
- Column Configuration
- Sort Configuration
- Action Configuration/Action Variable Mapping
- Action Categories
- Record Type Override
Step 2: Add an Omnitable as ‘Standalone’ or as ‘Related List’ to any object
-
Go to button to create a Lightning Page.
-
In the next three screens, select:
-
Type=‘App Page’
-
Label= Omnitable (or any preferred name)
-
Layout=‘One Region’
-
-
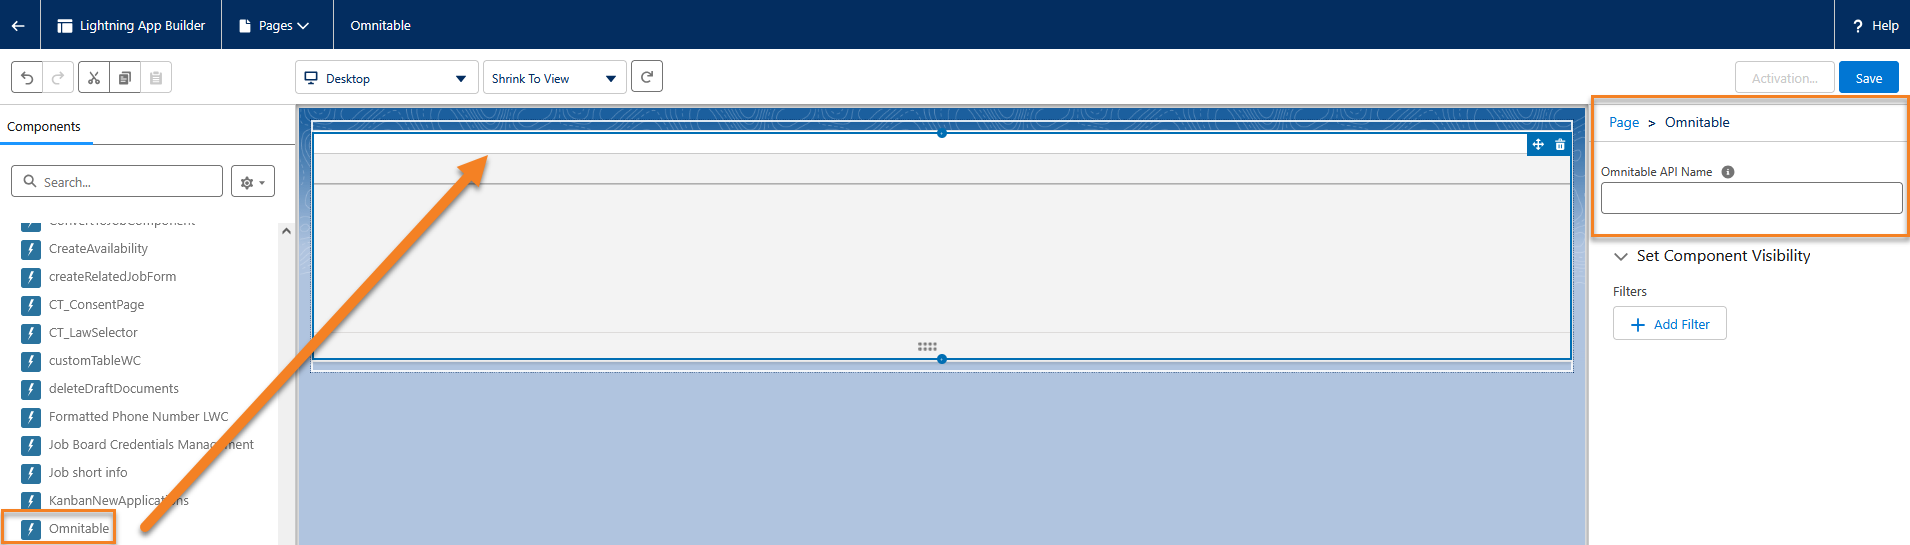
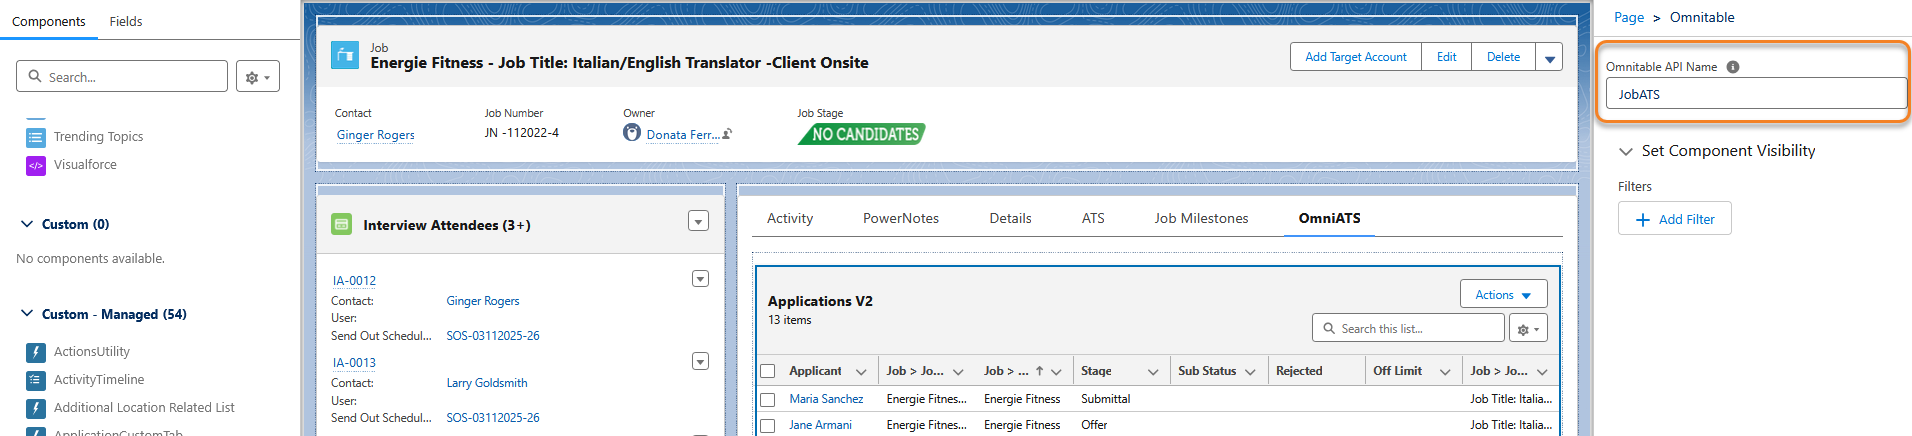
Once the Lightning App Builder editor opens for the page you created, pick Omnitable from the left-hand side list of Custom-Managed items and pull it onto the page
-
On the right-hand side of the page, the Omnitable API Name needs to be filled with the value from the Named Setting(BH4SF) Name field on the Named Setting(BH4SF) record minus the Omnitable_ prefix
-
Finally create a tab to access the Omnitable. Go to . Retrieve the name of the Lightning Page you create from the Lightning Page lookup and fill in the remaining mandatory fields.
If adding the Omnitable to an object as a Related List, please note the following:
-
The JSON configuration must contain a value for the
contextFilterFieldNameJson string. It’s whatever field on the primary object that links it with the context object.If you are adding a Call List Members Omnitable to a Call List:
objectName= TR1__Call_List_Member__c andcontextFilterFieldName= TR1__Call_List__c. -
If you are adding the Omnitable directly on the page, the context is picked up automatically.
-
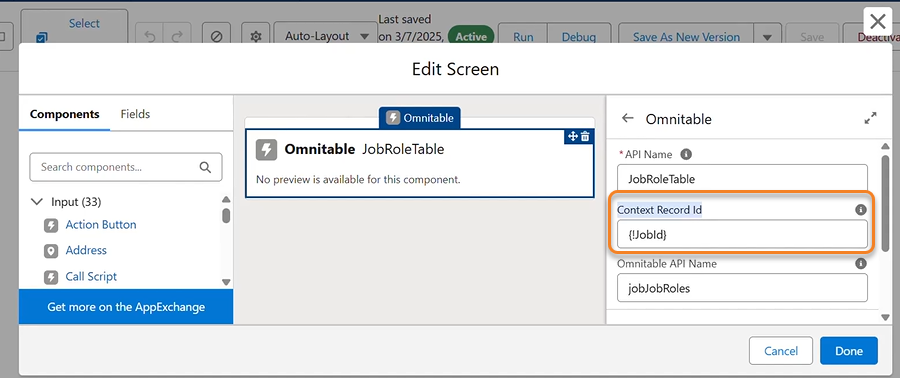
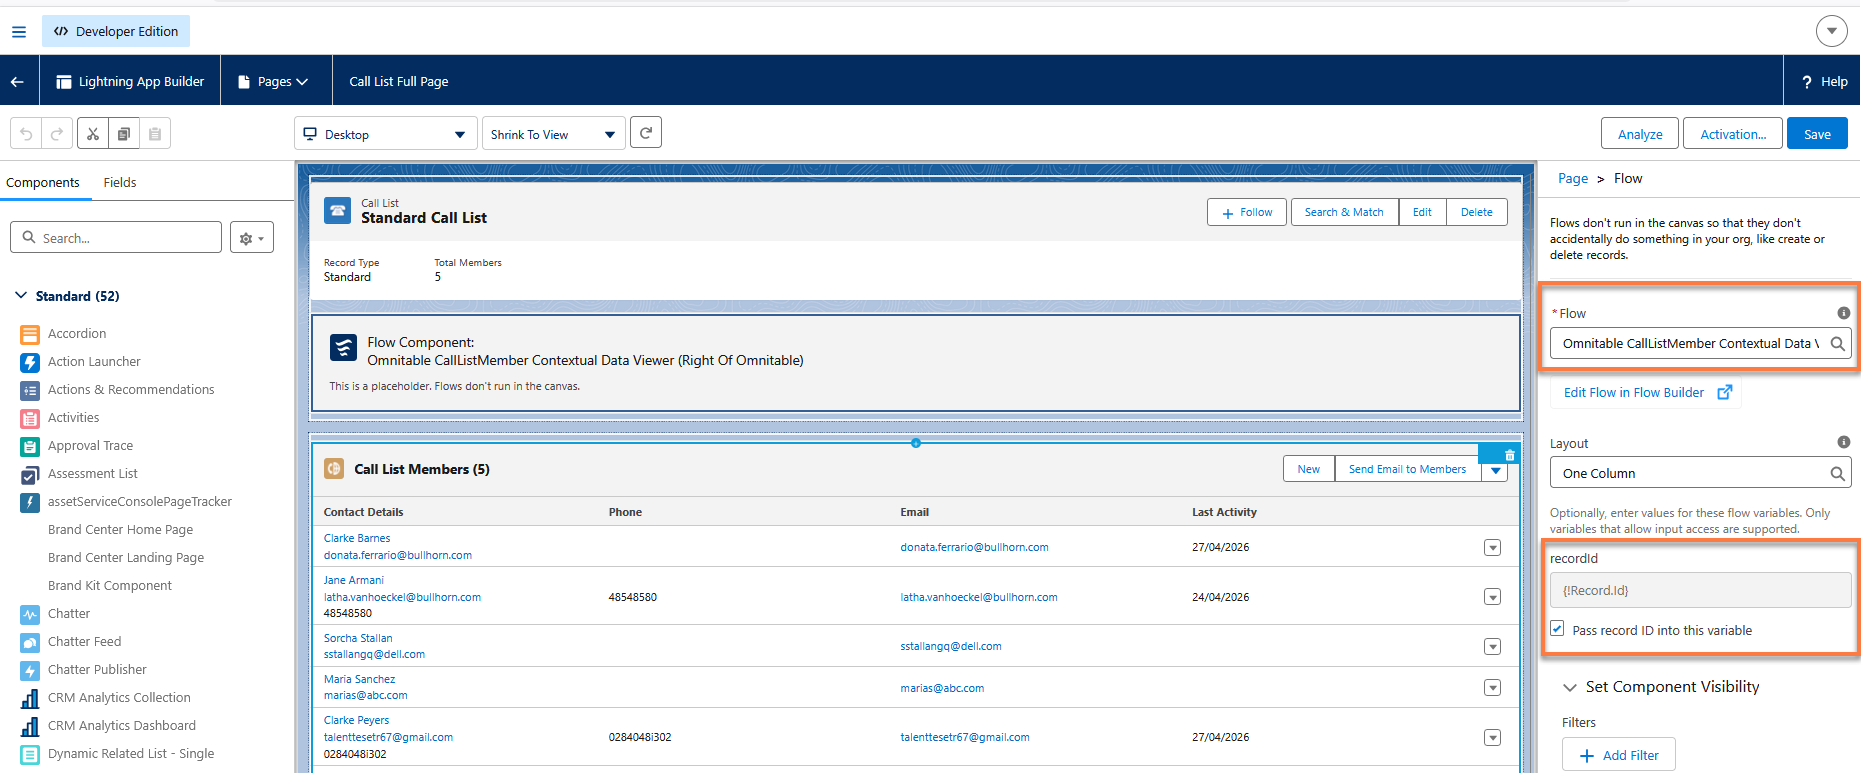
When used in a Flow Screen, the property Context Record Id is available to pass in the parent record ID. On the page layout when adding the omnitable flow, click into the flow component and check the box for 'Pass record ID into this variable' otherwise the parent ID is not passed and the list will not filter and load.
-
Step 3: Configure Omnitable Features Column Customization
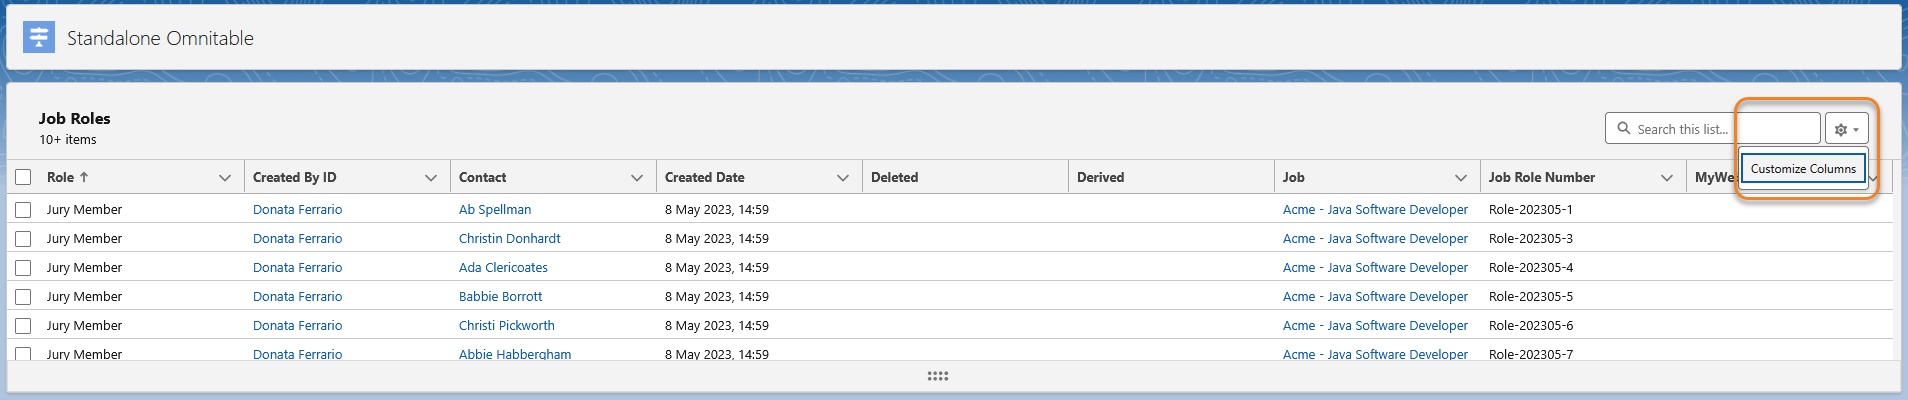
The Customize Column control opens the Customize Columns modal that shows to the user:
-
Selected Columns: The fields shown or moved here will appear on the UI as Omnitable columns
-
Available Columns: A set of fields configured by the System Admin for the specific Omnitable instance and that can be manually added to the Omnitable by the user
Save Custom Columns set based on Record Type
The defaultFields and availableFields settings are used to define the fieldsets (table columns) at the table level.
The following settings are used in the configuration JSON stored in TR1__Named_Setting__mdt to populate the Selected Columns and Available Columns modal sections:
- DefaultFields: The fields from the fieldset referenced in this JSON string will populate the Selected Columns modal sections when the Omnitable is opened by the user for the first time.
- AvailableFields: The fields from the fieldset referenced in this JSON string will populate the Available Columns modal sections.
There is a third setting called contextRecordTypeOverrides which allows the admin to override the table level settings for specific contextual record types (this is obviously only relevant for Omnitable used as related lists, not for standalone Omnitables).
contextRecordTypeOverrides is an array of overrides, one per record type, which specifies the contextual record type the override applies to, and the fieldsets to use for that record type.
- The contextual record type is to be given as its namespace and developer name, separated by a double underscore.
- The field sets are to be given as the api name of the fieldset on the object the table displays.
{
"objectName": "T R1__Job_Role__c",
"defaultFields": "omnitable_default",
"availableFields": "omnitable_available",
"infiniteScrollInitialChunkSize": 50,
"infiniteScrollChunkSize": 20,
"contextFilterFieldName": "TR1__Job__c",
"contextRecordTypeOverrides": [
{
"contextRecordType": "TR1__Permanent",
"defaultFields": "omnitable_default_permanent",
"availableFields": "omnitable_available_permanent"
}
]
}
Custom Column Renderer
A Custom Column Renderer is a custom component that is used to render the data for a specific column in the table. There are three parts to the configuration of a custom column renderer for an Omnitable instance:
-
Install Bullhorn LWS package in the Org where the Omnitable instance is configured.
Important:Tthe subscriber’s Org must have Lightning Web Security enabled ( Use Lightning Web Security for Lightning web components and Aura components must be set to True). Custom column renderer is not supported in Orgs where this setting is not enabled. - Use the omnitablePlus component that comes with the Bullhorn LWS package to add the Omnitable to the page, not the Omnitable component that comes from the TR1 package.
-
Configure the column for your Omnitable instance using the configuration JSON
- Add the renderer element when configuring the Omnitable columns using the columnOverrides JSON attribute
- Renderer requires the full name of the LWC used to render the data in the table:
- If it's in a namespace, use the format "namespace/componentName".
- If it's not in a namespace, use the format "c/componentName".
- Renderer requires the full name of the LWC used to render the data in the table:
- Configure the virtual column (see section below).
- Add the renderer element when configuring the Omnitable columns using the columnOverrides JSON attribute
If you have configured an Omnitable instance, and want to use the omnitablePlus component and add a rendered column to that Omnitable, you can keep using the existing custom metadata type/JSON, you do not need to create a new one. You will of course need to add configuration (for columnOverrides , renderer, and optionally virtualName) but after that just give it the same API Name wherever you drop the component.
For more technical details on Custom Column Renderer, see Omnitable Custom Renderer Implementation Guide.
Virtual Column
When using Custom Column Renderer, you can also configure a Virtual Column. Virtual Columns are perfect for when you want the Users to be able to choose between different "views" for the same field.
If you don't specify virtualName then the column overrides, including renderer and label, will simply be used for that column
A Virtual Column is a column that does not exist in any fieldset but it might be used in order for the 'rendered' data to be displayed on the Omnitable. Once configured, this virtual column will become available in the Omnitable ‘Customize Column’ modal and users will be able to add it to the Omnitable UI.
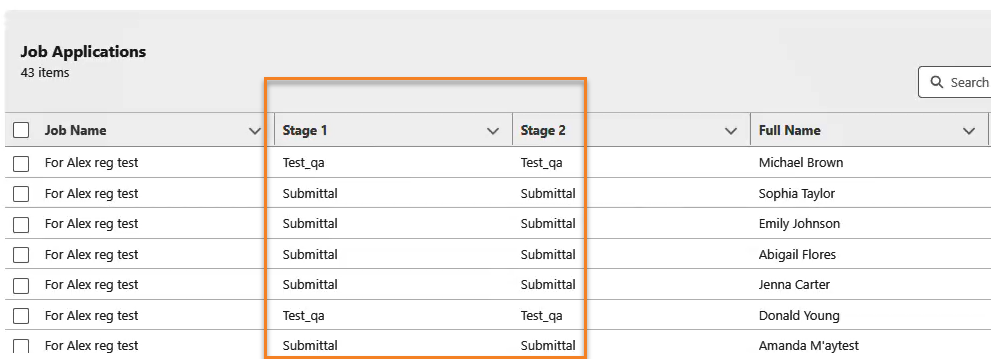
The columnOverrides attribute in Baseline JSON Configuration can be used to configure various overrides that apply to a specific column on the table. If you add virtualName to the JSON configuration for columnOverrides, then this config will form the basis for a brand new column created alongside the original column for that field, following the same rules for availability and default visibility.
Conversely, if columnOverride does not specify a value for the virtualName property then that config will only apply to the original non-virtual column for the field.
"columnOverrides":[
{
"virtualName":"Test",
"label":"Stage 2",
"fieldName":"TR1__Stage__c"
},
{
"label":"Stage 1",
"fieldName":"TR1__Stage__c"
}
]
The second part of that JSON sample (the reference to “label”: “Stage 1”) is only needed if you want to rename the column. That is, you only need to specify the "virtual" override to gain the extra column, not both.
Now admins can use the virtual column to display data rendered as images like chevrons, etc. (the original column can then be removed from the table).
"columnOverrides":[{
"virtualName":"Test",
"label":"Stage 2",
"fieldName":"TR1__Stage__c",
"renderer": "tr1/omnitableChevronPath"
The virtualName must be unique across all columnOverride definitions in a given JSON configuration.
Sorting and Filtering Exceptions
Filter Field Override
To enable users to sort/filter a column that displays data not stored in the database (as is the case of the custom column renderer, for example), specify an alternative "sortable" field that Omnitable can then use behind the scenes to sort the column while still displaying the original column data.
To configure this, set a filterField and a sortField in the columnOverrides section of the configuration JSON.
JSON Example: For a formula field displaying an image URL that you want to filter/sort by its text value instead:
"columnOverrides": [{
"fieldName": "TR1__SomeFormulaField__c",
"filterField": "TR1__SomeFormulaFieldValue__c",
"sortField": "TR1__SomeFormulaFieldValue__c"
}]
Hide filtering/sorting option
To prevent users from trying to sort/filter columns where it won't work, you can use the below attributes in the configuration JSON. This results in hiding the sort/filter options for columns that don't support that.
-
disableSorting : When true, sorting will be disabled for this column
-
disableFiltering : When true, filtering will be disabled for this column
Show Blank Values Last on a Sorted Column
Out of the box, Omnitable sorting of columns that contain blank values follows the SOQL query default behavior: NULL values are sorted first, regardless of sort direction (asc, desc), but Omnitable admins can configure a column so NULL values are always last: it’s an Org-level configuration per column, per Omnitable instance (so it cannot be changed by the end user).
Configuration Steps
To have empty (NULL) values displayed last when sorting a column you need to set sortNullsLast attribute to ‘true’ in the columnOverrides section of the related JSON configuration.
- Go to and edit the Named Setting record for the Omnitable you want to apply the changes to.
- In the JSON configuration field, find or add columnOverrides section (array)
- Find or create a Column Override entry for the field you want to make changes to.
- In this Column Override entry set
sortNullsLastattribute to "true".- It should look like this: "sortNullsLast": true
Known Limitations
- Picklist sorting is defined by the picklist sort determined during setup, and there are no null values but empty strings.
- Boolean fields also don’t have null values.
- Multi-select picklist, rich text area, long text area, encrypted (if enabled), and data category group reference type fields are not sortable at all.
- On relationship fields, null values always return at the top.
Named Views Filtering
Configure Record/Field Dropdown
To ‘control’ what is shown in the ‘Record’ and ‘Field’ dropdowns, there are two parts to the configuration:
- Create a field set.
- Add reference to that fieldset to the relevant Omnitable JSON configuration.
Once you have created a fieldset and have it populated as required, update the Omnitable JSON with the following:
- Go to.
- Edit the Named Setting record for the Omnitable you want to apply the changes to.
- In the JSON configuration field, add the filterableFields attribute followed by the fieldset API name (EX: “filterableFields”: “Omnitable_view_filter”.)
Add Is Blank/Is Not Blank Operators
If you upgraded your Org to package release 2025.10 or higher and already had an Omnitable instance configured, you will have to manually add the operators Is Blank/Is Not Blank.
- Go to (TR1__Filter_Condition__c).
- Go to (TR1__Operator__c).
- Go to the Values section for this picklist, click on New and add "is blank" and "is not blank" values.
- The values "is blank" and "is not blank" must be in lower case.
- Click Save.
Omnitable Actions Configuration
Once you have completed the basic configuration required to add an Omnitable to a chosen object, you can proceed and add Actions to that Omnitable: in Omnitable, Actions are added by wrapping them in Flows and then referencing the Flow in the JSON configuration.
As mentioned above, the configuration JSON stored in TR1__Named_Setting__mdt has an ‘Actions’ string that supports various configuration elements.
Packaged ATS Actions for Omnitable
A selection of ATS Actions is available to be added to an Omnitable on Job or Contact records in a few simple steps. By tweaking the OOTB Configuration JSON you can:
- Add/remove actions (custom actions are supported)
- Change the order of Actions in dropdown (by changing the order of the action in JSON)
- Configure actions based on record type
- Display the action either in the Action dropdown or as an icon to the left of the dropdown
- Change the icon
Add ATS Actions to an Omnitable on Job Records
-
Go to a to open the Lightning App Builder for that page
-
Add a tab for the Omnitable or replace an existing tab
-
Drag and drop the Omnitable component from the Custom-Managed list of components on the left hand side into the tab space.
-
Enter "JobATS" in the Omnitable API Name field on the right

-
Go.
-
Open the Omnitable_JobATS record to see what ATS actions are configured out of the box and how they are configured. You can copy and paste the JSON configuration from the Default Configuration field to the Configuration field if you want to make any change to it.
Add ATS Actions to an Omnitable on Contact Records
- Go to a to open the Lightning App Builder for that page
- Add a tab for the Omnitable or replace an existing tab
- Drag and drop the Omnitable component from the Custom-Managed list of components on the left hand side into the tab space.
- Enter "CandidateATS" in the Omnitable API Name field on the right.
- Go to .
- Open the Omnitable_CandidateATS record to see what ATS actions are configured out of the box and how they are configured. You can copy and paste the JSON configuration from the Default Configuration field to the Configuration field if you want to make any change to it.
Packaged Interview Scheduling Omnitable
Admins can add an Interview Schedule Omnitable to Job and Candidate records that shows all interviews scheduled for that Job/Candidate. The following columns are shown out-of-the box, but they can be customized:
-
Interviewee (Candidate)
-
Interviewer
-
Cancelled
-
Rejected
-
Schedule Type (SendOut, Internal Interview, Group Internal Interview)
Under the Actions dropdown, you will see the following:
-
Send Out Schedule (Create)
-
Internal Interview (Create)
-
Group Internal Interview (Create)
-
Edit Schedule
-
Cancel Schedule
-
Create PowerNote
Configuration Steps
-
Go to Setup > Custom Metadata Types > Named Settings(BH4SF) > Omnitable_jobSendOutSchedules (this is the JSON configuration that contains the out of the box configuration and that users can customize)
-
To add the Interview Schedule Omnitable to a Job record, follow the instructions provided in Omnitable Configuration Guide > Step 2: Add an Omnitable as ‘Standalone’ or as ‘Related List’ to any object. When entering the Omnitable API Name in the Lightning page, just enter “jobSendOutSchedules”.
To add the Omnitable Interview Schedule component to a Candidate record, follow the same steps as above and use the Omnitable_candidateSendOutSchedules JSON.
Packaged Call List Members Omnitable
It is possible to add a “Call List Members” Omnitable to Call List records. You will get all the Omnitable features with greater functionality and flexibility than a standard Related List.
The default columns are shown below, but they can be customized:
-
Call List Member First Name
-
Call List Member Last Name
-
Call List Member Email
-
Contact Account
-
Call List Record Type
Under the Actions dropdown, you will see the following options:
-
Add New Call List Member
-
Send Email to Members (Standard Call Lists)
-
Market Candidate (Candidate Marketing Call Lists)
-
Add To Another Call List
-
Move To Another Call List
-
Delete Members
-
Create Longlist
-
Create a PowerNote
Configuration Steps
-
Go to . This is the JSON configuration that contains the out-of-the-box configuration and that users can customize.
-
To add the “Call List Members” Omnitable to Call List records, follow the instructions provided in Step 2: Add an Omnitable as ‘Standalone’ or as ‘Related List’ to any object of the Omnitable Configuration Guide. When entering the “Omnitable API Name” in the Lightning page, enter
CallListMembers.
Option to Add Contextual Data Viewer to (Candidates) Call List Members Omnitable
Recruiters working in Call List Member Omnitables can now access a Contextual Data Viewer (CDV) directly within the table, allowing them to review key candidate information without leaving the Omnitable.
Out of the box, the following tabs are displayed:
-
Documents / Default Resume Preview
-
Contact Details
-
Combined Activity Timeline
-
Employment & Education History
-
Applications
Configuration
This CDV instance is part of the Managed Package and is not added to the page layout by default — administrators must manually configure it for an existing Call List Members Omnitable. The component is designed to work independently of any specific Omnitable instance, so admins should verify that the CDV configuration is appropriate for the composition of their Call List Members.
Add the Flow to the Call List Lightning Record Page
-
Navigate to a Call List record in your Org.
-
Click the to open the Lightning App Builder.
-
In the component palette on the left, search for "Flow" and drag a Flow component onto the page in your desired region.
-
In the component properties panel on the right, configure:
-
Flow: enter the API Flow name TR1__Omnitable_CallListMember_Contextual_Data_Viewer_Right_Of_Omnitable, OR
TR1__Omnitable_CallListMember_Contextual_Data_Viewer_Below_Omnitable
-
Select the Pass record ID into this variable’ checkbox.
-
Optional: Use the Set Component Visibility filter to set where this Flow is displayed. For example, ‘recordTypeName=Standard’.
-
-
Select Save.
Omnitable Row Actions
Configure Edit/Delete Actions as Row Actions
Standard Configuration
-
Go to .
-
Edit the Named Setting record for the Omnitable you want to apply the changes to.
-
In the JSON configuration field, add the following:
-
Copy
rowActions: ['standard_edit', 'standard_delete']
-
Customizable Configuration
Optionally, you can also override the standard Edit Record modal and configure your own. This is standard Salesforce configuration, please refer to Salesforce documentation for more details:
-
Go to.
-
Click Edit in the dropdown menu for the Edit row, and select a lightning component for the lightning experience override.
Configure Packaged/Custom Actions as Row Actions
-
Go to and edit the Named Setting record for the Omnitable you want to apply the changes to.
-
In the JSON configuration field, your row actions configuration:
-
CopyExample
rowActions: ["Move To Application", "Move To Internal Interview", "Move To Submittal", "Move To Send Out", "Move To Offer", "Move To Closing Report", "Apply To Other Job", "Send Email"].
-
-
What’s in the square brackets above is just an example. You will want to replace those with the name of the Actions you want displayed as Row Actions.
In order to simplify the configuration of the Actions positions, three JSON attributes are available:
- rowActions
- toolbarDropdownActions
- toolbarPinnedActions
Use these attributes followed by the list of Actions (in square brackets) you want to see in the respective position.
The name of the Action should match the action’s name used when the action’s properties were configured in the JSON under
actions attribute.
Omnitable Contextual Data Viewer
In BHRC we have four packaged Contextual Data Viewer Flows:
- Omnitable Contact Contextual Data Viewer (Below Omnitable)
- Omnitable Contact Contextual Data Viewer (Right of Omnitable)
- Omnitable Job Contextual Data Viewer (Below Omnitable)
- Omnitable Job Contextual Data Viewer (Right of Omnitable)
In order to have Omnitable instead of the Contextual Data Viewers Data Tables and BH Data Fetchers in those Flows, users will need to create an Omnitable Configuration for each Contextual Data Viewer instance.
Create a Field Set
- Go to .
- Create a new Field Set name "Omnitable_Default_CDV".
- Add the Required Fields
Create Custom Metadata Type with JSON Config
- .
-
Use the following as a guide, this example is to configure the Employment History tab:
- Label: Omnitable_EmploymentCDV
- Name: Omnitable_EmploymentCDV
- Schema: /resource/TR1__OmnitableConfigurationSchema
- Use the following JSON Configuration:
{
  "objectName": "TR1__EmploymentHistory__c",
  "defaultFields": "TR1__Omnitable_Default_CDV",
  "contextFilterFieldName": "TR1__Contact__c",
  "infiniteScrollInitialChunkSize": 50,
  "infiniteScrollChunkSize": 20,
  "actions": []
}
Replace the Data Tables in the Flow with Omnitables:
- Go to .
- Open the Screen and delete the Data Table for Employment History
- Note: The set the Component Visibility conditions first, to preserve the behavior of the tabs)
- With these configurations, you can now Save and reopen the Screen.
- Delete the Data Fetcher for Employment History.
- Add an Omnitable component where the Data Table was with the following information:
- API Name: EmploymentOmnitable.
- Context Record Id: {!highlightedContactId}
- Omnitable API Name: EmploymentCDV
- Set Component Visibility, replicated from the above.
Ensure the Correct Omnitable + CDV component is on the Relevant Page Layout
In order to see the Omnitable, ensure the corresponding Omnitable component is included on the appropriate page layout.
Display/Hide Omnitable UI Items
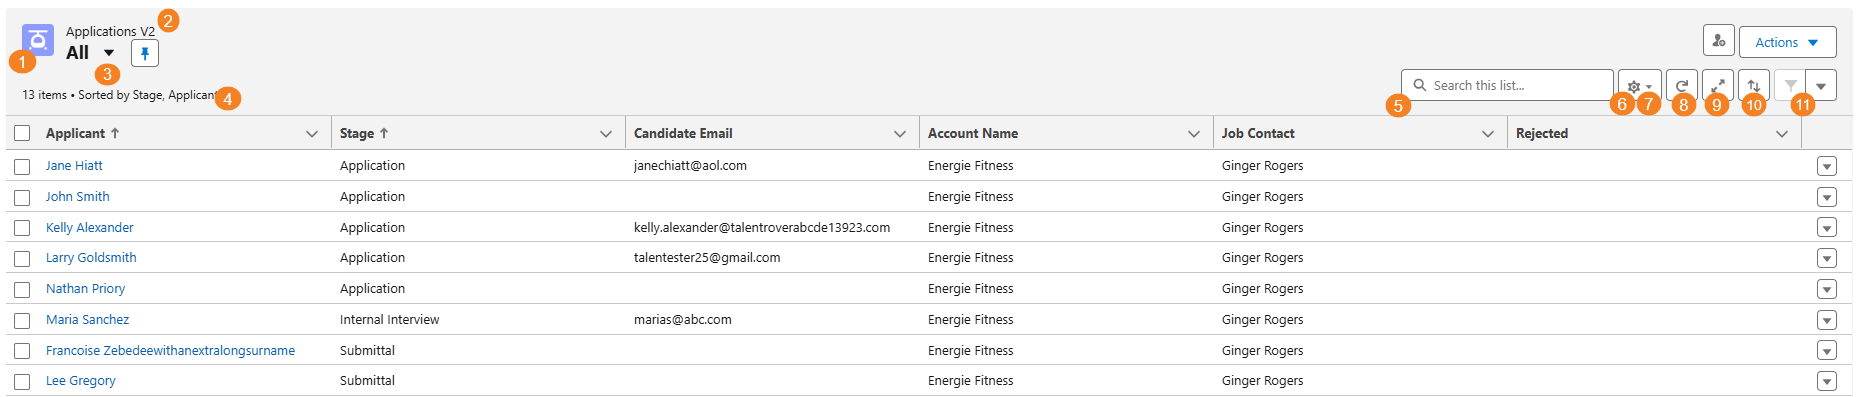
By default, the Omnitable header UI includes the following items that can be removed individually or collectively.
-
Object Icon (JSON: hideObjectIcon)
-
Object Label (JSON: hideObjectLabel)
-
Named View dropdown (incl. pin) (JSON: hideNamedViewSelector)
-
Text strings about record sorting/selection (JSON: hideInfoText)
-
Quick search field (JSON: hideQuickSearch)
-
Menu item in cog dropdown: Customize Columns (JSON: hideCustomizeColumnsMenuItem)
-
Menu item in cog dropdown: Reset Sort: (JSON: hideResetSortMenuItem)
-
Omnitable refresh button (JSON: hideRefreshButton)
-
Display in Full Screen mode (JSON: hideFullscreenButton)
-
Multi-columns sorting (JSON: hideResetSortMenuItem)
-
Filter controls (JSON: hideFilterControls)
To Display/Hide items:
-
Go to Setup> Custom metadata types>Named Settings> Manage Records and edit the Named Setting record for the Omnitable you want to apply the changes to.
-
In the JSON configuration field, add the ‘"visibilitySettings" attribute and the name of each of the UI items followed by ‘true’ or ‘false’.
Copy"visibilitySettings": {
"headerVisibilitySettings": {
"hideObjectIcon" : true,
"hideObjectLabel" : true,
"hideNamedViewSelector" : true,
"hideInfoText" : true,
"hideQuickSearch" : true,
"hideCustomizeColumnsMenuItem" : true,
"hideRefreshButton" : true,
"hideFullscreenButton" : true,
"hideFilterControls" : true
"hideResetSortMenuItem" : true,
"hideColumnSortButton" : true
}
}