E-Verify Case Creation
Bullhorn Onboarding offers a direct integration with E-Verify![]() An online system that confirms the eligibility of an Employee to work in the United States. The process compares information entered by an employer from an employee’s Form I-9, Employment Eligibility Verification, to records available to the U.S. Department of Homeland Security and the Social Security Administration to confirm employment eligibility. to improve the overall user experience. Once the candidate completes Section 2 of their I-9
An online system that confirms the eligibility of an Employee to work in the United States. The process compares information entered by an employer from an employee’s Form I-9, Employment Eligibility Verification, to records available to the U.S. Department of Homeland Security and the Social Security Administration to confirm employment eligibility. to improve the overall user experience. Once the candidate completes Section 2 of their I-9![]() Form I-9 to verify the identity and employment authorization of individuals hired for employment in the United States., the Onboarding Representative can create an E-Verify case manually or automatically based on their preference.
Form I-9 to verify the identity and employment authorization of individuals hired for employment in the United States., the Onboarding Representative can create an E-Verify case manually or automatically based on their preference.
E-Verify confirms employment eligibility by comparing the employee's Form![]() Any document that needs to be completed and signed by a Candidate I-9 details inputted into the system with the records available to the Social Security Administration (SSA) and/or the U.S. Department of Homeland Security (DHS).
Any document that needs to be completed and signed by a Candidate I-9 details inputted into the system with the records available to the Social Security Administration (SSA) and/or the U.S. Department of Homeland Security (DHS).
Requirements
Both sections of the I-9 form must be completed before initiating an E-Verify case. A case cannot be created if only one section of the I-9 is complete. Employers are responsible for reviewing and monitoring E-Verify cases to ensure appropriate action is taken when required.
Automatic Case Creation
Automatic case creation is the preferred method. When Section 2 of the I-9 is signed, the information needed to create a case is automatically submitted to E-Verify.
To enable automatic case creation:
-
Navigate to Configuration > Settings > System Settings > Form I-9 & E-Verify.
-
Toggle Auto Order E-Verify after signing of I-9 Section 2 to ON.
-
Configure a Default User to assign as the E-Verify case creator in the Integration Properties.
Manual Case Creation
If automatic case creation is not enabled, or if a case could not be created from the initial I-9 completion, the case can be created manually. Manual creation uses the information recorded from the I-9 — no separate data entry is required.
Steps to create a case manually:
- Navigate to Applicants > E-Verify.
- Select Create New E-Verify Case.
Steps for any cases that are being created late:
- Click on the Late Verification Reason drop-down.
- Select the appropriate reason from the drop-down.
- If Other is selected, a text box will appear allowing a reason to be entered.
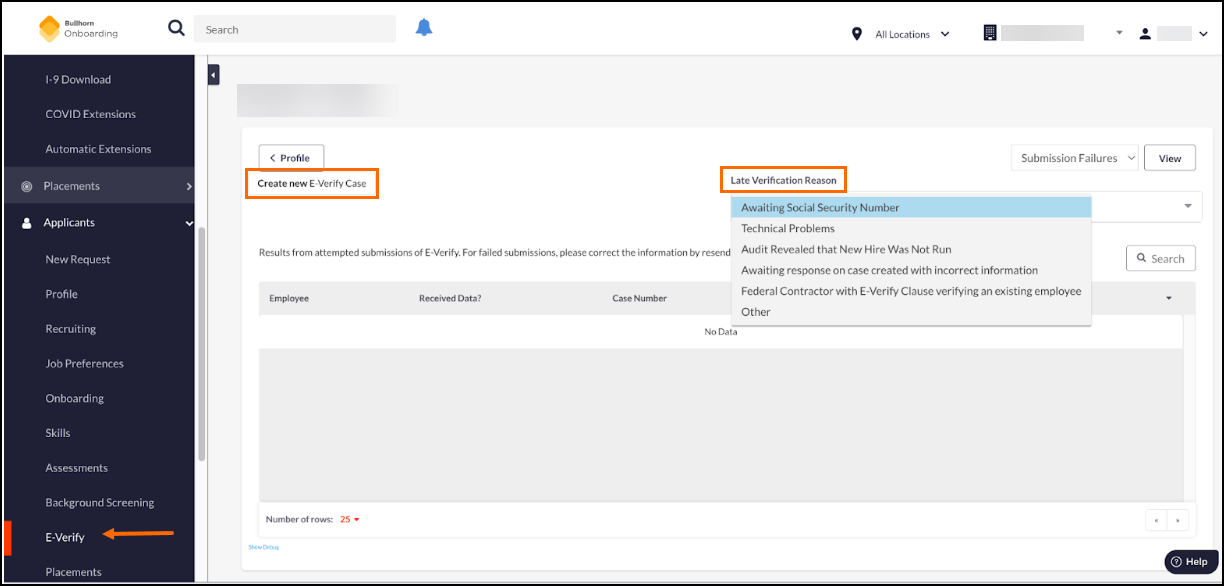
- If Other is selected, a text box will appear allowing a reason to be entered.
E-Verify Error Messages
If an error occurs during case creation, E-Verify errors typically fall into one of six categories:
-
Receipt Documents: Cases cannot be created when I-9 Section 2 contains receipt documents instead of original documents
-
Duplicate Cases: An E-Verify case already exists for this employee's SSN with your company
-
Invalid Data or Document Types: I-9 form contains invalid characters, incompatible document combinations, or missing required information
-
Integration Misconfiguration: E-Verify Client Company ID is invalid or incorrect in your system settings
-
Missing Delay Reason: Cases created more than 3 days after hire date require a reason for the delay
-
System Errors: Technical issues with the E-Verify system or connection
For detailed error messages, step-by-step resolution instructions, and prevention tips, see E-Verify Submission Errors - Troubleshooting Guide.