| Package: Recruiting(JS2) |
Preparing the CV / Resume for Presentation
![]()
Text Replacement

|
+ Select text + |

|
CV / Resume Workbench offers a limited text replacement capability. Since we are only making changes on an overlay of the CV, we cannot insert, replace, or delete text in the original CV. If the size of the desired replacement text is the same size or smaller than the original text area, we can use the text replacement to simulate an edit.
Replacing Text in a Single Line
-
Select the I Bar to enable text selection, if not already selected.
-
Click and drag in the CV to select the text to be replaced.
-
Choose the Replace tool.
-
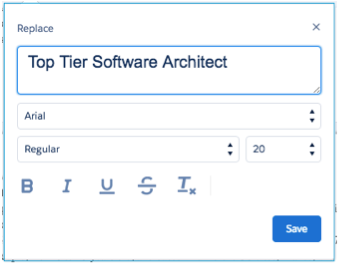
Enter the replacement text in the Replace dialog box and match the style and size of the original text using the other controls.
- Save and inspect the resulting output for fit within the original space.
 |  |  |
Proceed to Select.
Click on the text you just entered.
Select Delete Marks.
Redacting Text
Redacting text does not erase it from the original CV, but rather paints over the text on the overlay with the same white color as the background so that it appears to be erased.
Redact Text in a Single Line
| + Select text + |  |
Select to enable text selection, if not already selected.
Click and drag in the CV to select the text to be redacted.
Select Redact.
The text you highlighted will disappear. Hover over it to reveal the underlying text.
If you did not get the selection right:
Proceed to Select.
Click on the white space to reveal the blue handles.
Reposition with the start or finish to match your target text.
Redact Text in a Rectangular Area
| |  |
Redacting a rectangular area gives you more flexibility than just redacting the text in a row.
Proceed to Select.
Select Redact. Notice it turns white to indicate it is selected.
Click and drag in the CV to hide the entire rectangular area.
Note the blue box in the example above does not appear in the tool. It is for illustration purposes only.
When you finish dragging, the text should disappear. Hover over it to reveal the underlying text.
If you did not get the selection right:
Proceed to Select.
Click on the white space to reveal the blue handles.
Reposition with the start or finish to match your target text.
Automatic Redact
Data from the CV has been parsed and organized into the fields presented in the right pane. The candidate's name and other identifiable information has been organized in such a way that we can identify it in the original CV.

Three Show / Hide buttons appear on the Contact page in the right pane. When these selectors are moved to the Hide setting, CV / Resume Workbench will look for each occurrence of the text contained in these fields anywhere in the CV and mask them. In practice, the formatting used in CVs will remain on the screen, making it obvious that these sections were redacted. You might as well use a redact area to eliminate the personal information and the other text at the same time. Sometimes personal information appears at other locations in the document, so hiding this information using the switches will ensure that the other occurrences are not missed.
Template
The Template tool enables you to upload a header and footer and have it automatically applied to each page of the CV.
Navigate to Template
 .
.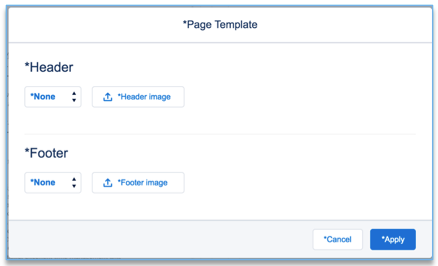
Headers and footers are image files (*.png, *.jpg, *.gif) that are sized to fit a full-page width. They can be created using any typical graphics tool.
Once loaded, you will see a preview in this control.
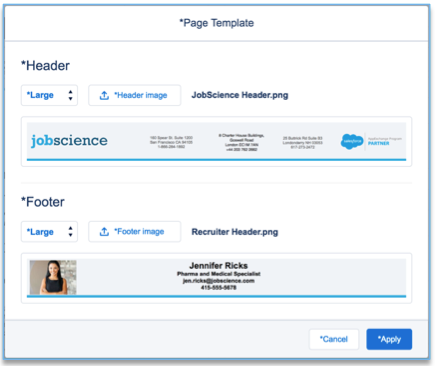
Select Apply to enable this template on the current CV.
Image
The Image tool is useful for inserting a photo of the candidate or perhaps a logo for the staffing company.
Navigate to Image
 . Images which are previously uploaded will be visible in the collection.
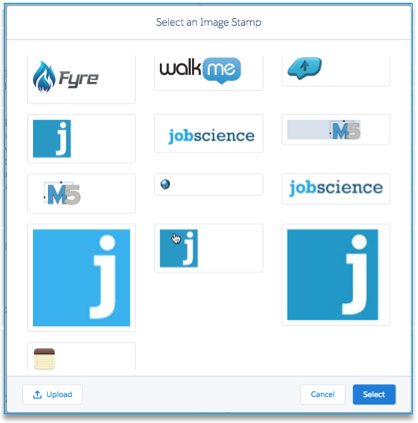
Go to Upload to import the image from your computer.
Click the image and then click the Select button to choose the image.
Once selected, the dialog box will disappear and a cross cursor will appear.
Click and drag in the CV to place the image on the overlay.
Once you have placed and sized the image, you may want to resize or move it.
Click Select and then click on the image. A border with resizing handles will appear around the image.

When the border is activated, you can click and drag the image to a new location. To resize the image, click on one of the round blue handles and drag until the desired size is achieved.