Candidate : Job Stages
This article applies to s using the data model only.
Overview
Job Stages help you manage and track Candidates as they move through the recruiting process. This article explains how to use Job Stages.
These are the standard Job stages included in the package:
- Application: The Candidate has been identified as being suitable for the position.
- Submittal: The recruiter submits the Candidate to the client. The Candidate can be moved to Submittal with the option to send an email (with attachments) while moving the Candidate.
- Send Out: The Candidate has been selected for an interview with the client. Interview details are entered.
- Offer: The Candidate has received an offer.
- Closing Report: The Candidate has accepted the client offer and agreed to all the terms. The placement of the Candidate is the end of the recruiting process.
Stages
Application
In the , a Job card can be moved to the Application stage in many ways. You can use Quick Add from the Actions Toolbar or one of the options offered by the Job Finder component.
When the Job card is moved to the Application stage, an Application record is created in the background. The prompts you to enter data related to the Application via the New Application screen.
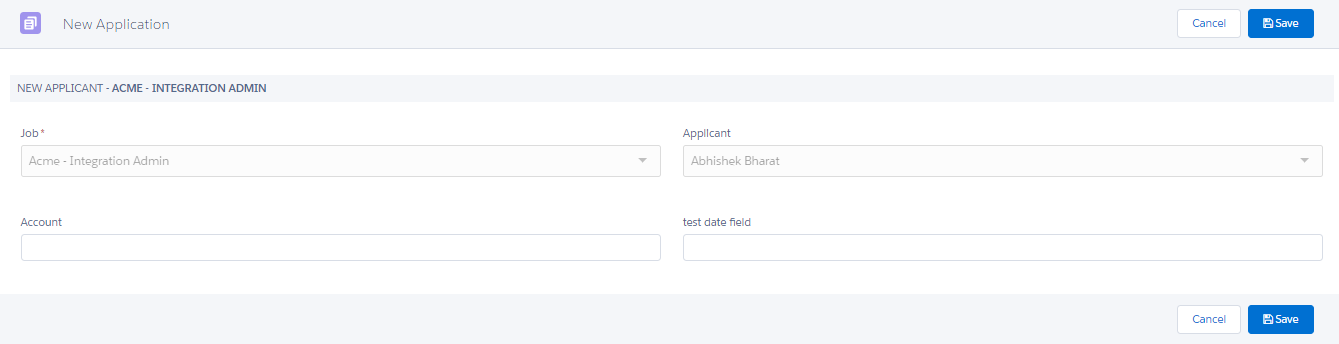
Admin Note:
To customize the fields that are shown on the New Application screen, add or remove from this Field Set: Setup > Build > Create > Objects > Application > Field Sets: New Application.
If users prefer moving the Job card directly to the Application swimlane without entering any extra information, remove all fields from the Field Set. This will result in the New Application screen being skipped entirely.
Submittal
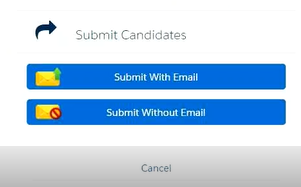
When moving a Job card to the Submittal stage, there are two options:
- Submit With Email: Select this option to access an email form to enter a message to the client or interviewer.
- Submit Without Email: The candidate is moved to the Submittal stage without sending an email.
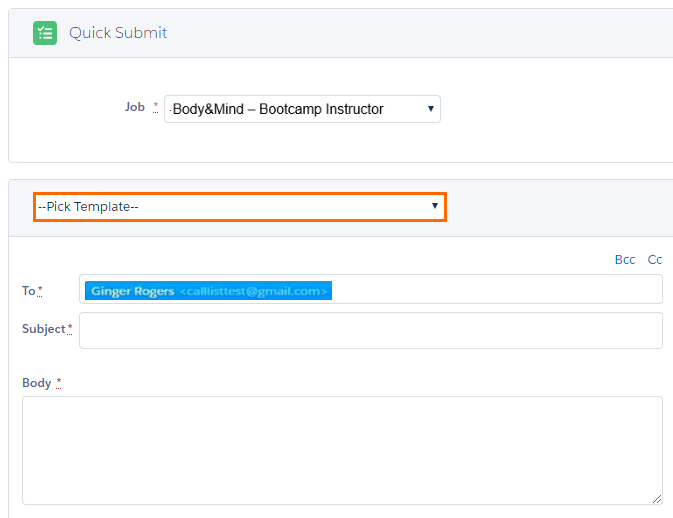
When Submit With Email is selected, the following features are available:
- Email Template: Manually select a template, or a default template can be set by the .
Admin Note:
Setting up a Default Template
Navigate to Setup > Custom Settings > Properties.
Enter the Email Template Unique Name in the Job Manager Submittal Email Template field.
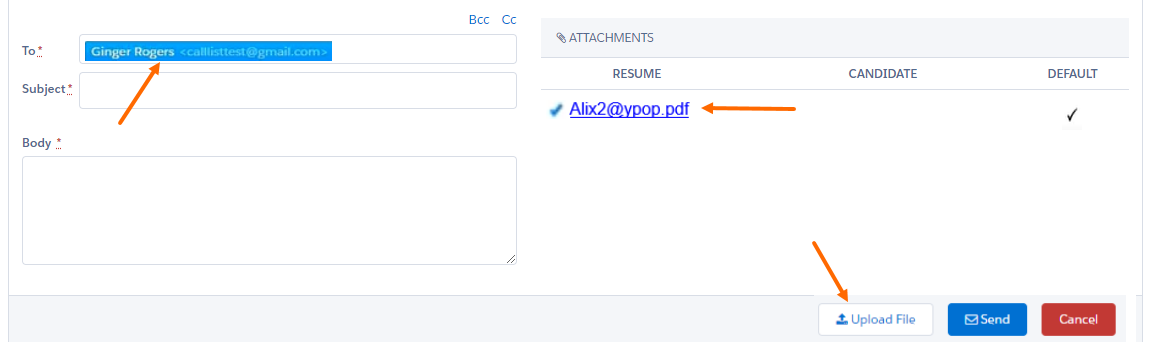
- To Field: This field will be pre-populated with the Job Contact' s email address as long as the Work Email field is populated on the Contact record, otherwise it remains blank.
- Candidate Resume: The default resume for the Candidate being submitted is automatically attached to the email. You have the option to attach more files by uploading from your computer.
Admin Note:
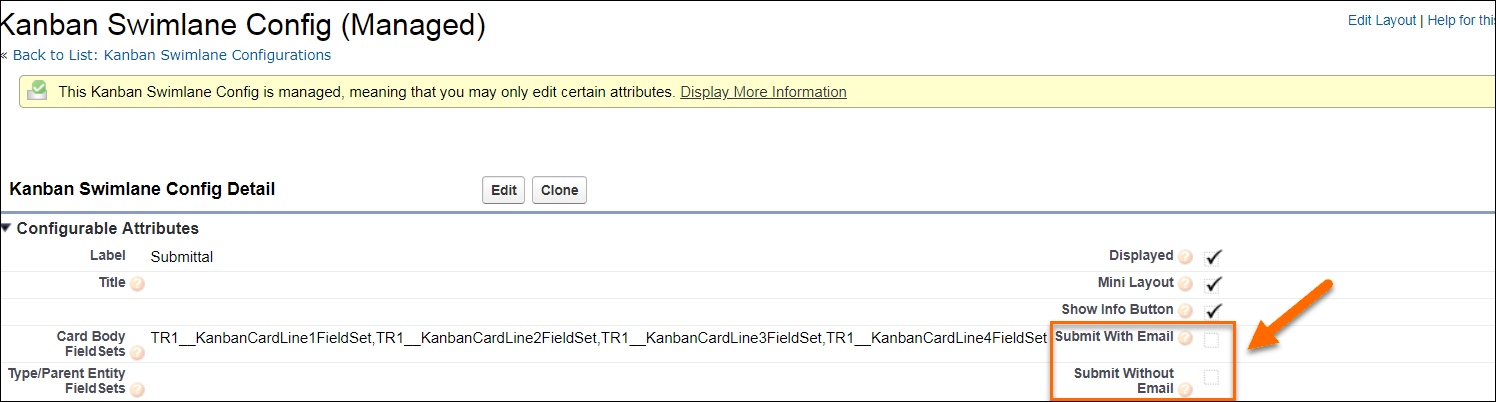
It is possible to have either Submit With Email or Submit Without Email as the default action when moving a Candidate to Submittal and skip the choice pop-up.
- Follow the steps in ATS v1: Customize the Kanban Board to access the Custom Metadata Type Swimlane Config for Submittal.
- Pull either the Submit With Email or Submit Without Email checkbox onto the page layout (they are not visible by default).
- Select the desired checkbox, then Save.
Send Out
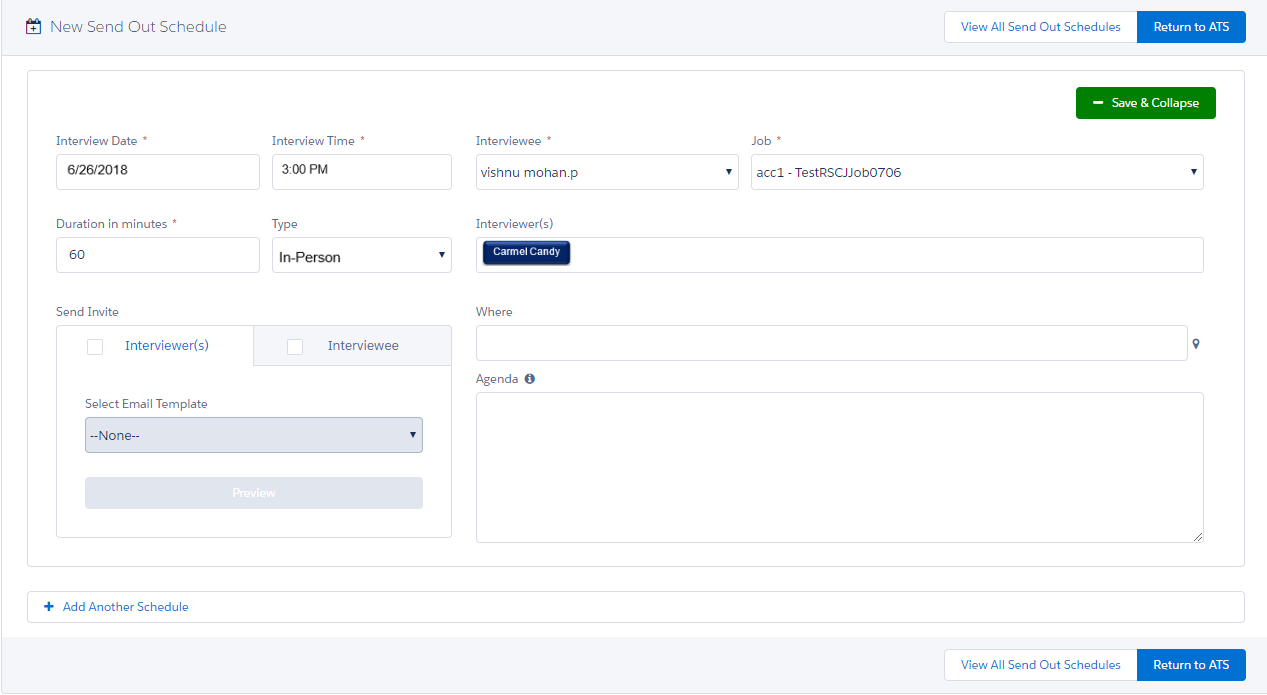
When you move a Job card to the Send Out stage, a pop-up window displays for setting up an interview with the Candidate. Complete the form and click the Send button. An email is sent to both Interviewee and Interviewer with the details of upcoming interview (Day, Time, Location).
The following options are available:
- Interview Date: Choose the interview day using the calendar. This is a mandatory field.
- Interview Time: Select the interview time from the drop-down. This is a mandatory field.
- Duration in minutes: Enter a value for the interview's duration.
Admin Note:
It is possible to set up a default value for this field:
- Navigate to Setup > Custom Settings > Properties.
- Enter the default interview duration in the Default Interview Duration field.
- Type: Enter a value for the interview type.
- Interviewee: This field is pre-populated with the name of the candidate.
- Job: This field is pre-populated with the Job name that appears on the selected Job card in Kanban. If multiple Job cards are selected, the Send Out window will a section for each selected Job card, and the Job field will be pre-populated for each.
- Interviewer: This is a Contact look-up field. You can enter multiple interviewers, and each of them will receive an email if the Interviewer(s) checkbox is selected in the Send Invite section.
-
Email (Send Invite): This option is provided if you want to send separate emails to the interviewer and interviewee. A different email template can be selected for each. To enter free text for your interview invite, add it to the Agenda box. Check the Interviewer(s) / Interviewee checkboxes in the Send Invite section.
-
Add Another Schedule: The link at the bottom left of the pop-up allows you to manually add another schedule without having to go back to the .
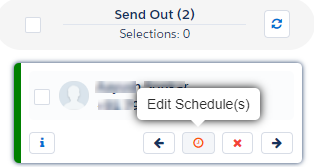
You can edit Send Out Schedules for a Candidate in the Send Out stage directly from the Job in the Kanban. Select the Edit Schedule icon  on the Job card.
Admin Note:
When you create email templates for Send Out invites, make sure that the template merge fields reference the Send Out Schedule object. Merge fields referencing other objects will not get populated.
The text entered in the Agenda field can be included in an email template, as long as the template contains the correct merge field for it which is {!TR1__Send_Out_Schedule__c.TR1__Description__c}.
Set up a default Send Out Schedule Template for Interviewer and Interviewee:
- Go to Setup > Email Templates, find the email template that you want to use for sending out invites to the Interviewers and copy the name of the template from the Template Unique Name field.
- Next go to Setup > Custom Settings > Properties and click on the Manage Records link.
- Find the Send Out Invite Interviewer Email Template Custom Setting.
- Enter the unique name of the template in this field and click on Save.
- When you create a Send Out (Interview) schedule, select your template from the list.
To set up a default template for the Interviewee (Candidate) Invite, repeat same steps as above, but use the Send Out Invite Candidate Email Template Custom Setting.
When a default Send Out template is set up, the template field will be pre-populated on the Send Out Schedule page: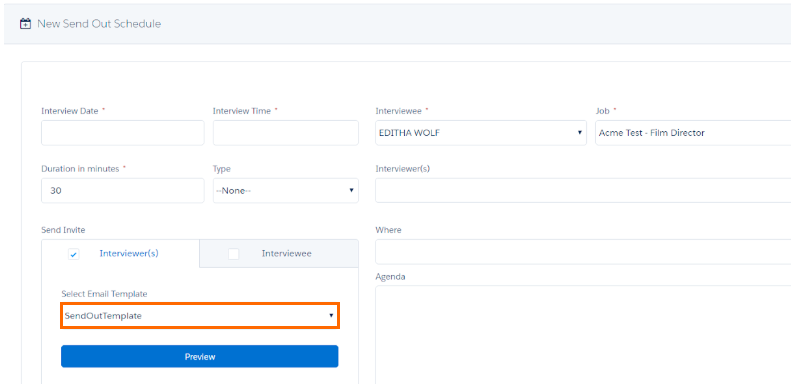
Offer
When you are ready to offer the Candidate the position, move the Job card to the Offer stage. This will open the Offer data entry screen.
The Job and Offered To fields are pre-populated. Enter information in the additional fields as needed.
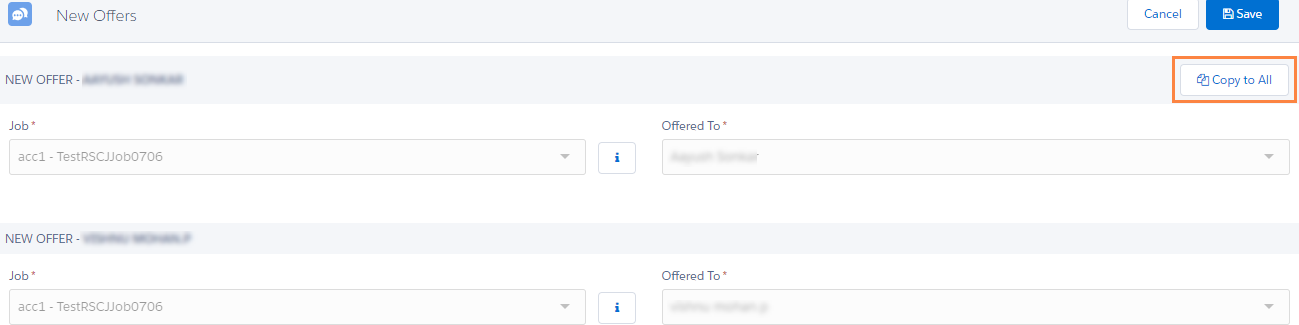
If you are moving multiple Job cards to the Offer stage, the Offer data entry screen will have a section for each selected Job card. The Copy to All button will enter the same values for all Candidates.
Admin Note:
To customize the fields shown on the Offer data entry screen, add or remove from this Field Set:
Setup > Build > Create > Objects > Application > FieldSets > NewOffer
The data entry page can be skipped completely if you want to move a Job card directly to the Offer swimlane without entering any additional information. To do this, remove all fields from the Field Set.
Closing Report
When you move a Job card to Closing Report, you are presented with the standard New Closing Report screen. This page will match the Record Type of the job - if it’s a Permanent Job, then the Permanent Closing Report page layout will be used.
Due to the amount of data required for filling in a Closing Report, only one Job card can be moved to this stage at a time.
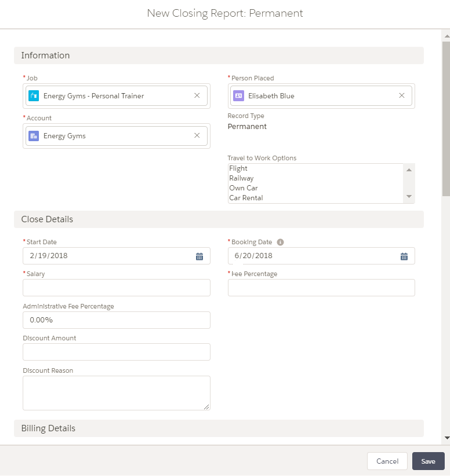
The following actions are not available for Jobs in the Closing Report stage: Move back, Move forward, Reject/Unreject.