: Customize the Kanban Board
This article applies to s using the data model only.
Overview
The Kanban can be customized in several ways to match your recruiter's needs. It is possible to customize the Columns (Swimlanes), the Candidate and Job Card details, and the Card Action Buttons. This article provides instructions for both the Candidate and Job .
Before you Begin
Most of the customization is done through the Kanban Swimlane Config Custom Metadata Type. Here's how to access that Custom Metadata Type:
- Navigate to Setup > Build > Develop > Custom Metadata Types > Kanban Swimlane Config.
- Click Manage Records.
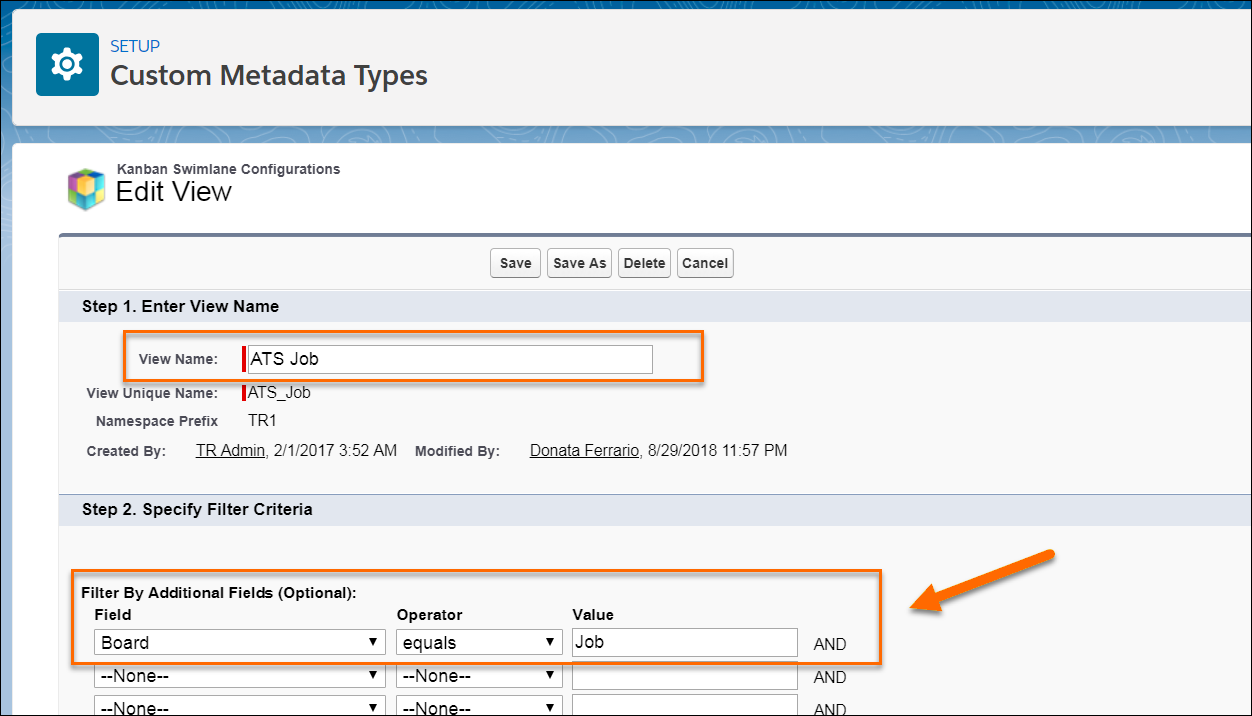
- Create a List View to access the Job or Candidate configuration settings. To filter, use Board equals "Job" for the Jobs and "Candidate" for the Candidates .
- You will be able to access the Custom Metadata Type records for each of the columns/stages and edit them. Click the Edit link next to the name of the column you want to customize.

Each column/stage has its own settings. If you want to change any of the settings in more than one column, repeat the steps for each.
Column/Stage (Swimlane) Configuration
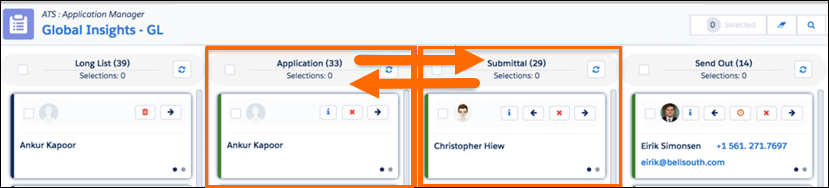
Out of the box, there are six columns, each representing a job application stage :
- Longlist (LL)
- Application (A)
- Submittal (S)
- Send Out (SO)
- Offer (O)
- Closing Report (CR)
Each is a separate component and can be configured independently. The column customization options are:
- Change Column Header
- Change Column Display Order
- Remove a Column
Change the Column Header
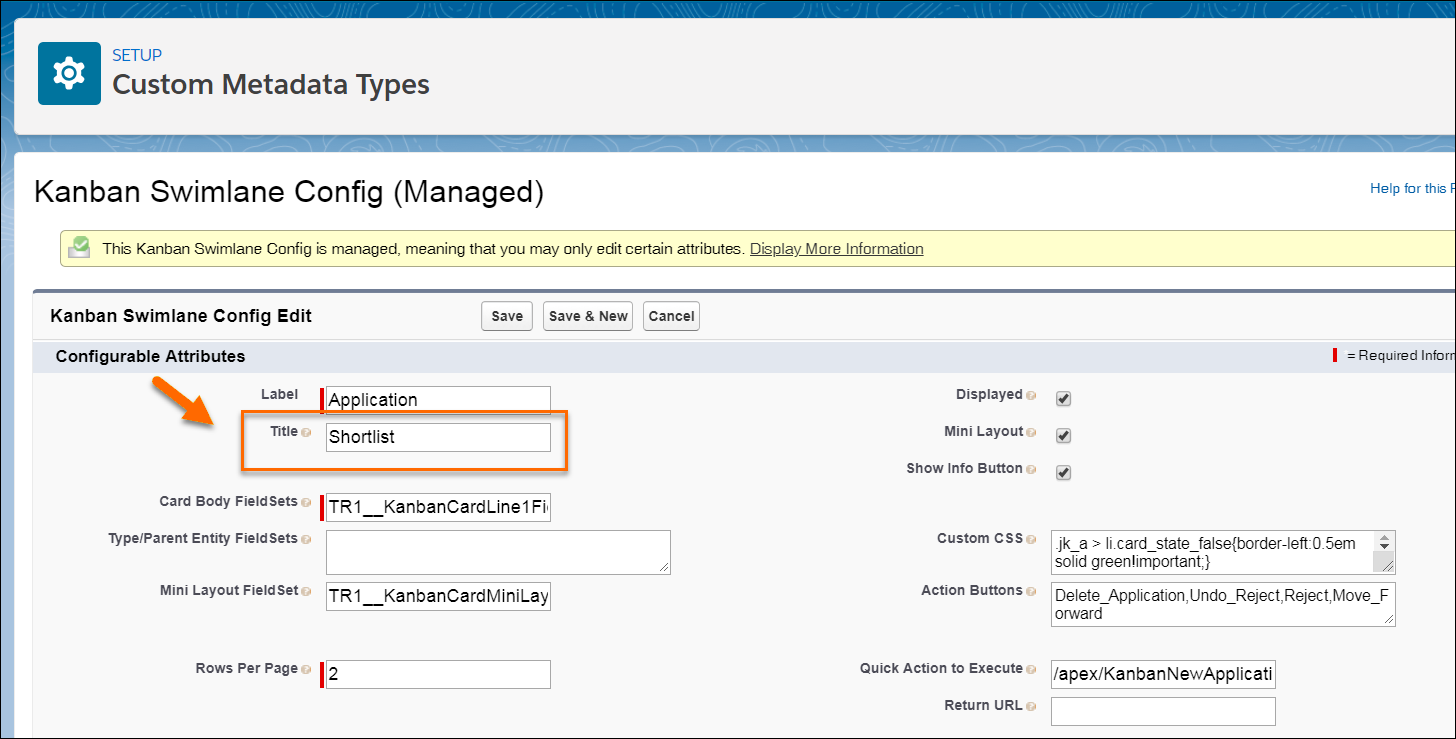
- Access the Kanban Swimlane Config Custom Metadata Type (see above).
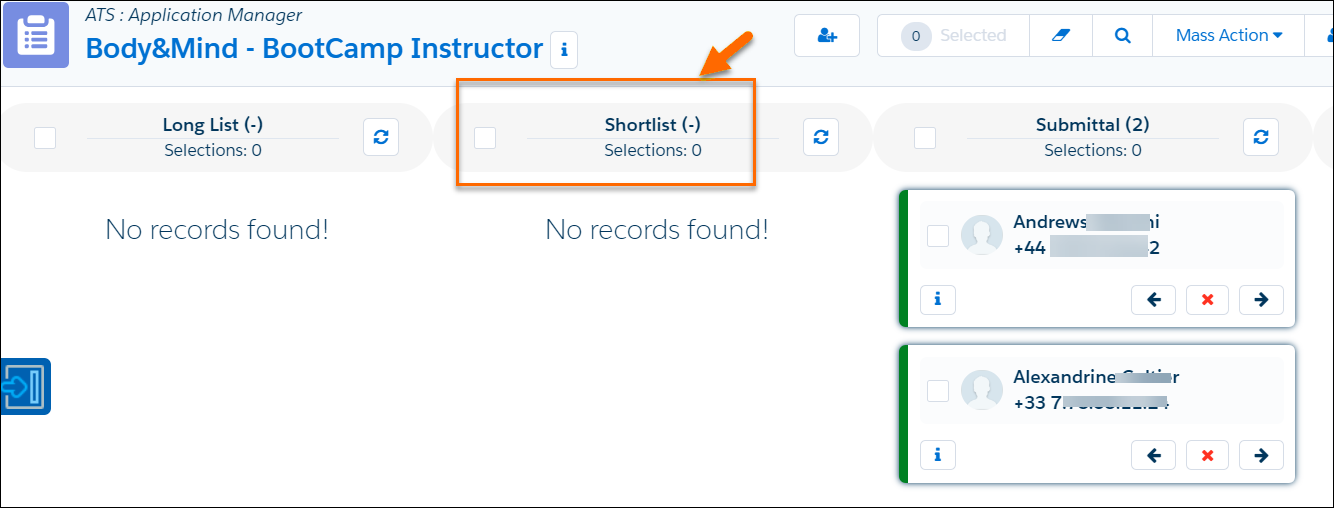
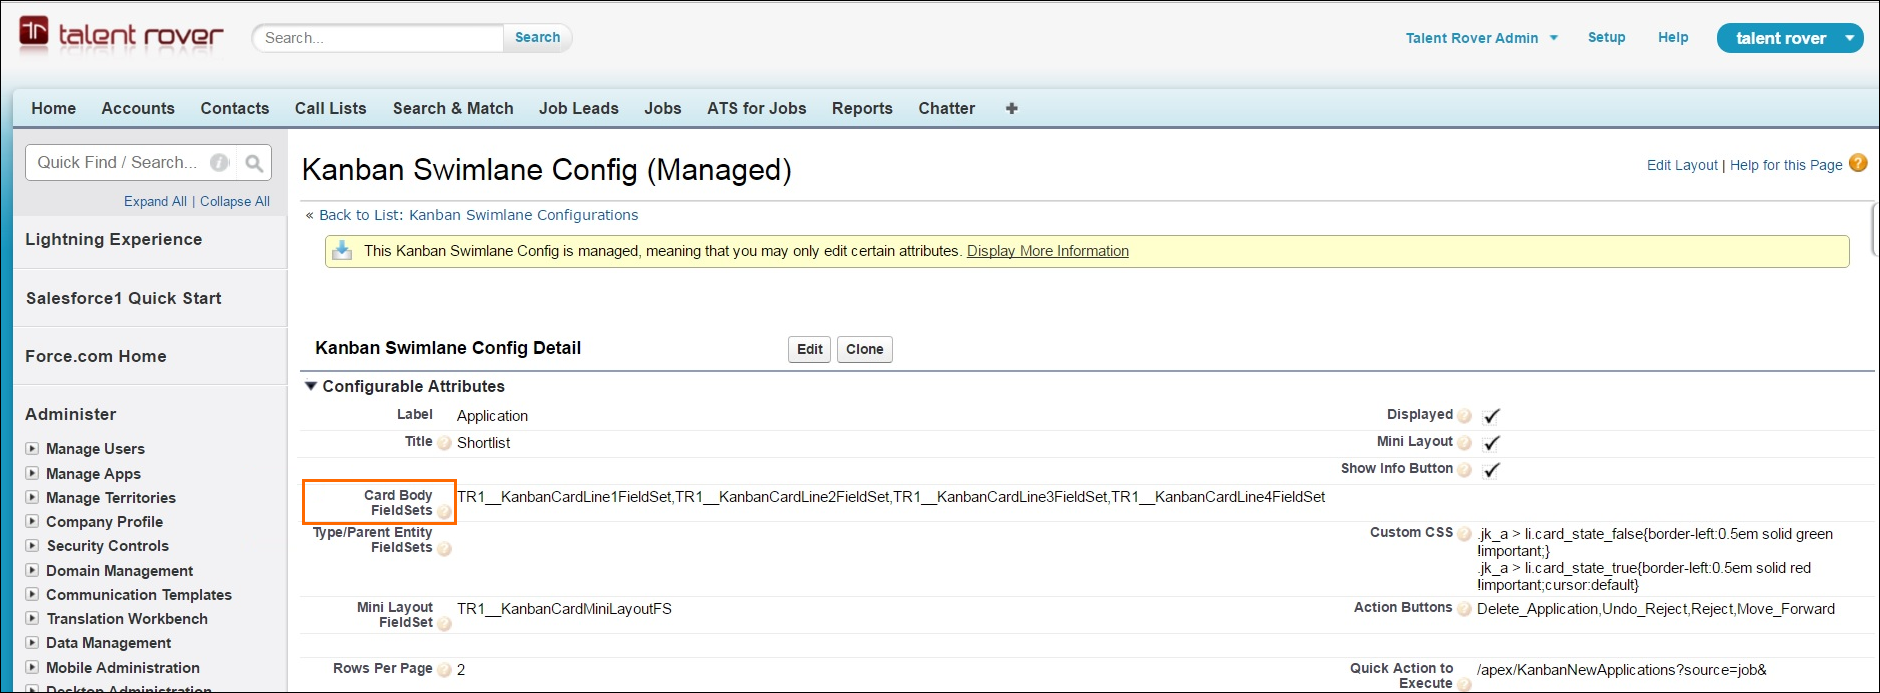
- Change the value in the Title field. For example, you could rename Application to Shortlist
-
Click Save.
If stages are renamed, they need to be re-named consistently throughout the . Be sure to also re-name the picklist values in the Stage picklist on the Job Reporting Object. Go to Setup > Build > Create > Objects > Job Reporting > TR1__Stage__c and replace the values there.
If this name change is part of a global re-naming, also replace the name in the Predicate field. For example, if you are in the Kanban Swimlane Config editing page for the Application swimlane, you will find this value in the Predicate field:
TR1__Job__c = '{0}' AND (TR1__Stage__c = 'Application' OR TR1__Stage__c = 'Application')
If you are renaming Application to Shortlist, after entering the new value in the Title field, you will also replace the value in Predicate as follows:
TR1__Job__c = '{0}' AND (TR1__Stage__c = 'Application' OR TR1__Stage__c = 'Shortlist')Change Column Display Order
- Access the Kanban Swimlane Config Custom Metadata Type (see above).
- Change the value in the Display Order field.
- Each stage has a Display Order assigned to it (Longlist is 1, Closing Report is 6). If you want to change the order in which the columns are displayed, assign the numbers differently.
- No two Swimlanes should have the same display order number
- Click Save.
Out of the box, there is no change of functionality attached to a change of display order in the Kanban, the Job application flow will still be the same.
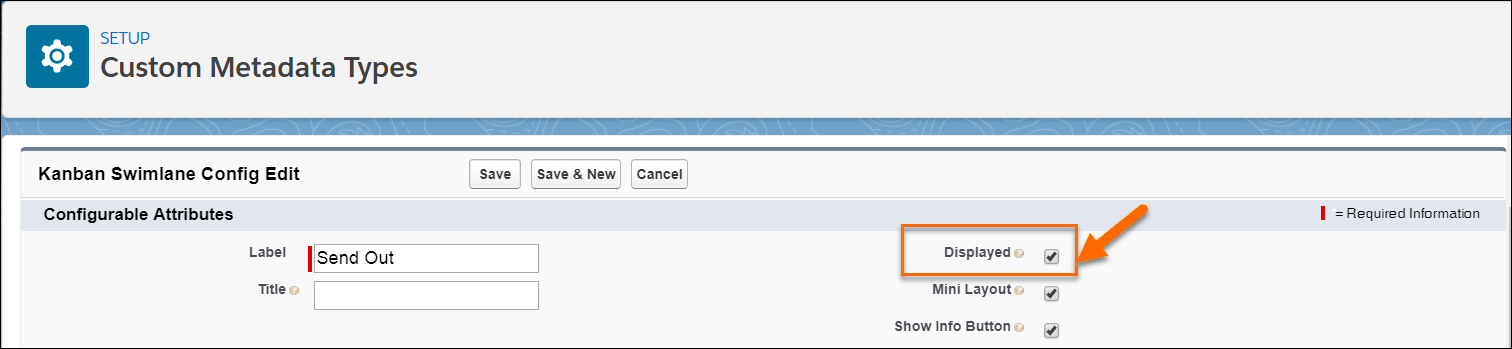
Remove a Column
- Access the Kanban Swimlane Config Custom Metadata Type (see above).
- De-select the Displayed check box if you want to remove a swimlane.
Candidate Cards Configuration
There are two options for viewing Candidate Card data:
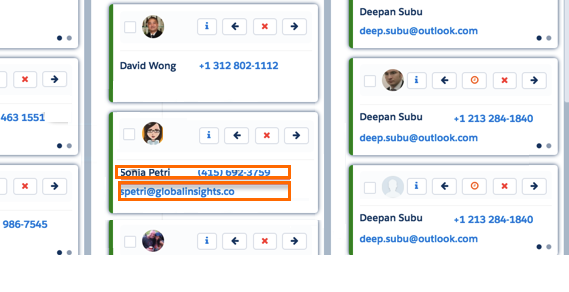
- Mini Layout: The out of the box configuration displaying two basic fields.
- Full Card: Gives flexibility for what information is displayed on the card.
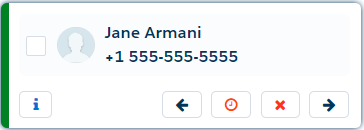
Mini Layout Mode
Mini Layout is the default Candidate Card view. When Mini Layout is used, up to two fields can be displayed on the Candidate card. The fields displayed come from a Field Set, so they can be customized.
- Go to the Field Set to change the fields you want to see: Setup > Build > Customize > Contacts > Field Sets > KanbanCardMiniLayoutFS.
- Access the Kanban Swimlane Config Custom Metadata Type (see above).
- Ensure the Mini Layout FieldSet field is populated with the FieldSet name KanbanCardMiniLayoutFS.
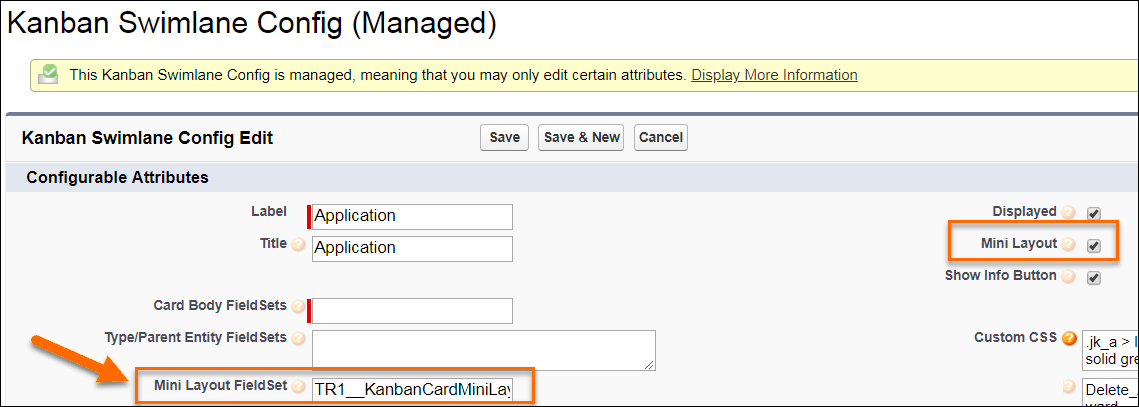
- You can switch Mini Layout on and off using the Mini Layout checkbox in the Kanban Swimlane Config page.
- Click Save when finished.
These steps needs to be repeated for each swimlane if you want to use Mini Layout. Be aware that if Mini Layout is deselected, the Full Card option needs to be configured.
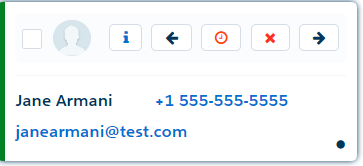
Full Card Mode
Every card is divided into rows and each row has two cells. Values from two fields can be displayed in one row on a card and several rows can be added as needed. Out of the package, four field sets display four rows of information per page per card, but you can add as many pages as you want on each card.
- Decide how many rows you want to display on the card, over how many pages, and create the relevant Field Sets on the Contact Object. You will want one Field Set containing two fields for each row.
- Field Sets can be accessed at Setup > Build > Customize > Contacts > Field Sets.
- If you only want one field displayed on a line, add a second value of Blank Space.
- Access the Kanban Swimlane Config Custom Metadata Type (see above).
- Enter the names of the relevant field sets in the Card Body FieldSets field and the number of rows per page in the Rows Per Page field.
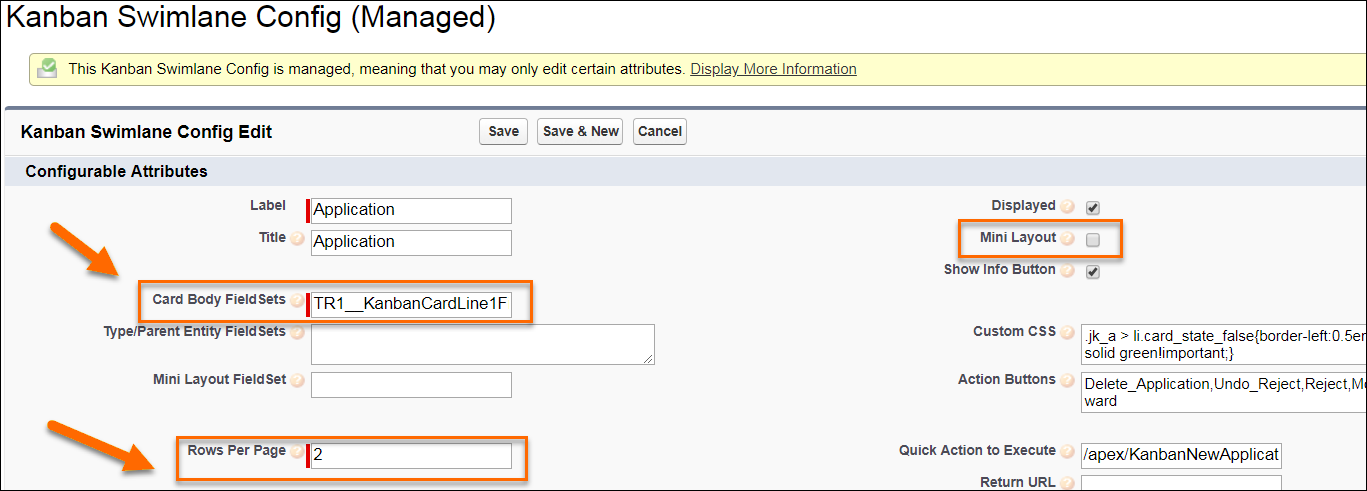
For example, if you want to add two rows per page to your card, you will add the API names of the first two field sets in Card Body Field Sets (KanbanCardLine1FieldSet and KanbanCardLine2FieldSet), then the number 2 in Rows Per Page.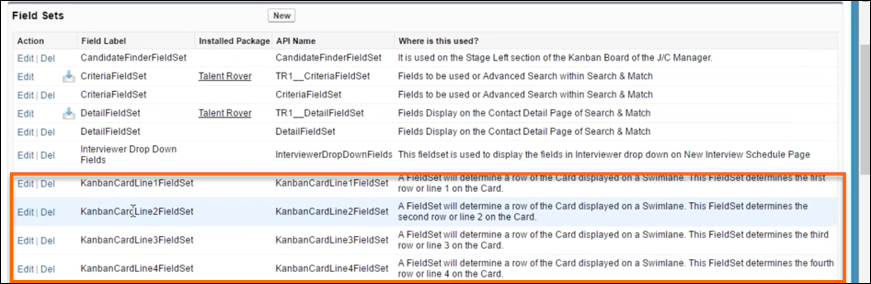
- Click Save.
Field Set Details and Parent and Child Entities
If you are making changes to an for Jobs swimlane, Contact Object field sets will be referenced.
Setup > Build > Customize > Contacts > Field Sets
If you are making changes to an for Candidates swimlane, Job object field sets will be referenced.
Setup > Build > Create > Objects > Job > Field Sets
A third set of field sets is available out of the package against the Job Reporting object.
Setup > Build > Create > Objects > Job Reporting > Field Sets
Each Swimlane has a Parent Entity and a Child Entity, which correspond to the Object it's related to. A Field Set containing the fields that will be displayed on the card can be created either on the Parent Entity Object or on the Child Entity Object, depending where you want to pull the information from.
| Object | Parent Entity | Child Entity |
|---|---|---|
| Longlist | Opportunity Discussed | Contact |
| Application, Submittal, Send Out, Offer | Job Reporting | Contact |
If you want to display fields from the Parent Entity Object, create the Field Sets on that object and then add their API Name in Kanban Swimlane Config under Type/Parent Entity Field Sets.

If you want to display fields from the Child Entity Object, create the Field Sets on that object and then add their API Name in Kanban Swimlane Config under Card Body Field Sets.
Cards Action Button Configuration
The action buttons that appear on the Candidate Cards can also be customized. Buttons can be added or removed from cards within each swimlane and the look of the buttons can be adjusted.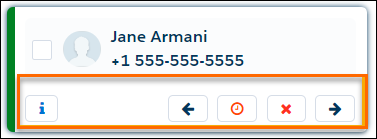
Add or Remove Buttons
- Access the Kanban Swimlane Config Custom Metadata Type (see above).
- Go to the Action Buttons Field and add or remove the API Name of the button you want to add or remove.
- Click Save.
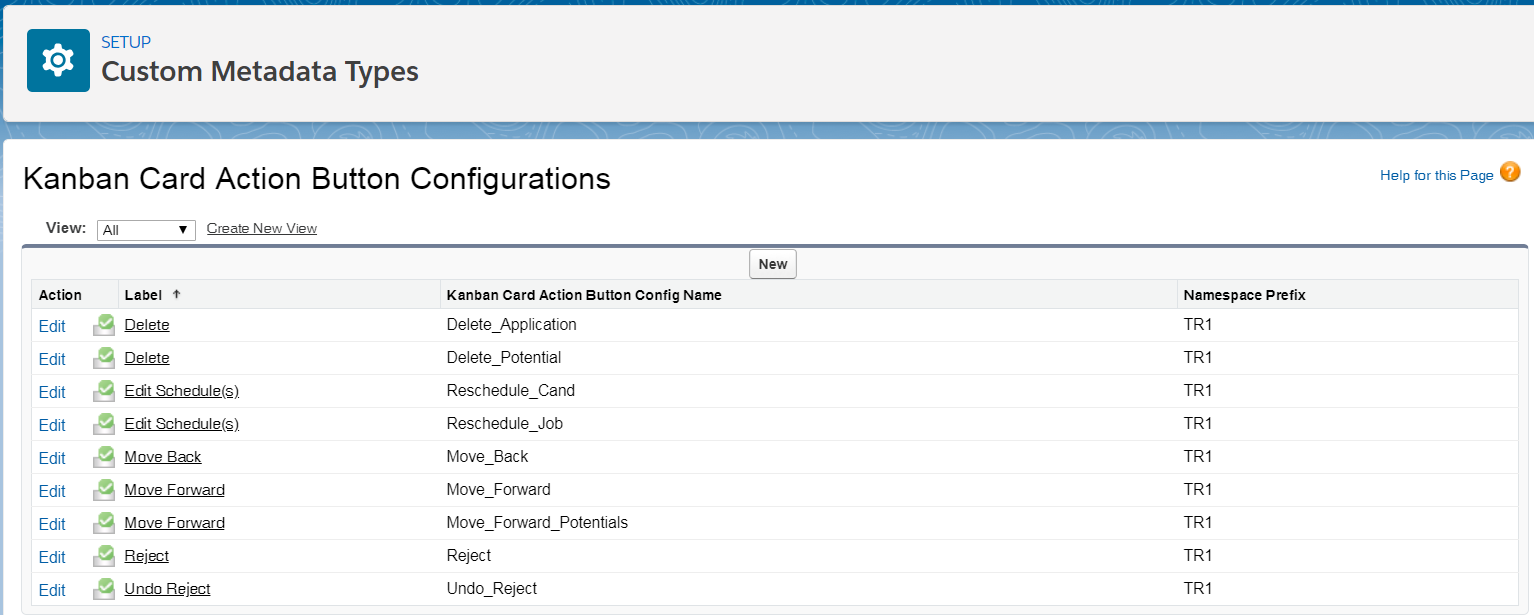
Each button name must be followed by “,” and no space is needed after the comma. The correct name must be entered here; the names can be found by going to Setup > Build > Develop > Custom Metadata Types > Kanban Card Action Button Config. Click Manage Records, find the button you want to add and copy the name from the Kanban Card Action Button Setting Name field.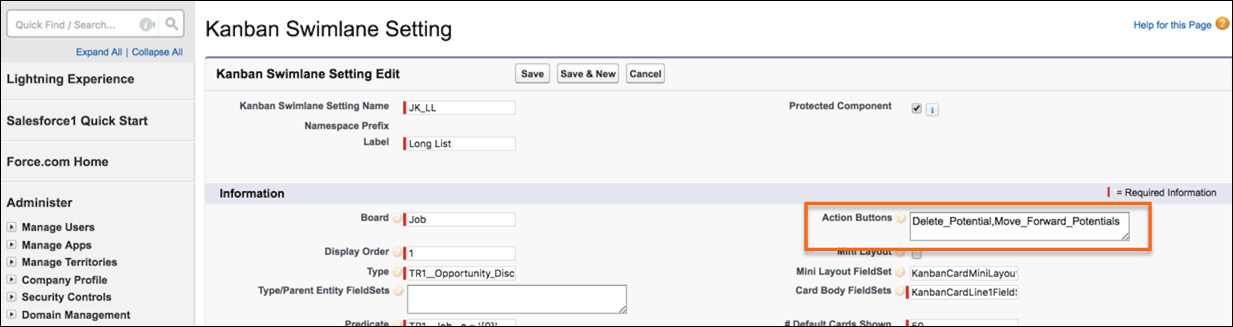
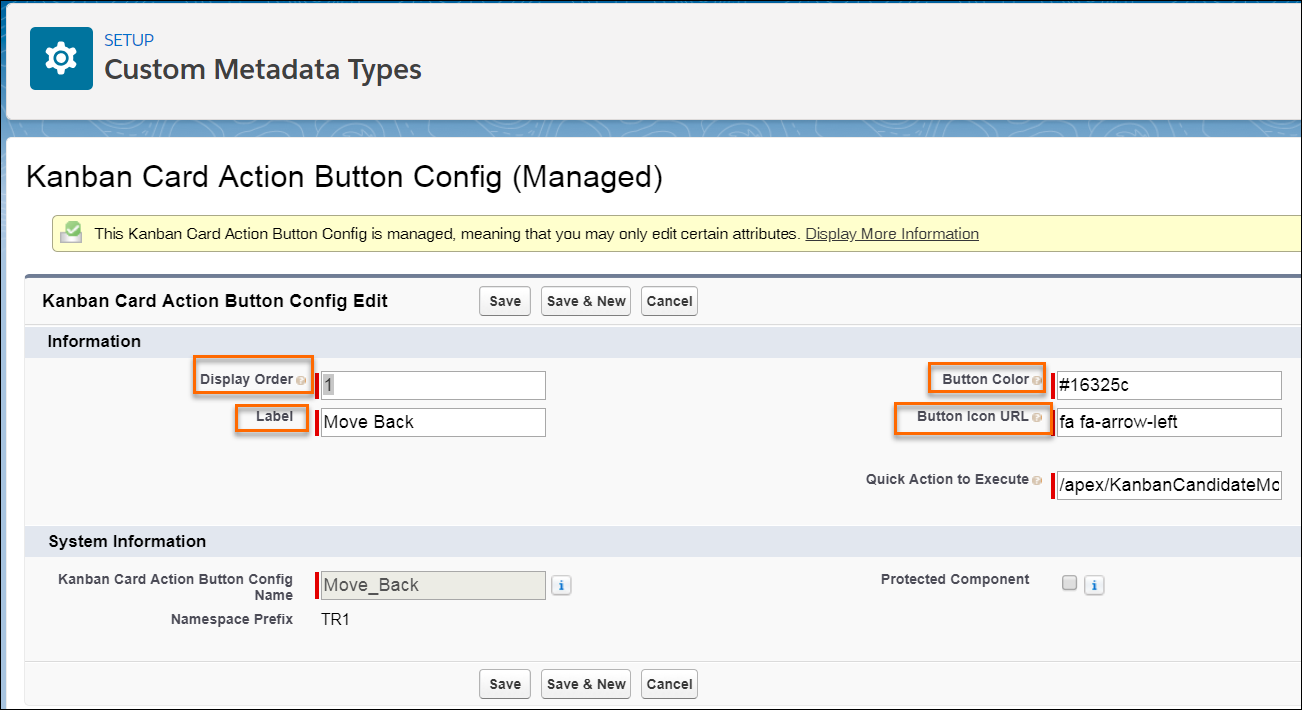
Change How a Button Looks
- Go to Setup > Custom Metadata Types > Kanban Card Action Button Config.
- Click Manage Records and you will see a list of the available Action buttons.
-
Click Edit next to the button name to change values in the following fields:
- Label: Change the name of the button.
- Display Order: Change the order in which the buttons appear on the card.
- Button Color: Change the color of the button.
- Button Icon URL: Change the icon used for that button.