Off Limits: Configuration Guide
Overview
This article guides you through how to configure an Off Limits Policy.
In this article, it is assumed all main Bullhorn Recruitment Cloud features are configured in the subscriber’s Org (, , relevant integration etc).
Prerequisites
- Org should be on package version 6.97.2 (2023.08.11) or higher.
- Assign relevant users to Off Limit User Permission Set.
- Ensure Generic Lookup is configured for the Org.
- For more information on the Generic Lookup Component, see Generic Lookup Component.
- Create Objects Tabs, as required.
- Add fields to page layout of new objects, as required.
Page Layout Changes
- Add Off Limit Policies Related Lists to and page layouts.
- The New/Edit button on the Off Limit Policy object is already overridden by custom logic out of the box. No configuration is needed.
- and policies can be created from these related lists. Do not use the standard New button.
- Navigate to Setup > Object Manager > Off Limit Policy > Page Layouts.
- Click on Page Layout Assignment.
- Assign the correct page layout per policy record type and profile.
- Navigate to Setup > Object Manager > Applicationv2.
- Add the TR1__Off_Limit__c field to these field sets:
- ATS Candidate ListView
- Candidate ATS Table view Field Set
- Lightning List Tab
- KanbanCardLineFieldSet
- Navigate to an record and click on the Edit Page link on the top right corner.
- The fields displayed in this component can be customized.
- Navigate to Setup > Object Manager > Off Limit Line Item > Field Sets > List View Fieldset2.
- There is also an option to hide the Enable/Disable button based on User/Profile.
- Navigate to Setup > Custom Settings > Executive Search.
- Click on the Manage link2.
- Click on New/Edit in the bottom part of the setting.
- What is configured here applies to the selected User or Profile and not to the whole Org.
- Click the Hide Disable Policies Button check-box .
- Click Save.
- Repeat the above steps for all the user/profile records, for which the 'Hide Disable > Policies Button' setting should be enabled.
- When the Edit Page opens, add Off Limit Policies custom component to the page layout.
- Fields displayed in this component can be customized by navigating to the below:
- Setup > Object Manager > Off Limit Line Item > Field Sets > List View Fieldset.
- Fields displayed in this component can be customized by navigating to the below:
- Repeat the previous step for the object.
- Navigate to Setup > Object Manager > Account > Page Layouts.
- Add the formula field TR1__Off_Limit__c to the relevant page layouts.
- Repeat the previous step for the object.
To create ATS Stage policies and Job Role policies, go to the Off Limit Policy tab. These need to be added in the subscriber’s Org.
- Navigate to Setup > Tabs > New > Object.
- Create your Off Limit Policy for the ATS Stage.
- Repeat the above steps to create your Off Limit Policy for the Job Role.
Org-level Settings Configuration
- Navigate to Setup > Custom Settings > Executive Search.
- Configure these fields:
- Enable Off Limit Policies: Make sure this checkbox is selected.
- Non Executive Job Field API Name: To mark jobs as ‘non-executive’ jobs and exclude them from the Off Limits logic, create a custom checkbox in the subscriber’s Org’ Job object then enter the API name of that field in this setting.
- Default Off Limit Icon: This setting is pre-populated with the static resource value that results in the default Off Limits icon to be displayed (the key padlock). You can replace the out of the box value with a different value (same format) if you want to use a different Off Limits icon.
- Line Item Batch Deletion Threshold: This setting should be used for Orgs where policies might have high volumes of line items associated with them. If a policy is deleted, the number entered in this field is the threshold number of associated line items, after which the delete operation should be performed asynchronously, to avoid errors.
- Every time the batch is executed, a log (on success or on error) is created in the BHLO Log object (TR1__BHLO_Log__c).
- Line Item Batch Deletion Chunk Size: Chunk size used for the batch operation described in the previous point.The default value is 200.
- Override Reason with Reason Code: This setting is only relevant for Orgs that opt for using the Reason Code picklist instead of Reason text field on Off Limit Policy records.
- Navigate to Setup > Custom Metadata Types > Off Limit Policy Definitions.
- These policy settings are configured and active out of the box, but you can make changes as required if you need to modify any of them.
- Navigate to Setup > Custom Metadata Types > Off Limit Configuration.
- These policy settings are configured and active out of the box, but you can make changes as required if you need to modify any of them.
- Navigate to Setup > Custom Metadata Types > ATS Config per Job Record Type.
- Add TR1__Off_Limit__c to the Fields to Display field for each of the relevant job record types.
Off Limit Icon Configuration
Configuration Options for Off Limit Icon
Display different Off Limits icons for Warn and Block behaviors.
- Navigate to Setup > Custom Settings > Executive Search.
- In the Default Off Limit Block Icon field, enter the URL that links to a Salesforce image resource (preferably an SVG).
- To do this, you must erase the default value "/resource/TR1__Lock_icon_svg".
- Removing this value will remove the lock icon from policies where the Type is Block.
- To do this, you must erase the default value "/resource/TR1__Lock_icon_svg".
- In the Default Off Limit Warning Icon field, enter the URL that links to a Salesforce image resource (preferably an SVG).
- To do this, you must erase the default value ":/resource/TR1__Warning_icon_svg".
- Removing this value will remove the lock icon from policies where the Type is Warning.
- To do this, you must erase the default value ":/resource/TR1__Warning_icon_svg".
- Click Save.
If you set overrides in the Checkpoint Configurator, the icon shown will depend on the behavior set in the Off Limit Policy Line Item. For more information, see Off Limits Policies and Off Limits Policy Line Items.
Alternative Configuration Options for Off Limit Icon
TR1__Off_Limit_Custom_Icon__c is the Off Limit Custom Icon field in the Contact object. This field is used for alternative configuration of the Off limit Icon. Populating this field with values allows specified Contacts to display different Off Limit icons than the default icons.
The supported value in the Off Limit Custom Icon field is a relative URL that directs to a Salesforce image resource, preferably an SVG. For example, /resource/TR1__Lock_icon_svg.
If the Off Limit Custom Icon field is empty, Bullhorn Recruitment Cloud displays the default Off Limit icon based on the Executive Search custom setting's Default Off Limit Icon field.
Off Limit Icon Pop-Up Configuration
-
Navigate to Setup > Object Manager > Off Limit Info.
-
Click Field Sets.
-
Click Off Limit Icon Hover-Over Pop-up.
-
Add/remove fields as desired.
-
This customizes the data shown in the pop-up.
-
Due to Salesforce limitations, the Off Limit icon hover-over pop-up is shown in all places where the Off Limits icon is visible, except for the following:
- Account Record detail and List View
- Contact Record detail and List View
Off Limit Checkpoint Modal Configuration
To add data from Off Limit Policy/Off Limit Line Item objects:
-
Navigate to Setup > Object Manager > Off Limit Line Item.
-
Click Field Sets.
-
Click Checkpoint Fieldset.
-
Add remove fields from this field set as required.
-
Click Save.
To add data from Contact/Off Limit Info objects:
- Navigate to Setup > Object Manager > Off Limit Info Item.
- Click Field Sets.
- Click Checkpoint Fieldset.
- Add remove fields from this field set as required.
Configure Org Defaults for Policy Type
- Navigate to Setup > Custom Metadata Types.
- Next to Off Limit Policy Definitions, click Manage Records
-
If this is first configuration, you will need to pull the relevant fields onto the Off Limit Policy Definition page layout.
- Click the mdt record for the policy type you want to configure the Org level Default for.
- Click Edit.
- In the Default Behavior Type dropdown, choose your desired default off limit behavior.
- Click either Warning or Block.
- Click Save.
Configure Org defaults for Policy Rank and Policy Rank + Type
- Navigate to Setup > Custom Metadata Types.
- Next to Off Limit Policy Definitions, click Manage Records.
- If this is first configuration, you will need to pull the relevant fields onto the Off Limit Policy Definition page layout.
- Click the Off Limit Policy Definition record you want to configure.
- For example, to configure the defaults for the Contact Policy, click Contact Policy.
- Click Edit.
- To set the default Rank value for the Warning policy behavior type, enter a positive Integer value in the Default Rank On Warn Type field.
- To set the default Rank value for the Block policy behavior type, enter a positive Integer value in the Default Rank On Block Type field.
- Click Save.
Clone Off Limits Policy
You have the ability to clone any type of Off Limits policy record. You may add the Clone_Policy action to where you need it in the layout.
- Navigate to Setup > Object Manager.
- Next to Off Limit Policy, click the dropdown and select Edit.
- Click Buttons, Links, and Actions.
- Click the appropriate page (EX: Clone Policy) > Edit.
- Replace the standard Clone button with Clone_Policy button.
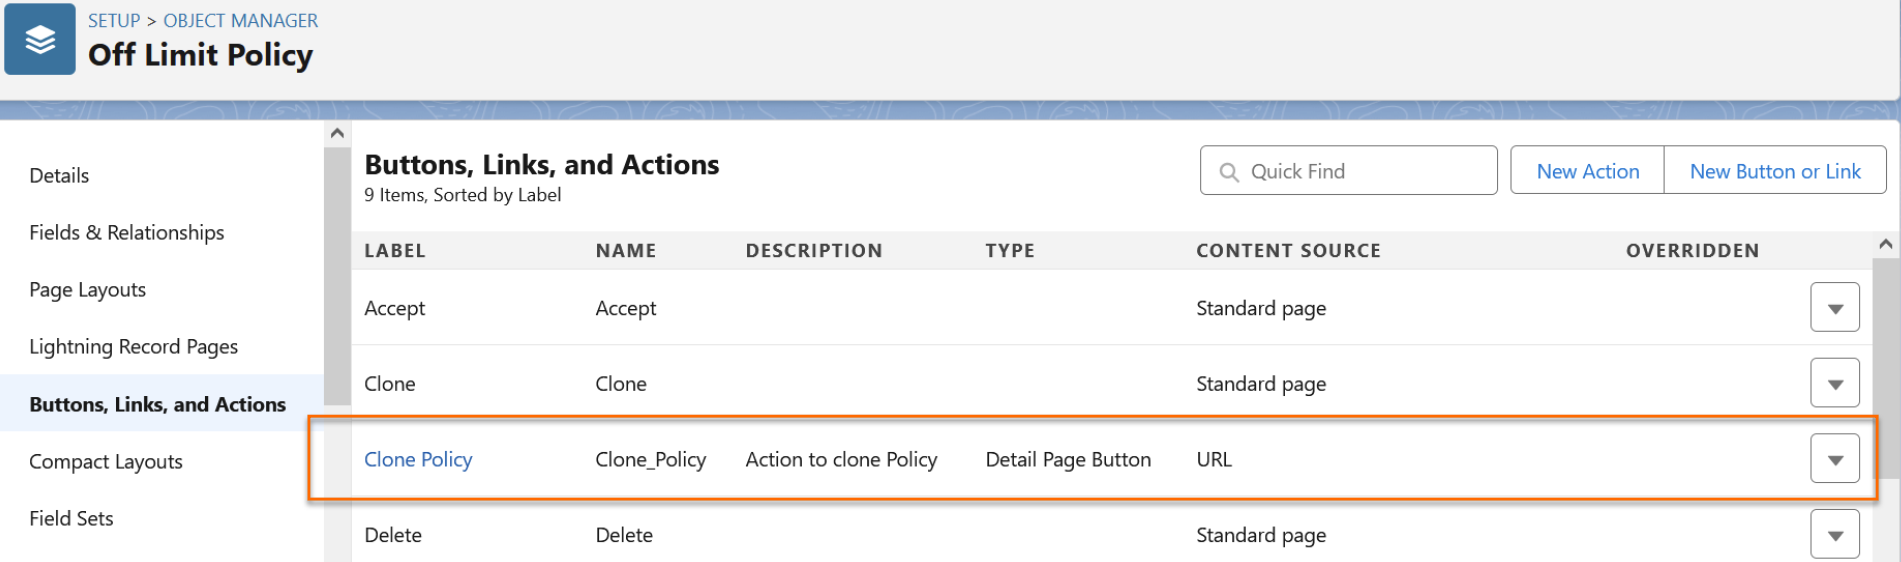
- Click Save.
Off Limits Policies Child Accounts Pop-Up
- Navigate to Setup > Object Manager > Account > Field Sets > Child Account.
- Add/ Remove any of the available fields as needed.
The Child Account pop-up is only available on an Account Policy record if an Account Hierarchy is present in the Org for that Account (i.e. if that Account has child accounts).
Successful Candidate Off Limit Policy Configuration
For more information on the Successful Candidate Off Limit Policy, see Off Limits Policies Successful Candidate.
Picklist
Add the Successful_Candidate_Policy picklist value to ensure the Classification picklist field is available for editing on the Successful Candidate Policy Record Type.
- Navigate to Setup > Object Manager.
- In the Off Limit Policy row click the dropdown and select Edit.
- Click Fields & Relationships > Classifications.
- In the Values section click New.
- In the blank box, enter "Successful_Candidate_Policy".
- In the Record Type Name column, click the Successful Candidate Policy checkbox.
- Click Save.
Custom Setting
Update the Executive Search custom setting to include the desired configurations.
- Navigate to Setup > Custom Settings.
- Next to Executive Search, click Manage.
- Click Edit.
- Configure these fields:
- Enable Successful Candidate: Make sure this checkbox is selected.
- SC Off Limits Default Reason: Enter your default reason for the Off Limits policy.
- SC Default Off Limits Duration:Set this value to your desired number according to days.
- Click Save.
Page Layout
Assign
Assign the Successful Candidate Policy Page Layout to Off Limit Policy records with Successful Candidate record type. Adjust layout fields if needed.
- Navigate to Setup > Object Manager.
- In the Off Limit Policy row click the dropdown and select Edit.
- Click Page Layouts.
- Click Page Layout Assignment.
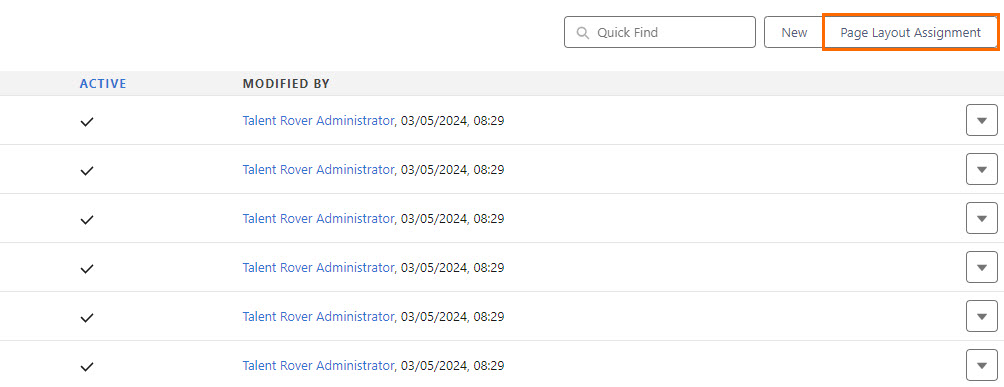
- Click Edit Assignment.
- Click the Page Layout to Use dropdown and select Successful Candidate Policy Page Layout.
- Assign Successful Candidate Policy Page Layout to Off Limit Policy records with the Successful Candidate record type.
- Assign per policy record type and profile. For example, System Administrator.
- Click Save.
For more information on Page Assignments, see the Salesforce article Page Layouts and Record Types in Salesforce.
Configure
You will need to configure the Closing Report object page layouts.
- Navigate to Setup > Object Manager.
- Next to Closing Report, click the dropdown and select Edit.
- Click Page Layouts.
- Select the appropriate
- In the Fields section, drag and drop the following fields into the Closing Report Detail section:
- Off Limits Duration
- Extend to Job's Account Hierarchy
- Include Billing Account Hierarchy
- Withheld
- Click Save.
- Complete the above steps for all necessary record types.
Edit Access
Assign Edit access to the Off Limits Duration field in the Closing Report to the relevant user profiles.
One way to do this is below:
- Navigate to Setup > Permission Sets.
- Next to an appropriate permission set you would like to add the permissions to (EX: ATSv2) click Clone.
- Enter a new unique label and API name for the cloned permission set.
- For example, for the label enter "ATSv2 Off Limits Duration" and the API Name enter "ATSv2_Off_Limits_Duration"
- Enter a Description.
- Click Save.
- Click your newly created Permission Set. For example, ATSv2 Off Limits Duration.
- Click Object Settings > Closing Reports.
- Click Edit.
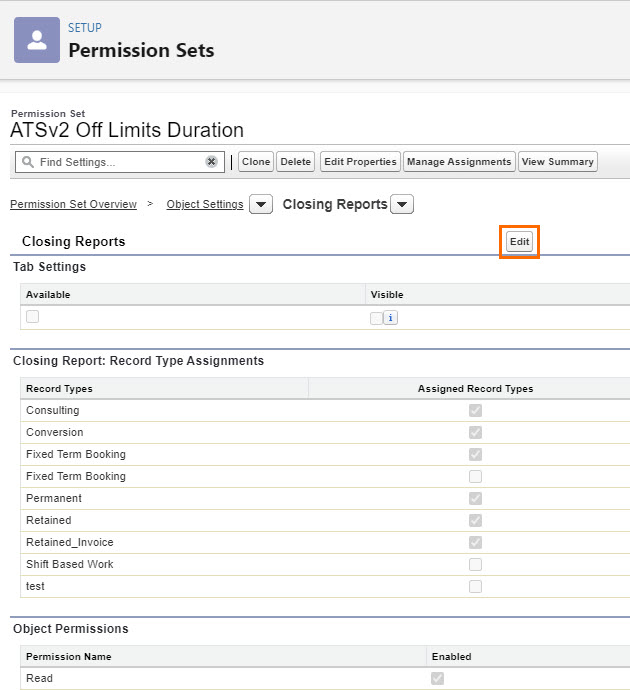
- For Off Limits Duration field, click the Edit Access checkbox.
- Click Save.
Create EditForm_Successful_Candidate Fieldset
- Start in the same place as above:
- Setup > Object Manager > Off Limit Policy.
- Click Field Sets.
- In the CreateEditForm_Successful_Candidate row click the dropdown and select Edit.
- In the Off Limit Policy section, drag and drop any fields that you need to use into the In the Field Set section. Below are some fields we recommend:
- Active
- Description
- Duration
- End Date
- Legal Reason
- Rank
- Reason
- Start Date
- Type
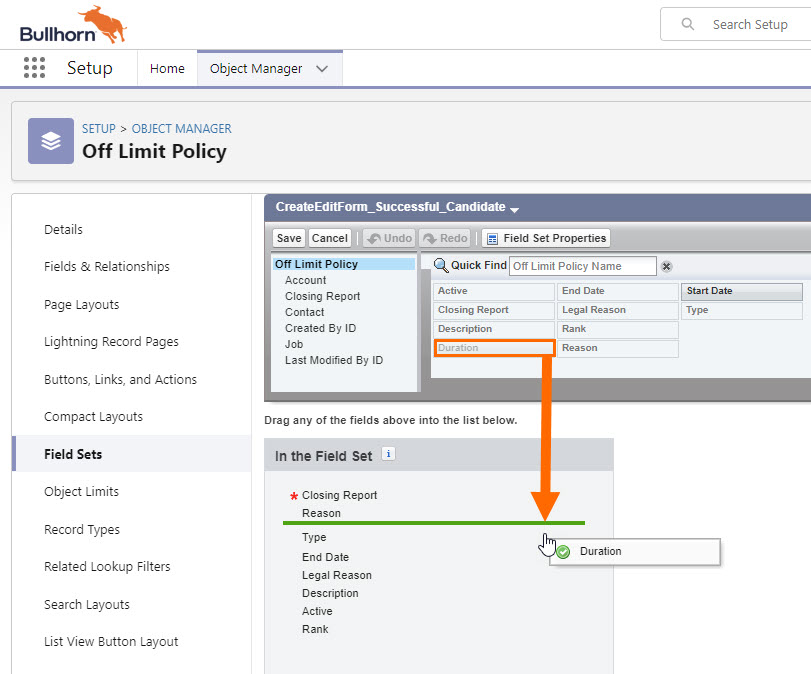
- Click Save.
Job Off Limit Policy Configuration
Assign Page Layout
Assign the Job Policy Page Layout to Off Limit Policy records with Job Policy record type. Adjust layout fields if needed.
- Navigate to Setup > Object Manager.
- In the Off Limit Policy row click the dropdown and select Edit.
- Click Page Layouts.
- Click Page Layout Assignment.
- Click Edit Assignment.
- Click the Page Layout to Use dropdown and select Job Policy Page Layout.
- Assign Job Policy Page Layout to Off Limit Policy records with the Job Policy record type.
- Assign per policy record type and profile. For example, System Administrator.
- Click Save.
For more information on Page Assignments, see the Salesforce article Page Layouts and Record Types in Salesforce.
Create EditForm_Job Fieldset
- Start in the same place as above:
- Setup > Object Manager > Off Limit Policy.
- Click Field Sets.
- In the CreateEditForm_Job row click the dropdown and select Edit.
- In the Off Limit Policy section, drag and drop any fields that you need to use into the In the Field Set section.
- Click Save.
Picklist
Add the Job_Policy picklist value to ensure the Classification picklist field is available for editing on the Job Policy Record Type.
- Navigate to Setup > Object Manager.
- In the Off Limit Policy row click the dropdown and select Edit.
- Click Fields & Relationships > Classifications.
- In the Values section click New.
- In the blank box, enter "Job_Policy".
- In the Record Type Name column, click the Job Policy checkbox.
- Click Save.
Job Record Button
Add the new Job record button New_Job_Off_Limit_Policy. This button will be used on the record Detail page of Job.
List View Button
Add the new List View button on Contact.
To do this, the Create_Job_Off_Limit_Policyshould be used on the Contact List view and on Contact Related Lists (EX: Contacts Related List on Account records).
Switch-Off Off Limits for Non-Executive Jobs
- Navigate to the Job object
- Create a new field with the field type of checkbox.
- This will flag non-executive Job records.
- Ensure this checkbox is enabled on all non-executive search Jobs.
- Navigate to Setup > Custom Settings > Executive Search.
- Enter the API name of the Job field you just created in the Non Executive Job Field API Name field.
Account Employment History Configuration
New/Edit Page Buttons
You will first need to override the behavior of the New and Edit buttons.
- Navigate to Setup > Object Manager.
- In the Employment History row click the dropdown and select Edit.
- Click Buttons, Links, and Actions.
- In the New row click the dropdown and select Edit.
- In the Lightning Experience Override field, select the Lightning Component radio button.
- In the Lightning component field, click the dropdown and select EmpHistoryCreateEditAction.
- Note: This may have a pre-fix (EX: TR1:EmpHistoryCreateEditAction).
- Click Save.
- You will need to repeat the last four steps for the Edit row as well.
New/Edit Page Fields
The fields on the New/Edit page are controlled by a field set.
- Navigate to Setup > Object Manager.
- In the Employment History row click the dropdown and select Edit.
- Click Field Sets.
- In the CreateEditForm row click the dropdown and select Edit.
-
We recommend adding the following new fields to the In the Field Set section, by clicking, dragging, and dropping them in:
- Account
- Verified
- The Current checkbox is a read-only field that is not visible on the Employment History Edit page.
- Click Save.
Mapping to Fields
To have the Company name mapped to the Account field when parsing a CV, you need to have the Prefill Employment History Account checkbox enabled.
- Navigate to Setup > Custom Settings.
- Next to Executive Search click Manage.
- Click Edit.
- Check the Prefill Employment History Account checkbox.
- Click Save.
Auto-Create Employment History Record
To have an Employment History record generated every time a Closing Report is created for a Candidate, ensure that the Employment Creation From CR checkbox is enabled.
- Navigate to Setup > Custom Settings.
- Next to TalentRover Properties click Manage.
- Click Edit.
- Check the Employment Creation From CR checkbox.
- Click Save.
Account Aliases
If you are using Account Aliases, add Account Alias related list to the Account page layout.
If the Alias Type field is not on the Account Alias page layout, manually add it.
- Navigate to Setup > Object Manager.
- In the Account Alias row click the dropdown and select Edit.
- Click Page Layouts
- In the Account Alias row click the dropdown and select Edit.
- Under Fields, find the Alias Type fields, click and drag and drop it into the Account Alias Detail section.
- Click Save.
Turn Off Automatic Calculations
To turn off automatic calculations for the Current checkbox, enable the Do Not Update Current Empl History checkbox.
- Navigate to Setup > Custom Settings.
- Next to TalentRover Properties click Manage.
- Click Edit.
- Check the Do Not Update Current Empl History checkbox.
- Click Save.
Current Flag on Employment History Records
See the Schedule Batch Jobs section below for steps on configuring the backend calculations for the Current flag on Employment History records.
Schedule Batch Jobs
Daily
Schedule the following classes as daily jobs:
- OffLimitPolicyDisablePassedBatch: Batch for disabling policy when End Date is Today
- Daily is required.
- OLLineItemDisableExpiredBatch: Batch to update expired line items to Disable.
- Daily is required.
- OffLimitPolicyRecalcTodayStartDateBatch: Batch for enabling a policy when Start Date is Today.
- Daily is required.
- EmploymentHistoryUpdateCurrentBatch: Batch to mark Current__c is false when EmploymentHistory__cEnd_Date__c is before TODAY.
- Daily is required.
One-Time Execution
One-time execution batches are available to update the Current checkbox on existing Employment History records.
This can be helpful because some batches only batch in specific scenarios. For example, the EmploymentHistoryUpdateCurrentBatch happens only when an Employment Record is created/updated.
- Start the batch from a non-console.
- 2000 is max SF chunksize.
-
Enter the following:
CopyDatabase.executeBatch(new EmploymentHistoryCheckCurrentBatch(), 2000);
- Use this information:
- Class Name: EmploymentHistoryCheckCurrentBatch
- Logic: Bullhorn Recruitment Cloud checks all existing Employment History records and identifies those for which Current should be ticked based on the following:
- End Date is in the past: Exclude.
- End Date is in the future: Mark as Current.
- End Date is blank: If there is a Start Date, mark as Current .
- End Date is a string: If there is a Start Date, mark as Current .
- For example, "present" is a string.
Apply Policies to Related Accounts
To enable the Related Accounts table or adjust the data displayed, an administrator must configure the related object and OmniTable settings.
For more details, see Off Limits Policies: Account.
Pre-conditions
A custom object that stores related Accounts and contains two lookup fields to Account.
Setup Steps
- Create Field Set(s) on the custom object
- Define the fields that appear in the Related Accounts table.
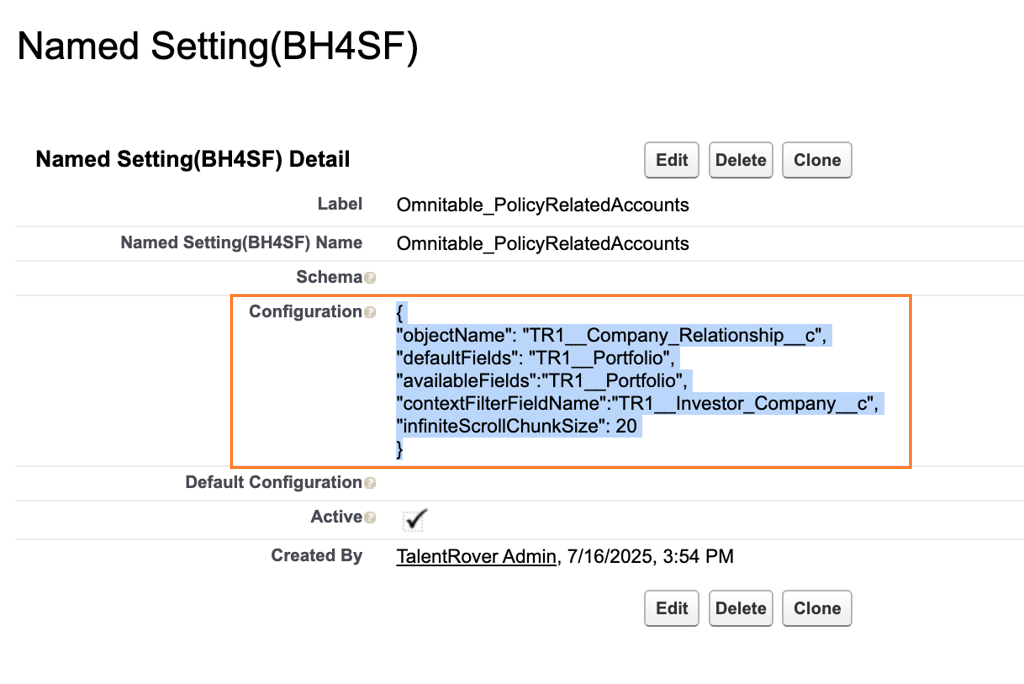
- Create OmniTable config:
- Add a new record in the Named Setting metadata type with the name "Omnitable_PolicyRelatedAccounts".
- Populate the fields:
- objectName: API name of the related-Account object
- defaultFields: Field set for initial columns
- availableFields: (Optional) Alternate field set for selectable columns
- contextFilterFieldName: API name of the Account lookup that filters results to the primary Account
- infiniteScrollChunkSize: Number of rows loaded per scroll
- Update Executive Search custom setting
- In Related Account Field API Name, enter the API name of the Account lookup field representing the related Account to include in policies.
The policy edit page displays a Related Accounts table that allows users to select Accounts outside the hierarchy (e.g., Portfolio companies) to apply the same Off Limits policy.