Report Settings
Overview
Use Report Settings to set options for importing time details from your Vendor Management System (VMS) to Exchange. Without these settings in place, Exchange cannot import time from your VMS to be processed. This article covers invidual report settings. For more general information on TMC Reports see Reports Menu.
Settings
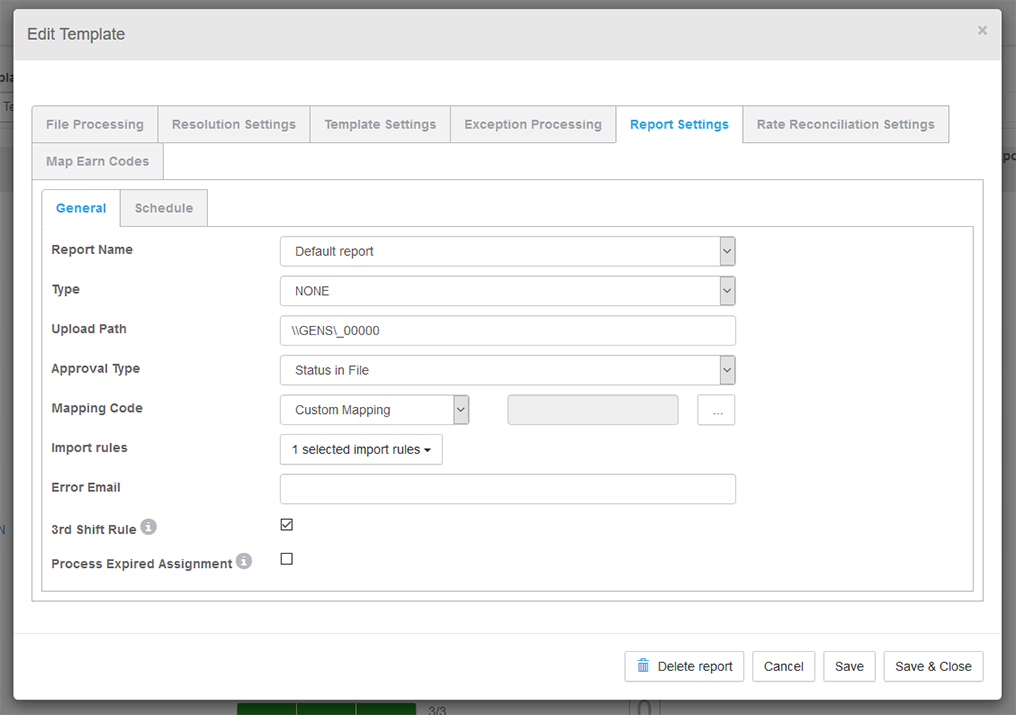
This is the only tab initially visible. After selecting an existing report or creating a new report, you will see additional tabs appear. General settings apply to all 4 report types.
If you've already configured reporting for the template, you may make edits to the options that appear.
- Report Name - You may select the name that automatically generates (matches the template name) or enter a new value for the name of the report.
- If using web automation, the Report Name must match the report name in the VMS.
- Anything after a ~ will be ignored by web automation. This can be used to distinguish two versions of web automation running on the same template (i.e. for Peoplefluent you might have 3070~GA and 3070~AL to run two 3070 reports, one for Georgia and one for Alabama)
- If using web automation, the Report Name must match the report name in the VMS.
- Type - Select an option from the list that matches the report import process:
- Web Automation - In this configuration, an automation service mimics the human actions of logging in to your VMS and running a report. Used for Peoplefluent and Agile / Acceleration
- Email Delivered - Choose this option if the VMS supports scheduled email delivery of reports. Used for Fieldglass, IQN, and Beeline.
- Manual - Manual reports are uploaded by hand to Exchange using the Upload File option on the main dashboard.
- Application Programming Interface - Select this option if your VMS configuration includes a service that creates and delivers a report to Exchange via FTP or other web services. Used for Econometrix.
-
Upload Path – This is the destination where all uploaded VMS reports are stored.
- In order for the missing files functionality to work properly, each report must have a unique upload path.
- Best practice is to make the upload path: \\[your company name]\[Client Name]\[Report Name]
- In order for the missing files functionality to work properly, each report must have a unique upload path.
-
Approval Type - Indicates where the approval status is defined for each time card.
- Status in File - Will reflect whatever status is specified in the file.
- Not Approved - All time cards in the file will be considered Pending Approval.
- Approved - All time cards in the file will be considered Approved.
- Mapping Code - Choose a client mapping option that appears in the list.
- You may only select one option per report.
- Import Rules - Choose how you want the report to generate considering import rules in place. There are a variety of import settings available. If needed, choose from a single rule, multiple rules, or no rules then save to proceed. See below for standard rules by VMS type:
VMSRules to applyConditionsFieldglassKeep only the Highest RevisionRemove Timecards with –ve valueThe client supports negative adjustmentsFieldglassReject the file if there is a –ve valueThe client does not support negative adjustmentsPeoplefluentSubmitted Date RuleAllAll other mappingsNo Rule Selected
- Error Email - Set an email address for delivery of notifications regarding report import errors.
- 3rd Shift Rule - Decide if you want to apply the 3rd Shift Rule to hours processed through Exchange. The rule states:
- "If the employee entered time the day before the week starts, then hours will be moved to the next day for each date. Likewise, if the employee entered time the day after the week has ended, then hours will be moved back by one day for each date."
- Process Expired Assignment - Select this to indicate whether you process a time card through Exchange even in the event that the assignment is expired for any day with hours.
After entering all needed fields, click on the Schedule tab to proceed.
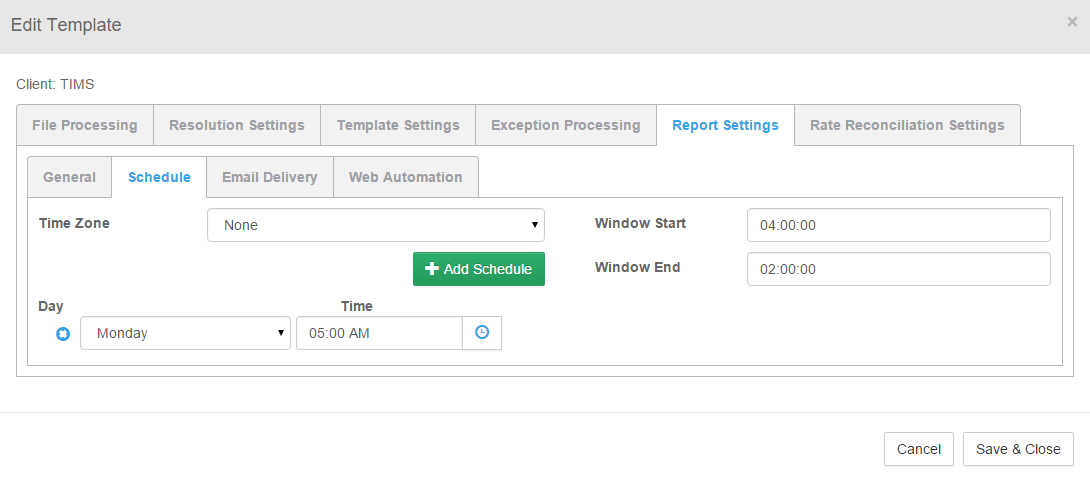
This tab allows you to schedule when the report is generated and delivered to Exchange. The settings you configure here can also determine when a file is considered missing.
Schedule settings apply to all 4 report types. If you are using Web Automation, then the schedule indicates the time the web automation will run.
- From the Time Zone drop-down, select your local Time Zone
- Click + Add Schedule to proceed.
- The schedule time indicates when the report is expected to be delivered to Exchange.
- You may add multiple schedule times as needed.
- Enter a Window Start and Window End.
- Think of the window as a grace period - the earliest and latest time range in which the report should be delivered.
- When defining your window, the Start and End times are hours offset from the scheduled time.
- If your delivery time is 5:00 AM and you have a Window Start of 4:00.00 hours, then a report could be delivered as early as 1:00 AM.
- Similarly, if your Window End is 2:00.00 hours, your report could be delivered as late as 7:00 AM. A report delivered after this time is considered missing.
- If a report is delivered outside of this window, it is considered missing and will be added to the Missing Files dashboard.
- When defining your window, the Start and End times are hours offset from the scheduled time.
- Think of the window as a grace period - the earliest and latest time range in which the report should be delivered.
- If you are done, configuring, select Save & Close.
Otherwise, select an option to continue configuration:- If your report type is Email Delivery, select the Email Delivery tab.
- If your report type is Web Automation, select the Web Automation tab.
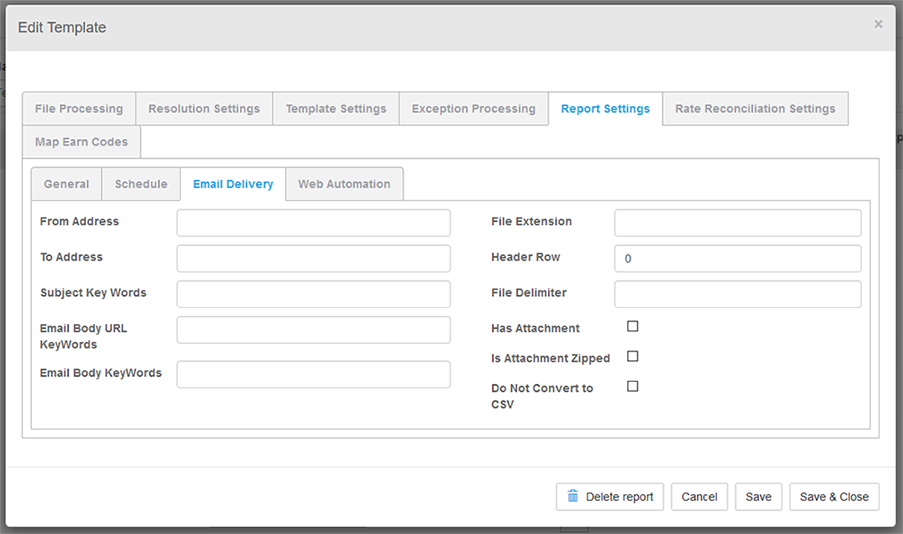
These settings must be assigned when a report is delivered to Exchange via email. If the proper email settings are not configured, Exchange may not be able to locate or import a report.
- From Address - Indicate the email address from which the report will be delivered to Exchange.
- To Address - Enter the email addresses configured as the recipient of the original VMS report.
- Subject Key Words - Enter key words found in the email subject to match on.
- Email Body Key Words – Searches the body of the email for this exact phrase.
- This search is case sensitive.
- This allows for search of a second text string.
- File Extension - Enter the file extension (.CSV, .XLS, .PDF) that is associated with the original report that is generated from the VMS.
- Header Row - If the VMS report includes a header row, indicate that number of rows in this field.
- This should be the number of rows before time card data in the report.
- File Delimiter - Specify the file delimiter associated with the VMS report.
- This can vary depending on the report, but typically are comma (,) semicolon (;) or pipe (|).
- Is Attachment Zipped – Select whether or not the attachment received will be zipped.
- Do Not Convert to CSV - Indicate if you want to keep your file from converting to CSV.
If you need to enter details for a different tab, click on that tab to proceed.
Select Save & Close if you are done.
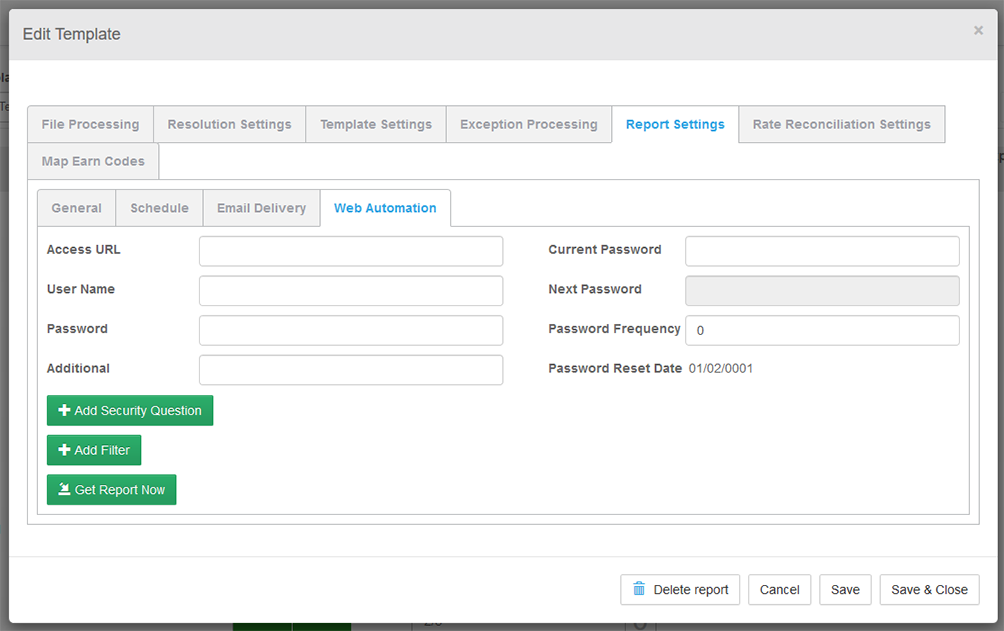
If your configuration uses web automation services to provide VMS report data to Exchange, you must fill in access details in this tab. Without these details, Exchange will not be able to retrieve VMS reports as expected.
Web Automation is currently used for Peoplefluent, Agile Acceleration, and Dotstaff.
Peoplefluent makes use of a combination of Web Automation and Email Delivery, so you must fill out both sections.
- Complete the folllowing fields:
- Access URL – This is the url for login to the VMS.
- Username – This is the username used to access the VMS.
- Password – This is the password for the account to access the VMS.
- Additional – This is an optional additional field for a 3rd login parameter.
- Peoplefluent uses this field for Organization Key.
- Password Frequency – This is the frequency in days before Exchange performs a password reset on the account.
- As passwords expire, the system will automatically update the password for the account at this frequency.
- If you set this to 0, the system will not update the password.
- Current Password – This must match Password for the web automation. This is used for the password update feature.
- Next Password – This is the next password that will be set for the system.
- When configuring a template, you need to add a new password.
- Once that is done, the system will begin generating random passwords moving forward.
- Password Reset Date - This indicates when the current password is set to expire (if applicable).
- Click + Add Security Question to store a security question.
- This may be used for a password reset.
- It is not required for Peoplefluent or Agile Acceleration.
- Click + Add Filter and enter filter criteria to be used by web automation when running the report:
- Field Name – The name of the field in the VMS.
- Filter Control – The type of web control that is being selected
- Filter Rule – Allows for logical expressions to be used.
They are as follows:- None – No rule needs to be used, but an operand must still be provided, even though it will not be used.
- Today – Uses today’s date
- Past – Allows you to search for “Past 14 days” or “Past 7 days”
- Monday thru Sunday – Provides the date of the previous day of the week selected.
- Operand – Allows for mathematical operations to be performed against dates.
- “Sunday – 7” would provide the date of the previous Sunday minus 7 days.
- If you select None for your filter rule, you must still enter an operand, even though it won’t be used.
- Value – Allows you to designate the value to select.
- If you are using a filter rule, this should be a number to add or subtract from the date.
- If your filter Rule is None, then this is the value to be selected in the report (i.e. Company Name).
- Click Get Report Now to prompt Exchange to retrieve the report based on the details you provided.
- You may click Save & Close if you are done.
Otherwise select a different tab to continue configuration.
Standard Rule Configurations
Use the images below to assist with VMS Rule Configurations.
- Peoplefluent
- It will run for the previous 14 days.
- Agile Acceleration
- It will pull time for 4 weeks prior to the previous Sunday.
- DotStaff
- It will pull time for three weeks from the previous Sunday.
- In order to get this to work properly, you should line up the time you pull with the week ending for the client.
- If the client has a Friday week ending, pull time from last Friday rather than last Sunday.
When you're done configuring report settings, click Save & Close.
Troubleshooting
Check Schedule & Formatting
Make sure the scheduling and formatting match for the report VMS as well as what you're configuring in these report settings in Exchange. If things don't line up properly, this could create some issues at a later point.
Review Load and Processing
When the next scheduled report runs you can verify that everything loaded properly. If everything doesn't load as you expect, you should review the template configuration again to ensure accuracy.
- This may also require you to adjust the VMS sourced report instead of only making changes to the template settings in Exchange.
- Keep in mind that you should adjust settings on both sides to match. If the settings don't match, this can prevent your import from completing.
If you need to cut down on your wait time during troubleshooting, you can manually upload the report instead of waiting for the next scheduled report to run.
- Click the Upload File option on the Exchange Dashboard to complete this.
Mapping
Depending on the report and VMS, you may need to adjust your mapping settings. Proper mapping is needed to set match details in the VMS report to data in Exchange and .
If the mappings on your report are non-standard, you may use Custom Mapping.
- See Custom Mapping Tool: General Settings for more information.


