I-9 Section 2 Correction - Recruiter Experience
When an error is found in Section 2 of an I-9 Form I-9 to verify the identity and employment authorization of individuals hired for employment in the United States., you can issue a correction to fix specific fields instead of restarting the entire form. The recruiter initiates and completes the Section 2 correction — the applicant is not involved. Section 2 corrections are limited to certain fields; if the wrong documents were collected entirely, you must reissue Section 2 instead.
For information about Section 1 corrections, see I-9 Section 1 Correction - Recruiter Experience.
Correction vs. Reissue: Which Do You Need?
Before initiating a correction, confirm that the issue falls within the correction scope. A correction fixes specific fields on the existing signed form. A reissue replaces Section 2 entirely and requires the authorized representative to complete the full document again.
- Use a correction for minor data entry errors: incorrect document numbers, expiration dates, issuing authorities, First Date of Employment, or authorized representative information.
- Use a reissue when the wrong documents were collected, or when the document title itself needs to change. Document titles cannot be modified through a correction.
Common Reasons to Correct Section 2
Section 2 corrections address data entry errors in the document fields or employer information. The most common reasons include:
- An expiration date was entered with incorrect digits or in the wrong format.
- A document number was typed incorrectly.
- An issuing authority was recorded with a typo or abbreviation error.
- The First Date of Employment was entered incorrectly.
- The authorized representative's name, occupation, or employer information contains a typo.
How to Initiate a Section 2 Correction
You can initiate a correction from the I-9 Dashboard Details panel or from the Applicant (or Candidate or Talent) Customer talent - the person applying or hired for the job > Onboarding page. The process is the same from either location. The system always uses the most recently signed Section 2 as the basis for the correction.
From the I-9 Dashboard
- Navigate to I-9 / E-Verify An online system that confirms the eligibility of an Employee to work in the United States. The process compares information entered by an employer from an employee’s Form I-9, Employment Eligibility Verification, to records available to the U.S. Department of Homeland Security and the Social Security Administration to confirm employment eligibility. > I-9 Dashboard.
- Click View Details for the record that needs a correction.
- Under Section 2, click Select an option and choose Begin Correction.
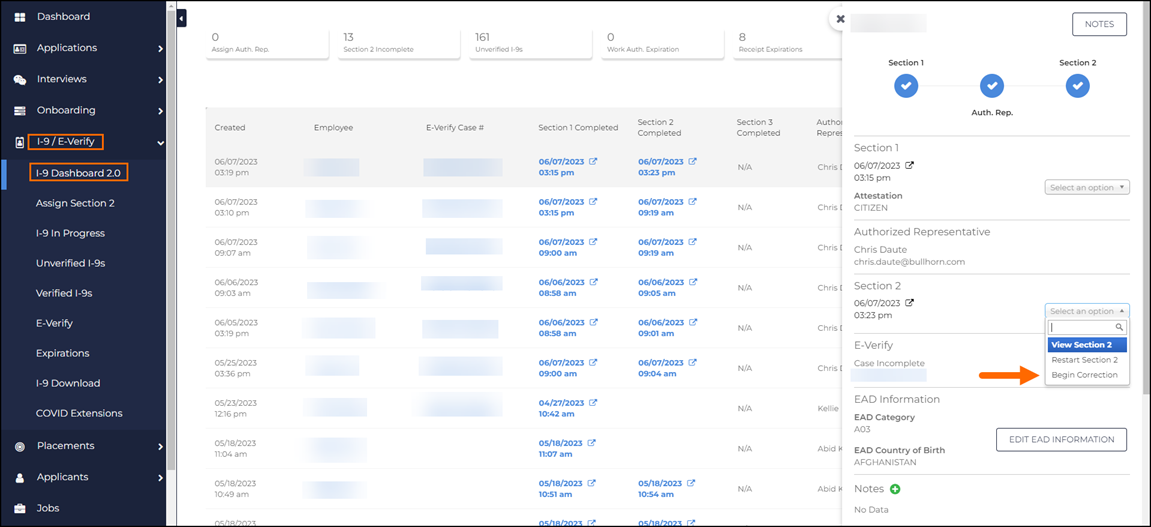
- Select OK in the confirmation dialog.
The Details panel refreshes and shows Correction Issued under Section 2.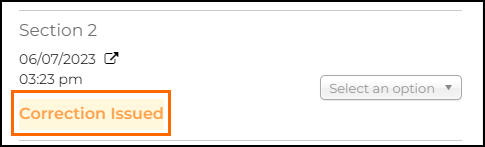
From the Applicant > Onboarding Page
- Navigate to Applicants and open the record that needs the correction.
- Select Onboarding.
- Click … next to the signed Section 2 document and select Begin Correction.
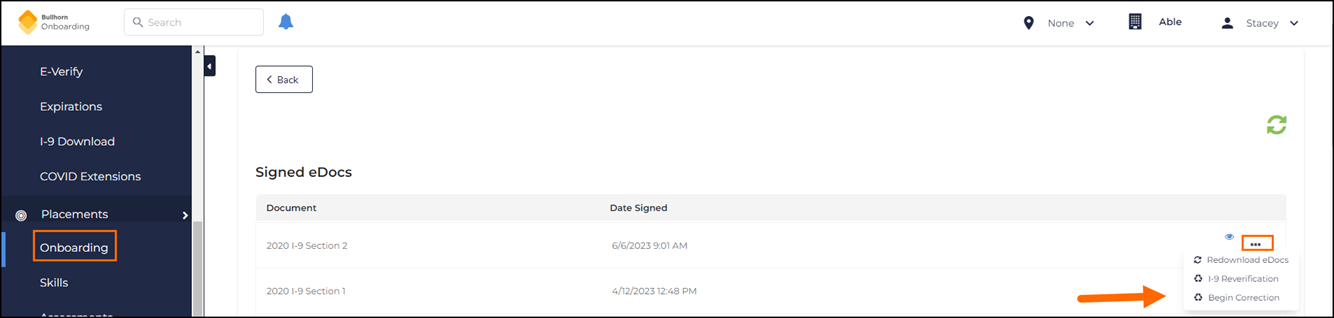
- Select OK in the confirmation dialog.
The page refreshes and shows the open correction under Open eDocs with a status of SIGNED WAITING.
How to View a Correction in Progress
After a correction is issued but before it is completed, you can check its status in two places.
- On the I-9 Dashboard, a new row is created for each correction issued. These rows represent I-9s, not unique applicants. The Details panel shows Correction Issued under Section 2, and the correction row shows a status of Pending until signed.
- On the Applicant > Onboarding page, the correction shows in the Document Package A group of Forms grouped together based on Location, Client, or other internal design that can be assigned as a single Task column marked with Correction and remains under Open eDocs until completed.
How to Cancel a Section 2 Correction
You can cancel a correction at any point before it is completed and signed. Once signed, the correction cannot be reversed — initiate a new correction if additional changes are needed.
- Navigate to .
- Click … next to the correction and select Cancel from the drop-down.
The cancellation is logged in the audit trail, but no data change is recorded. The original signed Section 2 remains unchanged.
How to Complete a Section 2 Correction
After initiating a correction, you open it to make the changes. The correction form pre-fills with the data from the most recently signed Section 2. Only certain fields are editable — see the fields table below. Both paths below open the same correction form.
From Open eDocs
- Navigate to .
- Locate the correction and select WAITING in the Status column.
From the I-9 Dashboard
- Navigate to .
- Open the Details panel for the record.
- Select Correct Section 2.
Make your changes to the editable fields and click Submit, then Electronically Sign.
The signature and date box appear near the Additional Information text box, not at the bottom of the form. This is because the original certification ("I attest under penalty of perjury...") was completed at initial signing. The person making the correction is not re-attesting to having viewed original documents.
Fields That Can and Cannot Be Modified
Document titles are the only Section 2 fields that cannot be changed through a correction. If a document title needs to change, reissue Section 2. Everything else — including document numbers, expiration dates, issuing authorities, and employer information — can be corrected.
| Fields that can be modified | Fields that cannot be modified | |
|---|---|---|
| List A Issuing Authority (except for U.S. Passport) | List B Expiration Date | List A Document Title |
| List A Document Number | List C Issuing Authority | List A Additional Document 1 Document Title |
| List A Expiration Date | List C Document Number | List A Additional Document 2 Document Title |
| List A Additional Document 1 Issuing Authority | List C Expiration Date | List B Document Title |
| List A Additional Document 1 Document Number | First Date of Employment | List C Document Title |
| List A Additional Document 1 Expiration Date | Additional Information | |
| List A Additional Document 2 Issuing Authority | Your Occupation/Job Title | |
| List A Additional Document 2 Document Number | Your First Name | |
| List A Additional Document 2 Expiration Date | Your Last Name | |
| List B Issuing Authority | List B Document Number | |
Audit Trail
When the correction is complete and signed, the changes are tracked in the Audit Trail. The audit trail records all field values before and after signing but does not identify which specific fields changed. Admin users can view the following correction events under :
- Initiation
- Access
- Completion
- Cancelation
All versions of the I-9 (original and all signed corrections) are retained and can be retrieved if needed by USCIS.
Troubleshooting
Use these steps to resolve the most common issues with Section 2 corrections.
If Begin Correction is not available in the Section 2 menu
Section 2 must be signed before a correction can be initiated. If Section 2 shows as incomplete, the authorized representative needs to finish signing it before a correction is possible.
If the field you need to change is grayed out
Document titles cannot be changed through a correction. If the document title is wrong, reissue Section 2. The authorized representative will need to complete the entire Section 2 again.
If the documents need to change entirely, not just a typo fix
A correction is not the right tool for this. Reissue Section 2 from the recruiter or compliance officer's workflow. The authorized representative will fill in the complete document from scratch.
If the correction row in the I-9 Dashboard looks like a duplicate applicant entry
Each correction creates a new row in the dashboard. These rows represent I-9s, not unique applicants. Multiple rows for the same applicant are expected if corrections have been issued.
If the correction was submitted but the changes are not visible on the I-9
Refresh your browser. If changes still do not appear, check the Audit Trail on the Applicant record to confirm the signature was recorded. Contact Bullhorn Support if the signature is in the audit trail but the I-9 still shows old data.
If you initiated a correction but need to start over
Cancel the existing correction from using the … menu. The cancellation is logged but no data is changed. You can then initiate a new correction.
Frequently Asked Questions
Can a document number or expiration date be corrected without reissuing Section 2?
Yes. Document numbers, expiration dates, and issuing authorities can all be corrected. The only fields that cannot be changed through a correction are document titles. If a document title is wrong, reissue Section 2.
Does the applicant need to do anything for a Section 2 correction?
No. Section 2 corrections are completed entirely by the recruiter or authorized representative. The applicant is not involved and does not need to sign anything.
Can multiple corrections be made to the same Section 2?
Yes. Each correction is issued and completed independently. The system uses the most recently signed version as the basis for each new correction.
Will a Section 2 correction affect the E-Verify case?
A Section 2 correction does not automatically trigger a new E-Verify case — E-Verify auto-creation is skipped for corrections. If the correction involves information used to create the E-Verify case (such as correcting a receipt document that previously blocked auto-creation), manually create a new E-Verify case after the correction is complete. Navigate to the Applicant Profile The Applicant’s self-service ability to add or update information about themselves (e.g., job preferences, references, education, work history), open the E-Verify tab, and select Create new E-Verify Case.
What is the difference between correcting Section 2 and reissuing it?
A correction fixes specific fields on the existing signed form. A reissue replaces Section 2 entirely and requires the authorized representative to complete the full document again. Use a correction for minor data entry errors. Use a reissue when the wrong documents were collected or when a document title needs to change.
Can any recruiter complete a Section 2 correction, or only the original authorized representative?
Any recruiter or authorized user with access to WFM can complete a Section 2 correction. There is no way to assign the correction to a specific authorized representative — the correction is available to any user who can access the applicant's Onboarding page or the I-9 Dashboard.
Scenarios
The following scenarios describe common situations where a Section 2 correction is needed. Each is written to stand alone for quick reference.
The authorized representative entered an incorrect expiration date for the applicant's document
Expiration dates can be corrected without reissuing Section 2. Initiate a Section 2 correction from the I-9 Dashboard or from . After confirming in the dialog, open the correction form, update the expiration date field, and submit and electronically sign. The change is recorded in the Audit Trail, and all versions of the I-9 are retained for USCIS if needed.
The authorized representative entered the wrong document title
Document titles cannot be modified through a correction. If the document title needs to change, reissue Section 2. The authorized representative will need to complete the entire Section 2 document again from scratch. Before reissuing, confirm whether the issue is actually the title (cannot be corrected) or an issuing authority or document number (which can be corrected).
A Section 2 correction was initiated on the wrong record
Cancel the correction from before it is signed. Click the … menu next to the correction in Open eDocs and select Cancel. The cancellation is logged in the audit trail but the original signed Section 2 is not affected. Navigate to the correct record and initiate the correction there.
A compliance officer needs to confirm that a Section 2 correction was made and what changed
The Audit Trail on the Applicant record logs the correction and records all field values before and after signing. Navigate to the Applicant record and open the Audit Trail. Look for the correction event. Note that the audit trail does not identify which specific fields changed — it shows all field values at the time of each signing.