| Package: Recruiting(JS2) |
Adding a Value to a Source Field on the Candidate Record
![]()
Step 1 - Determining which source field you are using
Adding a value to the Source field in your org is a fairly simple process, slightly complicated by the fact that Jobscience provides two source fields on the contact object (of which Candidates is a record type). So the first step in adding a value to your Source field involves determining which source field you are currently using on your Candidate layout.
The easiest way to do this is to simply navigate to any candidate record and edit the source field in question.
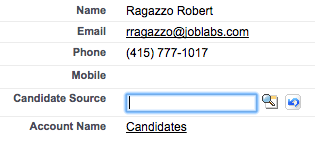
Pictured above is the Candidate Source field. This is a lookup field on the Source object. Easily identified when editing the field by the magnifying glass button that pops up just to the right of it. If this is the field showing on your layout, you want to go to Step 2a - Adding a value to the lookup field.
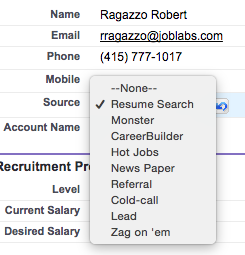
Pictured above is the Source field. This a pick list field. Easily identified when editing because it opens a dropdown menu for you to select from the available values currently on the field. If this is the field showing on your layout you want to jump to Step 2b - Adding a value to the pick list field.
Step 2a - Adding a value to the lookup field
If you are using Candidate Source you can add a value to the field by creating a Source Record. This is accomplished by accessing the Sources tab. To do so simply go to All Tabs (the + symbol in the blue bar) and select Source from the list. If you or a user cannot see the Source tab you will want to check that your (or their) User Profile has access to the Sources tab and has at least Read access to the Sources object.
Once in the Sources tab click on the New button.
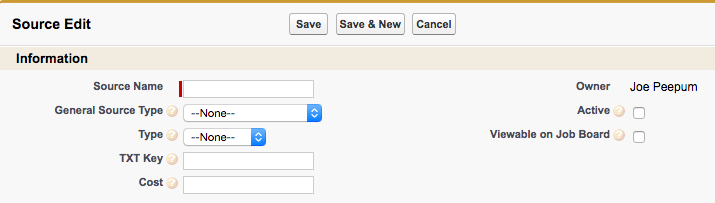
You will need to enter a name for your source (this is the value that will display in the Candidate Source field) and check off the Active box if you want to be able to select it as a value in the Candidate Source field.
Step 2b - Adding a value to the pick list field
If you are using Source you can add a value to the field just like you were adding a value to any other pick list. So you want to enter the setup menu (click on your user name in the top right hand corner, select setup from the dropdown menu), navigate to the object the field you are looking to modify lives on and open the fields page, then select the field you wanted to modify from the list. In this particular case the full click path is setup > customize > contacts > fields > Source. Once on this page you want to scroll down to where it says Values and select New.
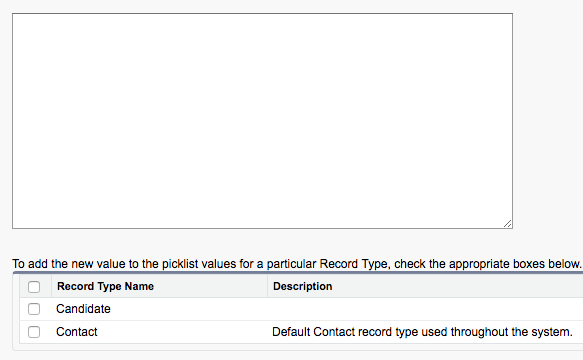
New values go in the large box on top, one per line. After you have finished that you will want to make sure to check off which record types you want the values to be accessible from. If you are not specifically looking to hide values, we suggest making the values available on all record types.