| Package: TimeCards |
TimeCards - User Guide
![]()
Each of the functional areas of the product works in concert with the front-end to form a system that will allow the collection of & approval of Timesheets, generation of Invoices, calculate Commissions, export Payroll & Accounting information, and provides reporting on the data captured by the system. The product only works properly when used in conjunction with the Jobscience platform and is not designed to operate as a stand-alone product.
The Backoffice Product is not (and should not be treated as) an accounting, payroll, HR accrual, or Employee Management system. Backoffice is designed to provide information to each of these systems to facilitate the running of your business.
Backoffice was designed to be used from the Salesforce Lightning User Interface. This Guide is written with step by step directions, including screenshots, for a User on the Salesforce Lightning UI.
Expected Process Flow
While the configuration and use of the Backoffice product likely differs from customer to customer, the overall process flow would be the same for all customers. The standard process flow for the Backoffice product includes the following five actions:
Temporary Placements
- A Recruiter creates a Placement Record and inputs several key pieces of data.
- Timesheets are generated for each week between the Start Date and End Date Field values.
- The Worker logs into a Community to enter hours worked on the Timesheet, and possibly related Expenses.
- A Timesheet Approval Manager will log into the Community to review the hours worked, and possible related Expenses, to approve or reject.
- Approved Timesheets will then be processed into Worker Payroll, Client Invoicing, and Employee Commissions.
Permanent Placements
- A Recruiter creates a Placement Record and inputs several key pieces of data.
- Placement will then be processed into Client Invoicing and Employee Commissions.
The Account Object
The Backoffice Product starts with the Account Object. An Account Record will contain important data points for the Client with whom the Worker will be placed. When creating a new Account Record, the following Fields should be populated with data. Populating these Fields at the Account Record will ensure an easier use of the Backoffice Product at the Placement, Timesheet, & Invoice Record levels.
A number of these Fields are Salesforce Lookup Fields, meaning a separate Record needs to exist in order for it to be selected, an example includes the Overtime Plan Field. Someone, likely a User with System Admin permissions, would have already created Records for use. If you not know which value to use or don’t see a value you need, connect with your System Admin or Manager to discuss about specific internal processes for your organization.
Required Fields
|
Field Label Name |
Field API Name |
Description / Purpose |
|---|---|---|
|
Accounts Receivable |
jstcl__Accounts_Receivable_U__c |
Captures the Client Contact who will receive the Invoice |
|
Accounts Payable |
ts2__Accounts_Payable__c |
Captures the Contact (at your organization) who will receive payment of the Invoice |
|
Overtime Plan |
jstcl__Overtime_Plans__c |
Determines how Hours worked is paid to the Worker & Invoiced to the Client |
|
Timesheet Format* |
jstcl__Timesheet_Format__c |
Controls how Workers submit Hours worked through the Community |
|
Holiday Calendar |
jstcl__HolidayCalendar__c |
Captures which Holiday(s) the Client honors |
|
Invoicing Type** |
jstcl__Invoicing_Type__c |
Determines how Invoices are created & sent |
|
Invoice Template (only required if Automatic Invoicing Type is selected) |
jstcl__Invoice_Template__c |
Controls which style layout of Invoice is generated for the Client |
|
Email Template Name (only required if Automatic Invoicing Type is selected) |
jstcl__Email_Template_Name__c |
Captures the desired Email Template to send the Invoice (Use the Email Template Unique Name) |
|
Invoice Processing Period |
jstcl__Invoice_Processing_Period__c |
Controls the frequency of which Invoices should be processed |
|
Invoice Terms |
ts2__Invoice_Terms__c |
Captures the frequency of which Invoices should be paid |
|
Invoice Overtime |
jstcl__Invoice_Overtime__c |
Determines how Overtime Hours are Invoiced to the Client |
|
Invoice Batch Option |
jstcl__Invoice_Batch__c |
Determines how Invoices are batched together |
*Timesheet Format options include: Hours Only or Start and End Time.
- Hours Only = Worker will enter hours worked based on a total amount for each shift, example 7.5 hours
- Start and End Time = Worker will enter the time when work began and ended for each shift, example 8A Start and 430P End.
**Invoicing Type options include: Manual, Semi-Automatic, and Automatic. It is recommended to utilize the Manual or Semi-Automatic value at the onset of using the Backoffice product. As more comfortability with the Product is gained and a firm schedule is set for Invoice processing, moving to Automatic would be preferred.
- Manual = Invoice Line Items will be manually consolidated and Invoices are manually emailed to the Client
- Semi-Automatic = Invoice Line Items will be automatically consolidated and Invoices will be manually emailed to the Client
- Automatic = Invoice Line Items will be automatically consolidated and Invoices will be automatically emailed to the Client.
Optional Fields
|
Field Label Name |
Field API Name |
Description / Purpose |
|---|---|---|
|
No Overtime |
jstcl__NoOvertime__c |
Determines if Workers are eligible for Overtime |
|
Payment Terms |
jstcl__Payment_Terms__c |
Tracks the desired Invoice due date period for the Client, example 30 or 90 days |
|
Create Timesheet Reports |
jstcl__Create_Timesheet_Reports__c |
Controls whether a PDF of Approved Timesheets will be attached during Invoicing |
|
Email Name Notification to TManager (if blank, the org default will be used) |
jstcl__Email_Name_Manager__c |
Tracks which Email Template will be sent to Managers to approve/reject Timesheets (Use the Email Template Unique Name) |
|
Email Name Notification to TWorkers (if blank, the org default will be used) |
jstcl__Email_Name_Workers__c |
Tracks which Email Template will be sent to Workers to submit Timesheets (Use the Email Template Unique Name) |
|
Credit Memo Template |
jstcl__Credit_Memo_Template__c |
Controls which style of Invoice is generated for the Client when Credits are issued |
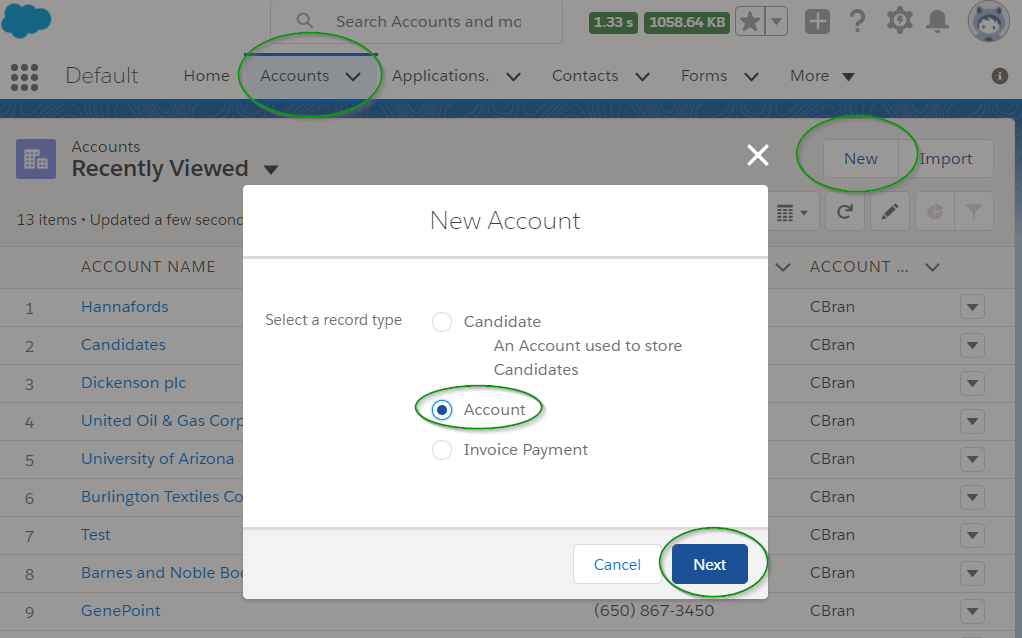
Create New Account
- Access the Account Tab
- Click the New button
- Select the desired Record Type, likely Account or Client
- Click the Next button
- Populate the Fields with desired values, keeping in mind the above mentioned Backoffice oriented Fields
- Click the Save button when satisfied
Modify Existing Accounts
- Search & Locate the desired Record
- Click the Edit button

- Modify the desired Fields, keeping in mind the above mentioned Backoffice oriented Fields
- Click the Save button when satisfied
The Contact Object
Contacts Records would be needed for anyone who would be recording Time (the Worker) and approving/rejecting Time (the Approval Manager).
Optional Fields
|
Field Label Name |
Field API Name |
Description / Purpose |
|---|---|---|
|
Disable Timecard Notification |
jstcl__Disable_Timecard_Notification__c |
Allows/Disallows the sending of Backoffice related emails to the Contact, recommended to be checked to allow the emails |
Create New Contact
- Access the Account Record the Contact will be associated with
- Access the Related subtab
- Scroll down to the Contact Related List
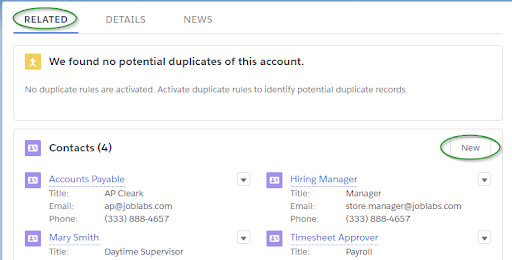
- Click the New button
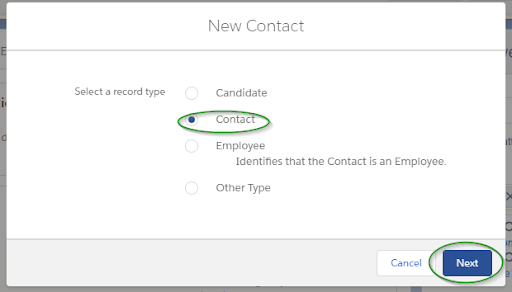
- Select the desired Record Type, likely Contact
- Click the Next button
- Populate the Fields with desired values, keeping in mind the above mentioned Backoffice oriented Fields
- Click the Save button when satisfied
Modify Existing Contacts
- Search & Locate the desired Record
- Click the Edit button

- Modify the desired Fields, keeping in mind the above mentioned Backoffice oriented Fields
- Click the Save button when satisfied
The Job Order Object
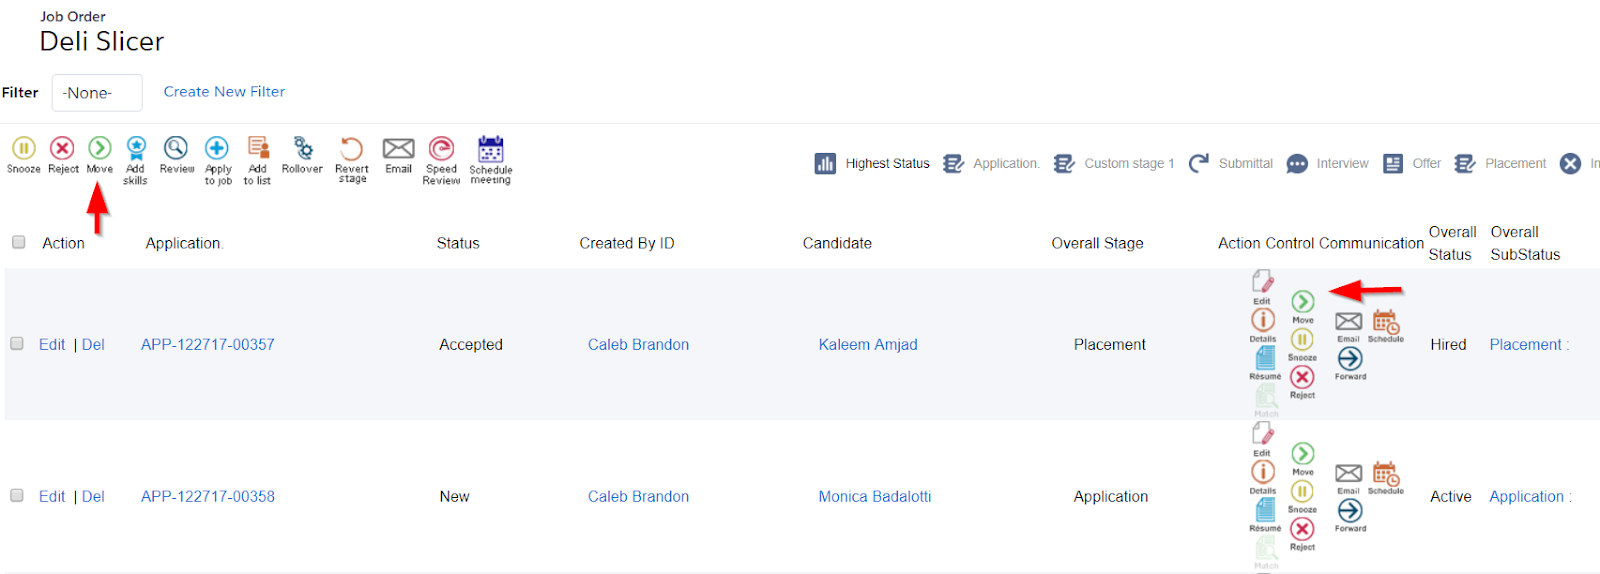
The Job Order Record holds the details regarding an individual Assignment at a Client. The Job Order is generally where the processing of Applications is completed, via the AMS.
Recommended Fields
The following Fields are Recommended to be populated for any Job Order associated with the Backoffice Process flow. Populating these Fields will ensure a smoother approach when working with Timesheets, Invoices, & Commissions.
|
Field Label Name |
Field API Name |
Description / Purpose |
|---|---|---|
|
Client |
ts2__Account__c |
Tracks the Client where this Job Order will be worked through |
|
Contact |
ts2__Contact__c |
Tracks the Client Contact who is responsible for the Job Order |
|
Primary Recruiter (Secondary Recruiter) |
ts2__Recruiter__c (ts2__Secondary_Recruiter__c) |
Tracks the individual(s) responsible for the finding / submitting of Candidates |
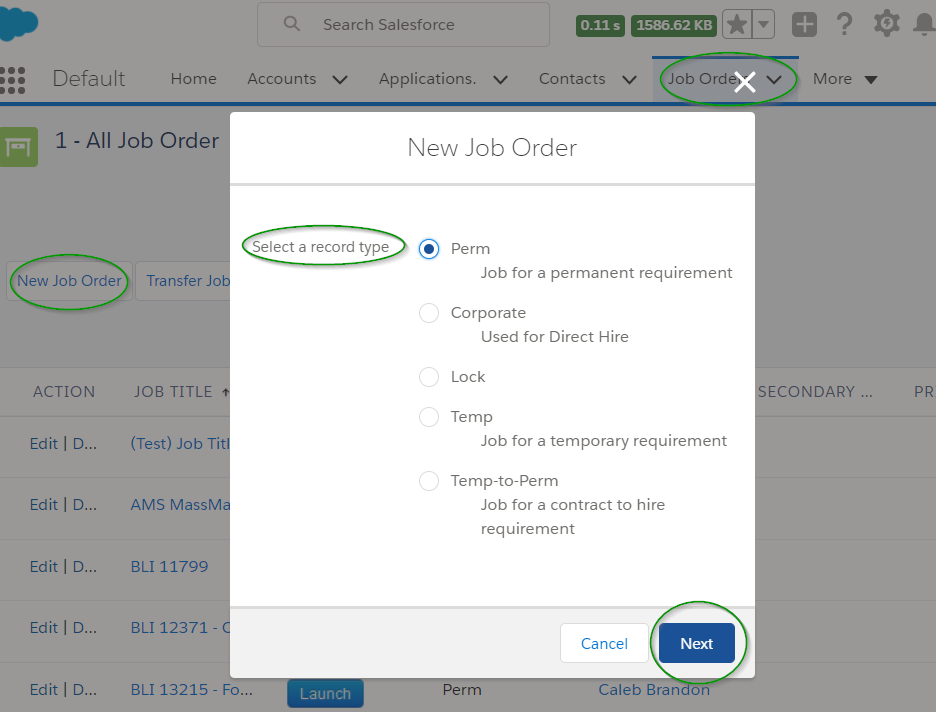
Create New Job Order
- Access the Account Record the Job Order will be associated with
- Access the Related subtab
- Scroll down to the Job Order Related List
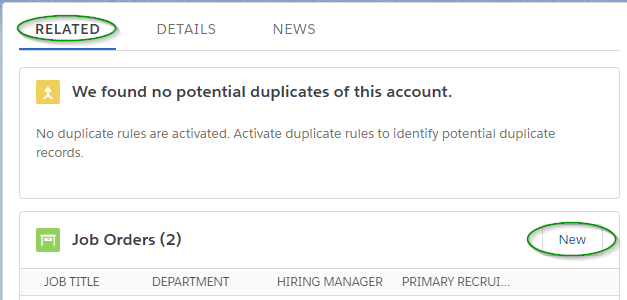
- Click the New button
- Select the desired Record Type
- Click the Next button
- Populate the Fields with desired values, keeping in mind the above mentioned Backoffice oriented Fields
- Click the Save button when satisfied
Modify Existing Job Orders
- Search & Locate the desired Record
- Click the Edit button

- Modify the desired Fields, keeping in mind the above mentioned Backoffice oriented Fields
- Click the Save button when satisfied
The Placement Object
The Placement Record associates a successful Candidate/Worker to a particular Job Order Assignment. A Placement is generally created through the AMS, moving from Application to Placement.
With the Backoffice Product, likely the following Record Types will be in use: Temp, Temp to Perm, and/or Perm. Within the Field section below, it will be noted which Fields are needed for each Record Type.
Required Fields
A number of these Fields will auto-populated based on data captured at the Account & Job Order level. Individual Users should verify the information is accurate before the generation of Timesheets.
A number of these Fields are Salesforce Lookup Fields, meaning a separate Record needs to exist in order for it to be selected. An Example includes the Overtime Plan Field. Someone, likely a User with System Admin permissions, would have already created Records for use. If you not know which value to use or don’t see a value you need, connect with your System Admin or Manager to discuss about specific internal processes for your organization.
|
Field Label Name |
Field API Name |
Description / Purpose |
Record Type |
|---|---|---|---|
|
Accounts Payable |
ts2__Accounts_Payable__c |
Captures the Customer Contact who will receive payment of the Invoice |
Temp, Temp2Perm, Perm |
|
Accounts Receivable |
jstcl__Accounts_Receivable__c |
Captures the Client Contact who will receive the Invoice |
Temp, Temp2Perm, Perm |
|
Invoice Overtime |
jstcl__Invoice_Overtime__c |
Determines how Overtime Hours are Invoiced to the Client |
Temp, Temp2Perm |
|
Timesheet Format* |
jstcl__Timesheet_Format__c |
Controls how Workers submit Hours worked through the Community |
Temp, Temp2Perm |
|
Invoice Processing Period |
jstcl__Invoice_Period__c |
Controls the frequency of which Invoices should be processed |
Temp, Temp2Perm, Perm |
|
Overtime Plan |
jstcl__Overtime_Plans__c |
Determines how Hours worked is paid to the Worker & Invoiced to the Client |
Temp, Temp2Perm |
|
Holiday Calendar |
jstcl__HolidayCalendar__c |
Captures which Holidays the Client honors |
Temp, Temp2Perm |
|
Invoice Batch Option |
jstcl__Invoice_Batch__c |
Determines how Invoices are batched together |
Temp, Temp2Perm, Perm |
|
Invoice Batch Group (only required when Invoice Batch Option is Batch Grouping) |
jstcl__Invoice_Batch__c |
Controls which custom Field will be set as the consolidating level for Invoice Line Items |
Temp, Temp2Perm, Perm |
*Timesheet Format options include: Hours Only or Start and End Time.
- Hours Only = Worker will enter hours worked based on a total amount for each shift, example 7.5 hours
- Start and End Time = Worker will enter the time when work began and ended for each shift, example 8A Start and 430P End.
These below Fields will need to be populated by the Recruiter to ensure proper generation of Timesheets, Employee Pay, and Client Invoices.
|
Field Label Name |
Field API Name |
Description / Purpose |
Record Type |
|---|---|---|---|
|
Bill Rate |
ts2__Bill_Rate__c |
Tracks the Amount per Hour that will be charged to the Client for the Worker |
Temp, Temp2Perm |
|
Pay Rate |
ts2__Pay_Rate__c |
Tracks the Amount per Hour that will be paid to the Worker for Hours worked |
Temp, Temp2Perm |
|
Salary |
ts2__Salary__c |
Tracks the Amount due for a years’ worth of Work |
Perm |
|
Start Date |
ts2__Start_Date__c |
Tracks when the Assignment is expected to start |
Temp, Temp2Perm |
|
End Date |
ts2__End_Date__c |
Tracks when the Assignment is expected to end |
Temp, Temp2Perm |
|
Pay Overtime Rate |
jstcl__PayOvertimeRate__c |
Tracks the Amount per Hour that will be paid to the Worker for Hours worked as Overtime |
Temp, Temp2Perm |
|
Overtime Bill Rate |
jstcl__Overtime_Bill_Rate__c |
Tracks the Amount per Hour that will be charged to the Client for the Worker as Overtime |
Temp, Temp2Perm |
|
Per Diem (only required if Rate Type is Per Diem) |
jstcl__Per_Diem__c |
Tracks the Amount that will be paid to the Worker for Hours worked as Per Diem |
Temp, Temp2Perm |
|
Burden |
jstcl__Burden__c |
Tracks an additional amount of monies that is needed to cover the Worker benefits, Taxes, etc |
Temp, Temp2Perm |
|
Enable Expense Submission |
jstcl__EnableExpenseSubmission__c |
Controls if the Worker can submit Expense Costs via the Community |
Temp, Temp2Perm |
|
Fee Percentage |
ts2__Fee_Pct__c |
Tracks the agreed Fee for successful Placements |
Temp2Perm |
|
Status |
ts2__Status__c |
Controls the ability to work with the Placement for AMS & Backoffice processes |
Temp, Temp2Perm, Perm |
|
Timecard Approver (Secondary Approver) |
jstcl__TimecardApprover__c (jstcl__SecondaryApprover__c) |
Determines who is responsible for approving/rejecting the Hours worked submitted by the Worker |
Temp, Temp2Perm |
|
Fee Pct |
ts2__Fee_Pct__c |
Determines the percent of funds to be charged extra to the Client |
Perm |
|
Discount |
ts2__Discount__c |
Determines any Amount to reduce the total Invoice cost |
Perm |
|
Min Days |
jstcl__Min_Days__c |
Controls when Commission Records will be created for a successful Placement |
Perm |
|
Filled By (Filled By 2) |
ts2__Filled_By__c (ts2__Filled_By_2__c) |
Determines who will receive a Commission for a successful Placement as a User in a Recruiter function role |
Temp, Temp2Perm, Perm |
|
Primary Percent (Secondary Percent) |
jsctl.FilledPct (jsctl.FilledPct2) |
Tracks the Commission Payout Percentage for a User in a Recruiter function role |
Temp, Temp2Perm, Perm |
|
Sales Rep (Sales Rep 2) |
ts2__Sales_Rep__c (ts2__Sales_Rep_2__c) |
Determines who will receive a Commission for a successful Placement as a User in a Sales function role |
Temp, Temp2Perm, Perm |
|
Sales Rep Pct1 (Sales Rep Pct2) |
jstcl__SalesRepPct__c (jstcl__SalesRepPct2__c) |
Tracks the Commission Payout Percentage for a User in a Sales function role |
Temp, Temp2Perm, Perm |
|
Taken by 1 (Taken by 2) |
ts2__Taken_By__c (ts2__Taken_By_2__c) |
Determines who will receive a Commission for a successful Placement as a User in a Misc. function role, example Resume Sourcer |
Temp, Temp2Perm, Perm |
|
Taken By Pct (Taken Pct 2) |
jstcl__TakenPct__c (jstcl__TakenPct2__c) |
Tracks the Commission Payout Percentage for a User in a Misc. function role, example Resume Sourcer |
Temp, Temp2Perm, Perm |
|
Rate Type |
jstcl__Rate_Type__c |
Determines how the Worker will be paid |
Temp, Temp2Perm |
|
Hire Type |
jstcl__HireType__c |
Determines how taxes, on behalf of the Worker, will be paid |
Temp, Temp2Perm |
|
Per Diem Cap (only required if Rate Type is Per Diem) |
jstcl__PerDiemCap__c |
Controls the total amount of hours to be paid via Per Diem Rates |
Temp, Temp2Perm |
|
Timesheet Period |
jstcl__Timesheet_Period__c |
Controls how many days are displayed on a Timesheet |
Temp, Temp2Perm |
|
Week Ending Day |
2jstcl__Week_Ending_Day__c |
Tracks the last day of the Work Week |
Temp, Temp2Perm |
|
Tax Percent |
jstcl__Tax_Percent__c |
Tracks the Sales Tax Percentage if any should be Invoiced to the Client |
Temp, Temp2Perm |
Optional Fields
The following Fields are optional to be used. If left blank, the values for the related Overtime will be calculated from the selected Overtime Plan.
|
Field Label Name |
Field API Name |
Description / Purpose |
Record Type |
|---|---|---|---|
|
Use Overtime Pay Rate |
jstcl__UseOvertimePayRate__c |
Tracks the Amount per Hour that will be paid to the Worker for Hours worked that are Overtime |
Temp, Temp2Perm |
|
Double Time Pay Rate |
jstcl__DoubleTimePayRate__c |
Tracks the Amount per Hour that will be paid to the Worker for Hours worked that are Double Overtime |
Temp, Temp2Perm |
Set Hour Types (for Temp & Temp2Perm)
Hour Types allow the Worker to submit time against buckets of time allowances; examples include Sick, Vacation, PTO, Jury Duty, etc. If a Worker has the ability to apply hours to different time allowances, Hour Types need to be associated to the Placement. Once associated, the Hour Type will be available to the Worker via the Community to select when entering time.
Field Options:
|
Field Label Name |
Field API Name |
Description / Purpose |
|---|---|---|
|
Placement |
jstcl__Placement__c |
Captures which Placement the Hour Type will be available to, if populated Hour Type is available to all Timesheets for the Placement |
|
Timesheet |
jstcl__Timesheet__c |
Captures which Timesheet the Hour Type will be available to, likely this will be blank |
|
Hour Type |
jstcl__Hour_Type__c |
Determines which Hour Type is available for selection |
Steps to assign Hour Types
- Locate & access the desired Placement Record
- Access the Related subtab of the Record
- Scroll down to the Hour Type Link Related List
- Click the New button
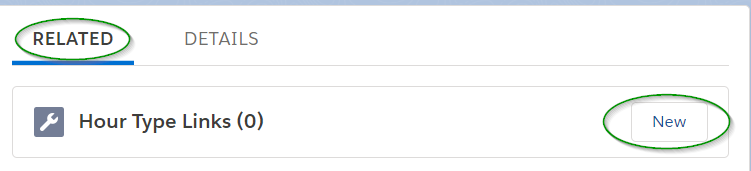
- Enter the desired value for the Fields
- Click the Save button
Repeat steps 4-6 as needed to add all desired Hour Types to the Placement and/or individual Timesheets.
Tip: Hour Types can be applied to a Placement or to individual Timesheets. Example, you might want Jury Duty only available for a subset of Timesheets, therefore only populate the Timesheet Field when creating the Hour Type Link.
Confirm the Placement
Setting the Placement Status Field to Active will fire off a number of Backoffice processes for Temp & Temp2Perm Record Types, including:
- Create Community Users for the Worker & Timesheet Approver
- Timesheet Record generation
- Invoice Line Item Record generation
- Create Commission Records
Setting the Placement Status Field to Filled will fire off a number of Backoffice processes for Perm Record Types, including:
- Invoice Line Item Record generation
- Create Commission Records
Steps to modify the Placement Record:
- Access the desired Placement Record
- Click the Edit button

- Populate the Fields with desired values, keeping in mind the above mentioned Backoffice oriented Fields
- Click the Save button when satisfied
Converting a Placement
There will be times when an Assignment starts as Temporary and moves to a Permanent role for the Worker. Jobscience Backoffice has a feature to capture the conversion details for a more accurate Client Invoice process.
When a Conversion is successful, a new Placement is created and associated to the original Placement for Reporting purposes. The existing Placement Record will be updated to Status of Inactive and any associating Timesheets with Status of Pending will be deleted. The new Placement Record will generate an Invoice Line Item and Commission Record based on the Conversion data.
Conversion Fields
|
Field Label Name |
Description / Purpose |
|---|---|
|
Start Date |
Captures the Start Date for the Perm role |
|
Salary |
Captures the Salary of the Perm role |
|
Flat Fee / Percent |
Determines how the Client will be Invoiced |
|
Percent / Fee |
Captures the dollar amount or Fee that will be Invoiced to the Client |
|
Discount |
Captures any dollar amount the Client Invoice will be reduced |
|
Discount Reason |
Tracks the purpose of the discount, example planned Temp2Perm role within 60 days |
Steps to Convert
- Locate & Access the desired Placement to convert
- Click the Temp to Perm button
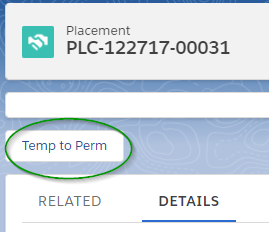
- Populate the Fields with desired values, keeping in mind the above mentioned Backoffice oriented ‘Fields’
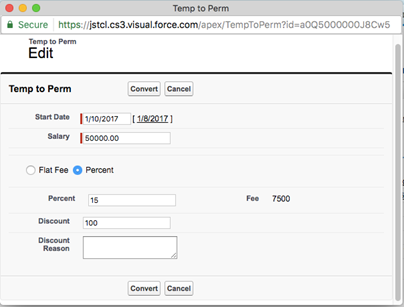
- Click the Convert button
Placement Modifications
Placements may have variable Pay and/or Bill Rates as the Assignment is completed. Example, for successful Workers a Pay increase after 30 Days or a decrease in Bill Rate for Workers over 120 Days. These changes in Rates can be applied directly to the Placement Record. Any such changes will be applied to Timesheets of the current week and have Status of Pending.
The End Date of a Placement Assignment could be modified by the Client at any time, meaning you need more or less Timesheets. The End Date can be modified directly on the Placement. When saved, new Timesheets will be created if the End Date is set further in the future. Likewise, Timesheets will be deleted if the End Date is reduced.
The Start Date of a Placement could be modified by the Client, meaning you need more or less Timesheets. The Start Date can be modified directly on the Placement. When saved, new Timesheets will be deleted if the Start Date is set further in the future. Likewise, Timesheets will be deleted if the Start Date is reduced.
*Tip: Start Date can be modified only if hours have been been submitted.
Steps to modify the Placement Record:
- Access the desired Placement Record
- Click the Edit button

- Populate the desired Fields which likely are Bill Rate, Pay Rate, or End Date
- Click the Save button when satisfied
The Timesheet Object
Community Users
Community Users are needed to access the Timesheet Community to submit Time as the Worker or to Approve/Reject Hours by the Approval Manager. Community Users will be created automatically when the Placement Status is updated to Active. However, Users could be created at any time to access the Timesheet Community. The following steps to create Users can only be created by Internal Users with System Admin permissions.
- Locate & Access the desired Contact to create as a Community User
- Click on the Manage External User button
- Click on the Enable Customer User option
- Ensure the correct information is captured, especially First/Last Name & Email Address. (Most of this information will flow over from the Contact Record)
- Select Customer Community for the User License
- Select JS Community Contractor (for Workers) or JS Community Hiring Manager (for Approval Managers) for the Profile
- Scroll to the bottom of the page
- Click Save
- Click OK
Likewise, automation is available through the Backoffice Product to disable Community Users after a period of inactivity. However, Community Users can be disabled manually by a Internal User with System Admin permissions.
- Locate & Access the desired Contact to disable as a Community User
- Click on the Manage External User button
- Click on the Disable Customer User option
- Click OK
Regardless of the creation method, once a new Community User is created, an email is automatically sent to the User. The Email will contain the URL Link of the Community they will use for either entering/submitting hours worked or approving/rejecting timesheets. The Email will also contain the User’s initial login details. Upon using the initial login details, the User will be directed to create a personalized Password to use for future access to the Community.
Email Notifications
Email Notifications are automatically sent to the Worker to submit hours on the Timesheet and to the Approval Manager to Approve/Reject the hours. The Worker will generally receive the email 1 or 2 days before the end of the Week while the Approval Manager will likely receive the email 1 or 2 days after the end of the week. (The exact email send time is configured at a database level; a User with System Admin permission can locate the specifics if it’s needed.)
The Email sent will provide URL links to the Week(s) in question that require attention to that particular Community User. Example, if a Worker has 1 week of Timesheets to submit, only 1 URL will be supplied. However, if a Approval Manager has 3 Contracts and 2 weeks of Timesheets to Approve/Reject, then 6 URL links will be displayed in the email.
An email is also sent to the Worker when time is Approved/Rejected. If the Timesheet is Rejected then, the email will direct the Worker to log back into the Community to correct & resubmit the Timesheet(s) in question.
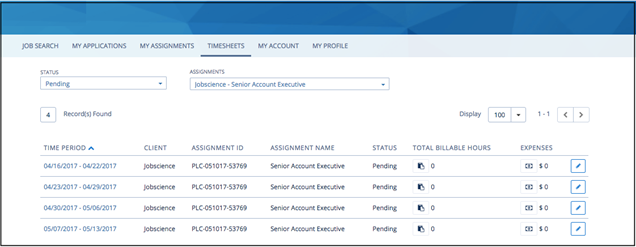
Submit Timesheets
Hours worked and Expenses can be applied to Timesheets where Status is Pending or Submitted. Entering a Timesheet/Expense will likely be completed via the Worker through the Community. However, situations may exist where an Internal User will need to action the submission through the ‘Timesheet Manager’. Both options are explained below as you may need to explain the Community method to the Worker.
Via Community
- Log into the Community
- Access the Timesheets Tab
- Use the Status of Pending to review Timesheets that require submitting
- Click the pencil Icon to edit that week for hours worked and/or expenses
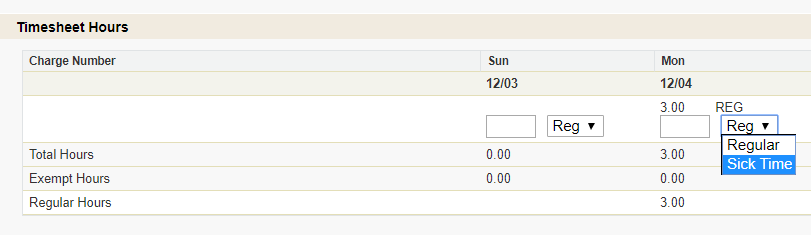
- Fill out the hours worked, depending on the Timesheet Format you’ll see:
- HOURS ONLY - Enter the total hours worked and select (if available) the type of hours worked. Click the blue menu along the right side to change the type of Hours worked.
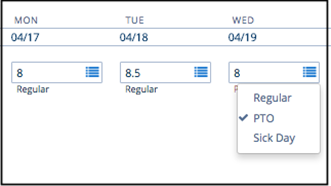
- START AND END TIME - Enter the start & end times of the hours worked and select (if available) the type of hours worked
- HOURS ONLY - Enter the total hours worked and select (if available) the type of hours worked. Click the blue menu along the right side to change the type of Hours worked.
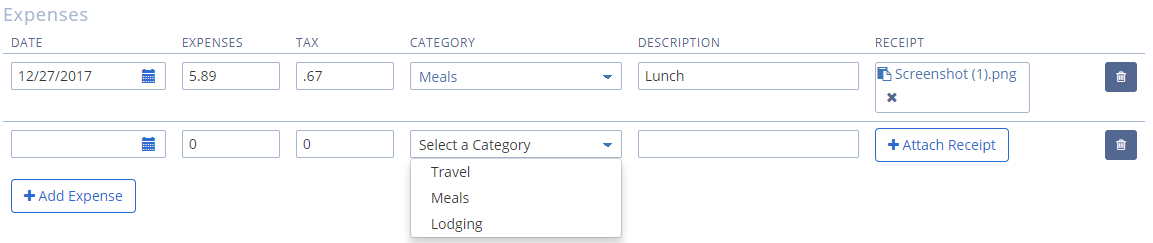
- Enter any available Expense data
- *Tip: Expenses is an optional item to collect, Expense collection is enabled on the Placement Enable Expense Submission Field
- Enter the Date of which the Expense is for
- Enter the Amount of the Expense
- Enter any Tax associated to the Expense
- Select the Category for the Expense
- Input a brief description / purpose of the Expense
- Upload an image of the receipt
- Click the Add Expense button to add more
- Click the Submit button
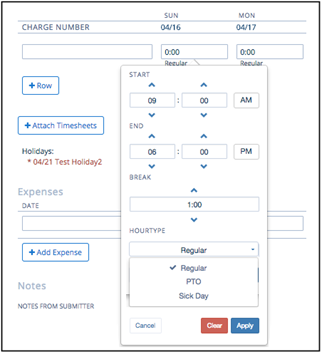
Via ‘Timesheet Manager’
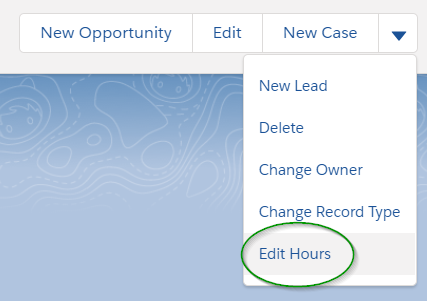
*Tip: Access to the ‘Timesheet Manager’ is available to Internal Users with Edit permissions on the Timesheet and Create & Edit permissions on the Expense Objects. Additionally, the Page Layout assigned must include the Edit Hours button.
- Locate & Access the desired Timesheet
- Click the Edit Hours button
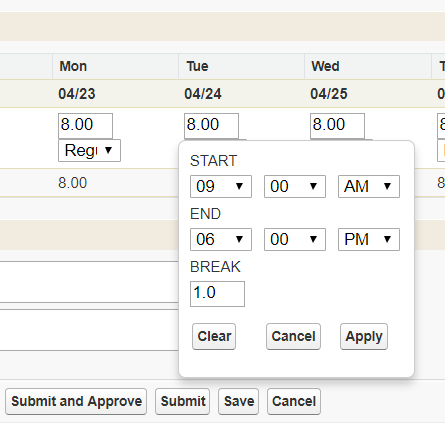
- Fill out the hours worked, depending on the Timesheet Format you’ll see:
- HOURS ONLY - Enter the total hours worked and select (if available) the type of hours worked
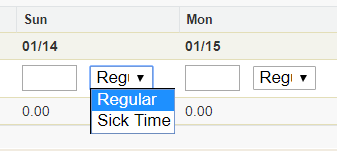
- START AND END TIME - Enter the start & end times of the hours worked and select (if available) the type of hours worked
- HOURS ONLY - Enter the total hours worked and select (if available) the type of hours worked
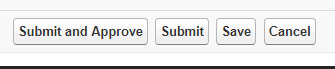
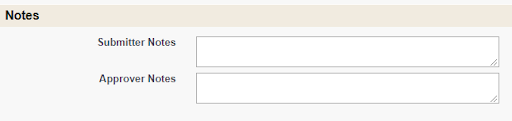
- Enter any desired Submitter Notes and/or Approver Notes
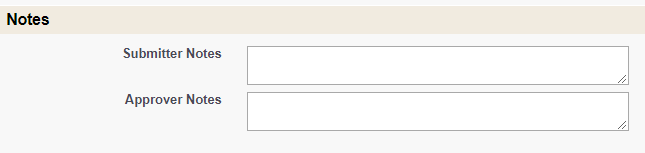
- Click the New Expense button, if desired & necessary
- Enter the Date of which the Expense is for
- Enter the Amount of the Expense
- Enter any Tax associated to the Expense
- Select the Category for the Expense
- Click the Save button when done
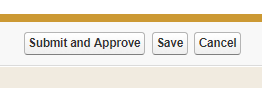
- Click the Submit and Approve, Submit, or Save button
- Submit and Approve will enter the hours worked by the Worker and Approve the hours worked
- Submit will enter the hours worked by the Worker, the Timesheet Approver will be notified via email to Approve the hours
- Save will simply save the hours worked by the Worker, this allows for future edits of the data before Submitting for Approval
Approve Timesheets
Hours worked and Expenses can be Approved on Timesheets where Status is Submitted. Approving a Timesheet/Expense will likely be completed via the Timesheet Approver at the Client through the Community. However, situations may arise where an Internal User will need to action the Approval through the ‘Timesheet Manager’. Both options are explained below as you may need to explain the Community method to the Approver.
Via Community
- Log into the Community
- Access the Timesheets Tab
- Use the Status of Submitted to review Timesheets that require Approving
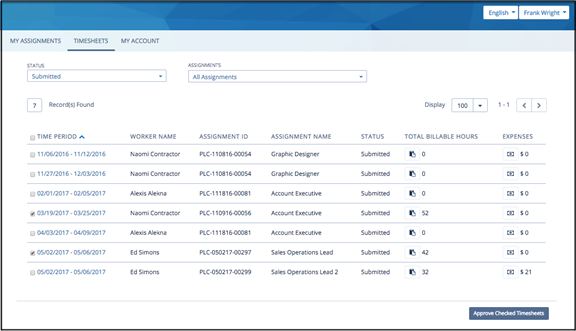
To Mass Approve:
- Select the desired Timesheets to approve
- Click the Approve Checked Timesheets
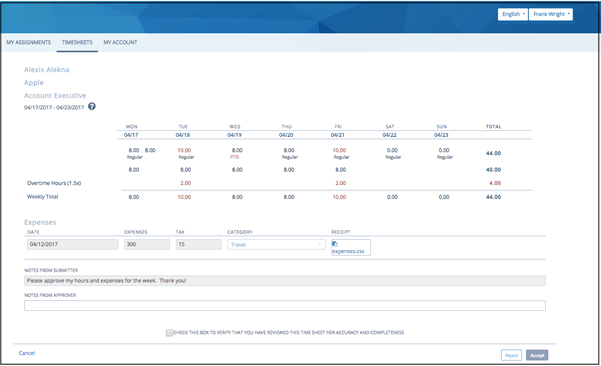
To Individually Approve:
- Click on the hyperlink Time Period Field
- Review all available data
- Check the Check this box to verify that you have reviewed this Timesheet for accuracy and completeness Checkbox
- Click the Accept button

Via ‘Timesheet Manager’
*Tip: Access to the ‘Timesheet Manager’ is available to Internal Users with Edit permissions on the Timesheet and Create & Edit permissions on the Expense Objects. Additionally, the Page Layout assigned must include the Edit Hours button.
- Locate & Access the desired Timesheet
- Click the Edit Hours button

- Enter any desired Approver Notes

- Click the Submit and Approve or Save button

- Submit and Approve will enter the hours worked by the Worker and Approve the hours worked
- Submit will enter the hours worked by the Worker and the page will refresh to display an Approve button
*Tip: Timesheets can be mass approved from the Timesheets Tab. Select the desired Timesheets and click the Approve button.
Reject Timesheets
Hours worked and Expenses can be Rejected on Timesheets where Status is Submitted. Rejecting a Timesheet/Expense will likely be completed via the Timesheet Approver at the Client through the Community. However, situations may arise where an Internal User will need to action the rejection through the ‘Timesheet Manager’. Both options are explained below as you may need to explain the Community method to the Approver.
Via Community
- Log into the Community
- Access the Timesheets Tab
- Use the Status of Submitted to review Timesheets that require Rejecting

To Individually Reject:
- Click on the hyperlink Time Period Field
- Review all available data
- Enter the reason for the Reject in the Notes from Approver Field (this reason will be shared to the Worker)
- Check the Check this box to verify that you have reviewed this Timesheet for accuracy and completeness Checkbox
- Click the Reject button
Via ‘Timesheet Manager’
*Tip: Access to the ‘Timesheet Manager’ is available to Internal Users with Edit permissions on the Timesheet and Create & Edit permissions on the Expense Objects. Additionally, the Page Layout assigned must include the Edit Hours button.
- Locate & Access the desired Timesheet
- Click the Edit Hours button

- Enter a Reject Reason in the Approver Notes Field
- Click the Save button
- Click the Reject button
Timesheet Corrections
Errors can occur when Approving Timecards. Usually these errors are caught after the Worker has been paid and the Client has been Invoiced. Jobscience has 2 methods to correct such errors that include over & under payment.
Timesheet Adjustments
Timesheet Adjustments can be applied to Timesheets where Status is Approved. The Timesheet Adjustments can be created by Internal Users only. Timesheet Adjustments will generally be used when an error is made in the Hours Worked, example the Worker submitted 10 hours but actually worked 12. A Timesheet Adjustment would satisfy the missing 2 hours.
- Locate & Access the desired Timesheet
- Click the Edit Hours button

- Click the Adjustment button
- Fill out the hours worked, depending on the Timesheet Format you’ll see:
- HOURS ONLY - Enter the total hours worked and select (if available) the type of hours worked.
- START AND END TIME - Enter the start & end times of the hours worked and select (if available) the type of hours worked
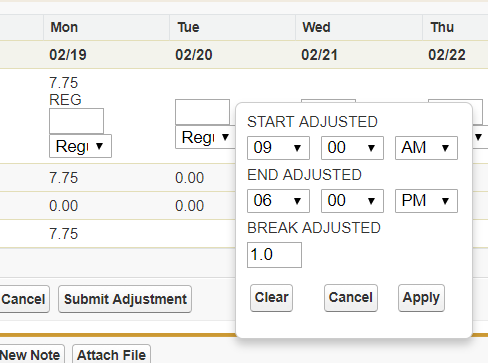
- HOURS ONLY - Enter the total hours worked and select (if available) the type of hours worked.
- Click the Submit Adjustment button
Once submitted, a new Timesheet is automatically created & associated to the original Timesheet. Also a new Invoice Line Item to capture the difference of hours worked will be created for Invoicing purposes.
New Timesheet Creation
Occasionally, a Pay or Bill Rate change may not be administered in time for Record processing. Creating a new Timesheet will support the difference calculations.
- Locate & Access the desired Placement Record
- Scroll to the Timesheet Related List section
- Click the New button
- Enter data into the following Fields:
- Status = Submitted or Approved
- *Tip: Use Approved if you don’t need the Hiring Manager to approve these ‘new’ hours
- Consultant = Worker’s Name
- Week Ending = the Date of which the Timesheet is being corrected for
- Bill Rate = difference of the Bill Rate on the Placement & the new Bill Rate
- Pay Rate = difference of the Pay Rate on the Placement & the new Pay Rate
- Treat as Separate = True (checked)
- Status = Submitted or Approved
- Click the Save button
*Tip: A negative amount can be entered to correct overpayment/billing.
Once the new Timesheet is set to Status of Approved, a new Invoice Line Item will be generated for Client Invoicing purposes. You will also be able to export the Timesheet for Payroll purposes.
Export for Payroll
As a reminder, Jobscience Backoffice is not an Payroll application and therefore it does not handle the check/pay stub creation for the Workers. However, Jobscience does have the ability to export the Timesheet data that allows for an easy import to your Payroll application.
Timesheets are eligible for export when Status is Approved.
Steps to Export
- Located & Access the Timesheet Tab
- Select the desired Timesheets to export (likely a List View exists to easily find such Invoices)
- *Tip: don’t select any Timesheet if ALL Timesheets are to be exported at the same time
- Click the Export to Payroll button
- The file will download according to computer preferences, but likely display at the bottom of the popup window & reside in the Downloads folder on the computer
- Review the file to confirm the data is accurate & expected
- When satisfied click the Confirm Export button
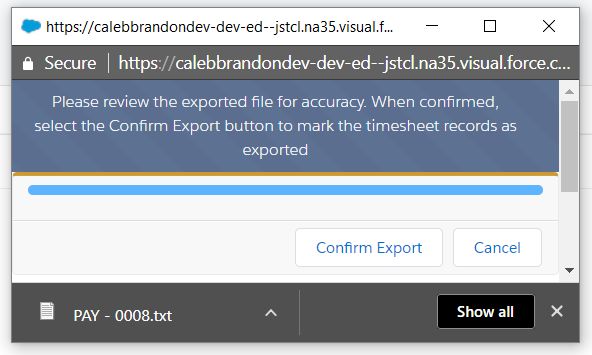
When the Confirm Export button is selected, the associating Timesheets will be updated to reflect a Status of Exported
Process Invoices
Generate Invoice
Invoice Line Items are required to generate an Invoice. Invoice Line Items are created in a number of methods as learned earlier in this guide. These methods may include: Timesheets, Expenses, Permanent Placements, and Placement Adjustments. When an Invoice Line Item is set to a Status of Pending, it enables the ability to consolidate similar Invoice Line Items to generate the Invoice.
There are 3 Invoice methods available via the Jobscience Backoffice Product. Each option will be explained below with steps to accomplish the method configured for your environment / client choice. It is recommended to use the Manual or Semi-Automatic at the onset of using the Backoffice product. As more comfortability with the Product is gained and a firm schedule is set for Invoice processing, moving to Automatic would be preferred.
- Manual
- Invoice Line Items will be manually consolidated. This method is best for brand new Jobscience Backoffice customers or customers with no set Client Invoicing schedule.
- Semi-Automatic
- Invoice Line Items will be automatically consolidated. This method is best for customers comfortable with the Backoffice Product and want to verify the Invoice data before sending out to the Client.
- Automatic
- Invoice Line Items will be automatically consolidated. This method is best for customers fluent with the Backoffice Product and have a set fixed schedule of which Timecards are collected & Approved.
Manual Consolidation (& Sending)
- Locate & Access the Invoice Line Item Tab
- Select the desired Invoice Line Items to consolidate together (likely a List View exists to easily find such Invoice Line Items)
- *Tip: Invoice Line Items can be consolidated together with like Record Types. Example, Perm with Perm but not Perm with Credit. If you select Invoice Line Items of different Record Types, an error will be thrown.
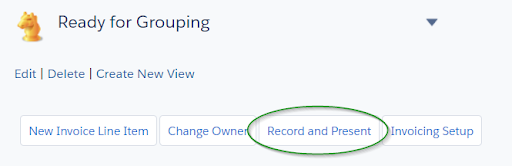
- Click the Record & Present button
- Input a personalized message to the Client, if desired, using the Enter Message Field
- Select the desired Invoice Template using the Select Template Picklist
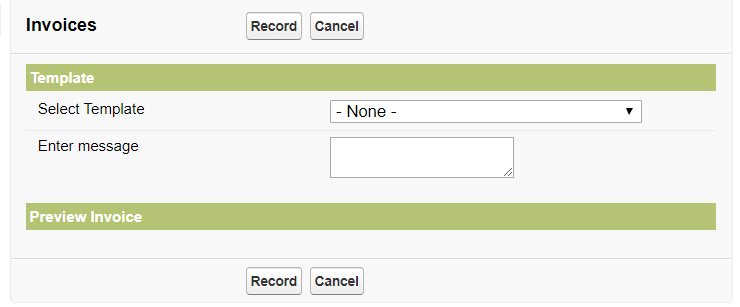
- *Tip: Once a Template has been selected, the page will refresh and display you a preview of the Invoice. Therefore, it’s best to input any personalized message before selecting the desired Template.
- Click the Record button when satisfied with the results
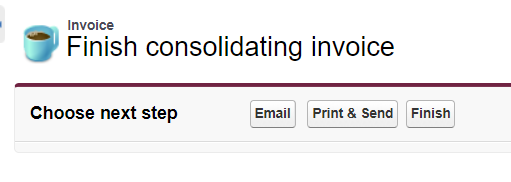
- Click the Email button if you are ready to sent to the Client
- Click Print & Send if you want to print a hard copy and physically mail to the Client
- Click Finish if you will send at a later time
*Tip: You may select a new Invoice Template, Send, and/or Print the Invoice directly from the Invoice Record.
Semi-Automatic Consolidation
- Locate & Access the Invoice Line Item or Invoice Tab
- Click the Invoicing Setup button
- Set the desired time frame to Consolidate
- For a customized time frame use the Consolidate From and Consolidate To Fields
- For a generic time frame (Weekly, Monthly, etc) use the picklist next to the Run Consolidation button
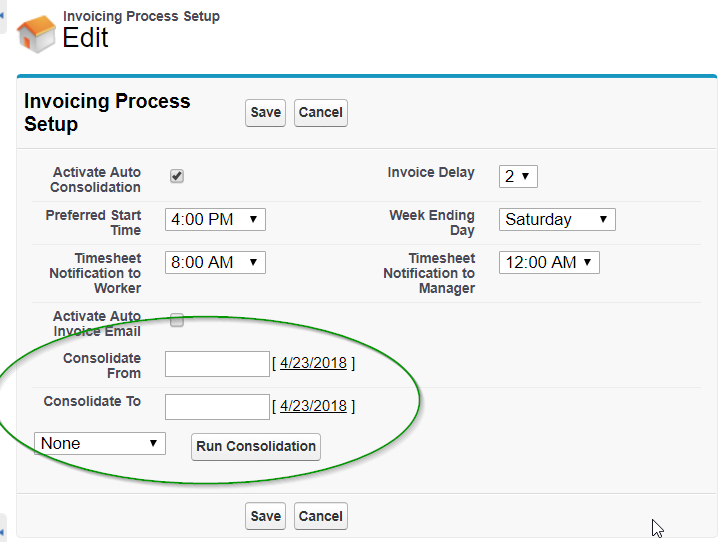
- Click the Run Consolidate button when satisfied with the time frame
- Click the Save button
Automatic Consolidation
Once the decision to move to Automatic Invoicing is made (and completed by a User with System Admin permissions) no further action is needed to ensure it’s running. Therefore, no steps are available to End Users to activate this Invoice method.
Un-Consolidate Invoice
Sometimes Invoice Line Items may be consolidated together in error or too early. Jobscience has a method to undo the consolidation in an easy manner.
When an Invoice is un-consolidated, a few things happen:
- The associating Invoice Line Items are disassociated to the Invoice
- The associating Invoice Line Items are reverted to a Status of New
- The Invoice is deleted
Steps to Un-consolidate an Invoice
- Access the Invoice Tab
- Select the desired Invoice(s) (likely a List View exists to easily find such Invoices)
- *Tip: Invoices with a Status of Sent can not be Un-consolidated.
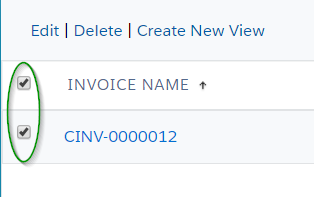
- *Tip: Invoices with a Status of Sent can not be Un-consolidated.
- Click the Un-consolidate button
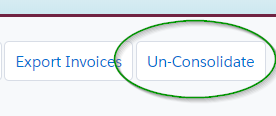
- *Tip: Check for a popup blocker if nothing seems to happen.
- Click the Confirm button
- Click the Close button
- *Tip: You may also un-consolidate directly from an Invoice Record.
Send Invoice
There are 3 Invoice methods available via the Jobscience Backoffice Product. Each option will be explained below with steps to accomplish the method configured for your environment / client choice. It is recommended to use the Manual or Semi-Automatic at the onset of using the Backoffice product. As more comfortability with the Product is gained and a firm schedule is set for Invoice processing, moving to Automatic would be preferred.
- Manual
- Invoice Line Items will be manually emailed to the Client. This method is best for brand new Jobscience Backoffice customers or customers with no set Client Invoicing schedule.
- Semi-Automatic
- Invoice Line Items will be manually emailed to the Client. This method is best for customers comfortable with the Backoffice Product and want to verify the Invoice data before sending out to the Client.
- Automatic
- Invoice Line Items will be automatically emailed to the Client. This method is best for customers fluent with the Backoffice Product and have a set fixed schedule of which Timecards are collected & Approved.
Based on organization settings, the email likely will have a PDF version of the Invoice and a backing sheet of Timesheets and Expenses. The backing sheet allows for a more granular level of accuracy checking for the Client before paying the Invoice. The PDF’s will be added to the email request automatically and be sent as an attached to the Contact listed as Accounts Payable.
Invoices that have a Status of New or Recorded are eligible for sending to the Client.
Manually Send Invoices
Likely the Invoice was sent during the Consolidation action. If not, you can following the steps from the Semi-Automatic Sending section.
Semi-Automatic Sending
- Locate & Access the Invoice Tab
- Select the desired Invoices (likely a List View exists to easily find such Invoices)
- *Tip: don’t select any Invoices if ALL Invoices are to be processed at the same time
- Click the Send Invoice button
- Select the desired Invoice Template using the Select Template Picklist
- Click the Send button when satisfied with the results
- Click the Email & Send button
- *Tip: You may select a new Invoice Template, Send, and/or Print the Invoice directly from the Invoice Record.
Automatic Sending
Once the decision to move to Automatic Invoicing is made (and completed by a User with System Admin permissions) no further action is needed to ensure it’s running. Therefore, no steps are available to End Users to activate this Invoice method.
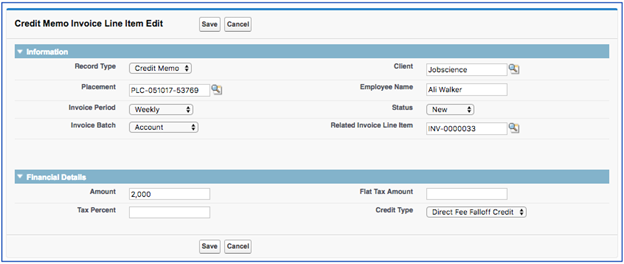
Issue Credit Memos
Occasionally, a Client may overpay an Invoice or a Permanent Placement doesn’t work out; in these situations money is due to the Client. A Credit Memo can be created to track these changes.
*Tip: Once you have created a Credit Memo, you’ll need to back and Invoice said Credit Memo. You can consolidate Credit Memo with other Credit Memos.
|
Field Label Name |
Description / Purpose |
|---|---|
|
Record Type |
Tracks the type of Invoice Line Item to create, defaults to Credit Memo |
|
Client |
Tracks which Client the Credit Memo is for, should default when initiated from Invoice Line Item |
|
Placement |
Tracks which Placement the Credit Memo is for, should default when initiated from Invoice Line Item |
|
Employee Name |
Tracks which Worker the Credit Memo is for, should default when initiated from Invoice Line Item |
|
Invoice Period |
Tracks when the Client should be Invoiced, should default when initiated from Invoice Line Item |
|
Invoice Batch |
Tracks how to consolidate the new Invoice Line Item, should default when initiated from Invoice Line Item |
|
Status |
Controls what the Status should be for the new Invoice Line Item, use New or Pending |
|
Related Invoice Line Item |
Tracks which Invoice Line Item the Credit Memo is for, should default when initiated from Invoice Line Item |
|
Amount |
Determines how much money is due back to the Client |
|
Flat Tax Amount |
Determines how much money is due back to the Client |
|
Tax Percent |
Determines any Tax due back to the Client |
|
Credit Type |
Tracks the purpose of the Credit Memo |
Steps to Create
- Locate & Access the Invoice Line Item that requires payment adjustment(s)
- Click the Create Credit Memo button
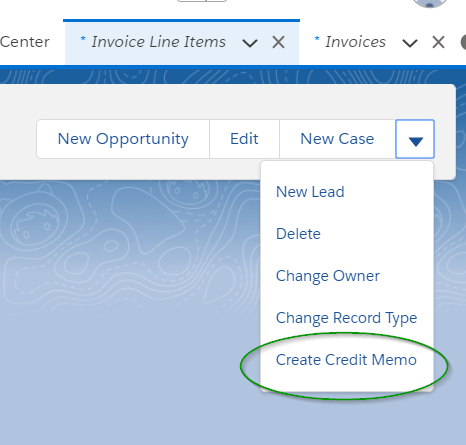
- Populate the Fields with desired values, keeping in mind the above mentioned Backoffice oriented Fields
- Click the Save button
- *Tip: Creating a Credit Memo is also possible via a Placement Record, however, some Fields will not auto populate.
Export Invoices
As a reminder, Jobscience Backoffice is not an Accounting application and therefore it does not track the receipt of the paid Invoice. However, Jobscience does have the ability to export the Invoice data that allows for an easy import to your Accounting application.
Invoices with a Status of Sent are eligible for Export
Steps to Export
- Located & Access the Invoice Tab
- Select the desired Invoices to export (likely a List View exists to easily find such Invoices)
- *Tip: don’t select any Invoices if ALL Invoices are to be exported at the same time
- Click the Export Invoices button
- The file will download according to computer preferences, but likely display at the bottom of the popup window & reside in the Downloads folder on the computer
- Review the file to confirm the data is accurate & expected
- When satisfied click the Confirm Export button

When the Confirm Export button is selected, the associating Invoices will be updated to reflect a Status of Exported