| Package: TimeCards |
Back Office: Invoices & Memos
![]()
Invoices
Overview
Perm Placement fees and approved timesheets from Temp Placements generate invoice line items for billing. The invoice line items are then consolidated or grouped to create a single invoice for delivery to the client. The consolidation or grouping depends on the Invoice Batch option that is selected on the Placement and carries to the invoice.
The primary invoice consolidation or grouping is by client account, by default. Invoice line items are then "sub-grouped" based on the Invoice Batch selected. The available batch options are by:
-
Account - An invoice is generated for a client account. This is the primary grouping.
-
Placement - An invoice is generated for a single placement.
-
Purchase Order - An invoice is generated for Placements with the same Purchase Order value.
-
AP Contact - An invoice is generated for Placements with the same Accounts Payable contact.
Consolidation by Placement is common for Direct Perm Placements, which typically require a separate invoice for each permanent placement.
The Invoicing system offers three modes of operation:
-
Semi-automatic - Batch jobs generate invoices, but they are not sent out until Accounts Receivable (AR) has a chance to review and manually record the invoice either by emailing the invoice to the client's Accounts Payable (AP) contact or by directly changing the status of the invoice to "Sent".
-
Fully-automatic - Batch jobs generate invoices, send attachments to the client AP contact, and update the invoice status to "Sent" without manual intervention.
-
Manual - The automated batch jobs are not used to generate the desired invoice. Accounts Receivable (AR) must take action to generate the invoice.
Organizations that follow a consistent weekly invoicing schedule should use the semi-automatic or automatic mode. Manual mode is used to generate a client invoice "on demand". It is used in cases where AR needs to create and send an invoice immediately.
Invoice Batch Jobs
Two batch jobs run on a regular basis. One processes weekly invoicing and the other processes the Monthly and Semi-Monthly invoicing.
The Week Ending Day, Invoice Delay, and Preferred Start Time are defined as custom settings and can be adjusted on the Invoice Setup screen.
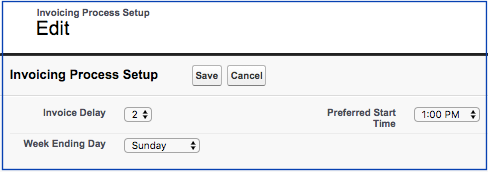
For example, week ending Sunday and 2 days delay means that the automated batch processes would run at 1:00pm local time on Tuesday.
Invoice Delay also applies to the Semi-Monthly processing. A setting of 2 days means that processing runs at midnight on the 2rd and the 17th.
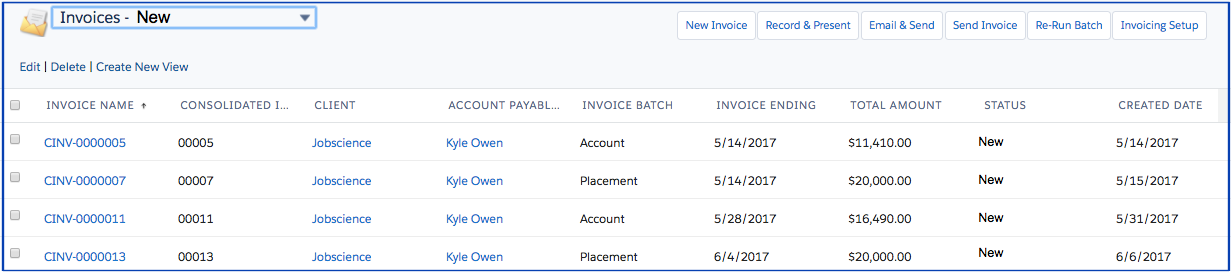
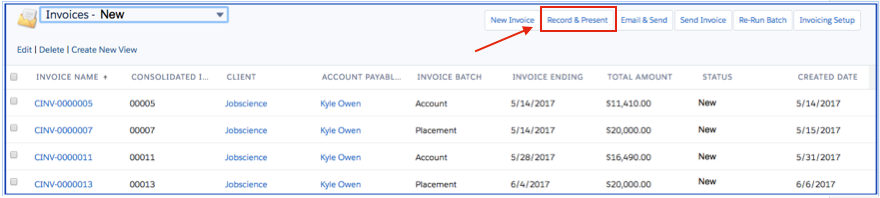
These batch jobs pick up all of the new Perm Placements made and all of the Approved Timecards from Active Placement records for this period and create a consolidated invoice for each and every Account with outstanding invoice records unless manual mode has been selected as the option for the placement. The Consolidated invoice is created with a "New" status and the Invoice Line item records are marked with a "Recorded" status to signify that they have been consolidated into a client invoice for delivery. The invoice list page displays all invoices consolidated by the client and can be filtered by status using the filter picklist.
What happens next depends on whether this account is set for Automatic or Semi-automatic invoicing.
Semi-Automated Invoicing
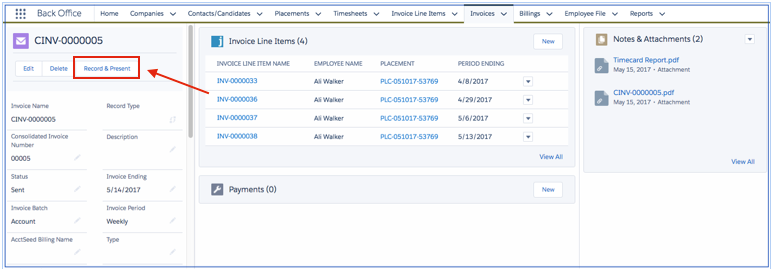
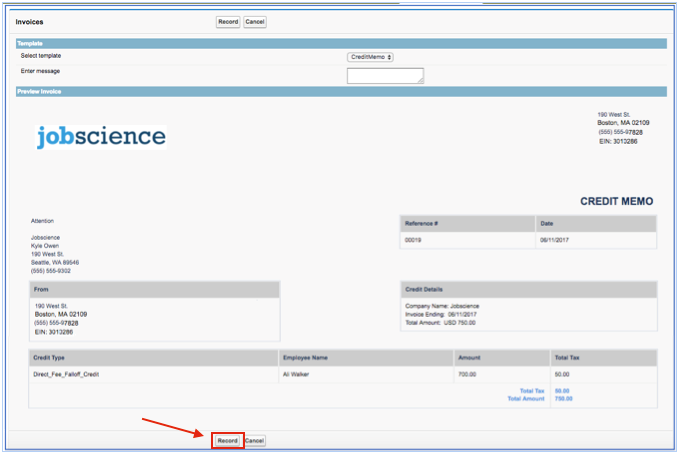
After the invoice batch process has run, the client invoices are generated in "New" status. For Semi-automatic invoicing accounts, the AR clerk is responsible for verifying the invoices and sending them to the client. This step can be performed from two places. From the Invoice list page, you can select an individual invoice link to get to the detail page. On the invoice detail page, click the Record & Present button.
The Record & Present button presents the user with the invoice generation viewer. The viewer contains a picklist to select the template that is used to create the invoice.
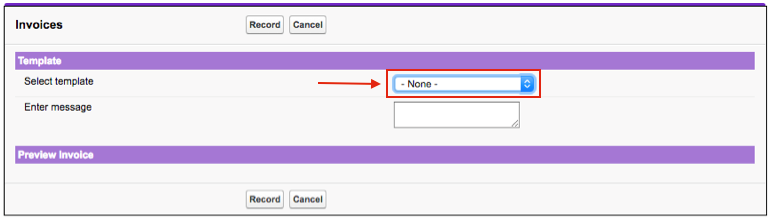
When the template is selected, the viewer displays a preview of the client invoice that is generated.
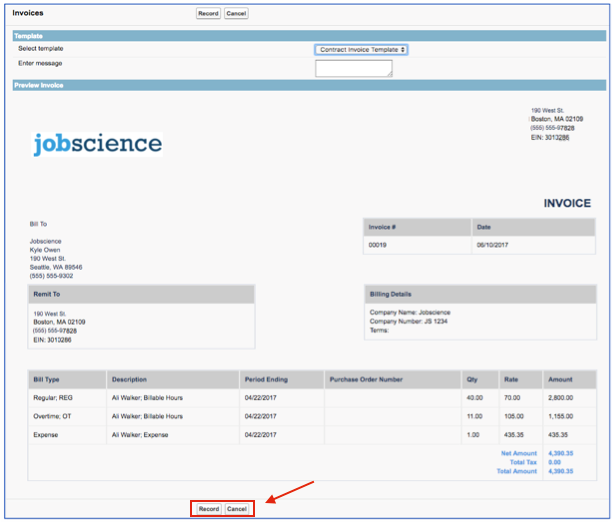
The user can record the invoice for generation by clicking the Record button or cancel the process by clicking the Cancel button.
The Record button:
-
Marks all of the Invoice line items as Recorded.
-
Burns a copy of the Visualforce page into a PDF and attaches it to the Consolidated invoice record.
-
Burns a timesheet PDF report and attaches it to the Consolidated invoice record (for temp placements).
-
Presents the user with the next step in the process.
For the next step, the user is able to:
-
Email & Send the recorded invoices to the Client.
-
Print & Send to display the PDF invoice for printing.
Do neither and Finish the step, which closes the window.

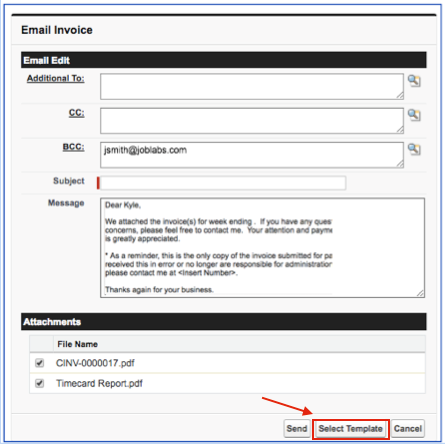
The Email action displays the Email Invoice window, with the client consolidated invoice and timesheet report (for Temp placements) already attached for sending. The user can click the Select Template button to choose an existing email template, if one is available. When the email is sent, it is auto sent to the Accounts Payable contact for the Account. Additional recipients can be added, as needed, using the lookup fields. When the email is successfully sent, the invoice is moved to "Sent" status.
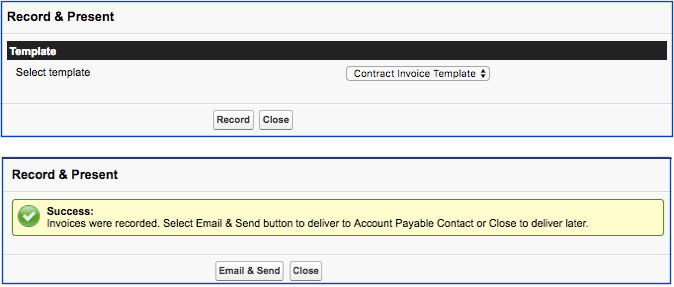
Multiple client invoices can be recorded and sent at the same time from the invoice list page. The user selects one or multiple invoices to process and clicks the Record & Present button from the list page.
The next step is to select the desired invoice template that should be used to produce the client invoice and record. Once recorded, the PDF invoice is created and attached to the invoice record. On the next screen you can Email & Send the newly generated invoices or close the window to send later. Email & Send displays the Email Invoice screen, described previously, to accommodate a "mass send" of all invoices that were generated.
Automated Invoicing
For fully automatic invoicing accounts, the Consolidated invoice is immediately processed and sent to the client Accounts Payable contact once the invoice batch process is executed. The default invoice template from the client account is used to generate the invoice. There is no manual sending of the invoice with the automatic method. Once the batch process is run, all of the invoice records are marked as Sent.
Manual Invoicing
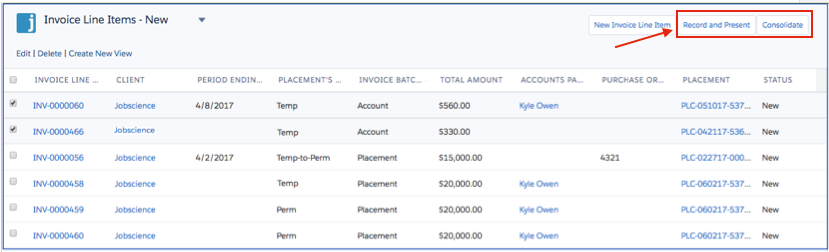
This mode is used to generate an invoice outside of the invoice batch process. This could be the case for special placements that require immediate invoicing. Manual invoice generation is done from the Invoice Line Item list page. The Account Payable Clerk can select a filter to identify Invoice line items in "New" status, which signify that the line item is ready for processing.
The invoice line items can be further filtered by:
- Account, Period, Invoice Batch, or Placement Type (Perm, Temp, or other placement types)
The next step is to select one or multiple invoice line items for processing and choose one of the following actions:
- Record and Present
-
Consolidate
Record and Present
The list view displays individual invoice line items. The user selects the invoice line items and then clicks the Record and Present button. The steps that follow match the exact steps described in the Semi-Automatic Invoicing section.
The user can record the invoice for generation or cancel the process.
The Record button:
-
Marks all of the Invoice line items as Recorded.
-
Burns a copy of the Visualforce page into a PDF and attaches it to the Consolidated invoice record.
-
Burns a timesheet PDF report and attaches it to the Consolidated invoice record (for temp placements).
-
Presents the user with the next step in the process.
For the next step, the user is able to:
-
Email & Send the recorded invoices to the Client.
-
Print & Send to display the PDF invoice for printing.
-
Do neither and Finish the step, which closes the window.
Consolidate
Consolidate is used to add one or more invoices to a consolidation in situations where they were not ready at the time of the batch job or manual run.
After clicking the Consolidate button, the user is presented with a list of one or more consolidated invoices for this account that are still in the "New" status.
If there are no consolidated invoices that match, a new invoice must be created with the new records.
Once the Consolidated Invoice is identified, the selected Detailed Invoices are added to the others and a new page with all of the invoice details is presented to the user.
Credit Memos
Credit memos are used when a correction to a previous client invoice is needed. A common need for a credit memo is for placement falloff, which is when an employee was placed, but left the position or did not work out for the client. In this case, all or a portion of the original placement fee charged to the client is credited.
Credit Memo Line Items
A credit memo is created either from an existing invoice line item or independently. The first scenario associates the original invoice to the credit memo. From the Placement, select the invoice line item that should be credited. From an existing invoice line item, the credit memo line item can be created using the Create Credit Memo button.
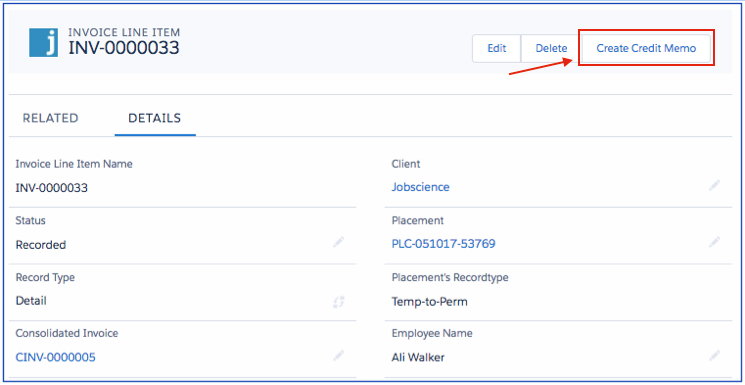
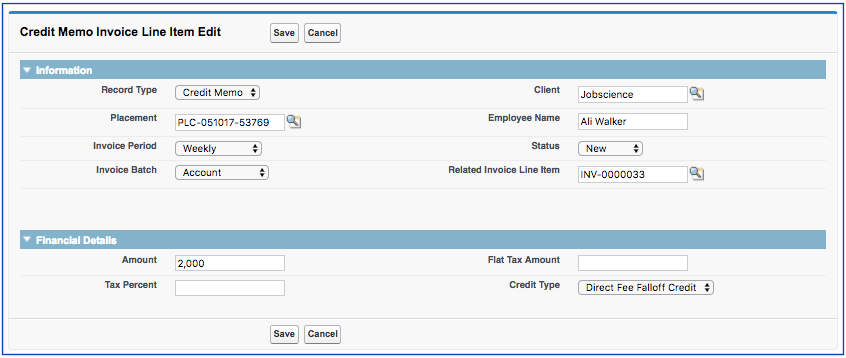
On the credit memo create screen, the user enters and confirms the data required to generate the credit memo. The credit Amount is what is credited back to the client. The related invoice line item is a lookup field to the original invoice line item. Clicking the Save button creates a new invoice line item with the credit memo record type.
The Create Credit Memo button is also available from a Placement record; however, if the credit memo is initiated from the placement, the related invoice line item is not defaulted in the lookup field.
Created Memo Creation
The same invoicing processes are used to generate the client credit memo. There is a Credit Memo default template that is defined under custom settings. This accommodates having a credit memo template, which is different from the generated invoice.
-
Credit Memo line items can be created from an existing invoice line item or from a placement.
-
The invoice batch process executes based on the week ending day, invoice delay, and preferred time settings.
-
For accounts set to Semi-Automatic batch mode, the credit memo line items are grouped into a consolidated client Credit Memo based on the invoice batch rule selected for the placement.
-
The client credit memo is manually recorded and emailed or sent to the client.
-
-
For accounts set to Automatic batch mode, the client credit memo is automatically recorded and sent to the client when the invoice batch process is executed.
-
Credit Memos can be manually created following the same steps performed for manual invoice creation.
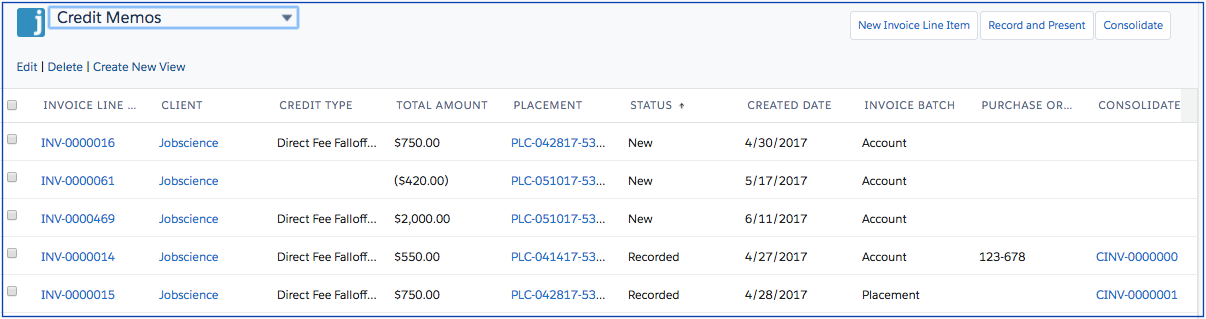
Credit memo line items are displayed from the invoice line item list page. They are filtered using the Credit Memo record type.
When performing the Record & Present process, the invoice generation view page displays the template(s) created for credit memo line items.
The user can record the invoice for generation or cancel the process.
The Record button:
-
Marks all of the credit memo line items as Recorded.
-
Burns a copy of the Visualforce page into a PDF and attaches it to the Consolidated Credit Memo Invoice record.
-
Presents the user with the next step in the process.
For the next step, the user is able to:
-
Email & Send the recorded credit memo to the Client.
-
Print & Send to display the credit memo PDF for printing.
-
Do neither and Finish the step, which closes the window.
Invoice and Credit Memo Layouts
The Back Office solution provides a standard layout for invoice output. The data displayed on the invoice are defined using object fieldsets. This allows for customized data output on the invoice.
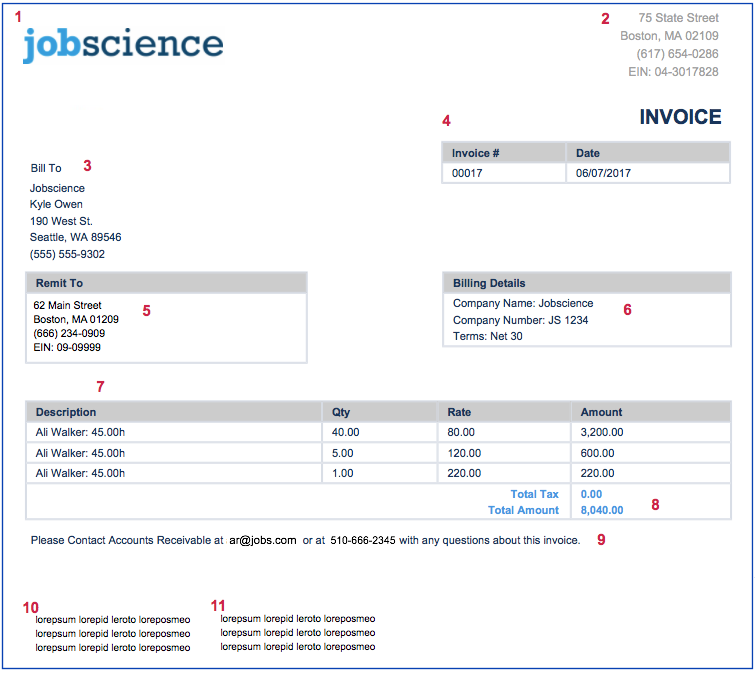
The invoice data blocks are described in the matrix below:
| Block | Source | Fieldset |
|---|---|---|
| Company Logo (1) | Image file from document library or URL. | N/A |
| Header Block (2) | Invoice Fieldset | Company Name, Mailing Address, Phone, Email |
| Bill To (3) | Contact Fieldset | Company Name, Mailing Address, Phone, Email |
| Title Block (4) | System default (non editable) | Custom Invoice# from custom setting, Created Date stamp Title: Invoice or Credit Memo |
| Remit To (5) | User Fieldset | Company Name, Mailing Address, Phone, Email |
| Billing Details (6) | Invoice Fieldset | Company Name, Net Terms, Due Date, Invoice Period |
| Invoice Line Items (7) | Invoice Line Item Fieldset | Description, QTY, Rate, Amount |
| Invoice Totals (8) | Invoice Fieldset | Total Tax, Total Amount |
| Message (9) | Invoice. Message (text Area 255) | Custom message managed on the invoice template. |
| Footer Text Left (10) | Invoice Fieldset | None - Customizable as needed. |
| Footer Text Right (11) | Invoice Fieldset | None - Customizable as needed. |
Invoice Template Object
The parent Invoice Template object defines the name of the template and a pointer to the Visualforce page that implements the template. An unlimited number of templates can be created, as needed. This allows organizations to deliver custom invoices for permanent placement, temporary placements, or others that may be desired.