| Package: TimeCards |
Back Office: Time & Expense Capture
![]()
Community Portal
Timesheet inputs and approvals for Back Office are hosted in a Branded Community designed to support Job Seekers, Contractors, Hiring Managers, and other Client roles. The Community site includes a Job Board, Requisition Status, and Placement Information, and many more features for everyone in your ecosystem. It is a pre-requisite for Jobscience Back Office (refer to the Jobscience Communities user guides for more detail).
Process Overview
Time capture is used with Temporary Placements. This process involves three primary participants:
-
Recruiter
-
Manager
-
Contractor
The process flow is summarized below:
-
The Recruiter creates a Placement record and is required to provide several key pieces of information.
-
Jobscience generates a timesheet for each period between those two dates as soon as the Placement is created and set to Active status. The status of these timesheets is Pending.
-
Once the timesheets have been created, the Contractor can log in as a community user and access their timesheets.
-
A Contractor can enter the number of hours or the times they worked each day of the week on a single timesheet, along with an optional Charge Code that links the hours to a specific project. If expenses are enabled on the placement, one or more expense line items may also be submitted from the timesheet.
-
At the end of the Timesheet Period, a notification is sent to the Contractor to remind them that the timesheet is due.
-
The Contractor submits the timesheet for approval once data entry is complete.
-
The Manager user logs in to the community and reviews the timesheet for approval.
-
When the Manager approves the timesheet, this triggers a number of calculations in Jobscience. Specifically, a Profit record, one or more Commission records, and an Invoice record are generated for each timesheet.
The creation of these records is tied to the Timesheet approval, but does not kick off any further consolidations.
Notification and Reminders
There are three types of timesheet notifications that are generated from the Back Office feature:
-
Timesheet submission reminder - Sent to the contractor if there is a pending timesheet that has not yet been submitted for the current period.
-
Timesheet approval reminder - Sent to the contact manager, and to the secondary approver if one is assigned, if there are timesheets that have been submitted and pending approval.
-
Timesheet status change - Sent to the contractor when the status of the timesheet has been updated from the approver (i.e., Approved or Rejected).
Notification Schedule
Using Custom Settings, the timesheet approval notification can be scheduled for delivery as soon as the period end day is reached. For example, if the weekend day is Sunday, the approval notification can be auto-sent starting the following Monday. The approval reminder is sent to the contact manager and secondary approval manager each day until there are no timesheets pending approval. Alternatively, the approval notification can be delayed any number of days after the weekend day.
The timesheet submission reminder email is delivered the day following the period end day (Sunday or Monday). Similar to the approval notification, the email is delivered to the contractor each day until the timesheet for the current period has been submitted. A maximum number of reminder notifications to the contractor can be specified using Custom Settings.
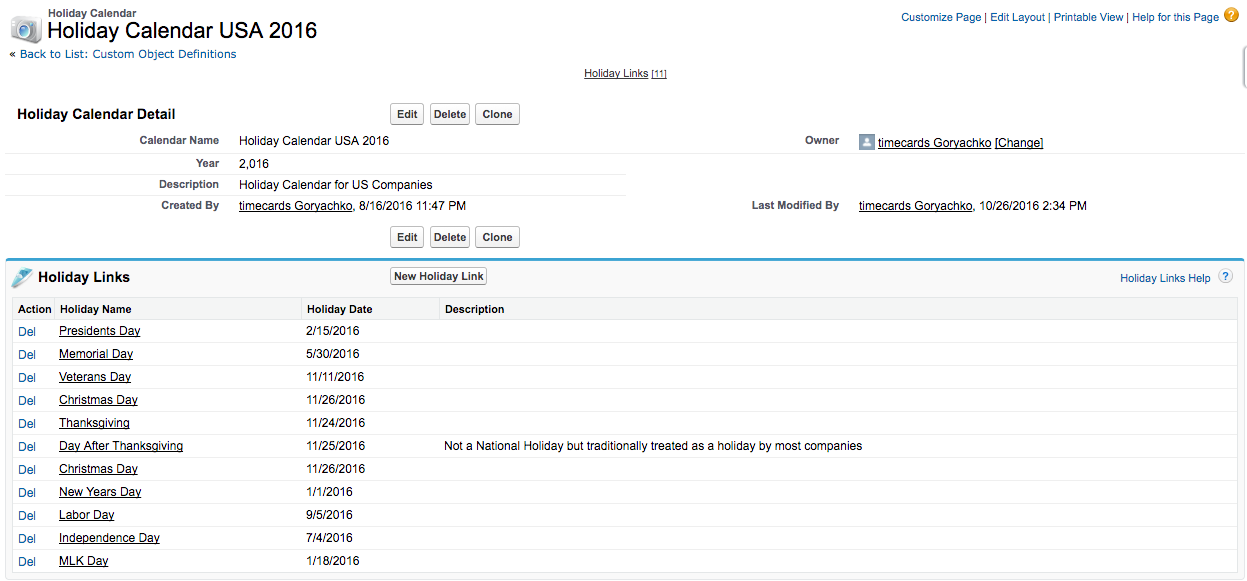
Holiday Calendar
To support Holiday Pay rules, we have provided an object called Holiday Calendar to document which set of holidays are in effect for a given Account and Placement. Here is a sample Holiday Calendar for 2016 in the US:
A second object called Holiday documents each holiday of the year. Individual Holidays are defined with the following information:
-
Holiday Name
-
Display Name
-
Holiday Date
-
Description

Holiday Calendar and Holidays are related through the final Object, Holiday Link, which is a junction between the two. This enables Christmas and other holidays to be created once for a given year and shared by multiple plans across multiple jurisdictions.
To implement Overtime Holiday rules, at least one valid Holiday Calendar must be available and linked to the Account and their Placements.
Using Admin View
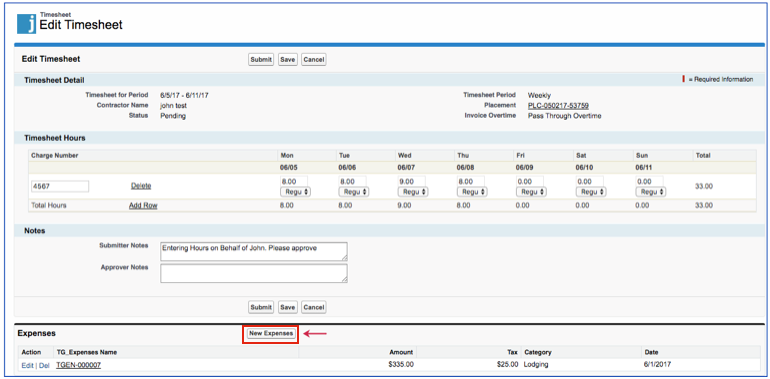
In some cases, workers are not able to enter hours, or may need assistance in doing so. To accommodate these scenarios, timesheet hours and expenses can be entered through the Jobscience Portal for users, such as an Admin user, who have access to the "Edit Timesheet" feature.
To submit hours from within Jobscience:
-
The authorized user opens the timesheet that needs to be submitted from either the Timesheet List page or the Timesheet related list on the Placement record.
-
On the Timesheet detail page, the click the Edit button to access the Admin Timesheet detail view.
-
Click the Edit button again and the timesheet becomes editable for hours entry or expense submission.
-
Enter the required hours, charge code, or expenses.
-
You can also add Submitter or Approver Notes, as needed.
-
When all desired data is entered, click the Submit button to request approval. The Admin view can also perform the approval step, if needed.
-
Once the timesheet is submitted, it goes through the same processing as if the worker entered it from the community site.
Adjusting Approved Hours
Once a timesheet has been submitted and approved, the client is invoiced for the approved hours. There are cases when hours from a previously invoiced timesheet need to be adjusted due to incorrect hours being entered. In these cases, an Admin user can perform a timesheet adjustment.
To adjust the hours on an existing timesheet:
-
Locate the timesheet that requires adjusting and access the detail page.
-
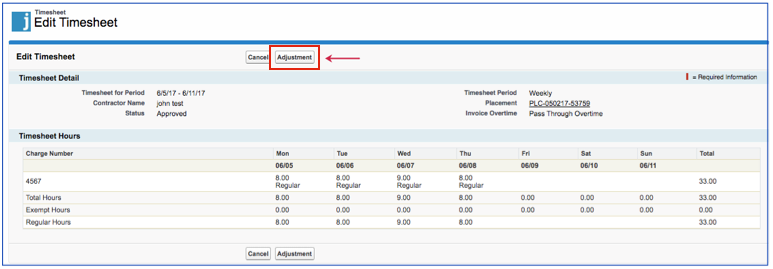
From the detail page, click the Adjustment button. The hours entry page is displayed with the previously submitted hours filled in.
-
Enter the correct hours in the field for the days that need adjusting.
-
If a Start and End timesheet is used, then enter the corrected Start and End time for the day that needs adjusting.
-
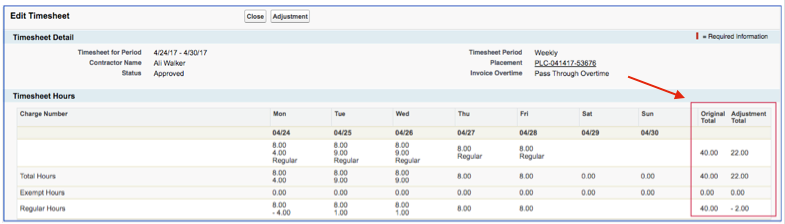
Once all daily hours are adjusted, click the Submit Adjustment button. A new timesheet Adjustment timesheet record is created, which has a lookup association to the original timesheet.
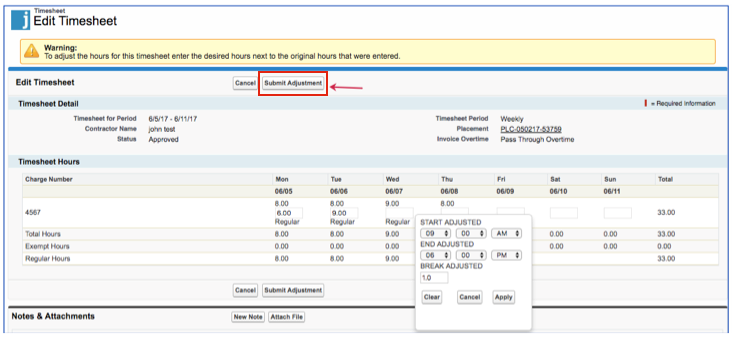
The Adjustment Timesheet calculates the difference between the original timesheet hours and the adjusted hours. If the result is a negative adjustment, then an invoice line item with a negative total amount is generated. If the adjusted hours are greater than the original, then the difference is reflected in the new invoice line item.