| Edition: Growth, Corporate, Enterprise | Audience: Metrics Admin |
Managing Metric Names, Visibility, and Column Layouts
Ensure your reports stay relevant and easy to read by managing how your metrics are displayed to your team. You can rename metrics, hide unused data, customize individual column layouts, or standardize columns across multiple metrics without changing the underlying calculation logic.
- Permission: Metrics Admin permission is required to use Metrics Admin tools. This is set in Users Admin by your Bullhorn Analytics administrator. For detailed instructions, see Setting App and Admin Permissions.
-
Editions: Metrics Admin is available only for Growth, Corporate, and Enterprise editions. It is not included in the Starter edition. To verify your edition, please contact your Bullhorn Account Manager.
-
Enterprise Only: Enterprise Metrics Admins have exclusive access to advanced tools for Creating and Editing Metrics.
Common Scenarios for Managing Metrics
Use these tools to tailor your reporting environment to your business needs:
-
Renaming: Match system metrics to your specific internal terminology (e.g., changing "Submissions" to "CVs Sent").
-
Decluttering: Hide unused or irrelevant metrics to simplify the experience for your recruiters.
-
Standardizing: Use mirroring to ensure that all "Placement" related metrics show the exact same data columns.
-
Efficiency: Reduce the learning curve for new users by customizing column layouts to highlight only the most critical information.
-
Bulk Updates: Open multiple metric tabs simultaneously to update your entire "Job" or "Candidate" entity in one session.
Understanding Your Metrics Library
When you access the Edit Metrics tab, your system is pre-populated with a "Dictionary" of metrics based on your Bullhorn Analytics edition. These dictionaries serve as your baseline library:
The tools in this article allow you to take these standard "out-of-the-box" metrics and customize them to fit your unique business needs.
Navigating to the Edit Metrics Tab
All display and visibility changes are managed within the Edit Metrics tab.
-
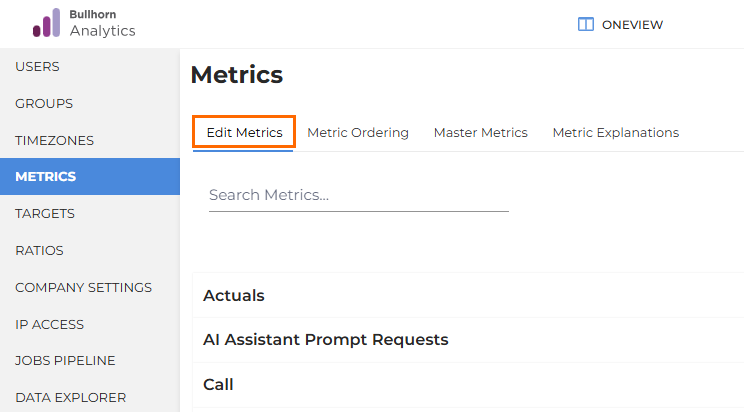
Go to Admin > Metrics.
-
Select the Edit Metrics tab.
-
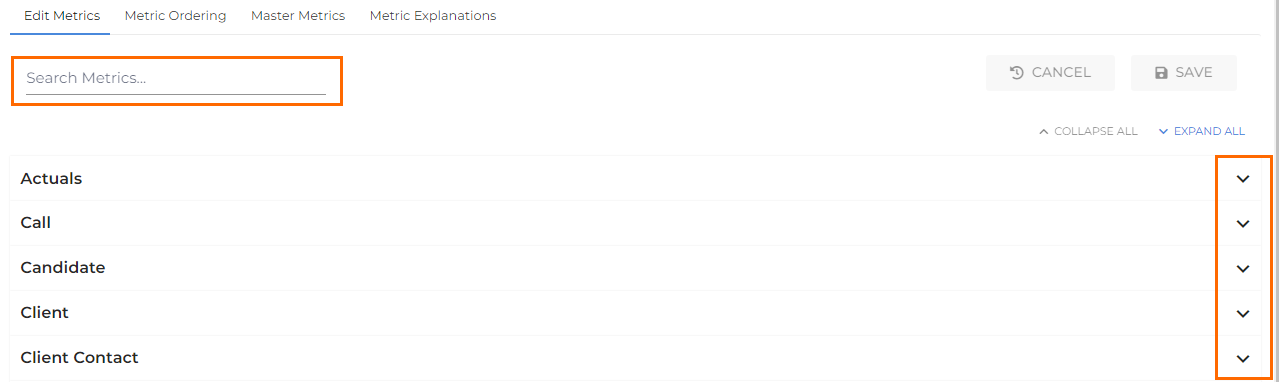
A list of all metrics will appear, grouped by categories (entities) like Candidate, Job, and Placement.
-
To find a specific metric, use the search bar at the top of the page or click the arrow next to a category name to expand the list and browse manually.
Renaming a Metric
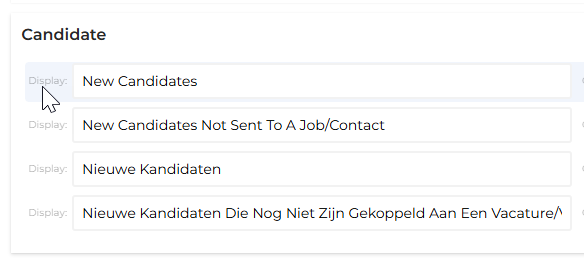
Change a metric’s display name to match your company's internal terminology.
-
Click directly on the metric’s Display or Original name field.
-
Type the new name.
-
Click the Save button at the top of the page to apply your changes.
Hiding or Showing a Metric
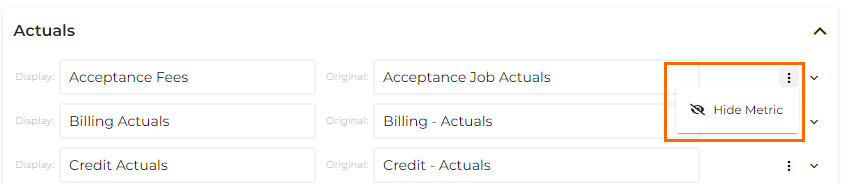
Simplify your team's view by hiding metrics that are not in use. Hiding a metric removes it from all dashboards and reports but does not delete the data. You can show it again at any time.
-
Locate the metric you want to show or hide.
-
Click the three-dot menu icon at the far right of the metric's row.
-
Select Hide Metric (or Show Metric if it was previously hidden).
-
Click the Save button at the top of the page to apply your changes.
Managing Column Layouts
The Columns tab controls the specific data fields users see when they click into a metric. Tailoring these columns ensures your team sees only the most relevant information.
Ensure key metrics share the same columns to help prevent data discrepancies in your reports. See Metrics Column Mirroring.
-
Click on a metric’s row (avoiding the name fields) to open the layout editor slideout.
-
In the Columns tab, you will see two lists: Visible Columns on the left and Hidden Columns on the right.
-
Adjust the columns as needed:
-
Add a Column: In the Hidden Columns list, click the eye icon (️
 ) to move a field to the visible list.
 -
Remove a Column: In the Visible Columns list, click the crossed-out eye icon (️️
 ) to move a field to the hidden list
 -
Reorder Columns: In the Visible Columns list, click and drag the reorder icon (
 ️) to move a column up or down.
Columns at the top of the list will appear furthest to the left in your reports.
-
-
When finished, click the Save All Metrics button at the bottom of the panel.
-
Refresh your browser window to view your changes.
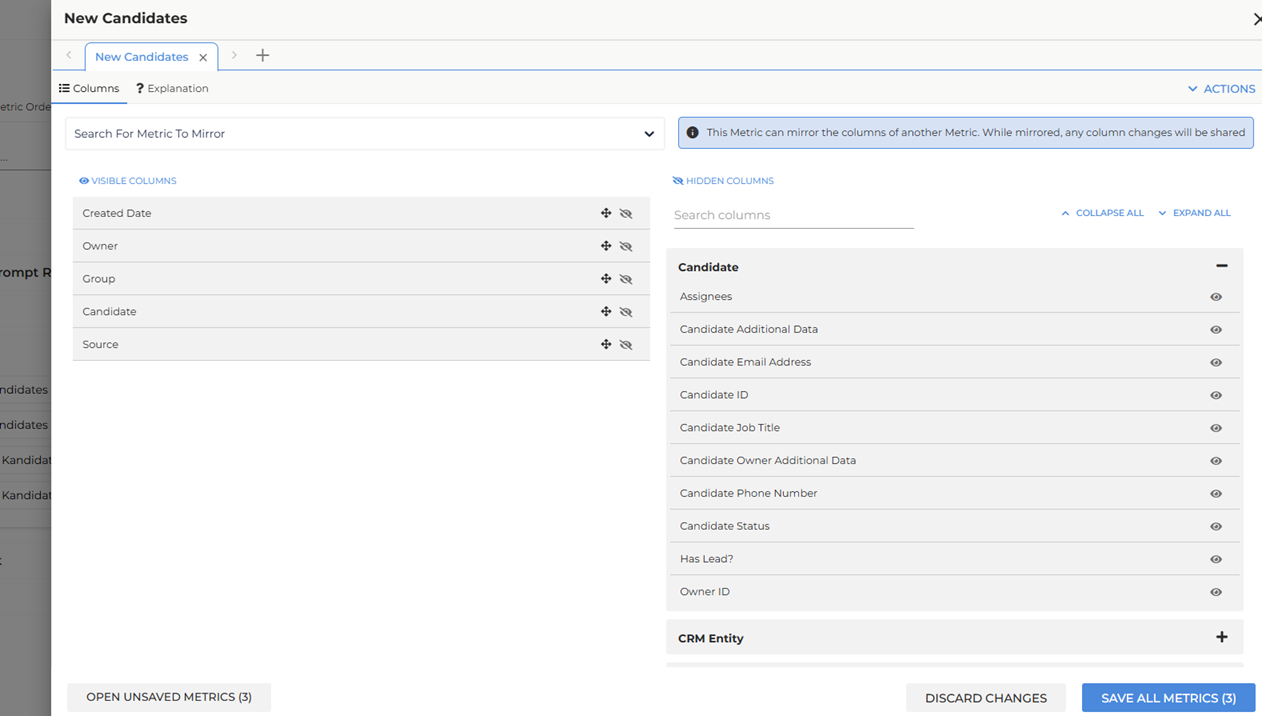
To reduce administration, you can use Column Mirroring to create standardized column layouts for similar metrics.
Metrics Column Mirroring
Mirroring ensures that similar metrics show the exact same columns for consistency. This is a great way to ensure that your team sees the same data fields across multiple related reports.
-
Click on the metric you want to mirror to open the metric slideout.
-
Use the Search For Metric To Mirror dropdown and select the "source" metric you want to copy the layout from.
-
Click SAVE ALL METRICS at the bottom of the slideout to apply the layout to both metrics.
Viewing Mirrored Columns
Once you have set a metric to mirror another, a color-coded icon will appear in the metrics list. All metrics sharing that specific column set will display the same color.
-
Identify Linked Metrics: Hover over the icon to see a list of all metrics currently using that mirrored column set.
-
Editing Mirrored Metrics: If you open the slideout for a mirrored metric, you will see a warning. This warning confirms that any changes you make to the columns will automatically affect all other metrics in that group.
-
Breaking the Link: If you want your changes to apply only to the current metric, click the STOP MIRRORING button. This allows you to customize the columns independently.
Bulk Updating Metric Displays
To save time, you can update the display settings for several metrics in a single session using the tabbed editor. This approach is ideal for applying consistent updates across several metrics without the need to open and close multiple windows.
-
Click on a metric's row to open the editing slideout.
-
At the top of the slideout, click the + icon to search for and open additional metrics.
-
Each metric will open in its own tab at the top of the slideout.
-
Once you have made changes across all tabs, click SAVE ALL METRICS to apply all updates at once. To cancel all your modifications, click DISCARD CHANGES.

Troubleshooting
Use this section to resolve common issues you might encounter while managing metrics.
-
If you cannot find the Metrics option under the Admin menu: Your user role may not have the necessary permissions. Contact your Bullhorn administrator to request Metric Admin access.
-
If you change columns but other metrics also change: You likely have Column Mirroring enabled. Open the metric and click STOP MIRRORING if you want to make unique changes to that specific metric.
-
If users cannot see a metric in their reports: Ensure the metric is set to "Show". If it is hidden, it will not be visible to your team.
-
If you cannot see your changes after saving: You must refresh your browser to see updates to a metric's columns. For other changes, ensure you clicked the main Save button at the top of the page.
Frequently Asked Questions (FAQ)
Can I update multiple metrics at the same time?
Yes. Open one metric to launch the editor slideout, then use the + button at the top of the slideout to open additional metrics in separate tabs. You can then save all your changes at once.
What happens if I hide a metric? Is the data deleted?
No, hiding a metric only removes it from view in reports. The data remains intact, and you can unhide the metric at any time.
If I change the columns on a mirrored metric, does it update the others?
Yes. Any change made to a metric that is part of a mirrored set will automatically apply to all other metrics in that set. To prevent this, click STOP MIRRORING before making your changes.
Who can see the changes I make to a metric's name or columns?
All changes are global. Once saved, every user in your organization with access to that metric will see the updated name and column layout.
Can I undo a change or restore a metric's original name?
There is no automatic "undo" button once changes are saved. To revert a change, you must manually edit the field back to its previous state and save again.