How to Customize and Understand the Bullhorn Hiring Process
As an administrator, you need to configure your Bullhorn ATS to reflect the unique hiring process of your company. This guide will help you understand Bullhorn’s default workflow and provide a clear path for customizing it to fit your team's needs.
The screenshots contained within this article are from the Bullhorn Novo interface. However, the concepts outlined are the same for Bullhorn S Release.
Common Scenarios for Customizing Your Hiring Workflow
The Bullhorn hiring workflow can be adapted to suit many different business processes. You may need to customize your workflow for reasons such as:
-
You want to rename the default workflow steps to match your company's internal terminology.
-
You need to add new submission statuses like "Pending Client Review" or "Second Interview Scheduled."
-
Your recruiters use specific activities, like "Pre-screening" or "Offer Extended," that you want to see at a glance on a job record.
-
Your team wants to track more detailed information than the standard workflow provides.
-
Your company's hiring process involves multiple, distinct steps that don't fit into the default workflow.
Understanding the Default Workflow
Bullhorn's standard hiring process is designed to help recruiters and hiring managers efficiently move a candidate from an initial submission to a successful placement. The process is broken down into four core stages, each with a corresponding submission status that automatically updates as a candidate progresses.
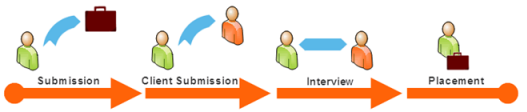
- Submission: When a user submits a candidate to a job, Bullhorn adds an internal submission for the job owner to review. If a user works “both sides of the desk” (meaning, the same person who submits the candidate internally is also going to submit the candidate to the contact on the job), they can skip this step and proceed directly to the Client Submission. After this step, Bullhorn automatically changes the candidate's submission status to Submitted. From here, a user can move the candidate forward or change their status to Sales Rep Rejected if they are not a good fit.
- Client Submission: After the internal review, the user submits the candidate's information to the client contact for review. This action automatically updates the candidate's status to Client Submission. If the client rejects the candidate, their status can be changed to Client Rejected.
- Interview: Once the client expresses interest, a user schedules an interview in Bullhorn, which creates a calendar entry with all relevant details. This action automatically updates the candidate's status to Interview Scheduled. The user can then update the status to reflect the outcome, such as Candidate Interested, Client Rejected, or Offer Extended.
- Placement. After the candidate accepts the job offer, the user creates a placement record in Bullhorn. This final action automatically sets the candidate's submission status to Placed. At this point, the process is complete, and the record is ready for any additional administrative steps.
Bullhorn uses submission statuses to provide a quick, detailed view of a candidate's position in the hiring workflow. They indicate the level of interest from both the candidate and the client.
View a Candidate's Status in the Workflow
Recruiters and administrators can quickly see where a candidate is in the hiring process by looking at their record. You can view workflow progress using either the workflow icons or the submissions tab.
-
Workflow Icons: These icons provide a high-level snapshot of a candidate’s progress, helping recruiters quickly assess their pipeline. Located at the top of every candidate, contact, company, and job record, the workflow icons visually represent the four main stages of the hiring process.
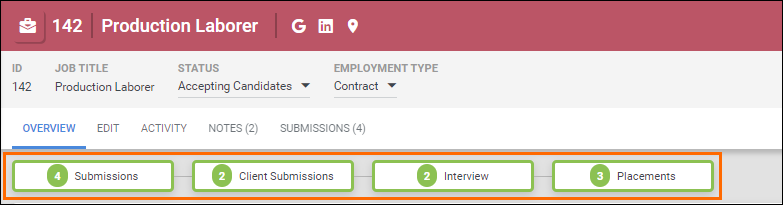
As a user completes each step, the corresponding icon is shaded in, and a number below it indicates how many times that step has occurred. For example (using the image above), by looking at the workflow icons on a job record, a user can quickly see how many candidates have been submitted or placed.
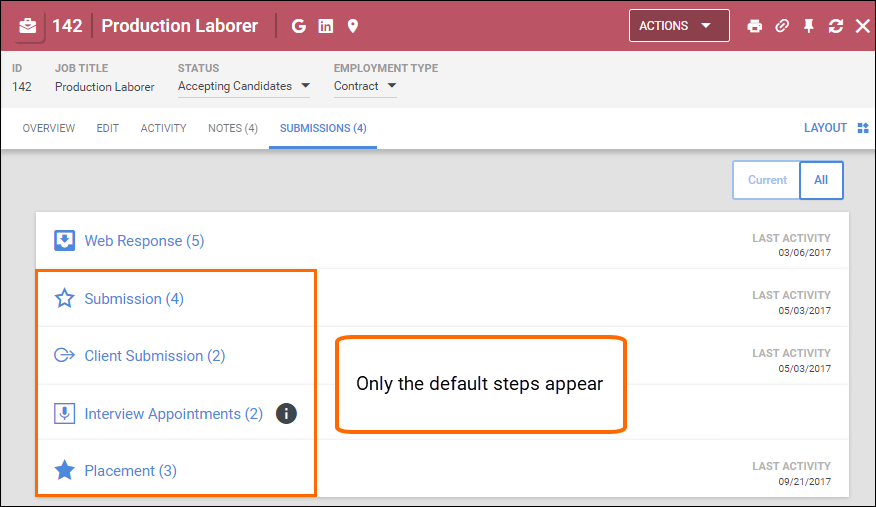
- Submissions Tab: For a more detailed view of the workflow, you can use the Submissions tab on a candidate or job record. This is the primary source for reviewing and updating a candidate’s status.
- The Submissions tab provides a comprehensive list of all candidate submissions for a specific job. You can expand each submission to see:
- The candidate’s name.
Their current submission status.
The date they were submitted.
Who submitted them.

- The Submissions tab provides a comprehensive list of all candidate submissions for a specific job. You can expand each submission to see:
Customize Your Hiring Workflow
As a Bullhorn administrator, you can modify the default workflow to better align with your company’s unique processes and terminology. This helps ensure that all users are following a consistent, efficient workflow that meets your business needs.
Renaming Workflow Steps
You can change the names of three of the four default workflow steps to better reflect the terminology your company uses. This helps new users quickly understand the process and ensures consistent data entry across your team.
- Submission: Can be renamed to "Internal Submission," "Shortlisted," or similar.
- Client Submission: Can be renamed to "Sendout" or "CV Sent."
- Placement: Can be renamed to "Hire" or "Assignment."
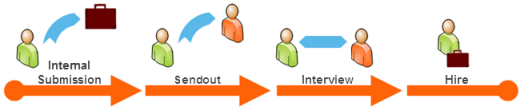
The Interview step is hard-coded and cannot be renamed. To change the names of the other three steps, follow the instructions Modifying Entity Titles.
Adding New Submission Statuses
You can modify the default list of submission statuses to add more specific or detailed stages to your workflow. Adding new statuses helps you track and report on custom steps, such as a second client interview or a pending offer.
To add new statuses, you will use the jobResponseStatusList system setting. For example, if your client interviews candidates multiple times, you could add statuses like Second Interview or Third Interview. For more information and instructions, refer to Understanding Bullhorn System Settings.
Adding Custom Workflow Steps
In addition to renaming steps, you can also add new visual icons to the top of a record to represent unique actions your team performs, such as a pre-screening interview or an offer extended. These custom icons provide an immediate visual cue that helps all users quickly understand a candidate's status.
For example, you could add a "Pre-screen" step that is shaded when a recruiter adds an appointment with the Prescreen appointment type. Similarly, you could add an "Offer Extended" icon that lights up when a submission status is updated to Offer Extended.

To add these visual steps, refer to Understanding Workflow System Settings. It's important to be selective with custom icons, as adding too many can make the record header cluttered. Focus on actions that are most critical for your recruiters to see at a glance.
Troubleshooting
-
If you need to report on custom submission statuses: Bullhorn’s standard reports do not report on submission statuses. You may need to create a custom report. Bullhorn Support for assistance with custom reports.
-
If a user can't select a custom submission status: Confirm that the status has been added to the jobResponseStatusList system setting and that the user has the correct permissions to update submission statuses.
-
If your custom steps aren't appearing on the Submissions tab: Note that custom workflow icons are visual aids only and will not appear as sections on the Submissions tab, as that tab is hard-coded.
FAQs
Q: What is the difference between workflow icons and the Submissions tab?
A: The workflow icons provide a quick, high-level summary of a candidate’s progress, while the Submissions tab provides a detailed, comprehensive list of all submissions for a job.
Q: Can I change the name of the "Interview" step?
A: No, the "Interview" step is hard-coded into the Bullhorn system and cannot be renamed.