November 2022 Release: Minor Enhancements
2022.11 GA Release - Package Version 6.49
2020 Email Editor
Reference Email Template in Task/Email Message Records
Two optional fields are available for the Task and Email Message objects to store information about the email template used:
- Template Id
- Template Name
Configuration Steps
- All users using the should be assigned the 2020 Email Editor User permission set to have access to the newly implemented fields. If a user has not been assigned to this permission set you can add Read and Edit access to these fields:
- EmailMessage: Template_Id__c, Template_Name__c
- Event: Template_Id__c, Template_Name__c
- Task: Template_Id__c, Template_Name__c
- s will need to add the Template Id and Template Name fields onto the layouts on Task and Email Message objects.
Use Template Name as Subject of the Task Created After Sending Email
You can now use the email template name as the subject of the Task created after sending an email.
- If this setting is enabled, the change will apply to any task created as a result of sending an email from a email page using a template.
- If this setting is enabled but no template is selected, the task subject will be copied from the email subject.
Configuration Steps
- Navigate to Setup > Custom Settings > Talent Rover Properties.
- Enable Use Template Name for Activity subject.
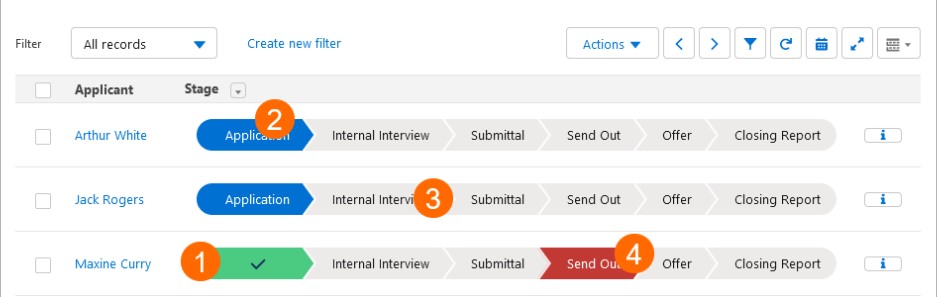
Custom Color Code Stage Status Chevrons
You can now customize the color coding of the stage status chevrons in the ATS View of both Job ATS and Candidate ATS.
In each stage can be in one of the following statuses:
- Completed (Default color: Green)
- Current (Most Advanced) (Default color: Blue)
- Not started (Skipped or Not Yet Started)(Default color: Gray)
- Rejected (Default color: Red)
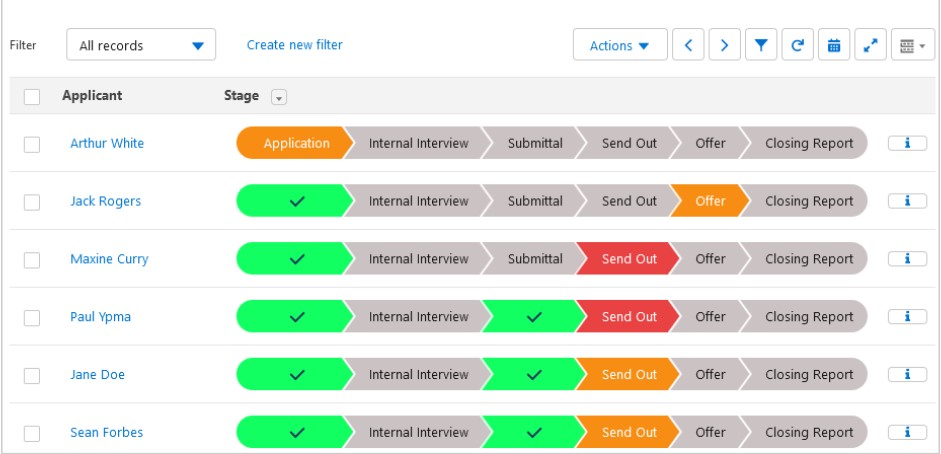
The new setting lets you customize the color used for each of the different statuses. The selected color will only be applied to completed stages.
Configuration Steps
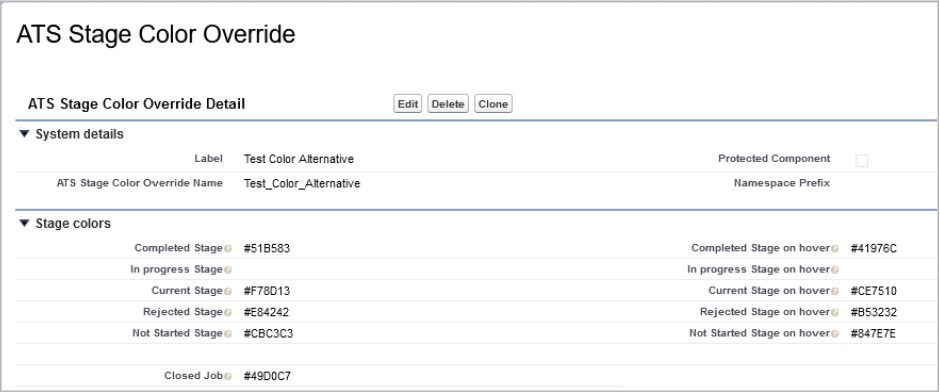
The out of the box color coding will only be overridden if records have been created against the ATS Stage Color Overrides and the fields in the records are populated with valid values.
- Go to Setup > Custom Settings > ATS Configuration Settings and enable the Enable Stage Color override checkbox.
- Go to Setup > > ATS Stage Color Overrides.
- Create a record with the new color override values. You can set a color value for each status and for the color that should appear when hovering the mouse over the chevron. Colors can be defined using RGB, Hex, HSL, or color name. Examples:
- RGB: rgb (255, 51,153)
- Hex: #ffb3d9
- HSL: hsl(60, 100%, 75%)
- Color Name: Red
- You can set a specific chevron color for when a Job is Closed by entering a color value in this field. It will only work if the ATS Configuration Settings > Disable ATSv2 actions for Closed Jobs custom setting is enabled.
- Update user permissions for access the ATSListViewUtilsController apex class.
See the images for a sample configuration and the result. The In progress field in the example image should not be used.
Rejection Reason Dropdown Dependent on Candidates Stage
You can now configure rejection reasons specific to each stage.
Configuration Steps
- Go to Setup > Custom Settings > ATS Configuration Settings and enable the Reject Reason Dependent On Stage checkbox.
- In Setup > Object Manager > Applicationv2 > Fields & Relationships make the Rejection Reason (TR1__Rejection_Reason__c) picklist dependent from the Stage (TR1__Stage__c) picklist.
- Adjust the two picklists values as needed.
Use Standard/Custom Actions in the Candidate ATS
The Action dropdown menu with standard and custom actions are now available for Candidate ATS. This was previously only available for Job ATS. These default actions are included:
- Internal Interview
- Apply to Other Job
- Placement (Closing Report)
- Add to Call List
- Create Power Note
Configuration Steps
- Go to Setup > Custom Settings > ATS Configuration Settings.
- Check Enable Actions for the Candidate ATS field.
- Configure ATS Candidate Action Configuration.
To add custom actions, add records against the ATS Candidate Action Configuration with the following fields:
- Label: Name of the record. This is a standard required field.
- ATS Candidate Action Configuration Name: Unique API name of this record. This is a standard required field.
- Active: Use this to activate/deactivate this action.
- ATS Flow Settings: Reference to ATS Flow Settings to run action as a Flow.
- Component Name: Name of the custom Aura component running for the custom action if its enabled.
- Order Number: Used to control the order of the action in the list.
- Action Name: Name of the action. This is displayed if a custom label is not specified.
- Icon Name: The name of the icon that will be shown in the Action bar for this action.
- Display Location: Choose if this is displayed in the Action dropdown or or Action bar.
- Custom Label Name: Stores the Custom Label API name which will be translated if it has appropriate translations.
- Disable for Closed jobs: This controls the availability of actions for closed jobs. Enable/Disable values will override Custom Setting configuration.
- None: Behavior will depend on Disable actions for Closed Jobs in the ATS Configuration Settings custom setting.
- Enabled: Enable action on Closed Jobs.
- Disabled: Disable action on Closed Jobs.
Move Forward Actions for Candidate ATS
Move Forward actions are now enabled in the Candidate ATS, to match the Job ATS.
Default View Configuration Option for Candidate ATS
It is now possible to configure the default view for Candidate ATS as either Table View or ATS View. If the new setting is blank or has an invalid value, the default view is ATS view.
Configuration Steps
- Go to Setup > Custom Settings > ATS Configuration Settings.
- Go to text field Candidate ATS Default View and enter "Table" or "ATS".
- Before setting up Table View as the default view make sure it is enabled for Candidate ATS by going to the ATS Configuration Settings custom setting and ensuring Enable Table View for Candidate ATS is checked.
Send Email on Rejection for Candidate ATS
We have added the ability for for Candidates to send an Email when rejecting candidates. This functionality mirrors whats available for Jobs.
Configuration Steps
A new field on the ATS Configuration Settings Custom Setting called Enable Send Email Mode on Candidate ATS is used to enable Email mode for Candidate .
- When the setting is enabled and a user rejects a single selected application the rejection popup opens to select the reject reason and method (Email). When the user clicks Save on this screen the email screen opens to send an email.
- If the user has multiple applications selected they will see a warning message displayed advising that mass rejection is not allowed: “You can’t reject more than 1 Application from the Candidate ATS while Send Email mode is enabled”.
- When the setting is not activated and an applicant is rejected the user will see the rejection popup without the Send Email checkboxes and the Email screen is not displayed because emails are not sent.
Auto Switch to Table View
When a job has a larger number of Candidates than a set value it will open in Table View, even if your default view is List View. Table View can handle large numbers of Candidates and it will open in less time. After it opens the user can switch back to List View.
Configuration Steps
- Go to Setup > Custom Settings > ATS Configuration Setting.
- Go to Max List View Record Size and enter a limit value, then click Save.
- If the Max List View Record Size field is empty then the ATS Default View will be launched.
All Views: Candidates Not Visible to the Logged-In User are Filtered Out
All Candidates that the logged-in user does not have access to are now filtered out when working on Jobs in .
Power Notes
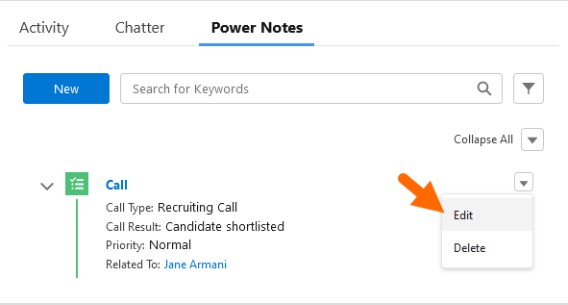
Edit Power Notes Tasks in Power Notes Feed
You can edit existing Power Notes using the new Edit option in the Power Notes feed.
Option to Hide the New Button
Admins can now hide the New button in the Power Notes component.
Configuration Steps
- Navigate to the Power Notes component. Click Settings > Edit Page.
- Go to Page > powerNoteList.
- Enable the Hide ‘New’ Button checkbox.
Power Notes List Displays Task Records with Various Record Types
Previously, only Tasks with record type of Power Notes could be displayed in the Power Notes component. Now you can display different task types under the Power Notes component by adding other task record types to the Power Notes Subject object.
Configuration Steps
Get the Task Record Type Developer Name
- Go to Object Manager > Task.
- Open the Record Types section and click on the label for the appropriate Record Type.
- Copy the Record Type name field value.
Add the Task Record Type Developer Name to the Task Record Type Picklist on the Power Notes Subject Object
- Go to Object Manager > Power Notes Subject > Task Record Type.
- Scroll to the Values section and click on New.
- Paste the Record Type name copied earlier.
- Repeat to add more than one record type.
- The API Name on the picklist must be the same as the Developer Name on the Task Record Type.
If you are installing this package and want to use different record types for Power Notes, a connected app needs to be created. Power Notes needs access to the Metadata API for proper functionality so a Connected App and Named Credentials with the appropriate access are required. See Create a Connected App to Display Multiple Task Types in Power Notes below for more details.
Configure Default Subject Values for Tasks
Power Notes Subject is a mandatory picklist that shows a set of predefined values, so any Power Notes shown under the Power Notes component displays with one of these predefined values.
If your Org is set up to display other Task types along with Power Notes in the Power Notes component, users may see unfamiliar subject lines. A Power Notes Default fieldset has been included to add the required subject to the other Task types in case they weren't correctly configured.
Configuration Steps
- Go to Setup > Object Manager > Task Object > Field Sets.
- Configure the Power Notes Default field set.
Resume Manager
Alternative Format Available for Select Version Dropdown
In Resume Manager, the default format for the resume version in the Select Version dropdown is version number + resume file title.
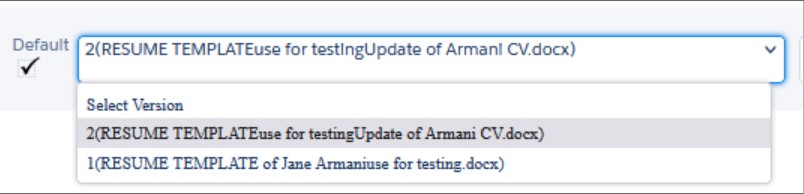
Now you have the option to display the version date instead of version number: date field (from Contact Document object) + resume file title.
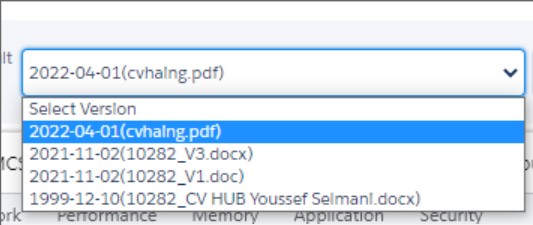
Configuration Steps
Navigate to Setup > Custom Settings > Resume Manager Settings and update the following fields to override the defaults:
- Alternative Document Description: Enter the API name of the field (from Contact Document object) to be used as an alternative description. The field type can be string, double, integer, boolean, date and DateTime. The default value is TR1_Version_c.
- Description Date Format: This field is used when a Date or DateTime field is specified in the Alternative Document Description field. The default format is yyyy-MM-dd.
- Sort order: Specify the order in which documents will be displayed as ascending (ASC) or descending (DESC). The default sort order is DESC.
Global
Save Send Out Schedule v2 Record if Interview Happens on Same Day as Placement
Previously when a Candidate was placed on a Job and a Closing Report was created, all Send Out Schedules with a date in the future, including with an interview date of today, were deleted.
Send Out v2 records are now saved when an interview happens on the same day of the placement, but prior to the creation of the Closing Report in Salesforce. There is no change for future interviews, once the Candidate has a Closing Report, the system deletes the future interviews.
Improved Error Message for Parsing of Large Size Resumes
The original error messages received when trying to parse a resume bigger than 4MB was unclear. The message has been updated to “File must be under 4 MB in size. Your file is too large and the resume will not be parsed. Please try again with a document of size less than 4 MB.”
New Custom Labels
There are new Custom Labels available. Contact Bullhorn Support for more information regarding custom labels.
Appendix
Create a Connected App to Display Multiple Task Types in Power Notes
Power Notes needs access to the Metadata API for proper functionality so a Connected App and Named Credentials with the appropriate access is needed.
Create Connected App
- Connected App Name: UI API Connected App
- API Name: UI_API_Connected_App
- Contact Email: Admin email
- Enable OAuth Settings: Checked
- Callback URL: {your_domain}/services/authcallback/UI_API_Auth
- To find the proper domain name open Developer Console and copy it from the address bar.
- Final URL Example: https://customer-flow-4368-dev-ed.my.salesforce.com/services/authcallback/UI_API_Auth)
- Selected OAuth Scopes: Full access (full), Perform requests at any time (refresh_token, offline_access)
- Require Secret for Web Server Flow: Selected
- Require Secret for Refresh Token Flow: Selected
Create Auth. Providers Record
- Provider Type: Salesforce
- Name: UI API Auth
- URL Suffix: UI_API_Auth
- Consumer Key: Copy from UI API Connected App
- App Manager > UI API Connected App > View > Manage Consumer Details
- Consumer Secret: Copy from UI API Connected App
- Default Scopes: Full refresh_token offline_access
- Include Consumer Secret in API Responses: Selected
Create Named Credential
- Label: UI API Creds
- Name: UI_API_Creds
- URL: {your_domain}
- To find the proper domain name open Developer Console and copy it from the address bar.
- Example URL: https://customer-flow-4368-dev-ed.my.salesforce.com/
- Identity Type: Named Principal
- Authentication Protocol: OAuth 2.0
- Authentication Provider: UI API Auth
- Scope: Full refresh_token offline_access
- Start Authentication Flow on Save: Selected
- Generate Authorization Header: Selected
- Allow Merge Fields in HTTP Body: Selected
After clicking the Save button you will be redirected to the login page. Input your credentials and then allow access to the requested source. If you receive any errors wait 5-10 minutes. The Authentication process can fail as the Connected App creation takes 10 minutes.