SSO Setup for Microsoft AD FS
SAML Single Sign-On (SSO) enables users to use one set of login credentials to access multiple applications, such as Bullhorn and Email. This article will outline the steps for configuring SSO for Microsoft AD FS. If you're looking to configure a different SSO provider, see SSO.
Steps
This information is applicable to both AD FS 2.0 (Windows Server 2008) and AD FS 3.0 (Windows Server 2012 & Windows Server 2012 R2) and assumes all Bullhorn CRM users are specified by a group in Active Directory.
Deliverables to Bullhorn
Information you will provide to Bullhorn:
- Identity-provider-initiated login URL, for example: https://adfs.company.com/adfs/ls/idpinitiatedsignon.aspx
- SAML 2.0/WS-Federation endpoint URL, for example: https://adfs.company.com/adfs/ls/
- Username and password of an Active Directory test user
- AD FS token signing certificate
Disable Windows Authentication Extended Protection
- Launch IIS Manager on server running AD FS.
- On left side tree view, navigate to Sites > Default Web Site > adfs > ls.
- Select /adfs/ls folder and double-click the Authentication icon.
- Right-click Windows Authentication and select Advanced Settings.
- In the Advanced Settings dialog, for Extended Protection, select Off (if is not already selected).
- Select OK.
Perform Tasks in Active Directory
- In Active Directory on server running AD FS, create a Bullhorn CRM Group.
- Create a test user and add that user to the Bullhorn CRM Group. For example: mltest@domain.company.com
- Provide Bullhorn with the test user’s full username and password in Active Directory.
Save Certificate to a File
- In AD FS, navigate to Service > Certificates.
- Select token-signing certificate.
- Right-click View Certificate.
- On Details tab, select Copy to File.
- In Copy to File wizard, select Base-64 encoded X.5009 (.CER).
- Save the certificate to a file.
- Provide Bullhorn with the certificate file.
Configure Trust Relationships
- In AD FS, navigate to Trust Relationships > Relying Party Trusts.
- Right-click Relying Party Trusts and select Add Relying Party Trusts.
- At Welcome, click Start.
- At Select Data Source, select Enter Data About The Relying Party Manually.
- Click Next.
- Specify Display Name as "Bullhorn CRM" and select Next.
At Choose Profile
- Select AD FS 2.0 Profile, then click Next.
- At Configure Certificate, select Next.
- At Configure URL, click Enable Support For The SAML 2.0 WebSSO Protocol.
- Find your version of Bullhorn.
- Use your version of Bullhorn to enter in the appropriate URL into the Rely Party SAML 2.0 Service URL field:
- For Bullhorn Novo, enter "https://universal.bullhornstaffing.com/universal-login/login".
- For S Release, enter "https://www.bullhornstaffing.com/BullhornStaffing/SAML/login_srel.cfm".
- For Bullhorn Novo, enter "https://universal.bullhornstaffing.com/universal-login/login".
- At Configure Identifiers, in the Relaying Party Trust Identifier field enter "".
At Choose Issuance Authorization Rules
- Select Permit To Access This Relying Party, then click Next.
- At Ready to Add Trust, select Next.
- At Finish, click Open the Edit Claim Rules Dialog For This Relying Party Trust When Wizard Closes.
- Select Close.
At Edit Claim Rules For
- At Issuance Transform Rules tab, select Add Rule.
- At Choose Rule Type: set Claim Rule Template to Send LDAP Attributes As Claims, then click Next.
- At Configure Claim Rule:
- In Claim Rule Name field, enter "Bullhorn Name ID".
- Set Attribute Store to Active Directory.
- Set first LDAP Attribute to E-Mail-Addresses and set first Outgoing Claim Type to Name ID.
- Select Finish.
At Issuance Authorization Rules
- Select Add Rule.
- At Choose Rule Type, set Claim Rule Template to Permit Or Deny Users Based On Incoming Claim, then click Next.
- At Configuration Claim Rule, in Claim Rule Name enter "Bullhorn CRM Users".
- Set Incoming Claim Type to Group SID.
- Select Browse and choose Bullhorn CRM Group.
- Select Finish.
- Select Close.
At AD FS > Trust Relationships > Relying Party Trusts
- Right-click Bullhorn CRM, then select Properties.
- At Endpoints tab, select Add. Address the following:
- Set Endpoint type to SAML Logout.
- Set Binding to POST.
- In the URL field, enter one of the following links:
- For Novo: "https://universal.bullhornstaffing.com/universal-login/sso/logoutRequest"
- For S-Release: "https://www.bullhornstaffing.com/BullhornStaffing/SAML/LogoutRequest_srel.cfm"
- In the Response URL field, enter "https://www.bullhornstaffing.com/BullhornStaffing/SAML/LogoutResponse.cfm".
- At the Advanced tab, set Secure hash algorithm to SHA-1.
- Select OK.
SSO User Enablement
After setting up your specific provider, SSO must be enabled for each user. You can grant user access individually or in bulk with assistance from Bullhorn Support.
You must be a Bullhorn Administrator to complete these steps.
Single User
Follow these steps to grant user access individually.
- Navigate to Menu > Admin > Users.
- Click the Pencil icon to the left of the user to enable.
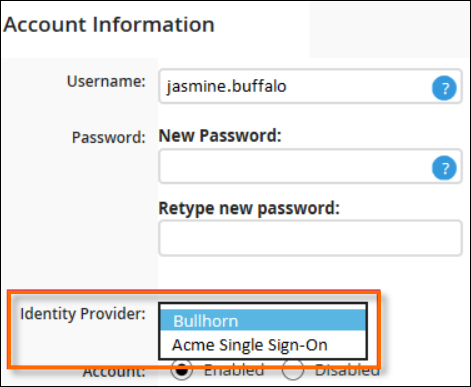
- In the Account Information section, from the Identity Provider drop-down, select your new client provider.

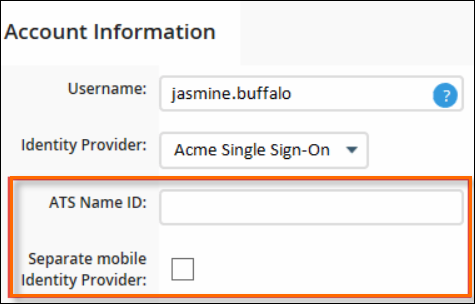
- In the new ATS Name ID field that appears, enter the Name ID of the user. Usually, this is their email address.
- If the user should also have access to SSO via their mobile device, select the Separate mobile Identity Provider check box.

- Click Save.
En Masse
Bullhorn can enable multiple users en masse by using a CSV file provided by you.
- Navigate to Menu > Admin > Users.
- Click Select an Action > Generate User List.
- Change the Format to Excel 2000, then click Generate Report.
- Open the downloaded file and edit it to only include users you want enabled.
- Remove all API users or any that shouldn't have SSO access.
- Rename the Login Name column to User.
- Delete all other columns.
- Click File > Save As.
- Select This PC as the location and change the file type to CSV (Comma delimited) (*.csv).
- Click Save.
- Send this file to Bullhorn Support.