SSO Setup for Microsoft Entra ID (Azure)
SAML Single Sign-On (SSO) enables users to use one set of login credentials to access multiple applications, such as Bullhorn and Email. This article will outline the steps for configuring SSO for Microsoft Entra ID (previously known as Azure). If you're looking to configure a different SSO provider, see the SSO page.
Steps
- Navigate and log into the Entra Admin Portal.
- Open App registrations , then select New registration.
.png)
- Complete the following:
- Name: Whatever you desire, for example "Bullhorn".
- Supported account types: Single tenant
- Redirect URI: https://universal.bullhornstaffing.com/universal-login/login"
- Ensure drop-down is set to Web.
- Select Register.
.png)
- Add the APP ID URI "api://bullhornstaffing.com" as a exemption by following the steps in How to Grant Exemptions.
- Click on the blue Add an Application ID URI hyperlink.
.png)
- Click the blue Add hyperlink.
.png)
- Update the Application ID URI to "api://bullhornstaffing.com", then click Save at the bottom of the page.
.png)
-
Navigate to API Permissions > Add a permission > Microsoft APIs > Microsoft Graph.
.png)
-
Enable the following:
- Delegated Permissions
- Directory.AccessAsUser.All
- User.Read
- Application Permissions
- Device.Read.All: used to get and save the properties of the device object.
- Directory.Read.All: used to get and save the properties of the device object.
- Domain.Read.All: used to validate an associated domain with your Azure AD. It needs read access to perform and log that validation.
- Delegated Permissions
- Select Add permissions.
.png)
- Click App registrations, then select Endpoints.
.png)
- Copy the URL in the Federation Metadata Document field.
.png)
- Open a new browser and navigate to the copied URL.
- Right-click anywhere on the page and select Save as... [or Save target as…], then choose to save it as an XML Document and send it through your Bullhorn ticket.
- This allows Bullhorn Support to complete the setup on their end.
- Alternatively, copy the following information from the resulting XML and send them through your Bullhorn ticket:
- Login URL:
<IDPSSODescriptor>
<SingleSignOnService Location=” “> (copy the binding URL and send to Bullhorn) - Issuer:
<EntityDescriptor entityID=” “> (copy the entity ID URL and send to Bullhorn) - Public Key (Certificate):
<IDPSSODescriptor>
<KeyDescriptor>
<KeyInfo>
<X509Data>
<X509Certificate> (copy this certificate and send to Bullhorn. There may be more than one certificate listed. Send all to Bullhorn.)
- Login URL:
- Once the setup is complete, Support will provide you with a new URL to log in from.
SSO User Enablement
After setting up your specific provider, SSO must be enabled for each user. You can grant user access individually or in bulk with assistance from Bullhorn Support.
You must be a Bullhorn Administrator to complete these steps.
Single User
Follow these steps to grant user access individually.
- Navigate to Menu > Admin > Users.
- Click the Pencil icon to the left of the user to enable.
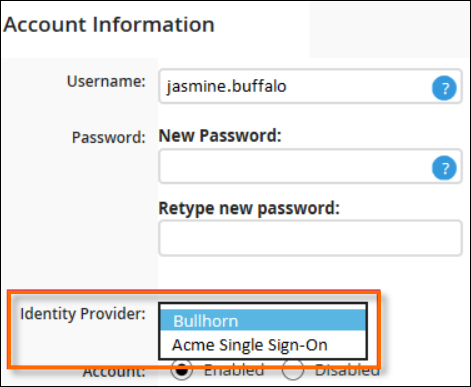
- In the Account Information section, from the Identity Provider drop-down, select your new client provider.
- In the new ATS Name ID field that appears, enter the Name ID of the user. Usually, this is their email address.
- If the user should also have access to SSO via their mobile device, select the Separate mobile Identity Provider check box.

- Click Save.
En Masse
Bullhorn can enable multiple users en masse by using a CSV file provided by you.
- Navigate to Menu > Admin > Users.
- Click Select an Action > Generate User List.
- Change the Format to Excel 2000, then click Generate Report.
- Open the downloaded file and edit it to only include users you want enabled.
- Remove all API users or any that shouldn't have SSO access.
- Rename the Login Name column to User.
- Delete all other columns.
- Click File > Save As.
- Select This PC as the location and change the file type to CSV (Comma delimited) (*.csv).
- Click Save.
- Send this file to Bullhorn Support.