Add a Custom Drop Down Field
Adding or updating drop down options in a custom field in Bullhorn ATS lets you provide users with predefined choices, keeping data entry consistent and reporting accurate. This guide walks you step by step through creating, configuring, and managing drop-down values so your custom fields meet your team’s needs.
All fields that have the edit type of Drop Down are editable from a record Overview. No other edit type allows this.
Common Reasons to Use a Drop Down Field
-
You want to provide a structured list of values to standardize data entry.
-
You need to update or edit existing drop-down values for accuracy or reporting purposes.
-
Your team is adding a new entity (like a location or department) that requires selection from predefined options.
-
You want to set default values for commonly selected options to speed up data entry.
Add or Update a Drop Down Field
-
From the Bullhorn Menu, select Admin > Field Mappings.
-
Expand the entity where you want to add or edit the field.
-
In the Field column, type in "customText" and press Enter.
-
Select a custom field that is not currently in use or that you want to edit by clicking its hyperlinked field name.
-
In the pop-up window, complete the field settings:
Field
Description
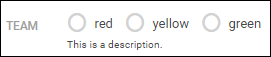
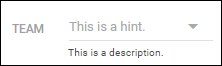
Display The label users will see inside Bullhorn.
Edit type
Choose Drop Down (required for drop-down functionality).
Required Selecting this option will make the field mandatory when saving the record.
Hidden Selecting this option will hide the field from the record layout.
Allow Multiple Values Allows users to select more than one option.
Some fields, like job title or plain text fields, do not support multiple values.
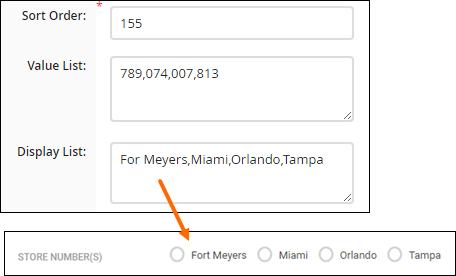
Sort Order
Enter the number that determines where this field appears on the Edit screen.
Sort orders must be unique.
Leave spacing between fields (for example, 130, 135) so you can easily add more fields in between them later.
Value List
Input the values users can select, separated by commas without spaces.
- Example: Tampa,Orlando,Fort Myers,Miami
Display List
Leave this blank unless you want user-friendly labels for technical values.
Example: Use location names as the display list and store location codes internally.
Default Value Enter the value that should appear by default (this value must exist in the Value List).
Leave blank if none is required.
Description
Optional; A short explanation that appears next to the field to help users understand its purpose.
Hint Optional; helper text that appears inside the field in grey.
-
Click Save.
-
You may need to refresh your Bullhorn session to see the changes.
-
Troubleshooting
-
If the drop-down values do not appear: Refresh your login or browser and verify the field is not hidden.
-
If users can’t select multiple values: Check that Allow Multiple Values is enabled and that the field type supports it.
-
If default values are not applied: Ensure the default value exists exactly in the Value List.
-
If the field is not visible in the record: Confirm the Hidden toggle is off and the Sort Order is correct.
-
If numeric back-end values display instead of labels: Use the Display List to map numbers to readable names.
FAQ
Can I add a new option to an existing drop-down field without affecting existing data?
Yes, you can append new values to the Value List. Existing records will retain their current selections.
Why can’t I select multiple options in some fields?
Only fields that support Allow Multiple Values and certain edit types (like Drop Down) allow multiple selections.
How do I set a default selection for a drop-down field?
Enter the default value exactly as it appears in the Value List under the Default Value field.
Can I reorder drop-down values after creating them?
Drop-down options display in the order you entered them in the Value List. To reorder, edit the list accordingly.
How do I remove or update options from a dropdown field?
You can manage a dropdown field’s options using Field Mappings. Go to Admin> Field Mappings, then locate the specific field you want to modify. In the Value List section, add, remove, or update any of the values. Make sure you separate each value with a comma and click Save when you are finished.