Enabling the Bullhorn Email and Calendar Integration with Microsoft Office 365 or Exchange 2016
If you're an IT administrator, this guide will walk you through the steps to set up Bullhorn's Email and Calendar integration for your company. Following this process will ensure your users' emails and appointments track automatically to the correct records in Bullhorn.
Bullhorn is working with Microsoft on authentication updates. This page will soon be updated with revised steps for enabling the Outlook Gadget once changes are finalized.
Before You Begin
This setup requires IT professional-level access to your Exchange environment. You may need your IT team or Microsoft Support to complete some steps.
What You Need
-
Tracker address from Bullhorn Support (format: abc.123@slXtracker.bullhornstaffing.com, where X is your cluster number). If you don't have this, contact Bullhorn Support.
-
SPF configuration: Add Bullhorn to your Sender Policy Framework. See Updating Your SPF Records for steps.
-
Email domain linked to Office 365/Exchange 2016: Your domain must be linked to your Exchange environment for the integration to work. Contact Microsoft Support if you need help with this.
-
Journaling capabilities: Your Exchange environment must support journaling. If it doesn't, email tracking won't work
-
Admin access to your Exchange environment.
-
External email address for undeliverable reports (a free Gmail or Yahoo account works fine). This address must be outside your organization domain—it receives notifications if journaling fails.
-
Distribution group (optional): If you don't want to track emails for all users, you'll need a pre-built group of the email addresses you want to track. See Microsoft's help on distribution groups for setup details.
Important Context
-
-
Setup time: It may take up to 45 minutes for emails to appear in Bullhorn after you create the journaling rule. Once tracking is active, emails will appear within moments of sending or receiving.
-
How journaling works: The journaling rule automatically forwards copies of inbound and outbound emails from Outlook to Bullhorn's tracking address. Exchange may send "Non Deliverable Reports" (NDRs) to the external email address you specify if a journal copy can't be delivered—this is normal and you can ignore them.
Navigate to Purview Portal
Navigate to the Microsoft 365 Admin Center > Show All > Admin Centers > Microsoft Purview (or directly via Purview portal).
Create Undeliverable Report Contact
Because Journaling automates sending copies of emails, your Exchange environment may receive what is called a "Non Deliverable Report" (NDR) that contains information on why the individual email copy Exchange attempted to send was rejected.
You need to create an external contact to send these reports to when setting up a journaling rule. For more guidance on what the NDR means or contains, contact your Exchange support.
- On the left-hand side, select Settings.
-
Under Solution settings, select Data Lifecycle Management.
-
Select Exchange (legacy).
- Fill out the field Send undeliverable journal reports to with an external email address.
- You must have created the external email address prior to this step.
- The purpose of this contact is to receive reports when journaling does not work.
- The email address must be located outside of your domain. This is required by Microsoft.
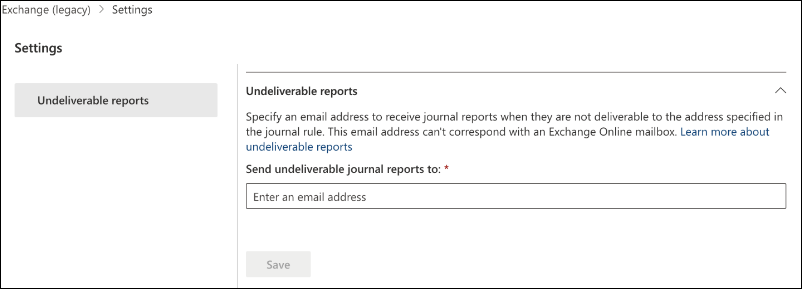
- Select Save.
Create Journaling Rule
The address in step 6 is provided by Bullhorn Support and should be formatted similar to abc.123@slXtracker.bullhornstaffing.com. X will be a number representing your cluster. If your tracker address is not similar, Contact Bullhorn Support to verify your tracker address.
-
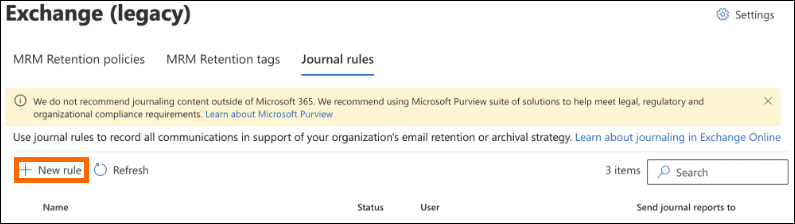
Within the Microsoft Purview Portal, navigate to the top search bar.
-
In the search bar, type "journal".
-
Click the Journal Rules row that appears (or navigate to Journal Rules).
- Select New rule.
- In the Send journal reports to field, enter your Bullhorn tracker address in all lowercase letters.
- Using capital letters in the tracking address will prevent the integration from working.
- Using capital letters in the tracking address will prevent the integration from working.
- Enter the name for your Journaling rule such as Bullhorn Tracking.
- Use one of the options below to determine which messages will track and for what users. You will want to either track all emails for all users or use a more selective process with the Journaling rule.
This is the recommended option. Emails that aren't tracked can't be added at a later time.
- From the If the message is sent to or received from field, select [Apply to all Messages].
- From the Journal the following messages drop-down, select All Messages.
This option requires you to update the rule every time you add a new user. For this reason, we strongly recommend Option 1.
This option requires a pre-existing group generated in Exchange of all the users for which you would like to track their email. You should be able to create this group within the Exchange environment by going to Recipients > Groups and click the plus (+) icon to generate. If this is not available, reach out to Microsoft Support for assistance.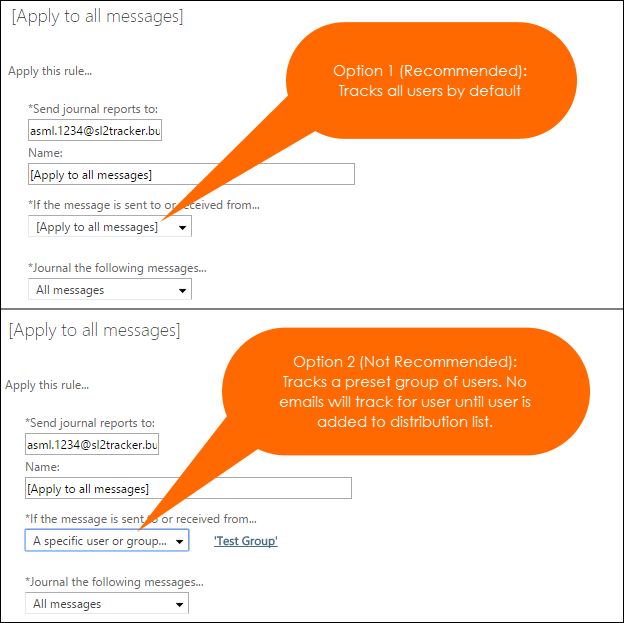
- Under Journal the following messages... select a specific user or group.
- Select Save.
Set up the Bullhorn For Email Outlook Gadget
Not available for ATS Growth (formerly Team edition)
Now that you've set up your email tracking, you can enable the Bullhorn for Email Gadget. This is optional but highly recommended.
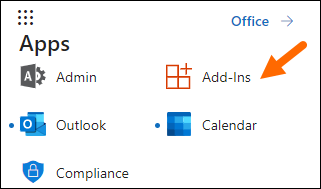
- From the menu in the upper-left corner, select Add-Ins.
- Search AppSource for .

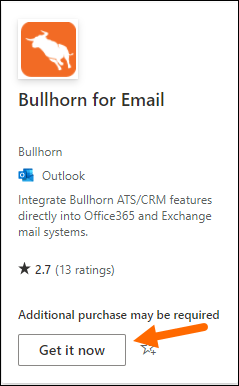
- Click Get it now in the Bullhorn for Email app.
- Check the box to allow Microsoft permissions and click Continue.
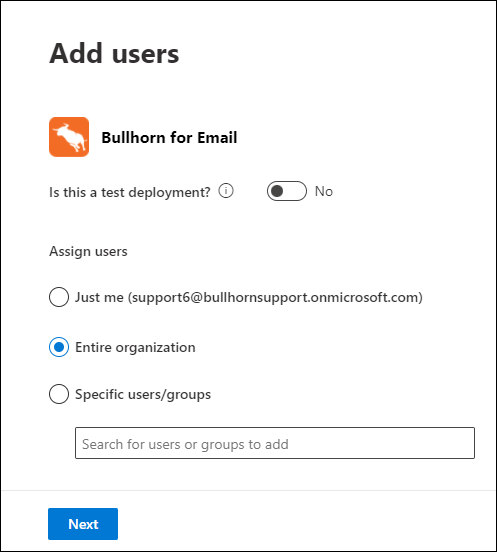
- Choose who should have access to the Bullhorn for Email app and click Next.
- Read about App Permission and Capabilities and click Next.
- Click Finish Deployment at the bottom of the window.

You can test your email integration by creating a record in your database attached to an external email address (such as a free gmail.com or outlook.com account) and sending emails to and from that address.
It may take up to 45 minutes for the email to appear on the record after initial generation of the Journaling rule. After the emails begin to track, you can expect emails to appear within moments of sending or receiving the email.
Next Steps
Your basic email integration is complete. Depending on your needs, you may want to enable these additional features:
-
Notify Bullhorn Support once setup is complete. They must take final steps to finish the integration.
- Launch Outlook from Bullhorn when selecting email addresses. You may need to adjust your computer settings. See this Microsoft article for details.
-
See Enabling Auto Accept for Appointments in Outlook to have Outlook automatically accept Bullhorn appointment invites and remove them from your inbox.
This is optional. Calendar invites will still work without it. Auto Accept simply automates the process so invites are recognized and accepted without showing up as emails.